Overview
The Details screen is the main screen where you can view and manage information and metadata for the following ThreatConnect® object types: Intelligence Requirements, Indicators, Groups, Tags, Tracks, and Victims. Although data displayed on the Details screen depends on the type of object you are viewing, some of the most commonly displayed information includes Attributes added to the object, Security Labels and Tags applied to the object, a list of objects associated to the object you are viewing, and insights from CAL™. This screen also provides shortcuts to various ThreatConnect features, such as reporting, Threat Graph, and the ATT&CK® Visualizer.
Before You Start
User Roles
- To view the Details screen for a threat intelligence data object in an Organization, your user account can have any Organization role.
- To view the Details screen for a threat intelligence data object in a Community or Source, your user account can have any Community role except Banned for that Community or Source.
- To delete a threat intelligence data object in an Organization via the Details screen, your user account must have an Organization role of Standard User, Sharing User, Organization Administrator, or App Developer.
- To delete a threat intelligence data object in a Community or Source via the Details screen, your user account must have a Community role of Editor or Director for that Community or Source.
Prerequisites
- To view information retrieved from CAL for Indicators, turn on CAL for your Organization and ThreatConnect instance (must be a System Administrator to perform this action).
- To display the Tags Across Owners card on the Details screen for Indicators, turn on the multiSourceViewEnabled system setting (must be a System Administrator to perform this action).
Viewing the Details Screen
Follow these steps to view the Details screen for a threat intelligence data object:
- Hover over Browse on the top navigation bar and select an object type (i.e., Intelligence Requirements (IR), Indicators, Groups, Tags, Tracks, Victims, or Victim Assets) or subtype (e.g., Host, Adversary).
- Hover over an object in the results table on the Browse screen and click one of the following icons in the Summary cell:
- View full details
 : Click this icon to open the object’s Details screen in the current browser tab.
 - View full details in new tab
 : Click this icon to open the object’s Details screen in a new browser tab.
- View full details
Alternatively, select an object in the results table on the Browse screen to open its Details drawer. Then click View full details at the top right of the drawer (if viewing the Details drawer for a Group, Tag, Track, Victim, or Victim Asset) or the object’s summary at the top left of the drawer (if viewing the Details drawer for an Indicator) to open the object’s Details screen.
at the top right of the drawer to open the Details screen for the Victim to which the Victim Asset belongs.New Details Screen View
The new Details screen view is currently available for Intelligence Requirements, all Indicator types, and the following Group types: Adversary, Attack Pattern, Campaign, Course of Action, Document, Event, Incident, Intrusion Set, Malware, Report, Tactic, Threat, Tool, Vulnerability Groups. It is not available for Email, Signature, and Task Groups; Tags; Tracks; and Victims.
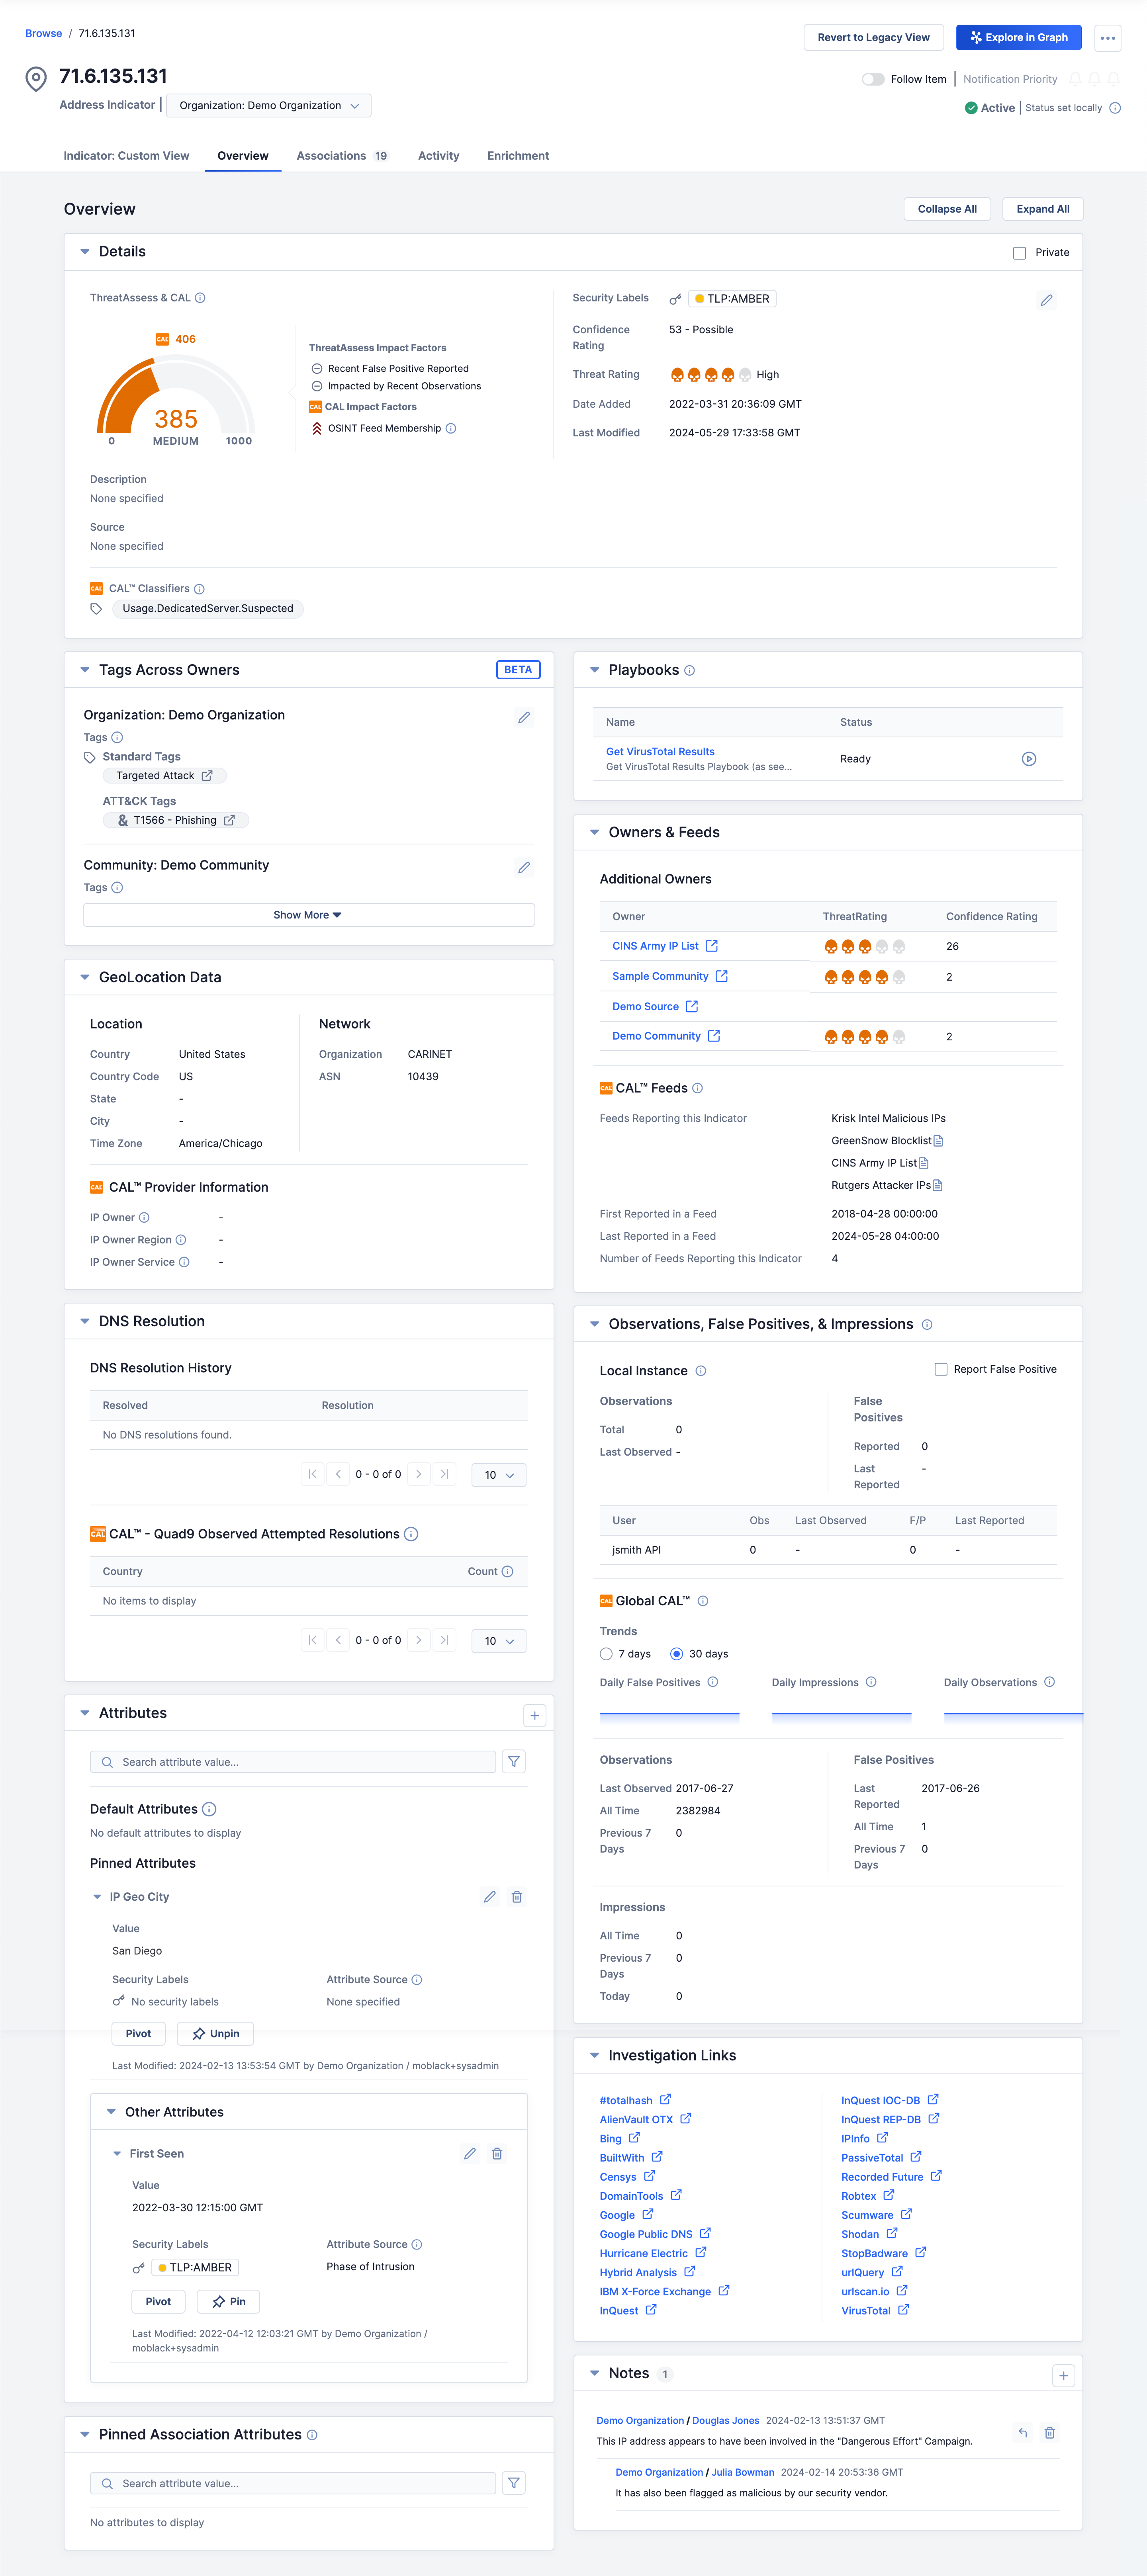
Figure 1 shows the Overview tab of the new Details screen for an Address Indicator (71.6.135.131), and Figure 2 shows the Overview tab of the new Details screen for an Adversary Group (Bad Guy).

New Details Screen Header
Intelligence Requirements
For descriptions of each section and element included in the header of the Details screen for Intelligence Requirements, see the “Details Screen Header” section of Viewing Intelligence Requirement Details.
Indicators
The new Details screen for Indicators (Figure 1) includes the following sections and elements in its header:
- Browse /<Object name>: This section is located at the upper-left corner of the screen and includes a link to view all Indicators on the Browse screen. It also displays the name of the Indicator whose Details screen you are viewing.
- Object icon and name: This section displays the Indicator’s name and an icon corresponding to its Indicator type.
- <Object type> | <Owner type: Owner name>: This section displays the Indicator’s type followed by the type and name of the owner to which it belongs. If the Indicator belongs to multiple owners, a dropdown from which you can select the owner in which you want to view the object’s Details screen will be displayed.
- Revert to Legacy View: Click Revert to Legacy View to open the legacy Details screen for the Indicator.
- Explore in Graph: Click Explore In Graph to view the Indicator in Threat Graph.
- ⋯ menu: Click the ⋯ menu at the upper-right corner of the screen to display the following options:
- Pivot: Select Pivot to pivot to a list of all associated intelligence for the Indicator.
- Change Status to Active: If viewing an Indicator whose status is inactive, select Change Status to Active to set the Indicator’s status to active.
- Change Status to Inactive: If viewing an Indicator whose status is active, select Change Status to Inactive to set the Indicator’s status to inactive.
- Disable CAL Status Lock: If CAL Status Lock is turned on for the Indicator, select Disable CAL Status Lock to turn off CAL Status Lock for the Indicator and allow CAL to change the Indicator’s status.
- Enable CAL Status Lock: If CAL Status Lock is turned off for the Indicator, select Enable CAL Status Lock to turn on CAL Status Lock for the Indicator and prevent CAL from changing the Indicator’s status. Note that when CAL Status Lock is turned on for an Indicator, a message stating “CAL Status Lock Enabled” will be displayed in the header of the Indicator’s Details screen, below the Follow Item toggle.
- Add to Exclusion List: Select Add to Exclusion List to add the Indicator to the Indicator Exclusion List corresponding to its Indicator type.
- Delete: Select Delete to delete the Indicator.
- Follow Item: Turn on the Follow Item toggle to receive alerts and updates on changes to the object. Then use the bell
 icons to set the desired notification priority, where Low is oneicon, Medium is twoicons, and High is threeicons.
 - Indicator Status: This section displays the Indicator’s status and whether it was set locally (i.e., by a user with permission to change Indicator Status on your ThreatConnect instance) or by CAL. If an Indicator is added to an Exclusion List, the text “⊘ On Exclusion List” will be displayed to the right of the Indicator’s status.
Groups
The new Details screen for Groups (Figure 2) includes the following sections and elements in its header:
- Browse /<Object name>: This section is located at the top left of the screen and includes a link to view all Groups on the Browse screen. It also includes the name of the Group whose Details screen you are viewing.
- Object icon and name: This section displays the Group’s name and an icon corresponding to its Group type. In addition, an Edit
 button will be displayed to the right of the Group’s name that, when clicked, allows you to edit the name.
 - <Object type> | <Owner type: Owner name>: This section displays the Group’s type followed by the type and name of the owner to which it belongs.
- Revert to Legacy View: Click Revert to Legacy View to open the legacy Details screen for the Group.
- + Create Custom Report: Click + Create Custom Report to display the following options:
- Create New: Select Create New to create a report for the Group that is not based on a report template.
- Create From Group Template…: Select Create From Group Template… to create a report for the Group from a saved Group report template. Then select a saved Group report template to use.
- Visual Analysis: Click Visual Analysis to display the following options:
- Explore in Graph: Select Explore In Graph to view the Group in Threat Graph.
- Visualize ATT&CK: Select Visualize ATT&CK to access the ATT&CK Visualizer and display a new standard ATT&CK view with the Group added as an analysis layer.
- ⋯ menu : Click the ⋯ menu at the upper-right corner of the screen to display the following options:
- Pivot: Select Pivot to pivot to a list of all associated intelligence for the Group.
- Download PDF: Select Download PDF to generate a PDF document of the Group.
- Delete: Select Delete to delete the Group.
- Follow Item: Turn on the Follow Item toggle to receive alerts and updates on changes to the object. Then use the bellicons to set the desired notification priority, where Low is oneicon, Medium is twoicons, and High is threeicons.
- Intel Rating: This section is where you can view the number of Upvote
 and Downvote
 Intel Ratings the Group has received and update the Group's Intel Rating.
Custom View Tab
The Custom View tab, available for Indicators and Groups only, allows you to display a customized view of the data that matter most to you when investigating these object types. See The Details Screen: Custom View for instructions on configuring the Indicator: Custom View and Group: Custom View tab on the Details screen for Indicators and Groups, respectively.
Overview Tab
The Overview tab of the new Details screen (Figure 1 and Figure 2) features several cards containing relevant information for the object you are viewing. Depending on the type of object you are viewing, the cards displayed on this tab will vary.
To collapse or expand all cards on the Overview tab, click Collapse All or Expand All, respectively, above the Details card. By default, all cards are expanded.
Intelligence Requirements
Table 1 provides a description of each card that may be displayed on the Overview tab of the new Details screen for an Intelligence Requirement (IR).
| Card Name | Description |
|---|---|
| Details | The Details card is where you can view the IR’s creation and last modified dates, as well as view and manage its subtype, category, default Description, and Tags. |
| Keyword Tracking & Results | The Keyword Tracking & Results card consists of three sections:
|
| Playbooks | The Playbooks card is where you can view and execute active Playbooks with a UserAction Trigger configured for IRs. |
Indicators
Table 2 provides a description of each card that may be displayed on the Overview tab of the new Details screen for an Indicator and the Indicator types for which the card is available.
| Card Name | Description | Applicable Indicator Types |
|---|---|---|
| Attributes | The Attributes card is where you can view the Indicator’s Attributes, including those configured as default or pinned Attributes, create new Attributes, and manage existing Attributes. | All |
| Details | The Details card is where you can view the Indicator’s ThreatAssess and CAL data (ThreatAssess score, CAL score, ThreatAssess and CAL impact factors, and CAL Classifiers) creation date, and last modified date, as well as view and manage its default Description, default Source, Security Labels, Tags, and Threat and Confidence Ratings. Important If your System Administrator turned on the multiSourceViewEnabled system setting, the Tags applied to the Indicator will be displayed on the Tags Across Owners card instead of the Details card, and they will be the Tags applied to the Indicator across all of the Indicator’s owners to which you have access. Note If your System Administrator turned on the system setting for private Indicators, the Details card will have a Private checkbox at the top right that you can use to mark the Indicator as private. Note An Indicator’s default Description Attribute is not displayed on the Attributes card; it is displayed on the Details card only. If a second default Description Attribute is added to an Indicator, that Attribute will be displayed on the Details card and the former default Description Attribute will be displayed on the Attributes card. | All |
| DNS Resolution | For Address Indicators, the DNS Resolution card displays Hosts that have resolved to the Address, presently or historically. For Host Indicators, this card displays Addresses that have resolved to the Host, presently or historically, and geographic information within ThreatConnect and CAL for those Addresses. For both Indicator types, the DNS Resolutions card also displays location and count information for computers that attempted to access suspicious domains captured by Quad9® infrastructure within the last 90 days. | Address; Host |
| File Hash Details | The File Hash Details card is where you can view and edit the File Indicator’s MD5, SHA1, and SHA256 file hashes and file size. It also displays analytics about a file sample’s various hashes derived from CAL, if such data are available for the Indicator. Note If adding a new file hash to an existing File Indicator and a File Indicator containing that file hash exists in the same owner, you will be prompted to merge the two File Indicators into a single Indicator containing both file hashes and any Attributes, Security Labels, and Tags added to each Indicator. | File |
| GeoLocation Data | The GeoLocation Data card displays IP address geographic information within ThreatConnect and CAL for the Address Indicator. | Address |
| Investigation Links | The Investigation Links card provides links to search results of various third-party lookup and other information services. Each link is a shortcut to query results for the object, which will open in a new browser tab. | All |
| Known File Occurrences | The Known File Occurrences card is where you can create File Occurrences and view the filename, run path, and date of each File Occurrence added to the File Indicator. | File |
| Notes | The Notes card is where you can view, create, and manage Notes (i.e., posts) for the Indicator. | All |
| Observations, False Positives, & Impressions | The Observations, False Positives, & Impressions card is where you can view the number of observations and false positive reports for the Indicator in your ThreatConnect instance and report the Indicator as a false positive. This card also displays the number of observations, false positive reports, and impressions derived from CAL for the Indicator. | All |
| Owners & Feeds | The Owners & Feeds card displays any additional owners to which the Indicator belongs, along with the Threat Rating and Confidence Rating assigned to it by those owners. It also displays any feeds that have reported the Indicator. | All |
| Pinned Association Attributes | The Pinned Association Attributes card displays association Attributes added to Groups associated to the Indicator. | All |
| Playbooks | The Playbooks card is where you can view and execute active Playbooks with a UserAction Trigger configured for the Indicator’s type. | All |
| Tags Across Owners | The Tags Across Owners card displays the Tags applied to the Indicator across all of the Indicator’s owners to which you have access. This card is available only if your System Administrator turned on the multiSourceViewEnabled system setting. Otherwise, the Tags applied to the Indicator will be displayed on the Details card, and they will be the Tags applied to the Indicator only in the owner listed at the top left of the Details screen. Important As of ThreatConnect 7.6, the Tags Across Owners card is a beta feature. | All |
| Whois | The Whois card displays WHOIS information for the Host Indicator. | Host |
- The CAL™ Classifiers section of the Details card
- The CAL™ Feeds section of the Owners & Feeds card
- The CAL™ File Hash Information section of the File Hash Details card
- The CAL™ Provider Information section of the GeoLocation Data card
- The Global CAL™ section of the Observations, False Positives, & Impressions card
Groups
Table 3 provides a description of each card that may be displayed on the Overview tab of the new Details screen for a Group and the Group types for which the card is available.
| Card Name | Description | Applicable Group Type(s) |
|---|---|---|
| AI Insights | The AI Insights card, available only for Report Groups in the CAL Automated Threat Library (ATL) Source, displays an artificial intelligence–generated summary of the Group. Note AI insights are not available for Report Groups created in the CAL ATL Source on your ThreatConnect instance before the instance was upgraded to version 7.4. Important Artificial intelligence (AI) summarizers use algorithms and AI to condense text into shorter summaries, saving time and effort. However, summaries generated from non-English content may have lower accuracy than those generated from English content. | Report (in CAL ATL Source only) |
| Attributes | The Attributes card is where you can view the Group’s Attributes, including those configured as default or pinned Attributes, create new Attributes, and manage existing Attributes. | All |
| Details | The Details card is where you can view the Group’s creation and last modified dates, as well as view and manage its default Description, default Source, Security Labels, and Tags. Note A Group’s default Description Attribute is not displayed on the Attributes card; it is displayed on the Details card only. If a second default Description Attribute is added to a Group, that Description Attribute will be displayed on the Details card and the former default Description Attribute will be displayed on the Attributes card. | All |
| Document File | The Document File card provides a thumbnail preview of the Group’s file and a link you can click to view the file in another browser tab. It also displays information about the file, such as the file name and type, and provides options for replacing and downloading the file. Note The Document File card displays thumbnail previews only for Excel®, HTML, PDF, PowerPoint®, and Word® files. Important If the Group’s file is stored in the Malware Vault, the Document File card will not display a thumbnail preview of the file or a link to view it. Also, if you replace a Group’s file that is stored in the Malware Vault, the new file will inherit the archive password from the previous file. | Document |
| Notes | The Notes card is where you can view, create, and manage Notes (i.e., posts) for the Group. | All |
| Pinned Association Attributes | The Pinned Association Attributes card displays association Attributes added to Groups associated to the Group. | All |
| Playbooks | The Playbooks card is where you can view and execute active Playbooks with a UserAction Trigger configured for the Group’s type. | All |
| Report File | The Report File card provides a thumbnail preview of the Group’s file and a link you can click to view the file in another browser tab. It also displays information about the file, such as the file name and type, and provides options for replacing and downloading the file (if a file has been uploaded), as well as uploading a file (if a file was not uploaded during the Group’s creation). Note The Report File card displays thumbnail previews only for Excel, HTML, PDF, PowerPoint, and Word files. | Report |
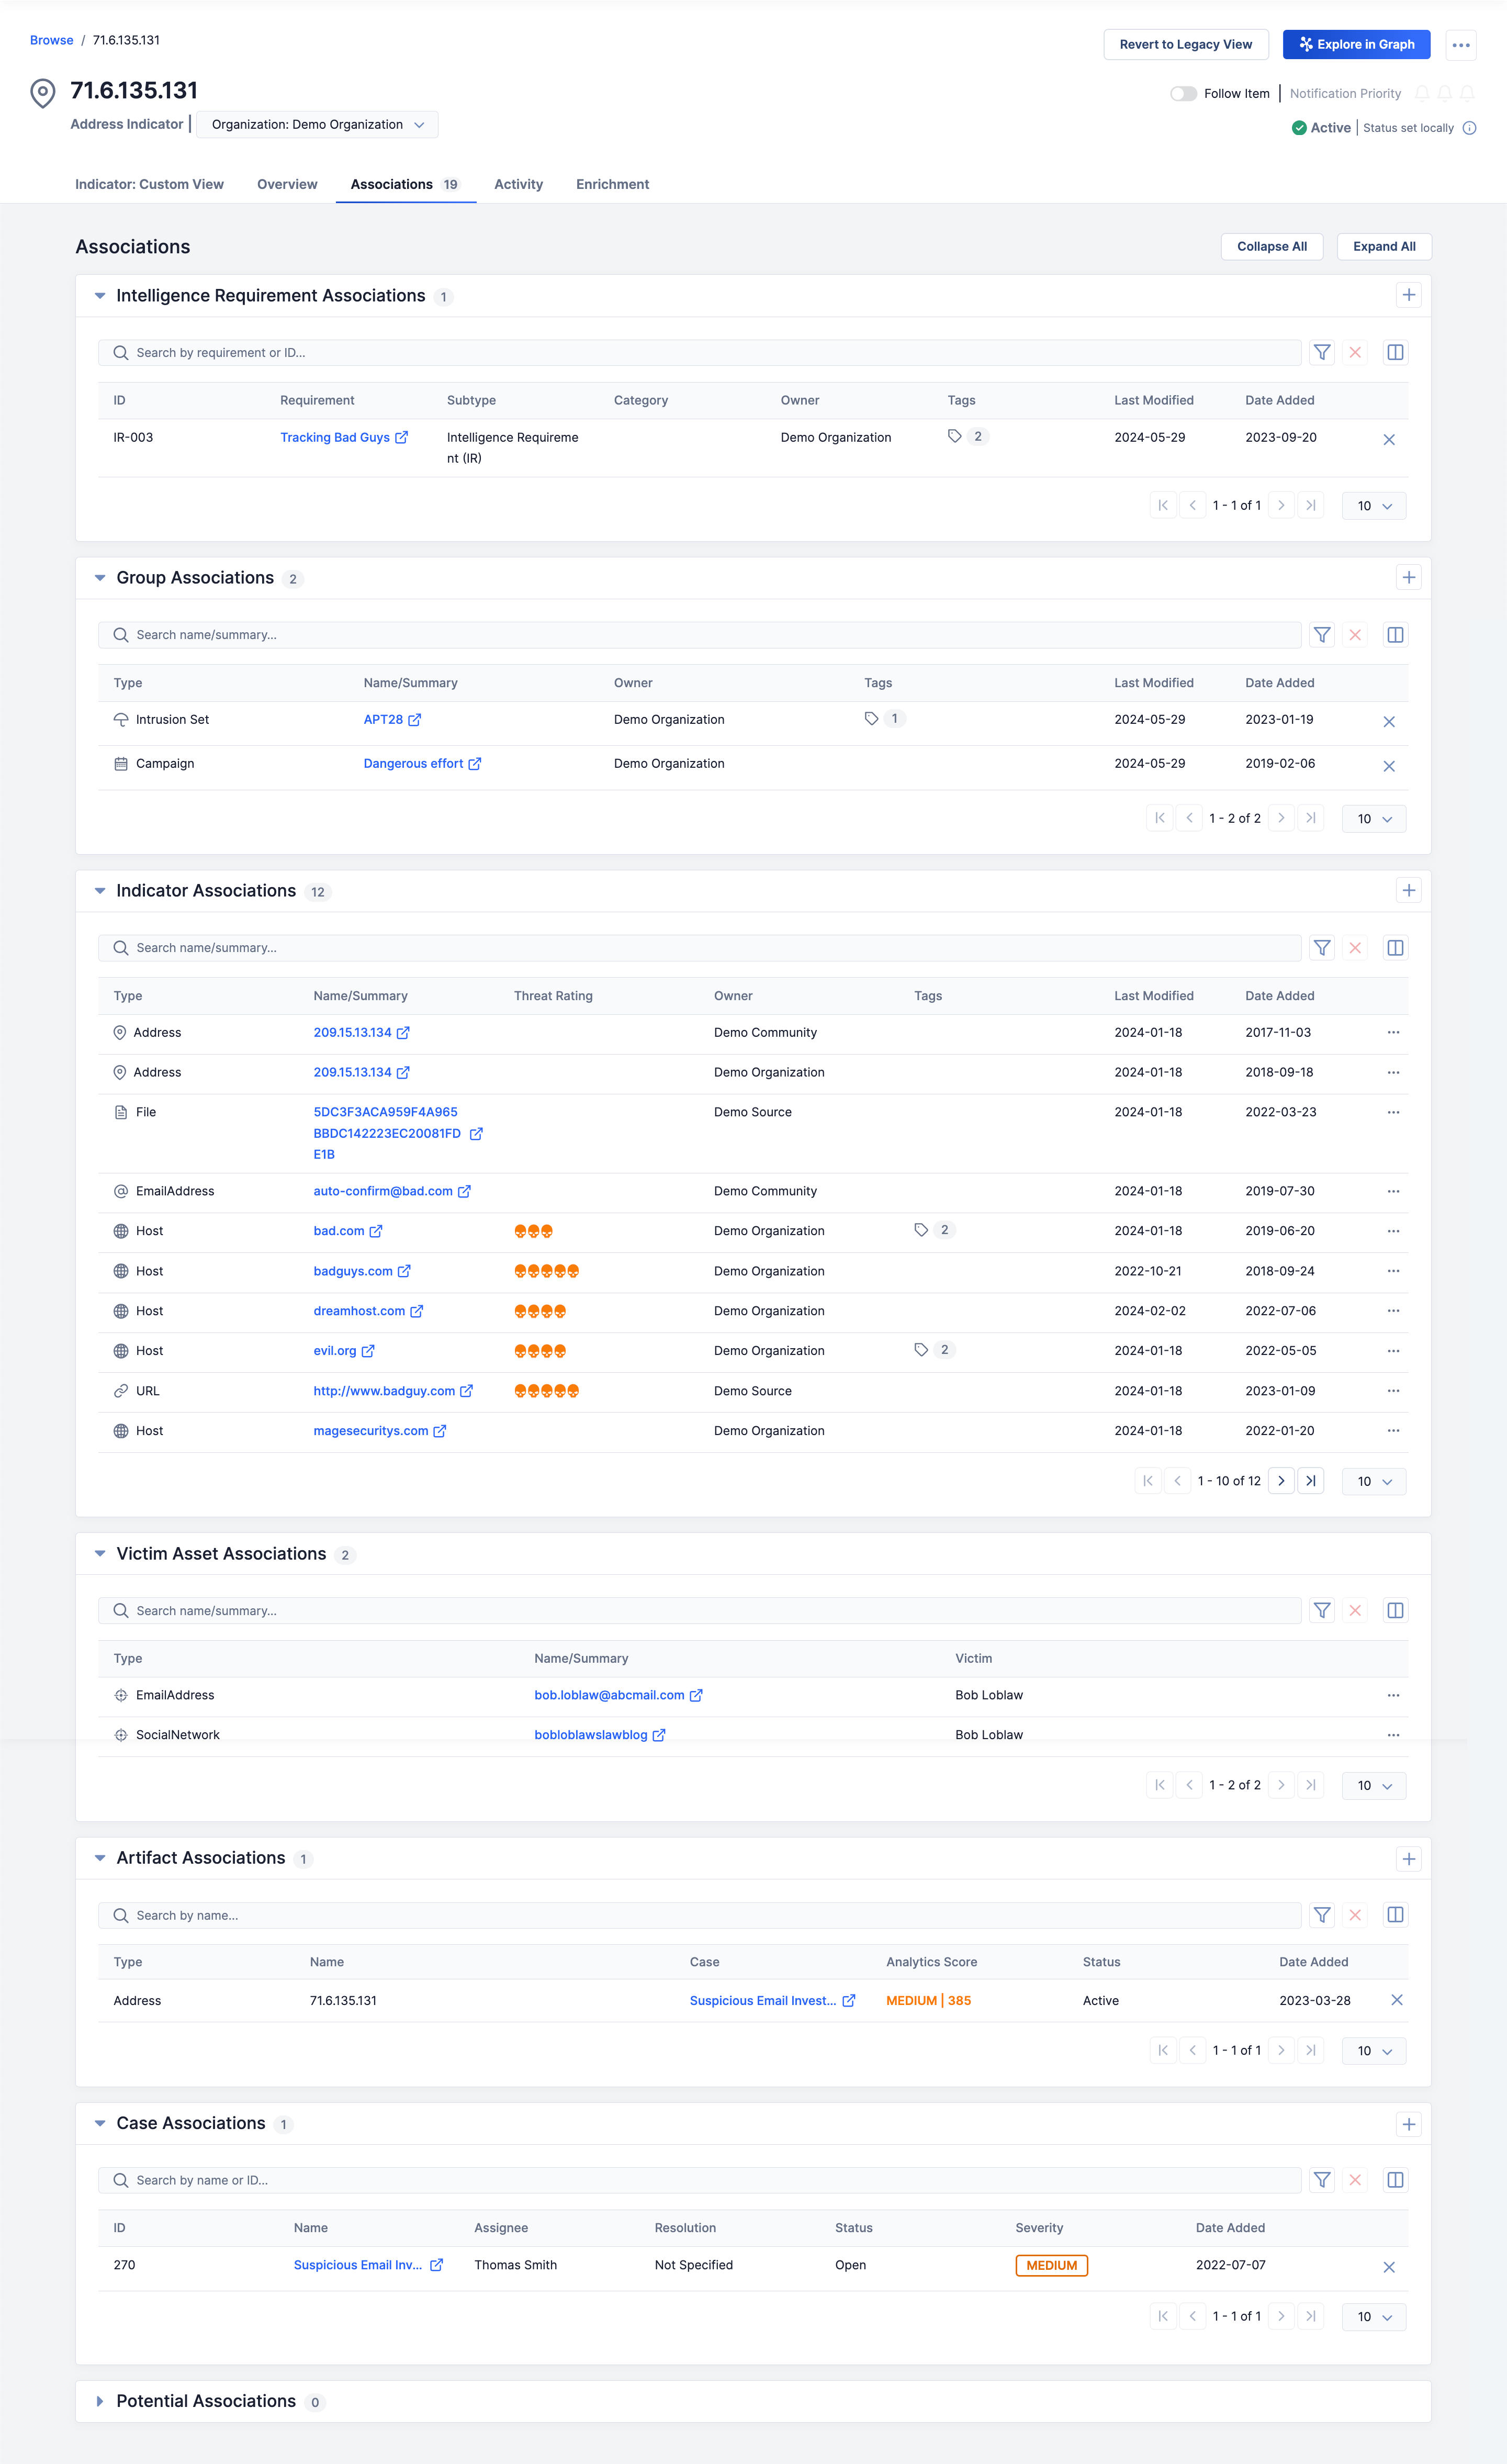
Associations Tab
The Associations tab (Figure 3) displays separate cards for Groups, Indicators, Victim Assets, Artifacts, and Cases associated to the object whose Details screen you are viewing (i.e., the primary object), with the total number of associated objects displayed to the right of the tab’s name. It also displays cards for potentially associated Cases and, for Groups only, Artifacts that you can review and consider adding as associations to the object. If viewing a Group’s Details screen, a card containing ThreatConnect Query Language (TQL) queries added to the Group for TQL associations will also be displayed.
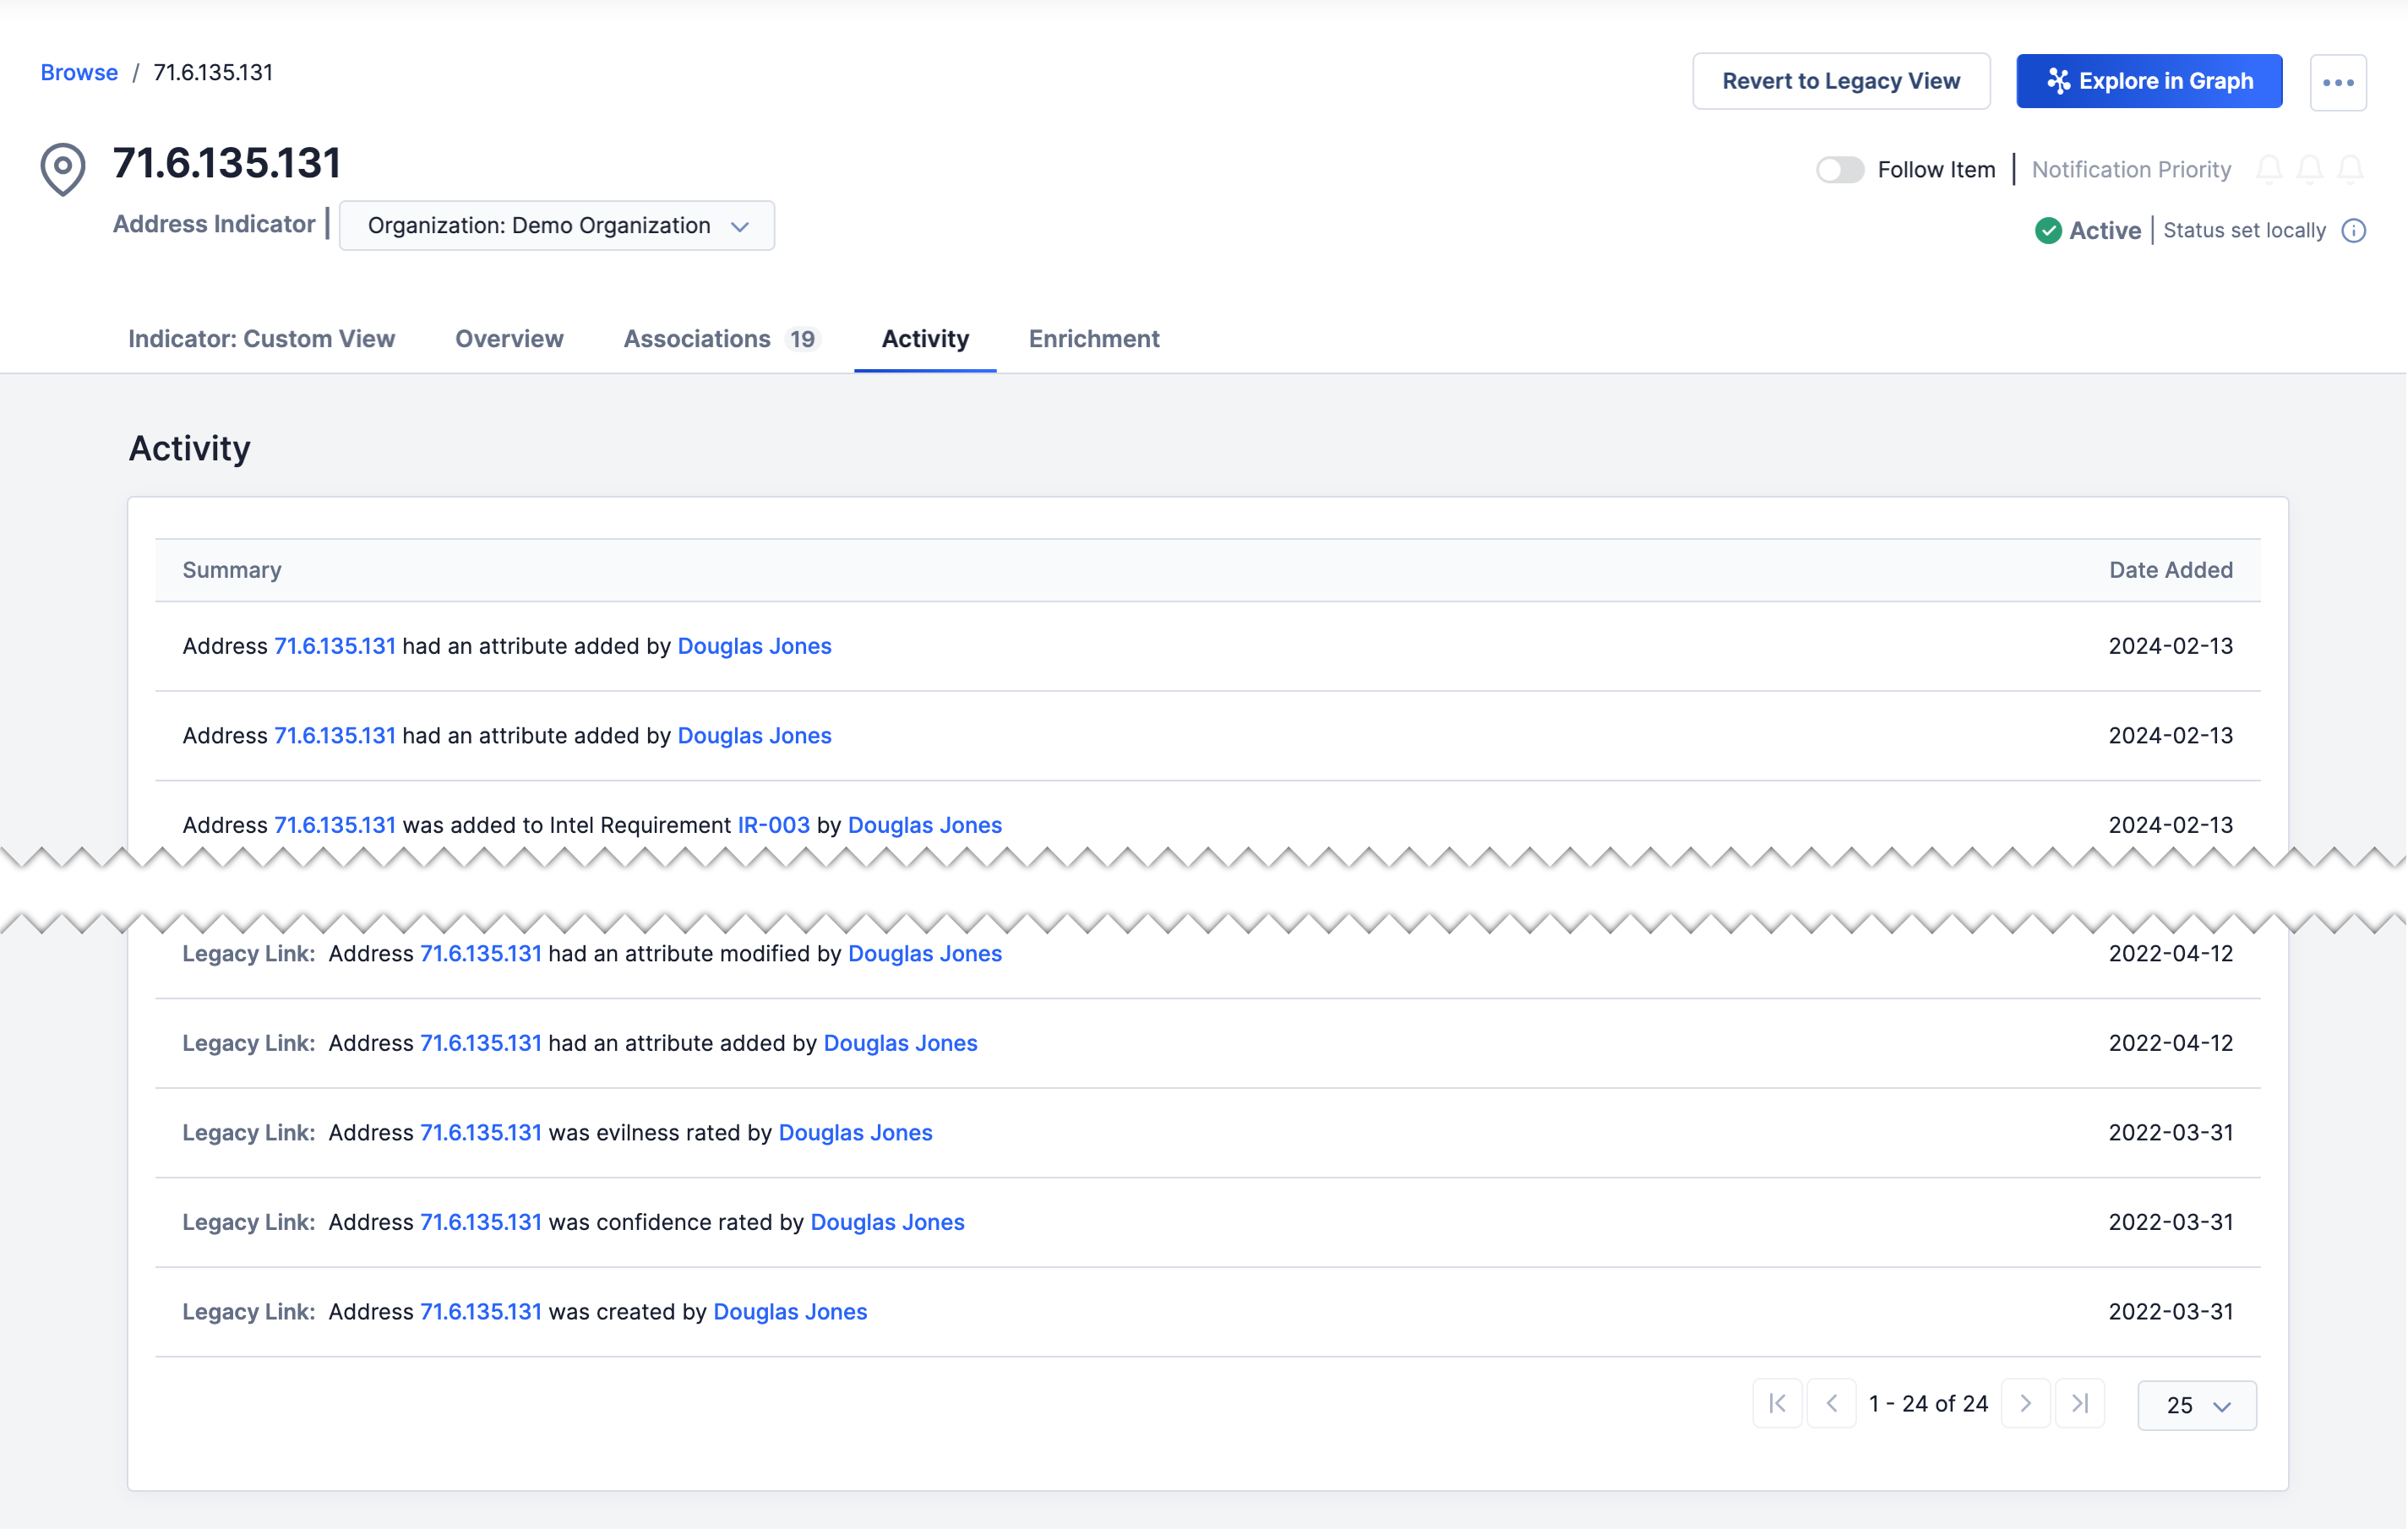
Activity Tab
The Activity tab (Figure 4), available for Indicators and Groups only, displays an activity list for the object, including a summary of the activity performed and the date and time the activity occurred. If an activity was performed on an object before your ThreatConnect instance was upgraded to version 7.0.0 or newer, the text “Legacy Link: “ will be appended to its summary.
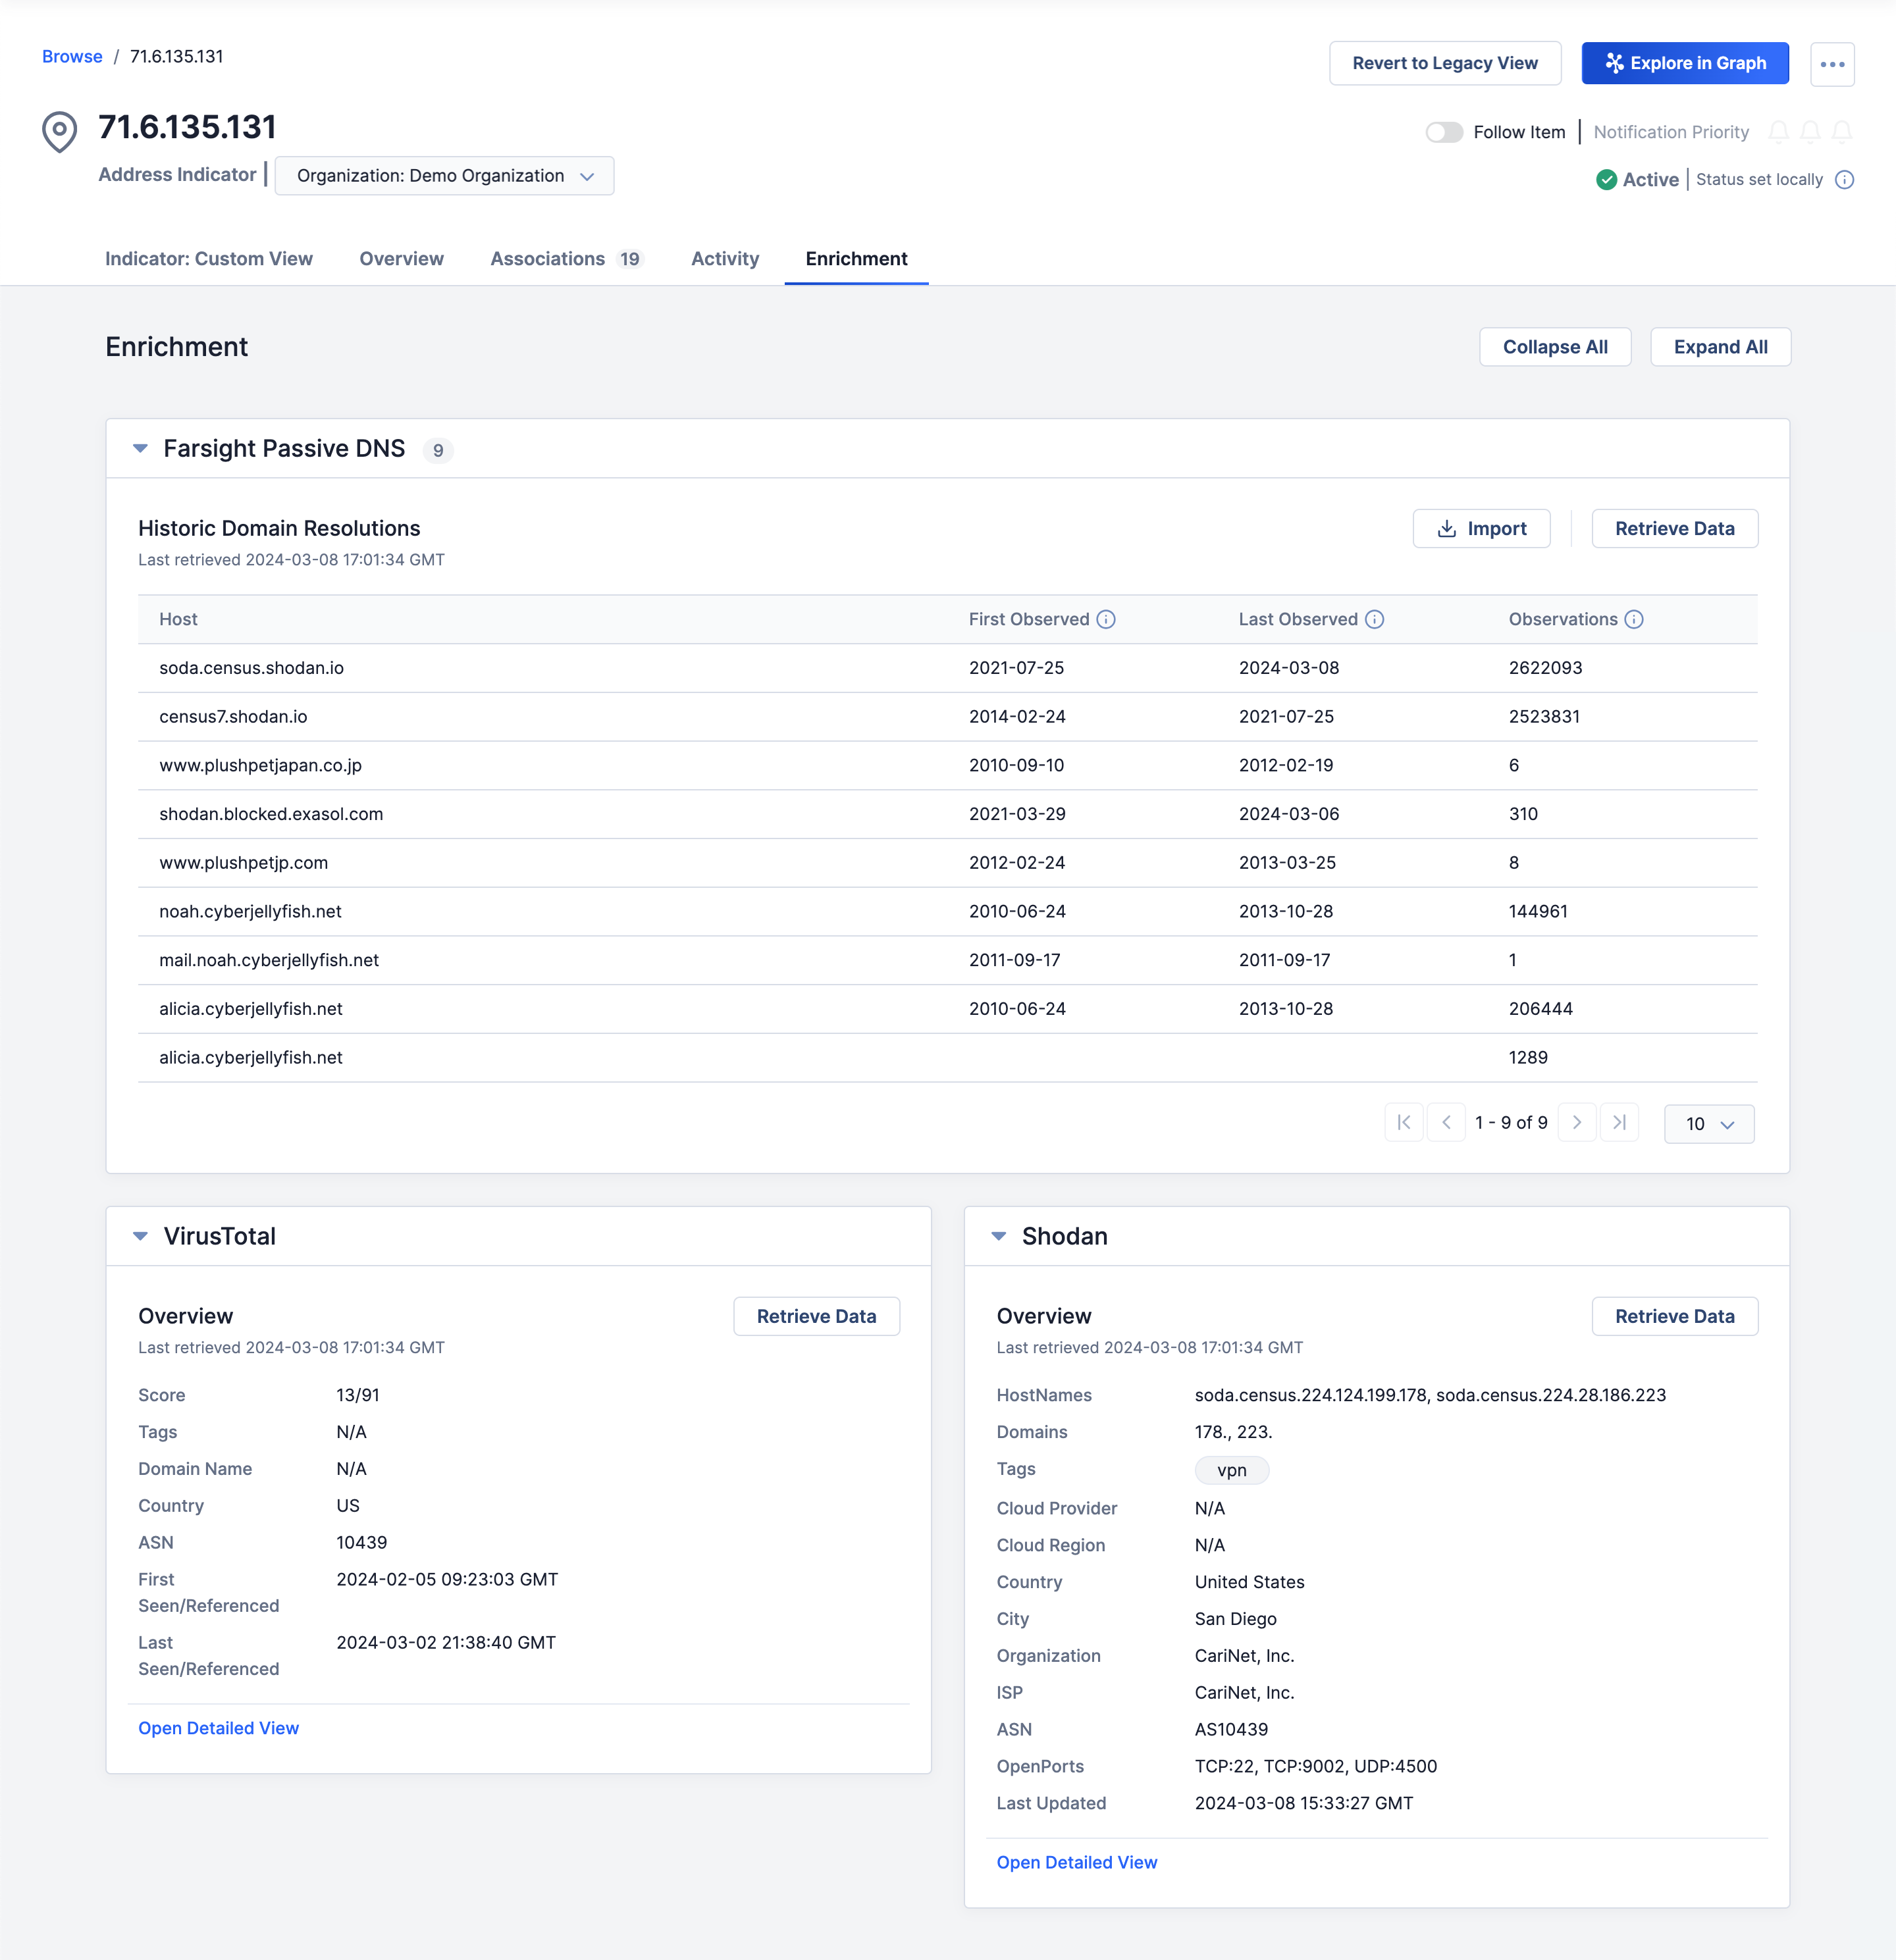
Enrichment Tab
For Indicators, the Enrichment tab (Figure 5) will be available if an enrichment service is available for its Indicator type. This tab displays a card for each available enrichment service (Farsight Security®, Shodan®, and VirusTotal™ in this example) that provides a summary of information retrieved from the enrichment service if it is enabled. Each card also includes a Retrieve Data button to retrieve new, instead of cached, data, and most cards include an Open Detailed View link to display a detailed view of the information retrieved from the enrichment service.
Legacy Details Screen View
The legacy Details screen view is available for all Indicator types, Group types, Tags, Tracks, and Victims. It is the only Details screen view available for Email, Signature, and Task Groups; Tags; Tracks; and Victims. For all other object types, the new Details screen view is the default view.
For more information on the legacy Details screen view, see The Details Screen (Legacy).
ThreatConnect® is a registered trademark, and CAL™ is a trademark, of ThreatConnect, Inc.
Farsight Security® is a registered trademark of DomainTools, LLC.
VirusTotal™ is a trademark of Google, Inc.
Excel®, PowerPoint®, and Word® are registered trademarks of Microsoft Corporation.
Quad9® is a registered trademark of Quad9 Foundation.
Shodan® is a registered trademark of Shodan.
MITRE ATT&CK® and ATT&CK® are registered trademarks of The MITRE Corporation.
20145-01 v.07.A