Overview
The Details screen for an Intelligence Requirement (IR) in ThreatConnect® is a starting point for an analyst who has been assigned to review the IR. Here, you can view the local and global results returned by the IR’s keyword query and determine the appropriate course of action to take for each result: associate the result to the IR object, archive the result, or mark the result as a false result. You can also view and manage the IR’s details and associations.
Before You Start
User Roles
- To view an IR’s Details screen, your user account can have any Organization role.
- To edit an IR’s details or delete an IR, your user account must have an Organization role of Standard User, Sharing User, Organization Administrator, or App Developer.
- To retrieve results manually for an IR, your user account must have an Organization role of Standard User, Sharing User, Organization Administrator, or App Developer.
- To manage keyword queries, results, and associations for an IR, your user account must have an Organization role of Standard User, Sharing User, Organization Administrator, or App Developer.
Viewing an IR’s Details Screen
Follow these steps to view the Details screen for an IR in ThreatConnect.
- Hover over Browse on the top navigation bar and select Intelligence Requirements (IR).ImportantMake sure that your Organization is selected in the My Intel Sources selector . IRs exist only in Organizations.
- Hover over an IR in the results table on the Browse screen and click one of the following icons in the Requirement cell to open the Overview tab of its Details screen (Figure 1):
- View full details
 : Click this icon to open the IR’s Details screen in the current browser tab.
 - View full details in new tab
 : Click this icon to open the IR’s Details screen in a new browser tab.
- View full details
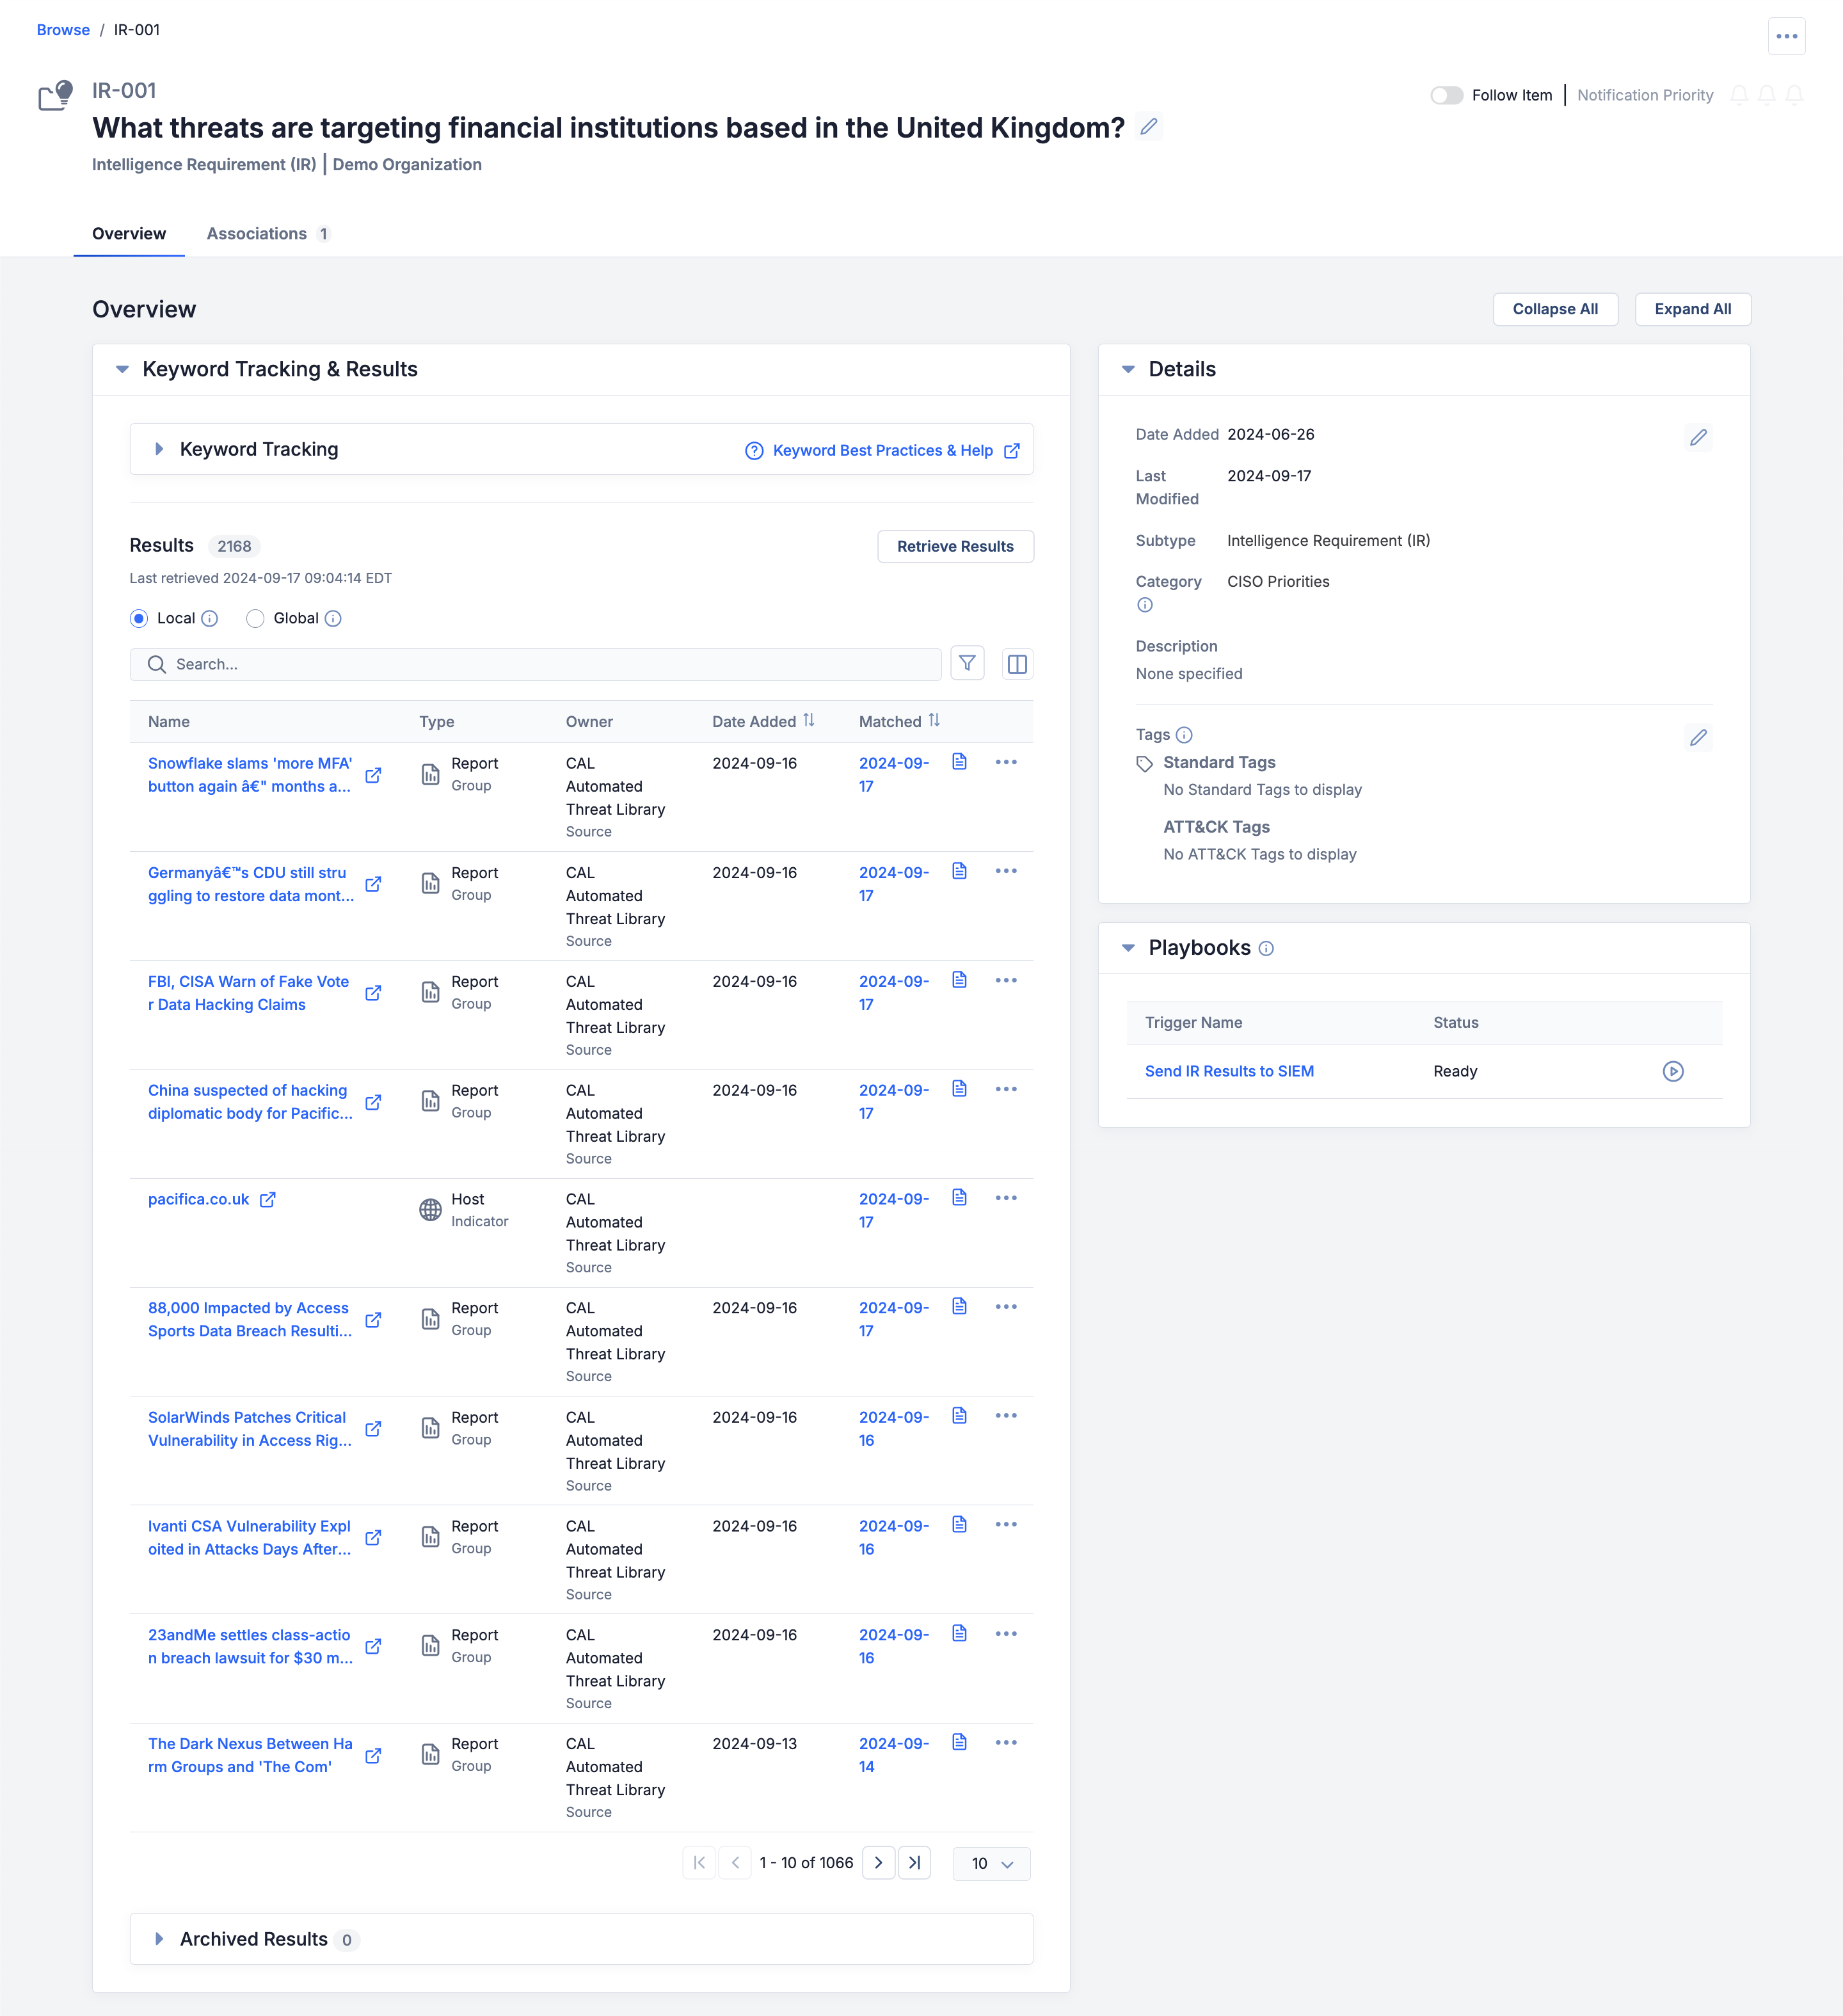
Details Screen Header
The Details screen for IRs (Figure 1) includes the following sections and elements in its header:
- Browse / <ID>: This section, located at the upper-left corner of the screen, includes a link to view all IRs on the Browse screen and displays the IR’s ID.
- IR ID and summary: This section displays the IR’s ID and summary (i.e., the question, topic, or statement on which the IR focuses). Click Edit
 to the right of the summary to edit it.NoteIf you edit an IR’s summary, the new summary cannot be the same as the summary for an existing IR in your Organization.
 - <IR subtype> | Organization: <Organization name>: This section displays the IR’s subtype followed by the name of the Organization to which the IR belongs.
 menu: This dropdown provides an option to delete the IR.
- Follow Item: Turn this setting on to receive alerts and updates on changes to the IR. Then use the bell
 icons to set the notification priority, where Low is oneicon, Medium is twoicons, and High is threeicons.
Overview Tab
The Overview tab of an IR's Details screen for IRs (Figure 1) contains three cards: Keyword Tracking & Results, Details, and Playbooks.
Keyword Tracking & Results
The Keyword Tracking & Results card (see Figure 1) has three sections: Keyword Tracking, Results, and Archived Results.
Keyword Tracking
The Keyword Tracking section displays the keywords defined in the IR’s keyword query (Figure 2). To view best practices for defining IR keyword queries, click the Keyword Best Practices & Help link.

Editing a Keyword Query
Click Editat the top right of the Keyword Tracking section. The IR’s keyword query will now be editable (Figure 3).
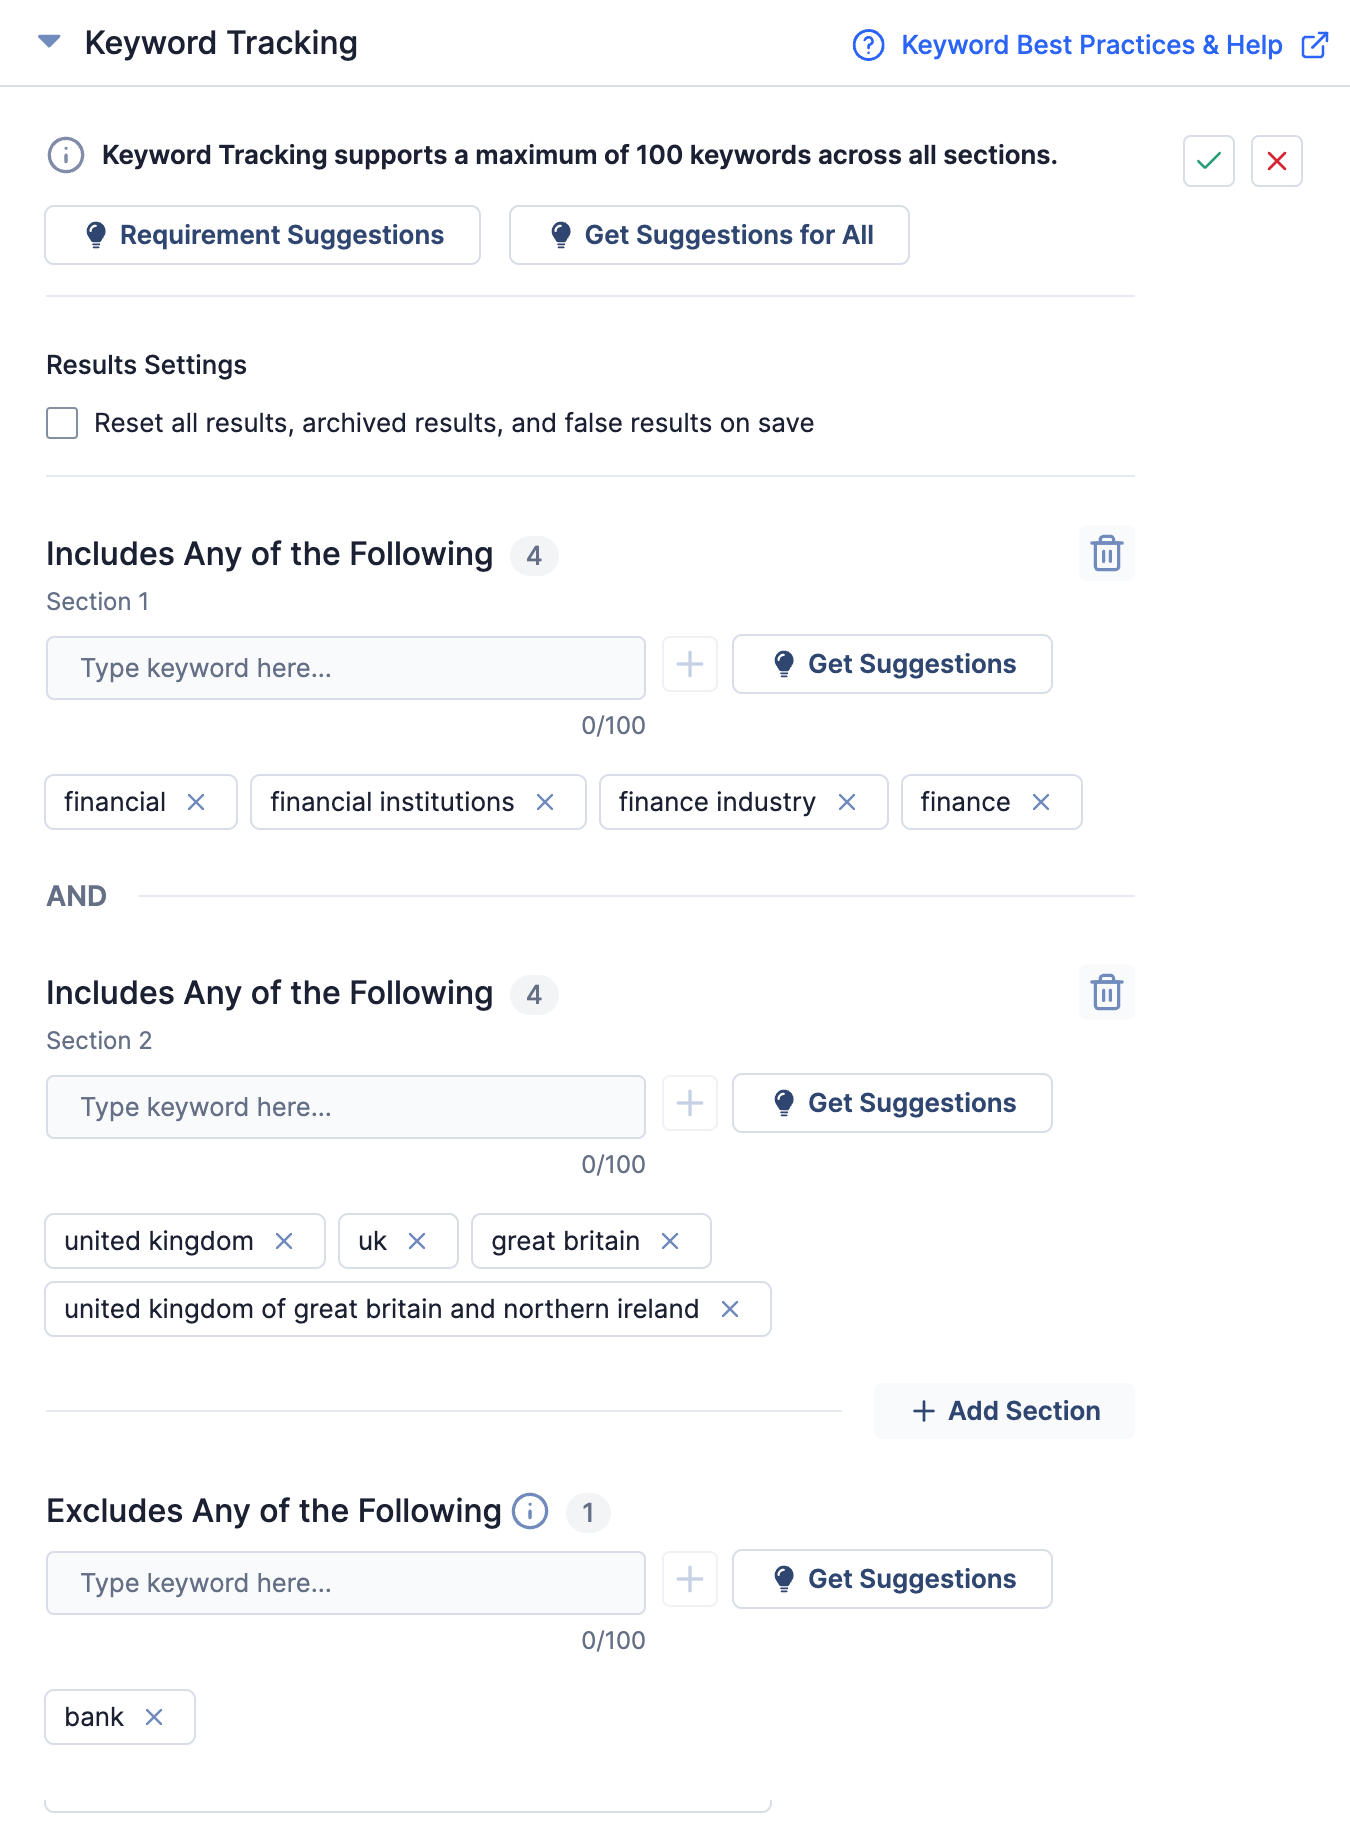
When the Keyword Tracking section is in edit mode, you can add keywords to sections, remove keyword from sections, and delete an Includes Any of the Following section (if there is more than one of these sections).
Add a keyword to a section by entering the keyword in the Type keyword here… box under the section header and then clicking +.
You can also add suggested keywords based on the IR’s summary. These suggestions are potential aliases for keywords recognized in the IR's summary based on geography, industry, MITRE ATT&CK® tactics and techniques, intrusion sets, tools, and malware families. Click one or more of the following buttons to view and add suggested keywords to your IR:
- Requirement Suggestions: Click this button to view suggested keywords that you can select and then add to an Includes Any of the Following section or the Excludes Any of the Following section.NoteIf there are multiple Includes Any of the Following sections, you will be prompted to select which of these sections (i.e., Section 1, Section 2, etc.) to add the selected keywords to when you click + Add to “Include”.
- Get Suggestions for All: Click this button to retrieve a set of keyword suggestions for each Includes Any of the Following section and the Excludes Any of the Following section based only on the keywords added to the respective section.
- Get Suggestions: Click this button in a section to retrieve a set of keyword suggestions based only on the keywords added to that section.
Industry-based keyword suggestions include North American Industry Classification System (NAICS) codes and their associated descriptions, such as NAICS: 521 – monetary authorities-central bank and NAICS: 52 – finance and insurance. When you include a NAICS keyword suggestion in your query, the results of your IR will include the following:
- The standard Tag for that NAICS code in the CAL Automated Threat Library Source and other feeds that leverage NAICS codes in ThreatConnect;
- The standard Tags for available NAICS subsector (three-digit) codes in the CAL Automated Threat Library Source if the selected keyword suggestion is a two-digit code (e.g., if you select NAICS: 52 – finance and insurance, then the Tags for that code’s subsectors—521, 522, 523, 524, and 525—will also be included); and
- CAL ATL Report Groups that have CAL ATL industry classification Tags corresponding to the keyword suggestion, representing a set of Reports broadly associated with the industry term that you can investigate (Global results only).
For more information on the use of NAICS codes in CAL ATL, see the “How Are ATL Reports Classified by Industry?” section of CAL ATL Industry Classification. For more information on NAICS codes in IR keyword suggestions, see the “Intelligence Requirements” section of CAL ATL Industry Classification.
Select the Reset all results, archived results, and false results on save checkbox in the Results Settings subsection (near the top of the card) to allow results that were previously archived or marked as false results to be included in the Results section the next time results are retrieved for the IR.
To add another Includes Any of the Following section, click + Add Section under the bottommost Includes Any of the Following section. To delete an Includes Any of the Following section, click Delete on the right of that section (available only if there is more than one Includes Any of the Following section).
Click Confirm at the top right of the section to save your changes.
Results
The Results section displays a table containing the Artifacts, Cases, Groups, Indicators, Tags, and Victims in your ThreatConnect owners (Local) and the ThreatConnect Global Intelligence Dataset (Global) that the keyword query returned (Figure 4). The total number of results of the selected type (Local or Global) is displayed to the right of the Results heading.
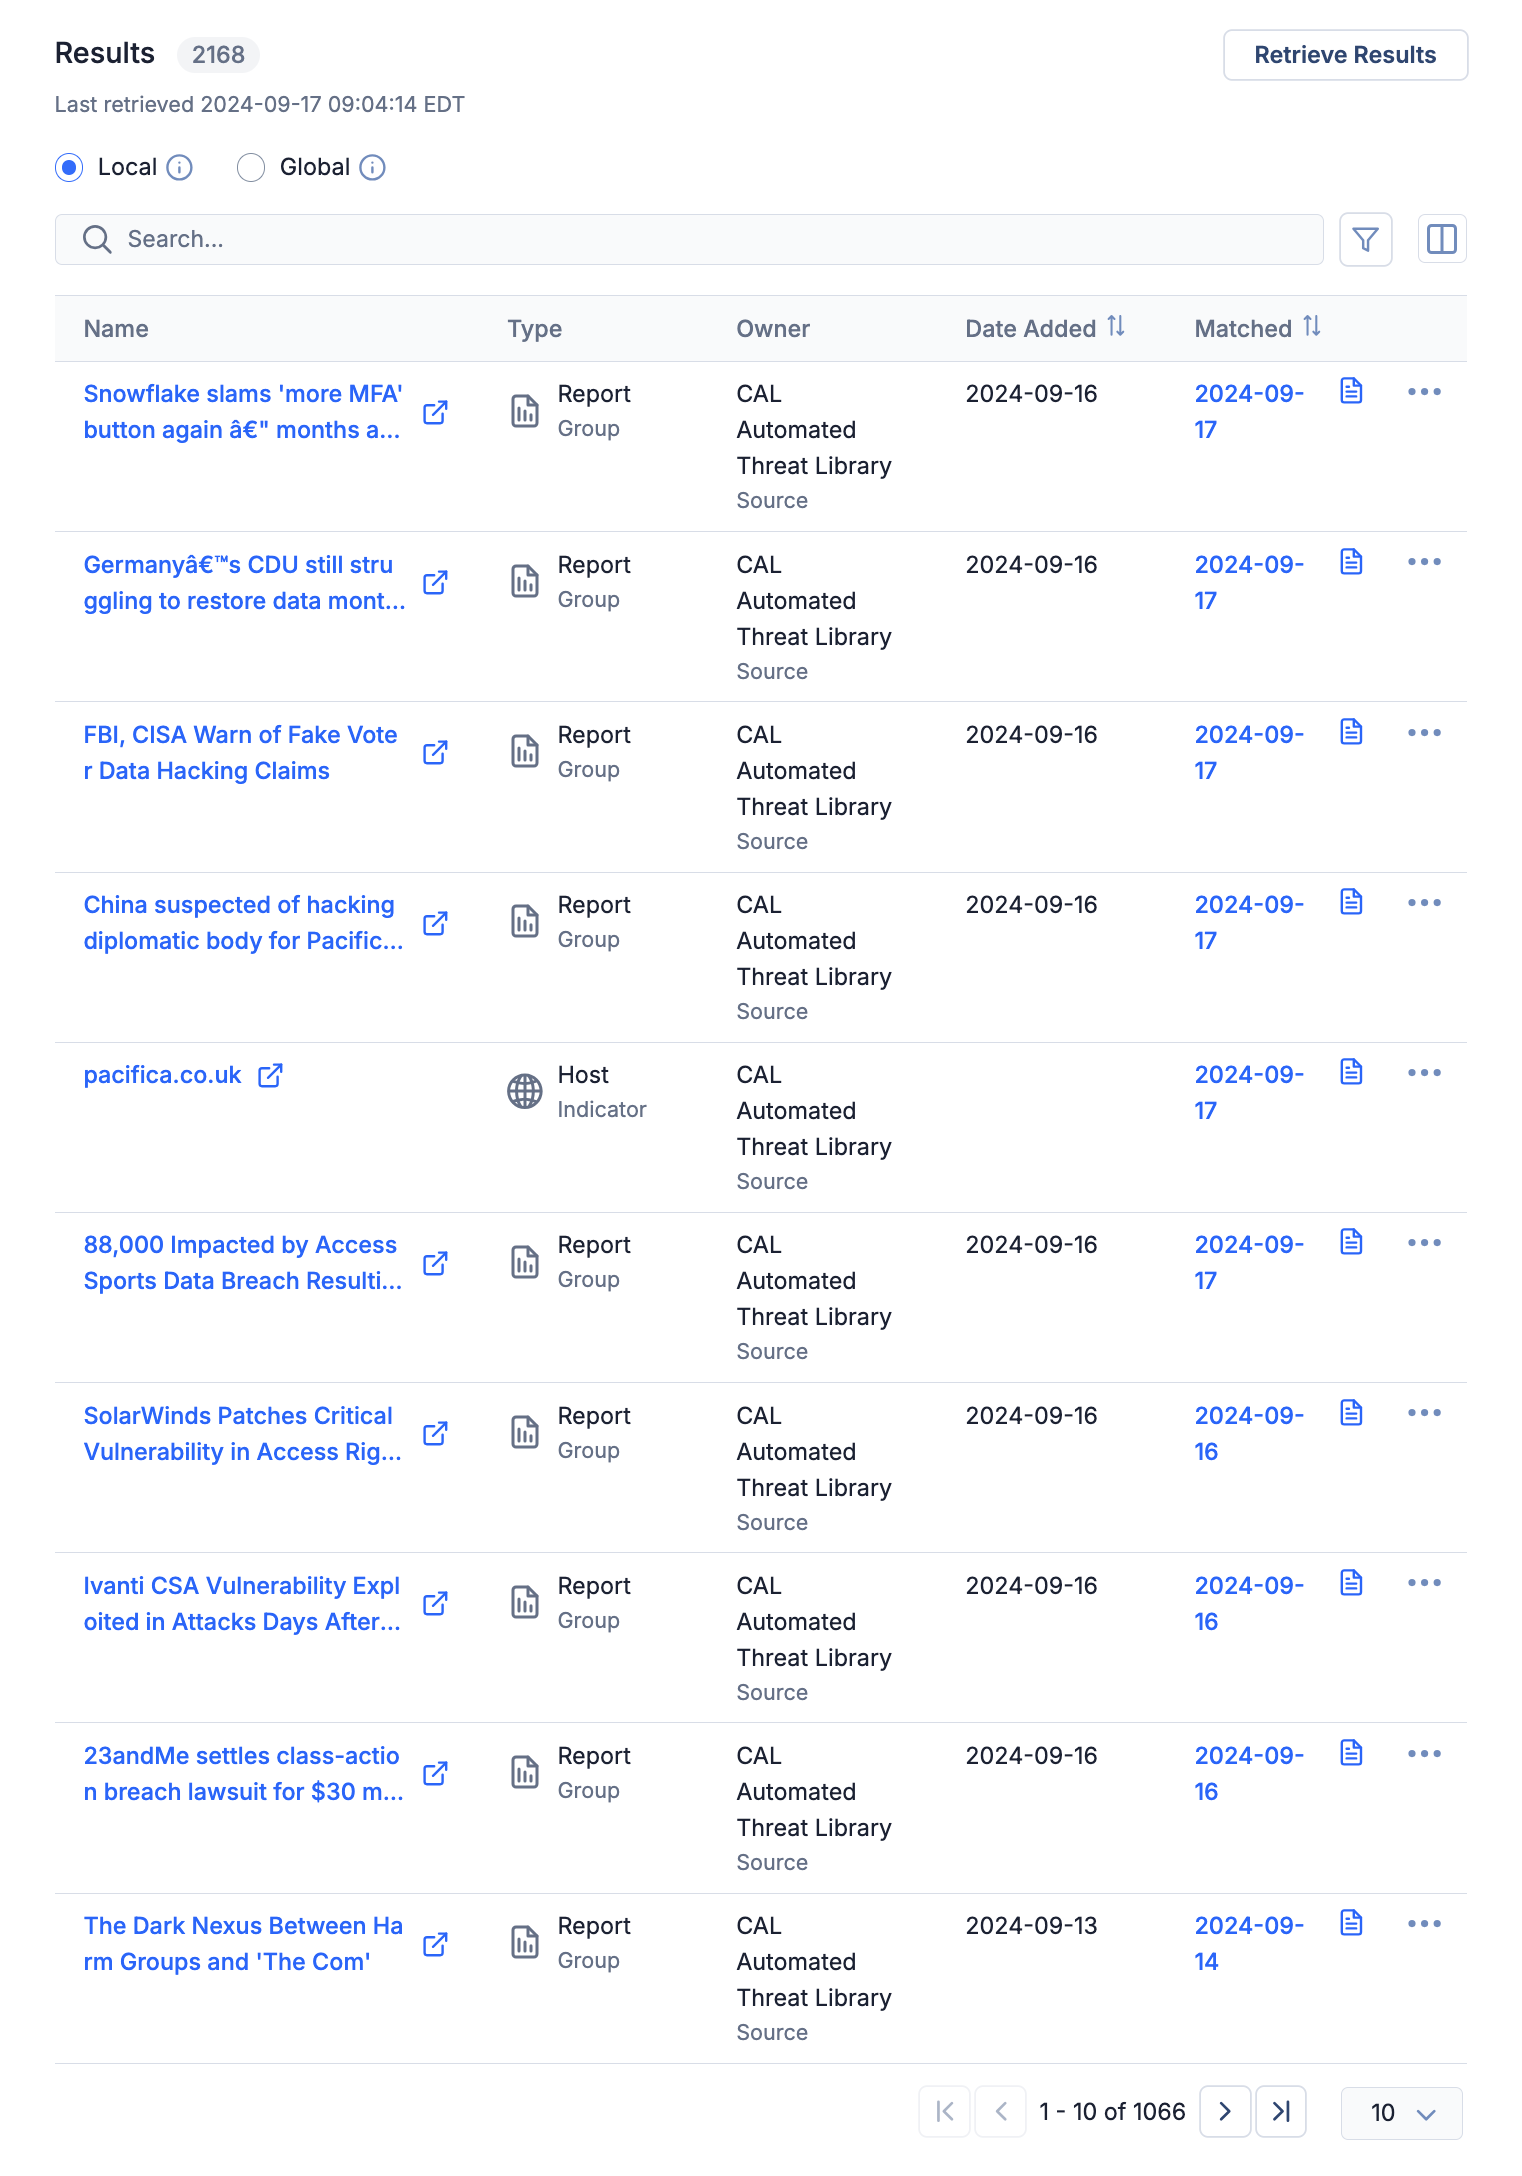
- Local: Select this option to view query results in your Organization, Communities, and Sources. When searching for local results, the query searches everything you have access to in your ThreatConnect owners, including all Attributes, Tags, names/summaries of objects, and the contents of files attached to Report and Document Groups. Click a result’s name to view its Details screen. Click the date in the Matched column (the date when the result was returned by the query) or View result details
 to see the result’s Result Details drawer, which displays the date and time that the result matched the query and highlights the text in the result that matched one or more of the query keywords.NoteThe Result Details drawer is not available for Tags.
 - Global: Select this option to view query results in the ThreatConnect Global Intelligence Dataset. If you have access to the CAL Automated Threat Library Source and a global result exists in that Source, you can click its name to view its Details screen. Click the date in the Matched column (the date when the result was returned by the query) or View result detailsto see the result’s Result Details drawer, which displays the date and time that the result matched the query and highlights the text in the result that matched one or more of the query keywords.NoteThe Result Details drawer is not available for Tags.NoteIndicators with a CAL score of 150 or lower will not be included in the global results.
Click Select columns to the right of the search bar to choose the columns you want to display in the table. By default, all columns except Last Modified are displayed in the table.
at the top right of the Keyword Tracking section. This will reset the IR’s results and populate the two date fields for all legacy results. If you do not want to reset an IR’s results, all results generated after the update to 7.7 will have the date fields populated, but the legacy results will not have data in those fields.Retrieving Results
After you create an IR, local and global results for its keyword query are retrieved immediately. From that point forward, ThreatConnect and the ThreatConnect Global Intelligence Dataset will be polled daily at a scheduled time configured by your System Administrator for new local and global results, respectively. When new results are available, they will be retrieved automatically for the IR. The date and time when the results for an IR were last retrieved are displayed at the top left of the Results section.
To manually retrieve the most recent results for the IR, click Retrieve Results at the top right of the Results section. Once the most recent results have been populated into the results table, subsequent manual retrievals will populate additional results with lower degrees of relevance to the keyword query.
Managing Results
Clickin a result’s row to display a menu with the following options:
- View Result Details: Select this option to display the result’s Result Details drawer, which displays the date and time that the result matched the query and highlights the text in the result that matched one or more of the query keywords.NoteThe Result Details drawer is not available for Tags.
- View Details: Select this option to display the result’s Details drawer (available for all Local results and, if you have access to the CAL Automated Threat Library Source, for Global results in that Source).
- Convert to Association: Select this option to associate the result to the IR and remove it from the Results section. If associating a global result that does not exist in one of your ThreatConnect owners, a copy of it will be created in your Organization and then associated to the IR.
- Archive Result: Select this option to archive the result, which moves the result from the Results section to the Archived Results section. This action is useful when you want to maintain awareness of historical results that may have significance for future investigations.
- Mark as False Result: Select this option to mark the result as a false result, which removes the result from the Results section. Results that have been marked as false results are not displayed on the IR's Details screen.NoteTo bring back a result previously marked as false, reset the IR’s results as follows: Edit the Keyword Tracking section, select the Reset all results, archived results, and false results on save checkbox in the Results Settings section, and click Confirmat the top right of the Keyword Tracking section.
Result Details Drawer
The Result Details drawer highlights the fields or other information in a result that matched one or more query keywords, as well as the date and time that the result was matched. For example, in Figure 5, the highlighted words in the result’s name, the Description Attribute, and the Source Attribute are matches to three of the query keywords (finance, uk, and bank). Expand the Keyword Tracking section to view the IR’s query keywords.
.png)
Archived Results
The Archived Results section displays the IR’s archived results, which are results that you or other users in your Organization have moved from the Results section (Figure 6). Archiving results is useful when you want to maintain awareness of historical results that may have significance for future investigations.
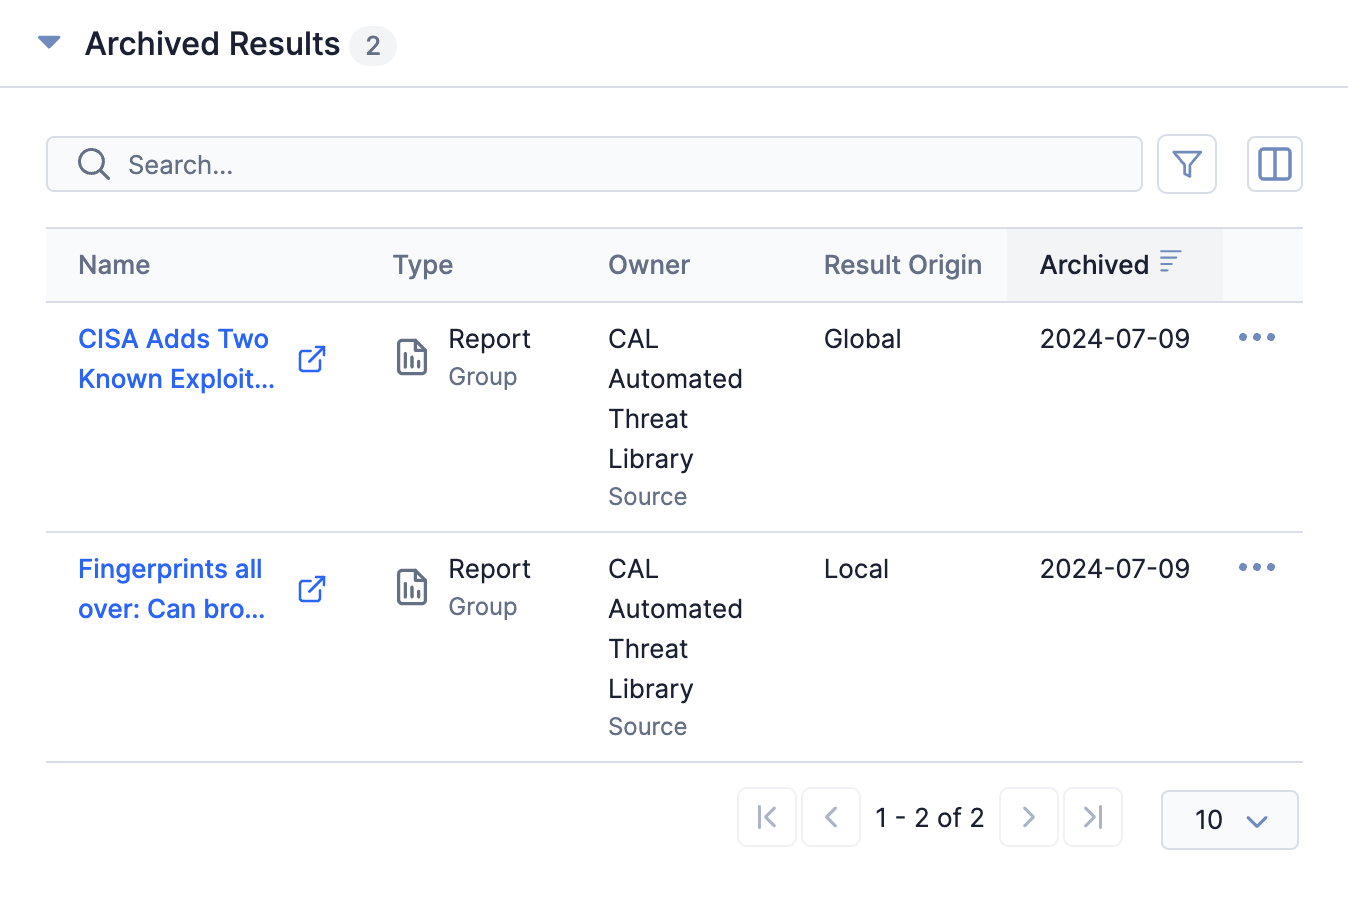
Click an archived result’s name to view the result’s Details screen (available for all Local results and, if you have access to the CAL Automated Threat Library Source, for Global results in that Source).
Click Select columnsto the right of the search bar to choose the columns you want to display in the table.
Managing Archived Results
Clickin an archived result’s row to display a menu with the following options:
- View Result Details: Select this option to display the result’s Result Details drawer, which displays the date and time that the result matched the query and highlights the text in the result that matched one or more of the query keywords.NoteThe Result Details drawer is not available for Tags.
- View Details: Select this option to display the result’s Details drawer (available for all Local results and, if you have access to the CAL Automated Threat Library Source, for Global results in that Source).
Details
The Details card (see Figure 1) displays the following information about the IR:
- Date Added: The date when the IR was created.
- Last Modified: The date when the IR was last modified.
- Subtype: The IR’s subtype.
- Category: The IR’s category.
- Description: The IR’s default Description.
- Tags: The standard Tags and ATT&CK Tags applied to the IR.
Click Editat the top right of the card to edit the IR’s subtype, category, or Description. Click Editat the bottom right of the card to edit the IR's Tags. Click the corresponding Confirmbutton to save the changes.
Playbooks
The Playbooks card (see Figure 1) is where you can view and execute active Playbooks with a UserAction Trigger configured for IRs.
Associations Tab
The Associations tab of an IR’s Details screen displays separate cards listing Groups, Indicators, Victim Assets, Artifacts, and Cases associated to the IR, with the total number of associated objects displayed to the right of the tab’s name. It also displays cards listing potentially associated Artifacts and Cases that you can review and consider adding as associations to the IR. Lastly, it displays a card that lets you assign up to two TQL queries to the IR—one for Groups and one for Indicators. When the assigned TQL queries run, associations between the IR and the objects returned by the query will be created automatically.
For more information on the Associations tab and the actions you can perform on this tab, see the “New Details Screen View” section of The Associations Tab.
ThreatConnect® is a registered trademark, and CAL™ is a trademark, of ThreatConnect, Inc.
MITRE ATT&CK® and ATT&CK® are registered trademarks of The MITRE Corporation.
20159-06 v.04.A