Overview
An Intelligence Requirement (IR) is a collection of topics or a research question reflecting an organization’s cyber threat–related priorities that guides a security or threat intelligence team’s research and analysis efforts. In ThreatConnect®, you can create IR objects in your Organization by using a logic-based keyword query that identifies and retrieves information relevant to the IR.
When creating an IR, you first provide information including a unique summary of the IR, a unique ID number for the IR, the IR’s subtype, the IR’s category, and any metadata (Description and Tags) that you want to add to the IR. ThreatConnect then provides you with a set of suggested keywords based on the IR’s summary. Next, you select keywords from this set to include and exclude in the query, or you can enter your own keywords manually.
After you have finalized your query, you can view a preliminary set of results comprising Artifacts, Cases, Groups, Indicators, Tags, and Victims in the ThreatConnect owners to which you have access and the ThreatConnect Global Intelligence Dataset. You can also view each result in more detail to identify the matching keyword(s) and the part of the result that matched the keyword(s). Finally, you can save the IR to your Organization.
Before You Start
User Roles
- To create, edit, or delete an IR, your user account must have an Organization role of Standard User, Sharing User, Organization Administrator, or App Developer.
Creating an IR
Follow these steps to create an IR in ThreatConnect:
- Hover over Create on the top navigation bar and select Intelligence Requirement (IR).
- Proceed through the steps on the Create Intelligence Requirement (IR) screen to create the IR. There are three steps in the IR creation process: Details (required), Keyword Tracking (required), and View Results (optional).
Step 1: Enter Details About the IR
The Details step of the Create Intelligence Requirement (IR) screen (Figure 1) is a required step where you enter basic information about the IR you are creating.
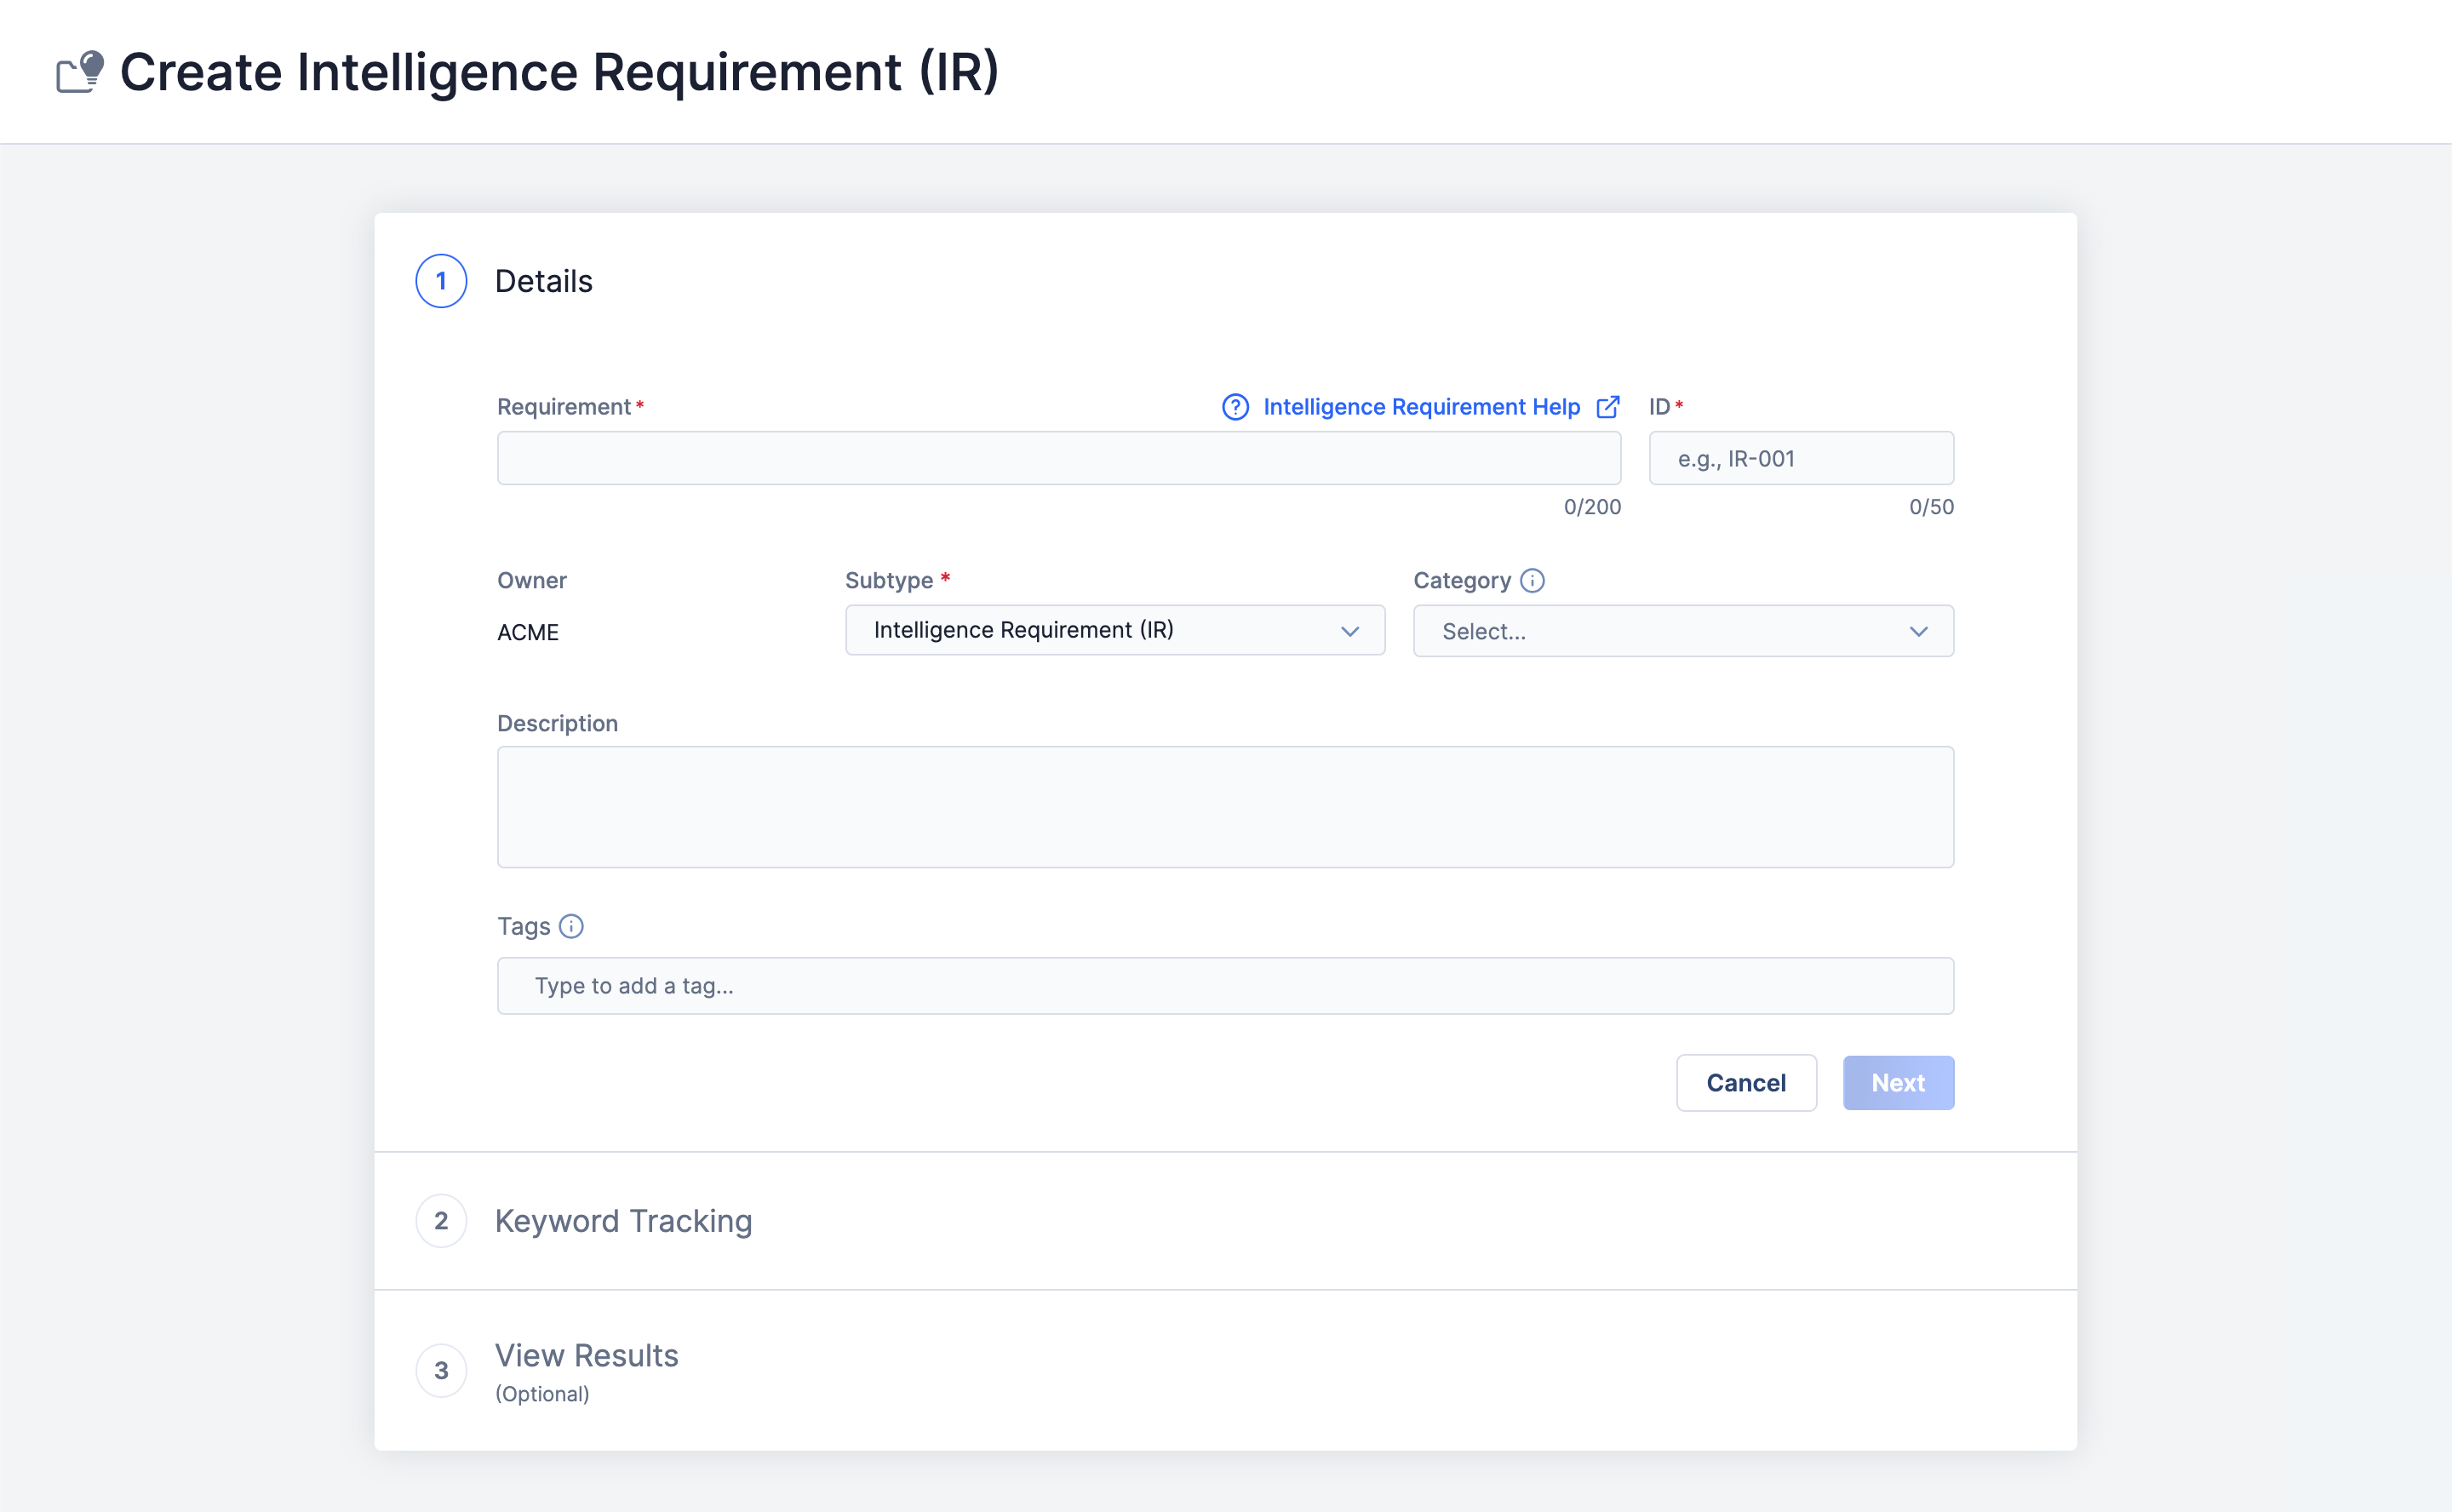
Follow these steps to fill out the fields on the Details step:
- Provide the following details for the IR:
- Requirement: Enter a unique summary of the IR (i.e., the question, topic, or statement on which the IR focuses). The summary you enter cannot be the same as the summary for an existing IR in your Organization.
- ID: Enter a unique ID for the IR. The ID you enter cannot be the same as the ID for an existing IR in your Organization.NoteIf your company or organization does not have an existing ID naming convention in place for IRs, it is recommended to identify the IR’s subtype in the ID. For example, the ID for a Priority Intelligence Requirement (PIR) would look like PIR-001.ImportantYou cannot change an IR’s ID after it has been created.
- Owner: The name of the Organization in which the IR will be created. This value is the name of your Organization and cannot be changed. IRs cannot be created in Communities or Sources.
- Subtype: Select one of the following subtypes for the IR:
- Intelligence Requirement (IR): Threats of overall concern to an organization (e.g., cyber threats, fraud, geopolitical/physical threats).
- Priority Intelligence Requirement (PIR): Threat actor motives; tactics, techniques, and procedures (TTPs); targets; impacts; or attributions in association with IRs.
- Specific Intelligence Requirement (SIR): Facts associated with threat activity, such as indicators of compromise (IOCs).
- Request for Information (RFI): One-off requests for information related to topics of interest to particular stakeholders.
- Research Requirement (RR): A topic or area of investigation that is of interest to an individual or group and does not merit a full IR, but does require tracking of relevant information.
- Category: (Optional) Select a category for the IR. If your System Administrator has not created any IR categories, the only available option will be None.
- Description: (Optional) Enter a default Description for the IR.
- Tags: (Optional) Enter one or more Tags to apply to the IR.
- Click Next to proceed to the Keyword Tracking step.
Step 2: Configure the IR’s Keyword Query
Clicking Next on the Details step will display the Keyword Tracking step (Figure 2). This is a required step where you define a logic-based keyword query for the IR.
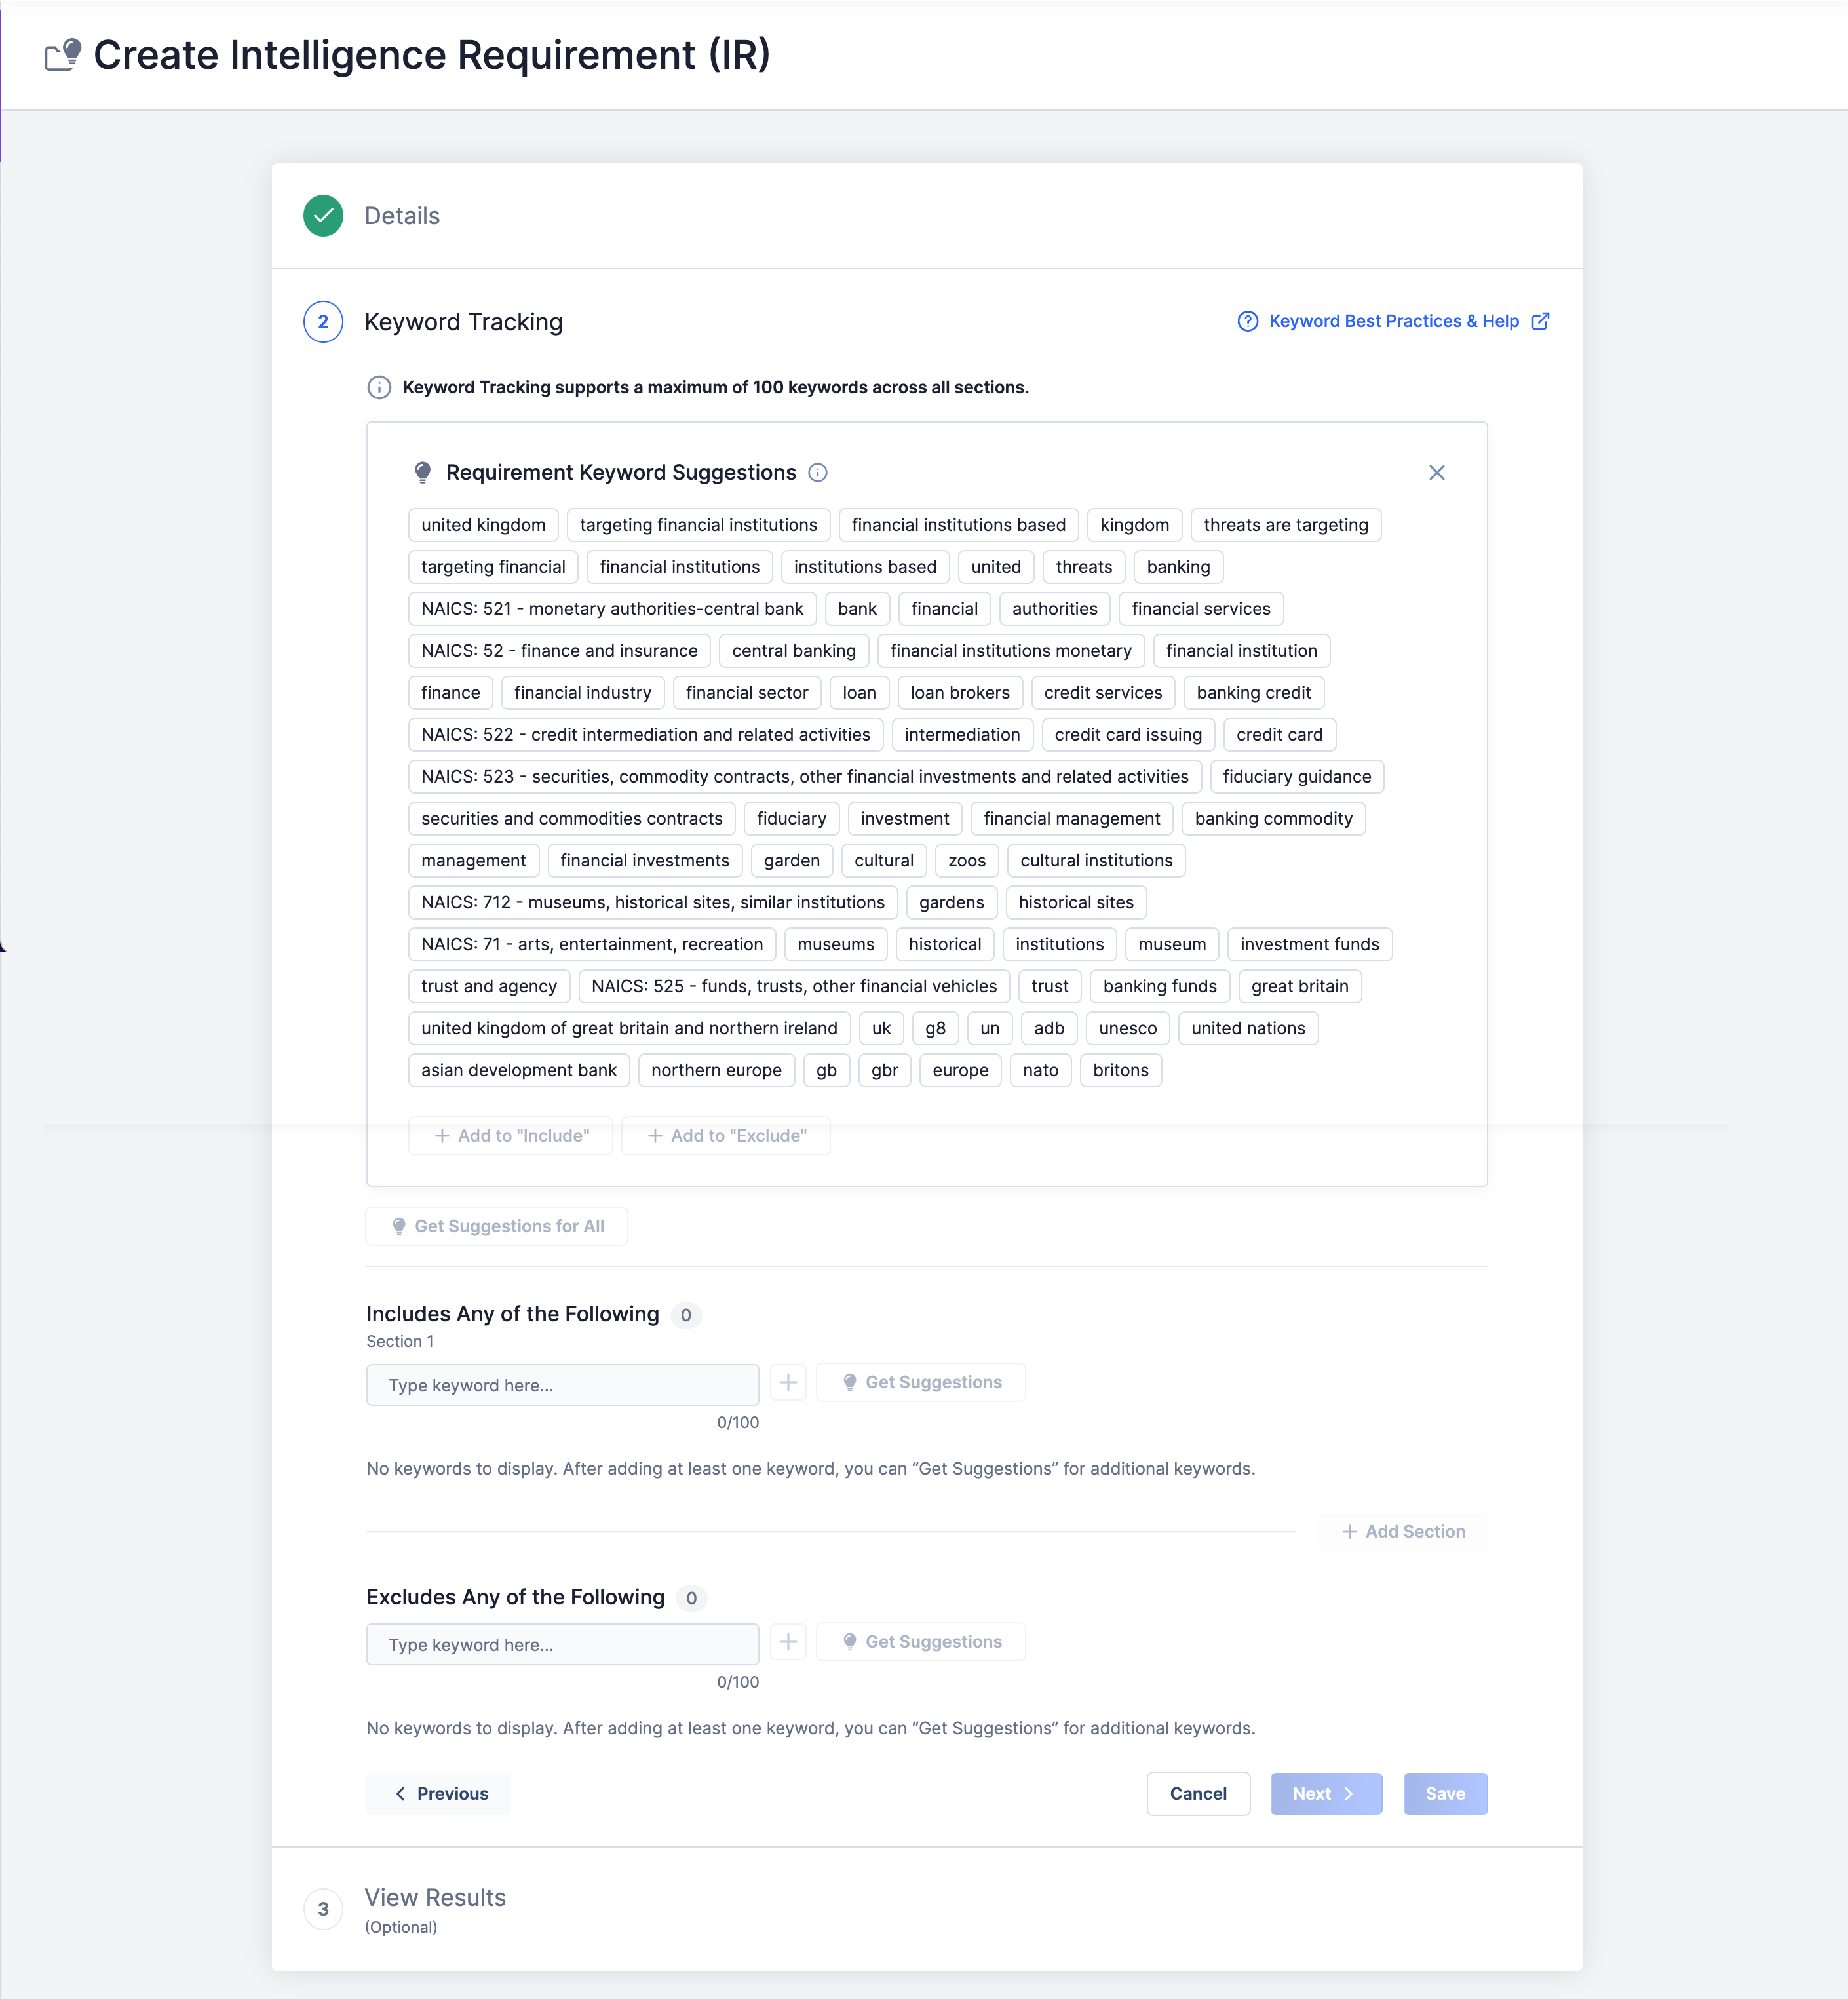
Follow these steps to fill out the fields on the Keyword Tracking step and configure your IR query logic:
- Add at least one keyword to the Includes Any of the Following section.
- (Optional) Click + Add Section to add another Includes Any of the Following section, and then add at least one keyword to that section. This step may be repeated as desired.
- (Optional) Add one or more keywords to the Excludes Any of the Following section.
- Click Next to proceed to the View Results step (optional), or click Save to create the IR and view its Details screen.
IR Query Logic
You will build the query by defining one or more sets of keywords to include and, optionally, a single set of keywords to exclude. Each set of keywords to include is defined in an Includes Any of the Following section, where all keywords in that section are joined together using “OR” logic. If you have multiple Includes Any of the Following sections, the sections themselves are joined together using “AND” logic. Finally, a single set of keywords to exclude is defined in the Excludes Any of the Following section, where all keywords in that section are joined together using “OR” logic. The portion of the query in the Excludes Any of the Following section is joined to the rest of the query using “AND NOT” logic. See Best Practices: Keywords for Intelligence Requirements for more details and an example demonstrating the query logic.
Add Keywords
The Requirement Keyword Suggestions section displays keyword suggestions based on the text you entered in the Requirement field on the Details step (“What threats are targeting financial institutions based in the United Kingdom?” in the example in Figure 2). These suggestions are potential aliases for keywords recognized in the Requirement field based on geography, industry, MITRE ATT&CK® tactics and techniques, intrusion sets, tools, and malware families.
Industry-based keyword suggestions include North American Industry Classification System (NAICS) codes and their associated descriptions, such as NAICS: 521 – monetary authorities-central bank and NAICS: 52 – finance and insurance in Figure 2. When you include a NAICS keyword suggestion in your query, the results of your IR will include the following:
- The standard Tag for that NAICS code in the CAL Automated Threat Library Source and other feeds that leverage NAICS codes in ThreatConnect;
- The standard Tags for available NAICS subsector (three-digit) codes in the CAL Automated Threat Library Source if the selected keyword suggestion is a two-digit code (e.g., if you select NAICS: 52 – finance and insurance, then the Tags for that code’s subsectors—521, 522, 523, 524, and 525—will also be included); and
- CAL ATL Report Groups that have CAL ATL industry classification Tags corresponding to the keyword suggestion, representing a set of Reports broadly associated with the industry term that you can investigate (Global results only).
For more information on the use of NAICS codes in CAL ATL, see the “How Are ATL Reports Classified by Industry?” section of CAL ATL Industry Classification. For more information on NAICS codes in IR keyword suggestions, see the “Intelligence Requirements” section of CAL ATL Industry Classification.
Select keywords from the Requirement Keyword Suggestions section and then click + Add to “Include” or + Add to “Exclude” at the bottom of the section to add them to an Includes Any of the Following section or the Excludes Any of the Following section, respectively. When a keyword is added to one of these sections, it will be removed from the Requirement Keyword Suggestions section. You can also add keywords manually by entering the keyword in the Type keyword here… box under the section header and then clicking +.
Figure 3 shows an Includes Any of the Following section with three keywords added.

After you have added keywords to a section, you can click Get Suggestions in that section to retrieve a set of keyword suggestions based only on the keywords added to that section.
Step 3: View Results for the IR (Optional)
Clicking Next on the Keyword Tracking step will display the View Results step (Figure 4). This step is where you can view a preliminary set of Artifacts, Cases, Groups, Indicators, Tags, and Victims in your ThreatConnect owners (Local)and the ThreatConnect Global Intelligence Dataset (Global) that the keyword query returned. The total number of results of the selected type (Local or Global) is displayed to the right of the Results heading.
The preliminary set of Local results includes the 500 most relevant results in your owners sorted based on how closely they match the IR’s keyword query. The preliminary set of Global results includes the 500 most relevant results in the ThreatConnect Global Intelligence Dataset based on CAL keyword matches and associations, excluding Indicator results with a CAL score below 150.

- Local: Select this option to view query results in your Organization, Communities, and Sources. When searching for local results, the query searches everything you have access to in your ThreatConnect owners, including all Attributes, Tags, names/summaries of objects, and the contents of files attached to Report and Document Groups. Click a result’s name to view its Details screen. Click a result’s row to see its Result Details drawer, which displays the date and time that the result matched the query and highlights the text in the result that matched one or more of the query keywords.NoteThe Result Details drawer is not available for Tags.
- Global: Select this option to view query results in the ThreatConnect Global Intelligence Dataset. If you have access to the CAL Automated Threat Library Source and a global result exists in that Source, you can click its name to view its Details screen. Click a result’s row to see its Result Details drawer, which displays the date and time that the result matched the query and highlights the text in the result that matched one or more of the query keywords.NoteThe Result Details drawer is not available for Tags.NoteIndicators with a CAL score of 150 or lower will not be included in the global results.
Click the Save button to create the IR and view its Details screen.
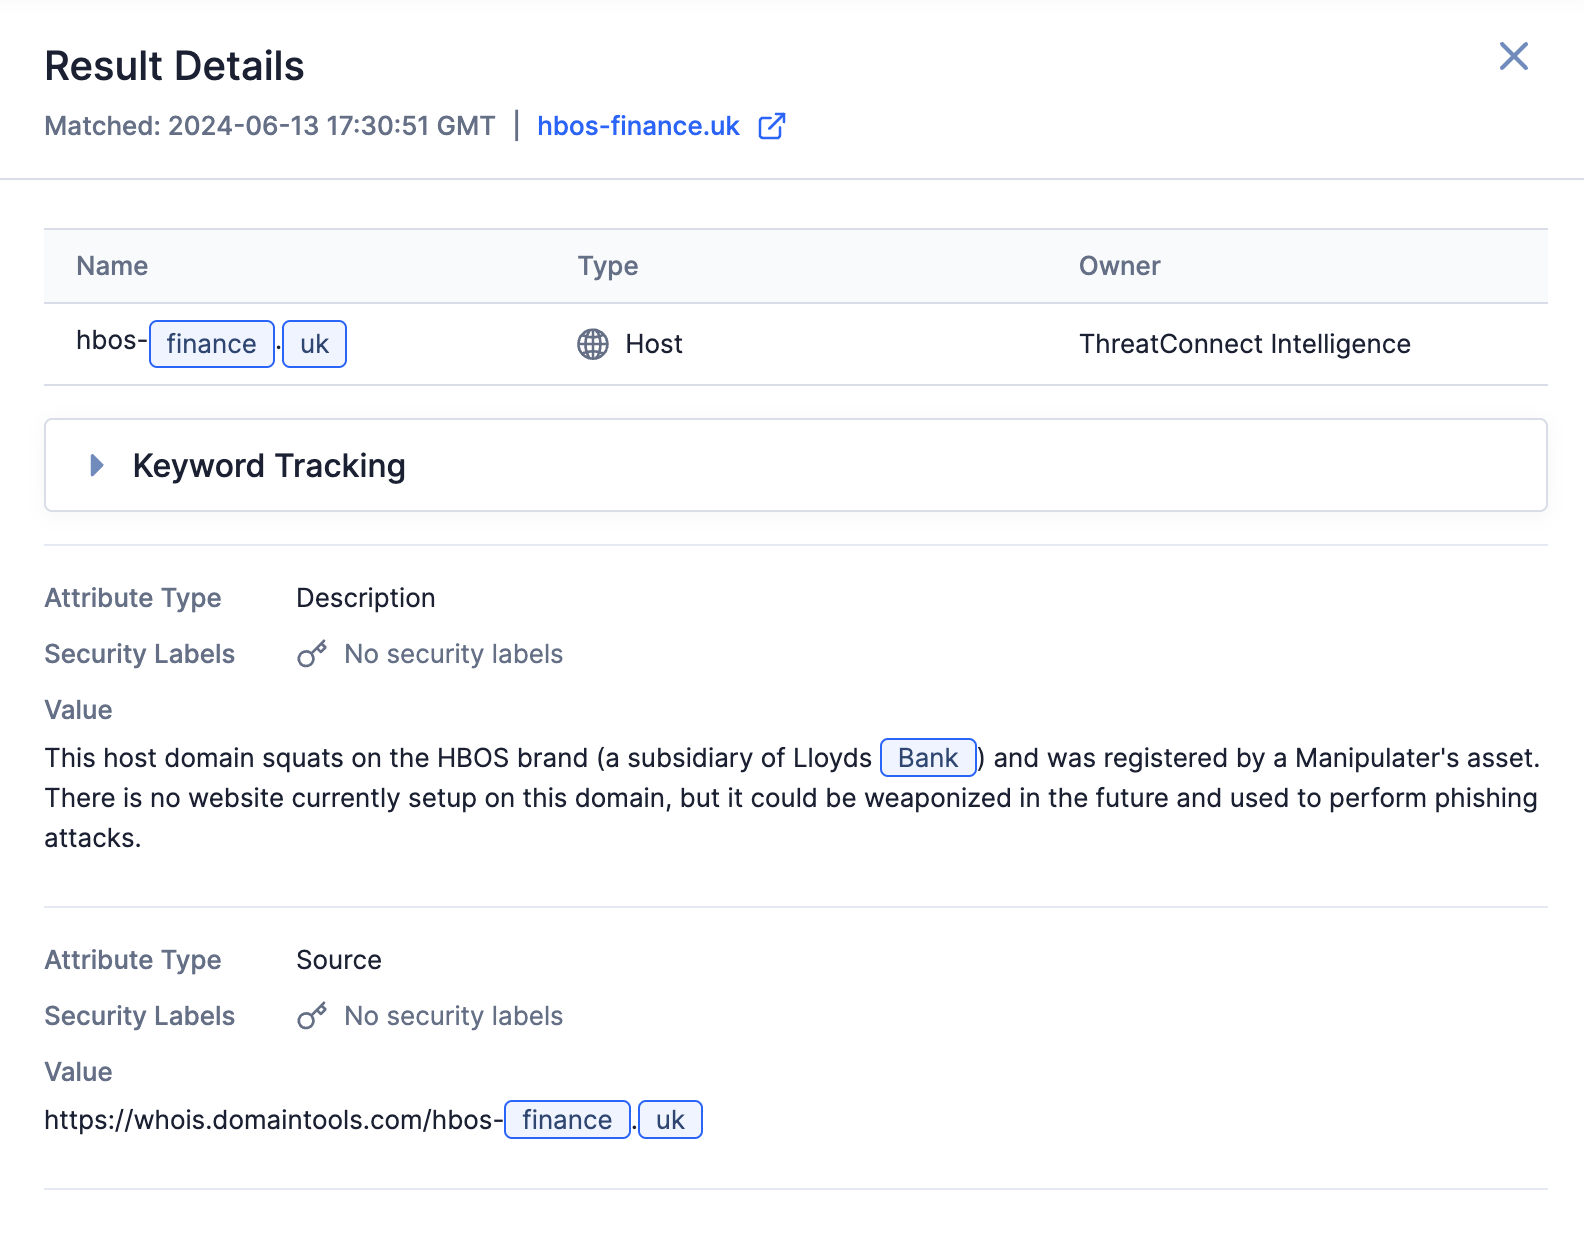
Result Details Drawer
The Result Details drawer highlights the fields or other information in a result that matched one or more query keywords, as well as the date and time that the result was matched. For example, in Figure 5, the highlighted words in the result’s name, the Description Attribute, and the Source Attribute are matches to three of the query keywords (finance, uk, and bank). Expand the Keyword Tracking section to view the IR’s query keywords.
ThreatConnect® is a registered trademark, and CAL™ is a trademark, of ThreatConnect, Inc.
MITRE ATT&CK® and ATT&CK® are registered trademarks of The MITRE Corporation.
20159-05 v.04.A