Overview
Tags are data objects in ThreatConnect® that you can apply to Indicators, Groups, Victims, and Workflow Cases. They create associations between the data they are applied to, as well as a path from one intelligence item to another. Tagging is a powerful and easy way to add metadata to an object, allowing you to quickly identify or follow associated activities of a particular interest within your ThreatConnect owners. Currently, there are two types of Tags you can apply to objects: standard Tags and ATT&CK® Tags.
This article describes how to manage Tags for Indicators, Groups, and Victims. For instructions on managing Tags for Cases, see the “Tags” section of Case Details.
Before You Start
User Roles
- To manage Tags for Indicators, Groups, and Victims in an Organization, your user account must have an Organization role of Standard User, Sharing User, Organization Administrator, or App Developer.
- To manage Tags for Indicators, Groups, and Victims in a Community or Source, your user account must have a Community role of Contributor, Editor, or Director for that Community or Source.
Prerequisites
- To display the Tags Across Owners card on the Details screen for Indicators, turn on the multiSourceViewEnabled system setting (must be a System Administrator to perform this action).
Best Practices
Each owner in ThreatConnect has different concerns and therefore different uses for Tags. Creating and following a tagging policy for all objects within an owner enables you to categorize, connect, and identify data more efficiently. This section provides some best practices for creating a tagging policy.
- Create well-thought-out Tags that meet an agreed-upon standard within the owner.
- Add a description to all Tags, unless the Tags are self-explanatory.
- Create Tags that are clear and concise, with no grammatical or spelling errors.
- Review all Tags to ensure uniqueness.
- Define when the use of acronyms is allowed (e.g., APT vs. Advanced Persistent Threat), particularly for words that have commonly used acronyms.
- Capitalize all Tags that are acronyms (e.g., APT instead of apt).
- Use the proper case in all Tags (e.g., Trojan RAT instead of trojan rat).
- Make sure that Tags that have been shared between owners or that are applied to objects that have been shared between owners have matching configurations.
- Keep Tags updated to reflect analytical or context changes. Maintenance of Tags is key to keeping data accurate and relevant.
- Configure Tag normalization rules to convert Tags using “like terms” to a single main Tag. For instance, creating a Tag normalization rule that converts Tags named APT-28, Fancy Bear, and Threat Group-4127 to a main Tag named APT28 helps ensure all analysts are tagging data related to APT28 uniformly.
- Use ATT&CK Tags to identify techniques and sub-techniques used by a particular adversary or threat actor, and leverage ATT&CK Tag conversion rules to convert standard Tags into ATT&CK Tags based on whether they exactly or approximately match a specific ATT&CK Tag.
Viewing Tag Details
On the Browse screen, you can view and filter Tags by selecting Tags in the menu on the left side of the screen. You can also access a Tag’s Details drawer or legacy Details screen, both of which display the Indicators, Groups, and Victims to which the Tag is applied and provide the ability to view the Tag in Threat Graph.
Applying Tags to an Object
New Details Screen
On the new Details screen for Groups, you can apply Tags to a Group on the Details card. On the new Details screen for Indicators, you can apply Tags to an Indicator on either the Tags Across Owners card (if the multiSourceViewEnabled system setting is turned on) or the Details card (if the multiSourceViewEnabled system setting is turned off).
Tags Across Owners Card
The Tags Across Owners card shows all Tags applied to the Indicator you are viewing in all of the Indicator’s owners to which you have access, letting you quickly contextualize an Indicator without having to open the Indicator’s Details screen or drawer in each owner. To use this feature, your System Administrator must turn on the multiSourceViewEnabled system setting. Otherwise, the Tags applied to the Indicator will be displayed on the Details card, and they will be the Tags applied to the Indicator only in the owner listed at the top left of the Details screen.
The following steps describe how to apply Tags to an Indicator on the Tags Across Owners card of the new Details screen. This card is available on the Overview tab, and it can be added to the Indicator: Custom View tab.
- Navigate to the Details screen for an Indicator.
- Click Edit
 to the right of an owner’s name, or click on the list of Tags under an owner’s name, on the Tags Across Owners card. The Tags applied to the Indicator in the selected owner will now be editable (Figure 1). Depending on the number of owners the Indicator exists in, you may need to click Show More at the bottom of the Tags Across Owners card to display all of the Indicator’s owners on the card.
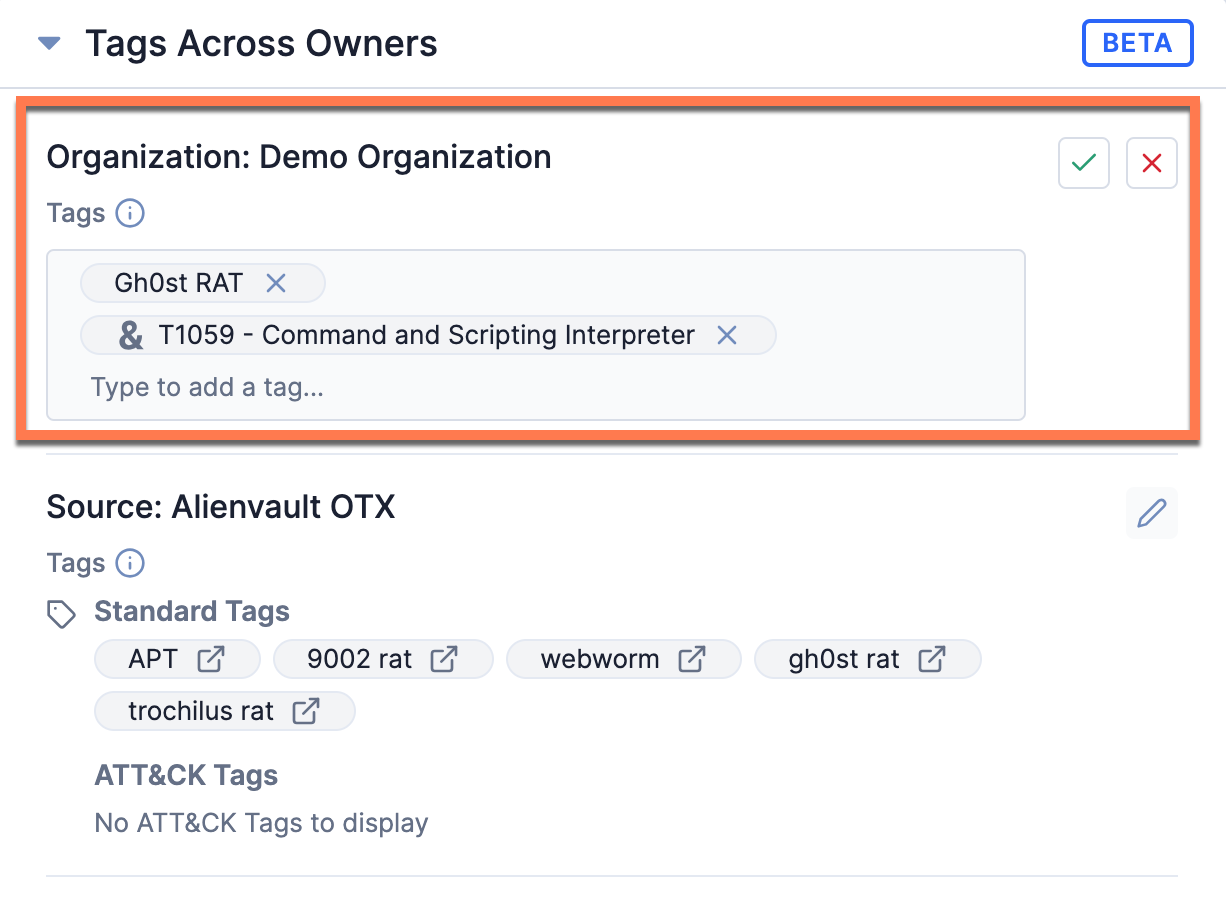 NoteTags without an icon to the left of their name are standard Tags that have not been normalized to a main Tag through a Tag normalization rule. Tags with the
 icon are main Tags–that is, standard Tags for which a normalization rule has been enabled so that Tags defined as synonymous to the main Tag are converted to the main Tag when applied to an object. Tags with the
 icon are ATT&CK Tags.
 - Begin entering text into an owner’s Tags text box on the Tags Across Owners card. As you type, one of the following menus will be displayed:
- If there are existing standard Tags or ATT&CK Tags that match part or all of the entered text, a menu containing those Tags listed under Standard Tags and ATT&CK Tags headings, respectively, will be displayed. Select a Tag from the menu to add it to the text box.
- If there are no existing Tags that match the entered text, a menu with the + Add “<entered text>” as a new tag option will be displayed. Select this option to create a new Tag that matches the entered text and add it to the text box.
- Click Confirm
 to the right of an owner’s name on the Tags Across Owners card to apply Tags to the Indicator in that owner.
Details Card
The following steps describe how to apply Tags to a Group or Indicator on the Details card of the new Details screen. This card is available on the Overview tab, and it can be added to a Custom View tab.
- Navigate to the Details screen for an Indicator or Group.ImportantThe new Details screen is not currently available for Email, Signature, and Task Groups and for Victims. As such, you can apply Tags to these object types on the legacy Details screen only.
- Click Editat the lower-right corner of the Details card, or click on the list of Tags on the Details card. The object’s Tags will now be editable (Figure 2).
 NoteTags without an icon to the left of their name are standard Tags that have not been normalized to a main Tag through a Tag normalization rule. Tags with theicon are main Tags–that is, standard Tags for which a normalization rule has been enabled so that Tags defined as synonymous to the main Tag are converted to the main Tag when applied to an object. Tags with theicon are ATT&CK Tags.
 - Begin entering text into the Tags text box on the Details card. As you type, one of the following menus will be displayed:
- If there are existing standard Tags or ATT&CK Tags that match part or all of the entered text, a menu containing those Tags listed under Standard Tags and ATT&CK Tags headings, respectively, will be displayed. Select a Tag from the menu to add it to the text box.
- If there are no existing Tags that match the entered text, a menu with the + Add “<entered text>” as a new tag option will be displayed. Select this option to create a new Tag that matches the entered text and add it to the text box.
- Click Confirmto the right of the Tags text box on the Details card.
Legacy Details Screen
The following steps describe how to apply Tags to a Group, Indicator, or Victim on the Tags card of the legacy Details screen.
- Navigate to the legacy Details screen for an Indicator, Group, or Victim.
- Scroll down to the Tags card on the right side of the screen (Figure 3).
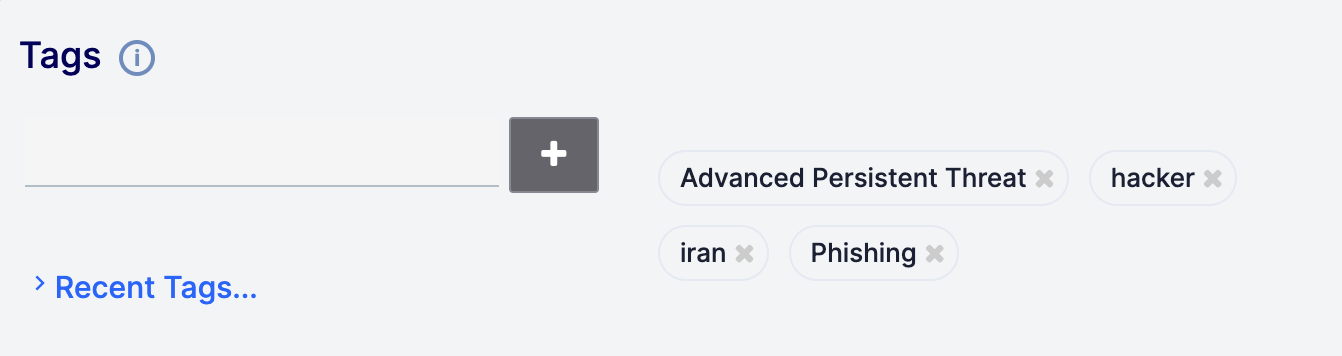
- Begin entering text into the text box. If there are existing Tags that match part or all of the entered text, a menu with those Tags will be displayed. Select a Tag from the menu to apply it to the object. If there are no existing Tags that match the entered text, click Add
 or press Enter on your keyboard to create a new Tag and apply it to the object.
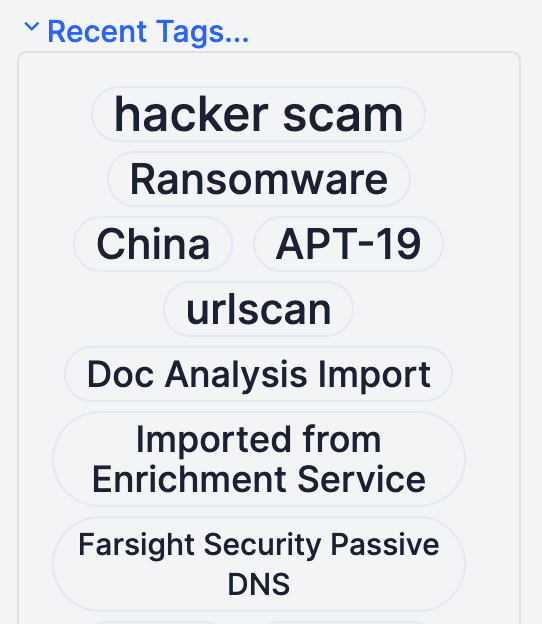
 - (Optional) Click Recent Tags… to display a list of recently used Tags (Figure 4). Tags displayed in this list are sized and ordered according to how recently or how often they were used. If desired, select a Tag from the list to apply it to the object.
Removing Tags From an Object
New Details Screen
Tags Across Owners Card
If an Indicator’s Details screen includes the Tags Across Owners card, you can remove Tags from the Indicator while the Tags applied to the Indicator in a given owner are editable (Figure 1). To remove a Tag, click Remove to the right of the Tag, and then click Confirmto the right of the owner’s name on the Tags Across Owners card.
Details Card
You can remove Tags from an object when the Tags section of the Details card is editable (Figure 2). To remove a Tag, click Removeto the right of the Tag, and then click Confirmto the right of the Tags text box on the Details card.
Legacy Details Screen
Tags applied to an object are displayed on the right side of the Tags card (Figure 3). To remove a Tag from an object, click Remove to the right of the Tag, and then click YES on the Remove Tag window.
ThreatConnect® is a registered trademark of ThreatConnect, Inc.
MITRE ATT&CK® and ATT&CK® are registered trademarks of The MITRE Corporation.
20024-01 v.11.A