Overview
The Case Details card, located at the top right of a Workflow Case, displays important details about the Case, including time-based information related to the Case, Tags that have been applied to the Case, and a description of the Case. This article describes the elements included in the Case Details card, as well as how to update each element.
Before You Start
| Minimum Role(s) |
|
|---|---|
| Prerequisites |
|
Case Details Card
Figure 1 shows an example of a Case Details card for a Workflow Case.
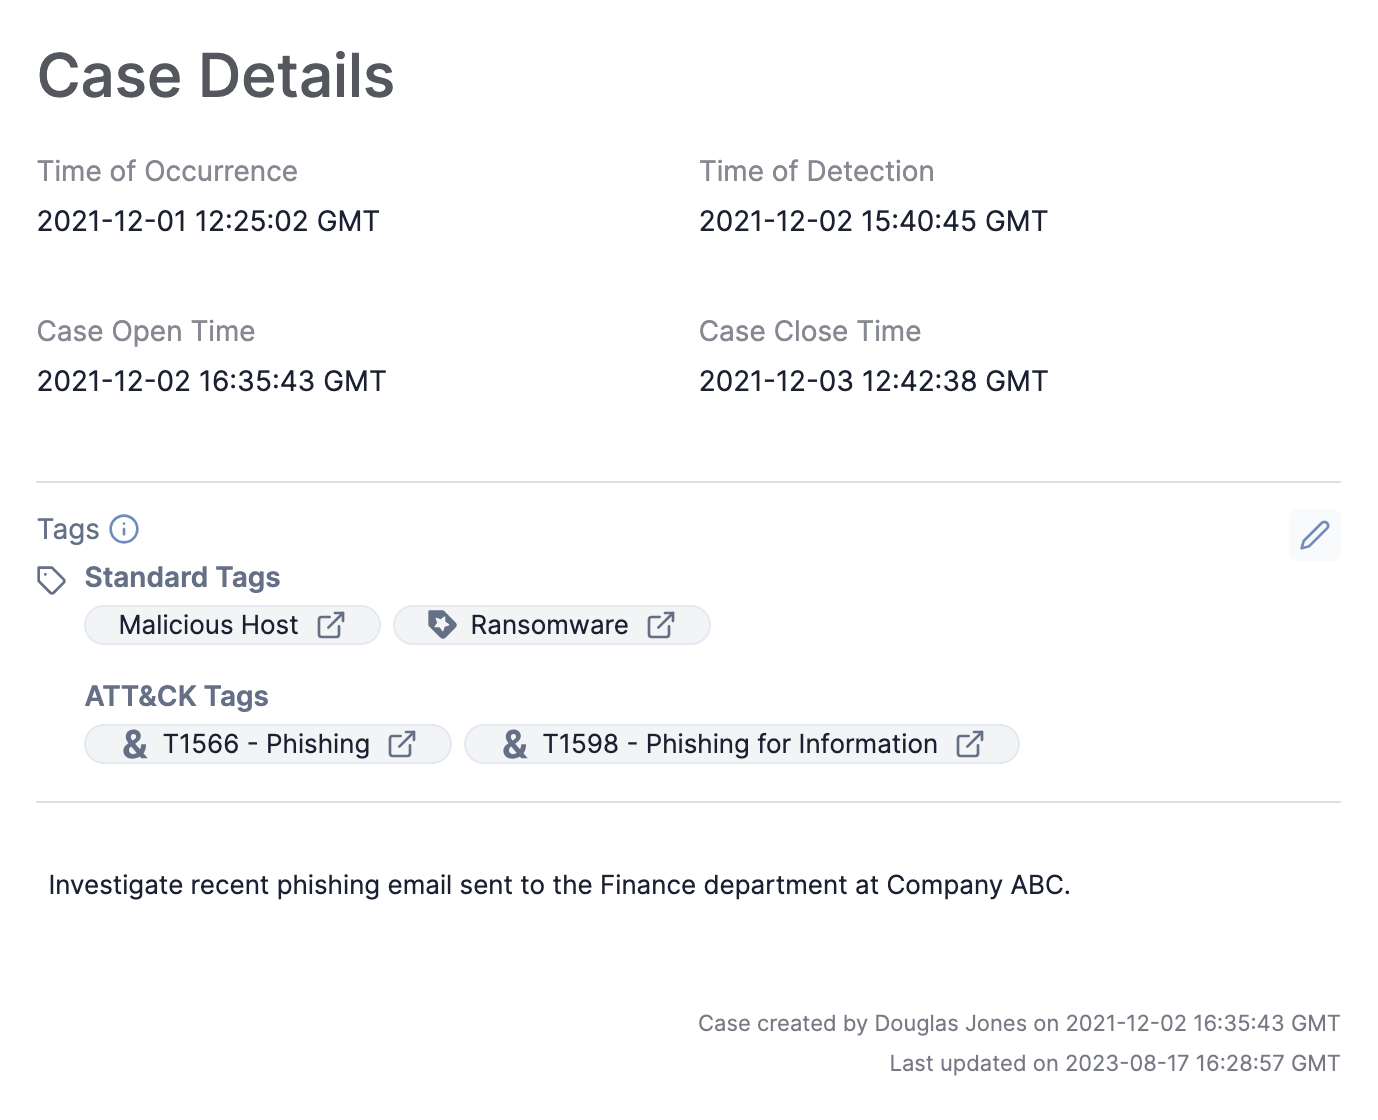
- Time of Occurrence: The date and time when a security incident or threat occurred.
- Time of Detection: The date and time when a security incident or threat was detected (e.g., by a security team).
- Case Open Time: The date and time when the Case was opened.
- Case Close Time: The date and time when the Case was closed.
- Tags: A list of standard Tags and ATT&CK® Tags applied to the Case. These are the same Tag objects used throughout ThreatConnect®.
- Description: A description of the Case.
The four time-based elements (Time of Occurrence, Time of Detection, Case Open Time, and Case Close Time) are used to calculate the Mean Time to Detection (MTTD), MTTD Average, Mean Time to Resolution (MTTR), and MTTR Average Cases metrics dashboard cards.
Time of Occurrence
To set or update a Case's Time of Occurrence, hover over the Time of Occurrence label and then click Edit . A date and time selector will be displayed (Figure 2).
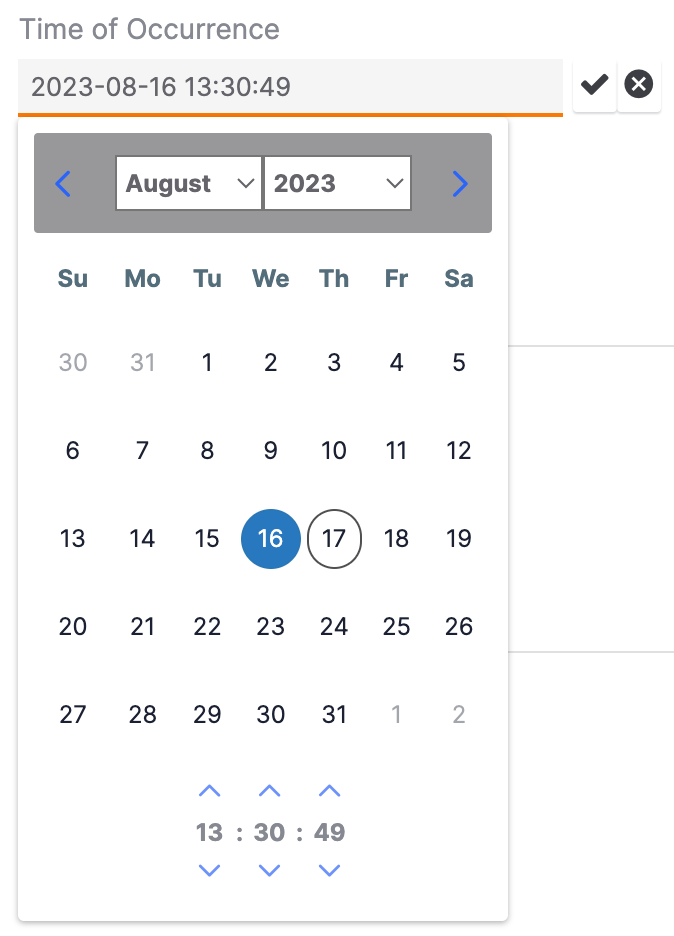
- Select the desired date and time.
- Click Save
 to save your changes.
Time of Detection
To set or update a Case's Time of Detection, hover over the Time of Detection label, click Edit to display a date and time selector similar to the one in Figure 2, select the desired date and time, and then click Save.
Case Open Time
A Case's Case Open Time is set whenever the Case is created. If a Case is closed and re-opened at a later time, its Case Open Time will reflect the date and time that it was first opened, not the date and time that it was re-opened. You can update a Case's Case Open Time, which is helpful in situations such as when a Case is opened on a Friday evening, but is not worked on until the following Monday.
To update a Case's Case Open Time, hover over the Case Open Time label, click Editto display a date and time selector similar to the one in Figure 2, select the desired date and time, and then click Save.
Case Close Time
A Case's Case Close Time is set whenever the Case is closed. If a Case is closed and re-opened at a later time, its Case Close Time will no longer have a value assigned to it. If the Case is closed again, its Case Close Time will reflect the new date and time that it was closed. While a Case is open, you cannot set or update its Case Close Time; however, you can do so once the Case is closed.
To update a closed Case's Case Close Time, hover over the Case Close Time label, click Editto display a date and time selector similar to the one in Figure 2, select the desired date and time, and then click Save.
Tags
To apply Tags to a Case, click Edit in the Tags section of the Case Details card, or click on the Tags section. The Case's Tags will now be editable (Figure 3).
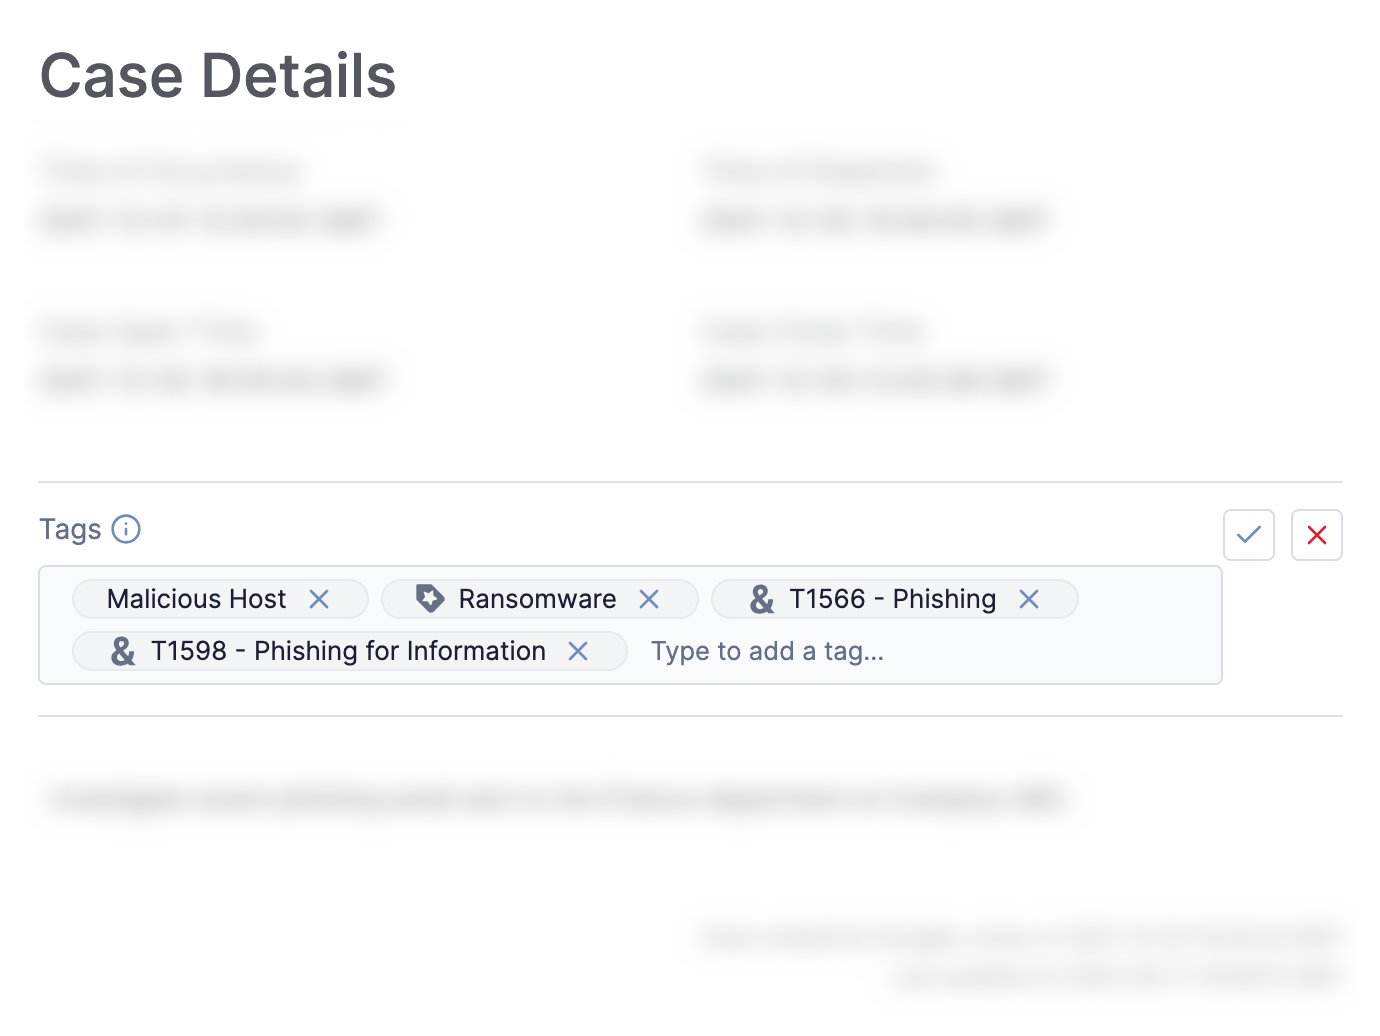
 icon are main Tags–that is, standard Tags for which a normalization rule has been enabled so that Tags defined as synonymous to the main Tag are converted to the main Tag when applied to an object. Tags with an
 icon are ATT&CK Tags.
- Begin entering text into the text box. As you type, one of the following menus will be displayed:
- If there are existing standard Tags or ATT&CK Tags that match part or all of the entered text, a menu containing those Tags listed under Standard Tags and ATT&CK Tags headings, respectively, will be displayed. Select a Tag from the menu to add it to the text box.
- If there are no existing Tags that match the entered text, a menu with the + Add “<entered text>” as a new tag option will be displayed. Select this option to create a new Tag that matches the entered text and add it to the text box.
- Click the Confirm
 button to the right of the text box to apply the Tag(s) to the Case.
If you created a new Tag that matches a synonymous Tag listed in a Tag normalization rule, it will be converted to the main Tag listed in the rule. Similarly, if you created a new Tag that matches an ATT&CK Tag, it will be converted to that ATT&CK Tag.
Description
To edit a Case's description, hover over the Description section and click Edit at the upper-left corner of the text box. The Case’s description will now be editable (Figure 4).
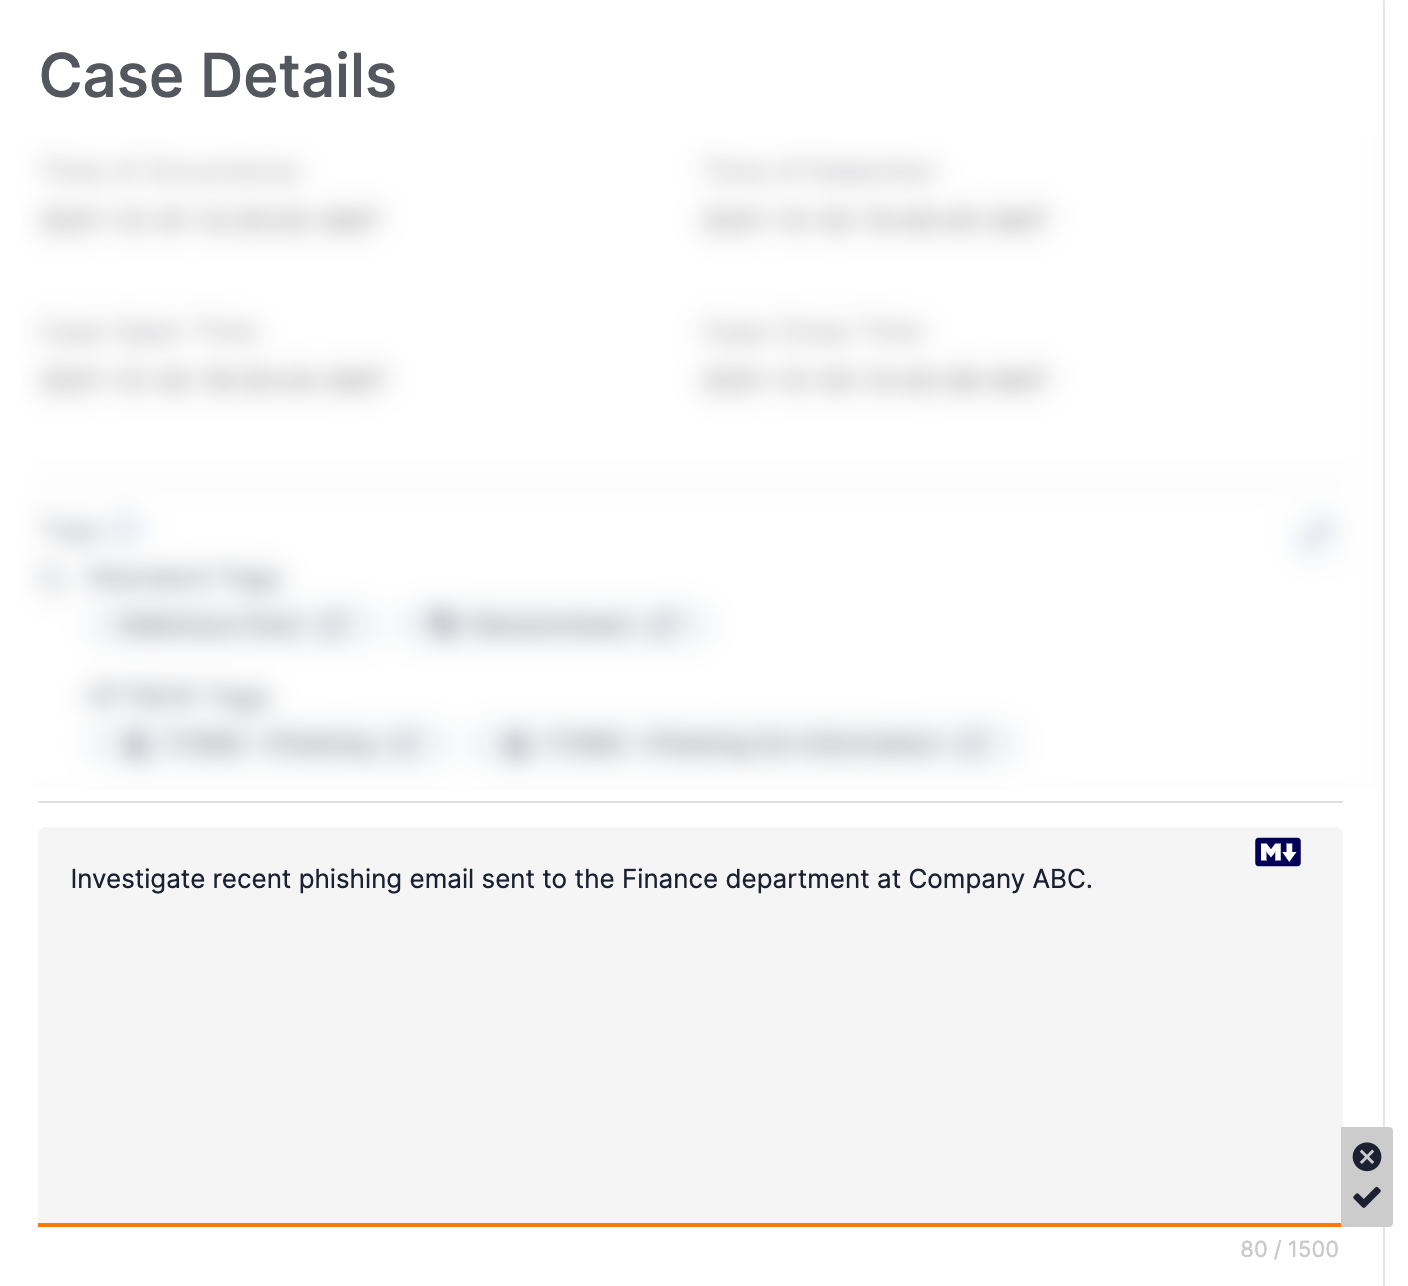
- Make any desired changes to the Case's description.
- Click Save
 to save your changes.
ThreatConnect® is a registered trademark of ThreatConnect, Inc.
MITRE ATT&CK® and ATT&CK® are registered trademarks of The MITRE Corporation.
20126-01 v.02.A