- 08 Feb 2024
- 9 Minutes to read
-
Print
-
DarkLight
-
PDF
Potential Associations Card for Cases
- Updated on 08 Feb 2024
- 9 Minutes to read
-
Print
-
DarkLight
-
PDF
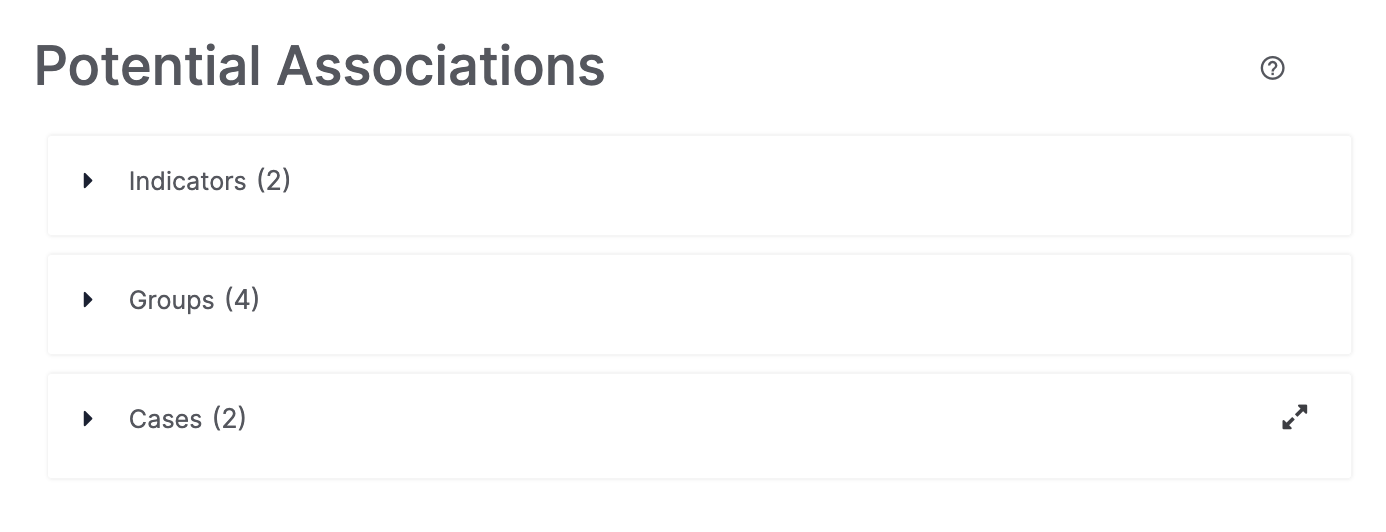
Figure 1 shows an example of the Potential Associations card for a Case, which is located below the Associations card on the right side of the screen displaying the Case. You can collapse and expand the Potential Associations card by clicking anywhere at the top of the card.

Hovering over the tooltip at the upper-right corner of the Potential Associations card will display an overview of where Organization Administrators can enable Indicators and Groups in a Community or Source to be populated in the Potential Associations card for Cases. For further instruction on enabling this feature, see the “View and Manage Community and Source Membership” section of ThreatConnect Organization Administration Guide.
Indicators
The Indicators section of the Potential Associations card displays Indicators that meet one of the following conditions, depending on how your System Administrator configured potential associations for your ThreatConnect instance:
- The Indicator matches the type and summary of a Case Artifact that has its Use to potentially associate cases. checkbox selected. Indicators that meet this condition will be suggested as associations only if your System Administrator set the potential associations system setting to Matched.
- The Indicator is associated to a Group associated to the Case. Indicators that meet this condition will be suggested as associations only if your System Administrator set the potential associations system setting to Associated.
Viewing Potentially Associated Indicators
Expand the Indicators section to display all Indicators being suggested as associations to the Case (Figure 2). Indicators that are marked as inactive or false positive will not be suggested as potential associations to the Case.

Each Indicator’s type, CAL™ and ThreatAssess scores, Indicator Status, and creation date will be displayed in the table. To view the owner(s) to which the Indicator belongs, click the icon to the right of its summary.
Viewing Indicator Details
Select an owner in the dropdown to display the Details drawer for the Indicator in that owner. You can also click the link in the Summary column or select Details from the vertical ellipsis to the right of an Indicator’s table entry to display the Details drawer for the Indicator in the owner listed at the top of the
 dropdown.
Creating an Association
To associate an Indicator to the Case, select Add Association from the vertical ellipsis to the right of the Indicator’s table entry. The Indicator will be removed from this section and added to the Indicators section of the Case’s Associations card. If at any point the Indicator is dissociated from the Case, it will be readded to the Indicators section of the Potential Associations card.
Groups
The Groups section of the Potential Associations card displays Groups that meet one or both of the following conditions, depending on how your System Administrator configured potential associations for your ThreatConnect instance:
- The Group is associated to an Indicator that matches the type and summary of a Case Artifact that has its Use to potentially associate cases. checkbox selected. Groups that meet this condition will be suggested as associations only if your System Administrator set the potential associations system setting to Matched or Both.
- The Group is associated to an Indicator associated to the Case. Groups that meet this condition will be suggested as associations only if your System Administrator set the potential associations system setting to Associated or Both.
Viewing Potentially Associated Groups
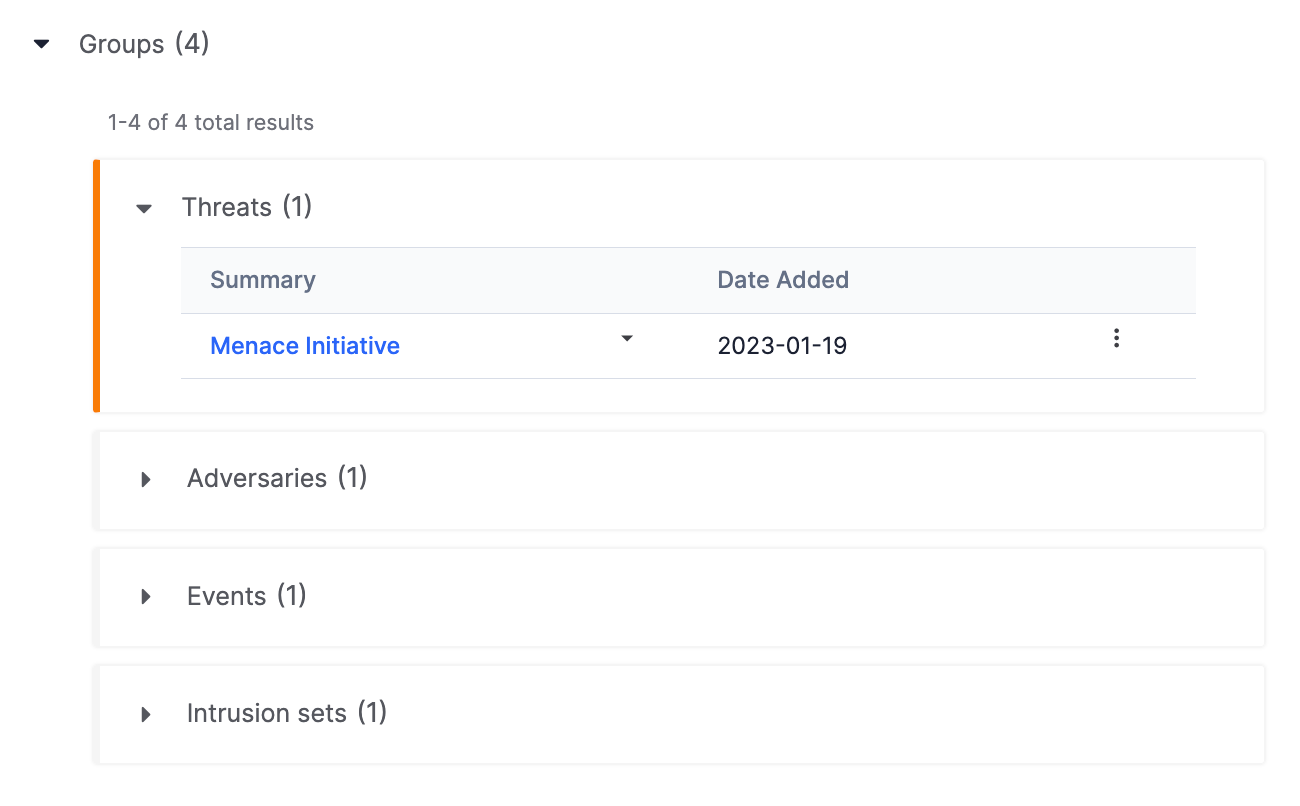
Expand the Groups section to display all Groups, categorized by type, being suggested as associations to the Case (Figure 3). When a Group type’s section is expanded, the summary and creation date for each Group of that type will be displayed.

Each Group’s creation date will be displayed in the table. To view the owner(s) to which the Group belongs, click the icon to the right of its summary.
Viewing Group Details
Select an owner in the dropdown to display the Details drawer for the Group in that owner. You can also click the link in the Summary column or select Details from the vertical ellipsis to the right of a Group’s table entry to display the Details drawer for the Group in the owner listed at the top of the
 dropdown.
Creating an Association
To associate a Group to the Case, select Add Association from the vertical ellipsis to the right of the Group’s table entry. All copies of the Group will be removed from this section and added to the Groups section of the Case’s Associations card. If at any point the Group is dissociated from the Case, all copies will be readded to the Groups section of the Potential Associations card.
Cases
The Cases section of the Potential Associations card displays Cases that share an Artifact with the Case you are viewing (i.e., both Cases contain an Artifact with the same summary and type). For these associations to be suggested, each copy of the shared Artifact must have its Use to potentially associate cases. checkbox selected.
Viewing Potentially Associated Cases
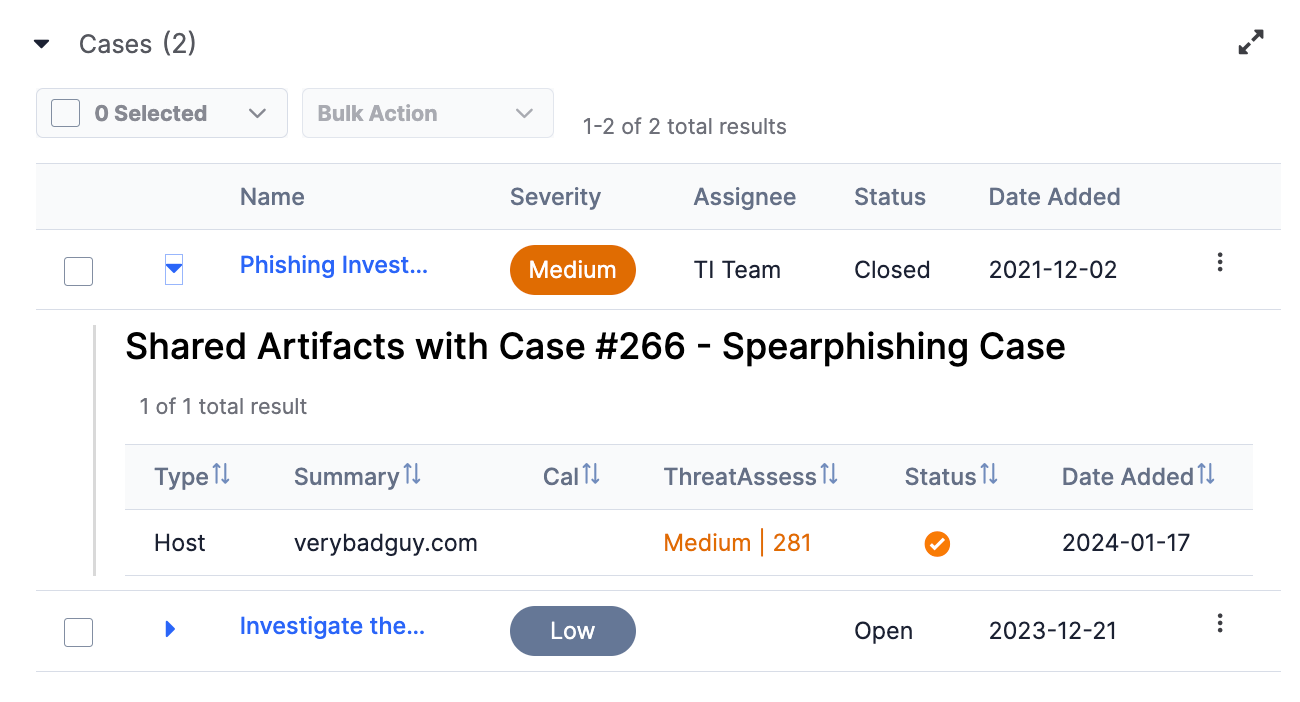
Expand the Cases section to display all Cases being suggested as associations to the Case you are viewing (Figure 4). Alternatively, click Expand![]() to display the Cases section in a full-screen view. To close the full-screen view, click Close
to display the Cases section in a full-screen view. To close the full-screen view, click Close![]() at the upper-right corner of the screen.
at the upper-right corner of the screen.

Viewing Case Details
Click a potentially associated Case’s name, or select Details from the vertical ellipsis to the right of a potentially associated Case’s table entry, to open the Case in a new browser tab.
Viewing Shared Artifacts
To view the Artifact(s) shared between the Case you are viewing and a potentially associated Case, click the icon to the left of the potentially associated Case’s name. A table listing each shared Artifact's type, summary, CAL and ThreatAssess scores, Indicator Status (for Artifacts that are ThreatConnect Indicator types), and creation date will be displayed (Figure 5).

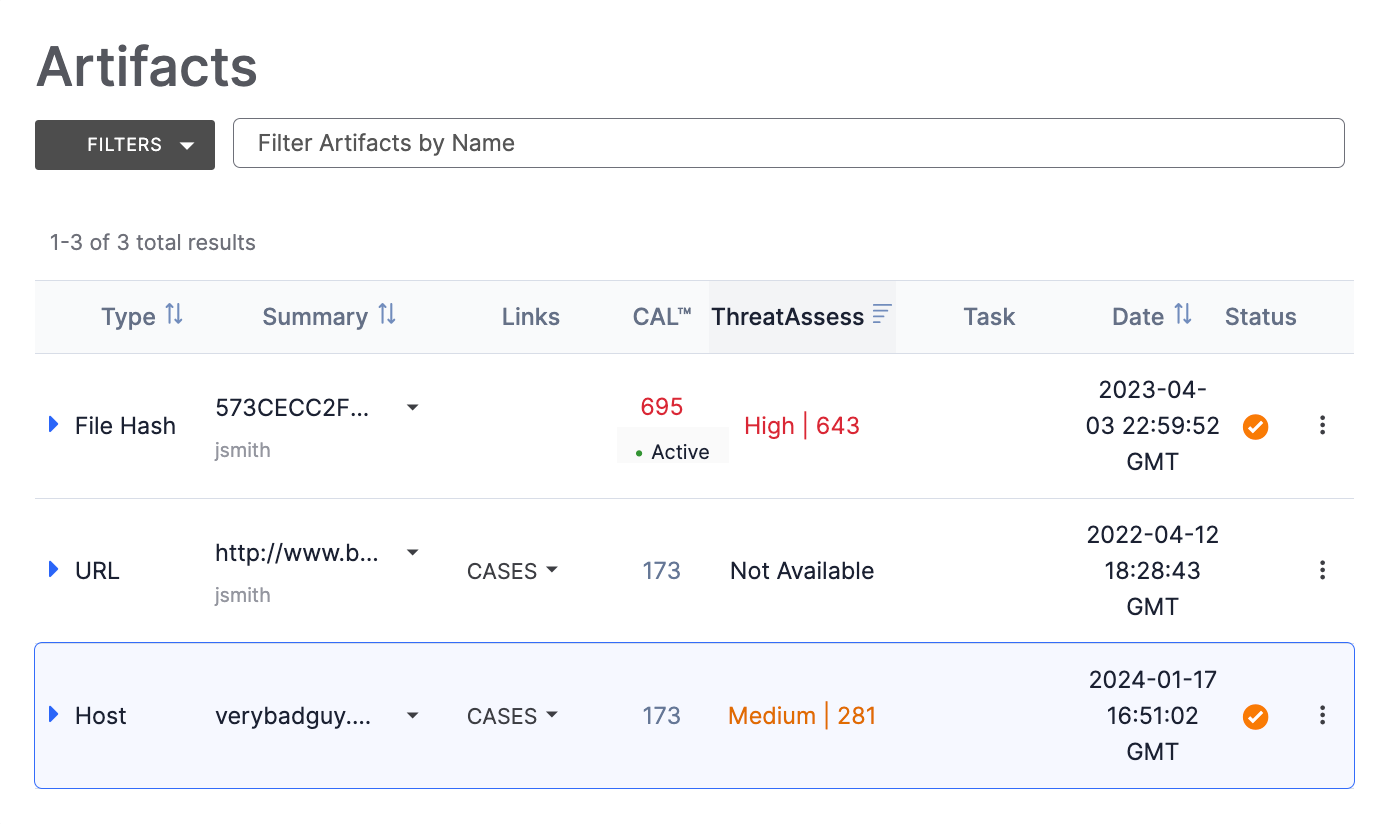
If you click a shared Artifact listed in this table (the verybadguy.com Host Artifact in this example), your browser will scroll down to the Case's Artifacts card and highlight the shared Artifact temporarily (Figure 6).

Creating an Association
To associate a potentially associated Case to the Case you are viewing, click the vertical ellipsis to the right of the potentially associated Case’s table entry and select Add Association. The potentially associated Case will be removed from this section and added to the Cases section of the Associations card for the Case you are viewing. Organization Administrators can also perform this action via the Bulk Action dropdown menu, as detailed in the “Performing Bulk Actions for Potentially Associated Cases” section.
If at any point the Case is dissociated from the Case you are viewing, it will be readded to the Cases section of the Potential Associations card.
Performing Bulk Actions for Potentially Associated Cases
Organization Administrators can perform bulk actions for potentially associated Cases via the Bulk Action dropdown menu.
Selecting Potentially Associated Cases
To perform bulk actions for potentially associated Cases, select the checkbox to the left of each desired Case’s name in the Cases section of the Potential Associations card (Figure 4). Each time you select the checkbox for a potentially associated Case, the number displayed in the Selected dropdown will update automatically to reflect the number of selected Cases.
To select or deselect multiple potentially associated Cases at once, click the Selected dropdown and select one of the following options:
- Select none (0 cases): Select this option to clear the checkboxes for all selected potentially associated Cases.
- Select page (<#> cases): If the table of potentially associated Cases is paginated, selecting this option will select all Cases displayed on the current page of the table. For example, if there are 12 potentially associated Cases and the table displays 10 Cases at a time, either 10 or 2 Cases will be selected, depending on which page of the table you are viewing when you select this option.NoteSelecting the checkbox to the left of the # Selected text in the Selected dropdown will also perform this type of selection.
- Select all (<#> cases): Select this option to select all potentially associated Cases.
Selecting Bulk Actions
When at least one potentially associated Case is selected, the Bulk Action dropdown will be enabled. This dropdown allows Organization Administrators to perform the following actions for one or more potentially associated Cases:
- Assignee: Select this option to change the assignee for the selected potentially associated Case(s).NoteWhen you assign a user to multiple Cases via a bulk action, they will receive a single notification in the Notifications Center that provides the number of Cases assigned to them via the bulk action and a link to view all open Cases assigned to them (e.g., “You have been assigned 3 cases. My Open Cases”). In addition, a single email that contains this information will be sent to the email address associated with their ThreatConnect user account unless they customized the settings for their Notifications Center so that they do not receive email notifications for actions related to Cases.
- Add Associations: Select this option to associate the selected potentially associated Case(s) to the Case you are viewing. The Case(s) will be removed from this section and added to the Cases section of the Associations card for the Case you are viewing.
- Resolution: Select this option to change the resolution for the selected potentially associated Case(s).
- Severity: Select this option to change the severity for the selected potentially associated Case(s).
- Status: Select this option to change the status for the selected potentially associated Case(s).
- Multiple Actions: This option allows you to change the assignee, resolution, severity, or status of the selected potentially associated Case(s) all at once. This functionality is useful when you want to change all or a subset of these options for multiple potentially associated Cases or a single potentially associated Case at once.NoteWhen you select the Assignee, Resolution, Severity, Status, or Multiple Actions options, you can create a Note that will be applied to the Case(s) upon which the action is to be performed.
After the selected action is performed, a message stating which action you performed and the number of Cases it affected (e.g., “Status changed to Open for 2 Cases”) will be displayed temporarily at the lower-left corner of the screen.
ThreatConnect® is a registered trademark, and CAL™ is a trademark, of ThreatConnect, Inc.
20124-03 v.06.A


