Overview
Each Indicator in ThreatConnect® has an Indicator Status that specifies whether the Indicator is active or inactive:
- Active: The Indicator is, or has the potential to be, an Indicator of Compromise (IOC) at the current time.
- Inactive: The Indicator is not currently an IOC, but is retained in ThreatConnect for recordkeeping purposes rather than being deleted. Inactive Indicators are not included in responses for requests to the ThreatConnect APIs.
Knowledge of whether an Indicator is active or not informs analysis and decision making and prevents you from wasting time and resources on Indicators that do not have any recent activity. Indicator Status can be set by ThreatConnect users (e.g., manually on a single Indicator; in bulk during Indicator import; via requests to the v3, V2, or V2 Batch API), automated operations (e.g., Playbooks or feeds), or processes (Indicator confidence deprecation or synchronization), or it can be determined by CAL™ (that is, updated to match the Indicator’s CAL Status, which is based on factors such as metadata and the Indicator’s CAL Global Threat Score).
When viewing an Indicator’s Details drawer or screen, you can see whether its status was set locally (i.e., by a ThreatConnect user or a ThreatConnect process) or determined by CAL. You can also view an Indicator’s activity log for details on the reason for a status change.
System Administrators can turn on a system-level status lock to prevent CAL and synchronization from determining Indicator Status on their ThreatConnect instance. Alternatively, they can turn on the owner-level status lock feature, which allows configuration of owner-level status locks that prevent CAL, synchronization, or both from changing Indicator Status for selected Indicator types in individual owners. In addition, ThreatConnect users can turn on a status lock that prevents CAL from changing Indicator Status for individual Indicators.
Before You Start
User Roles
- To view Indicator Status in an Organization, your user account can have any Organization role.
- To view Indicator Status in a Community or Source, your user account must have a Community role of User, Commenter, Contributor, Editor, or Director for that Community or Source.
- To set Indicator Status in an Organization, your user account must have an Organization role of Standard User, Sharing User, Organization Administrator, or App Developer.
- To set Indicator Status in a Community or Source, your user account must have a Community role of User, Commenter, Contributor, Editor, or Director for that Community or Source .
- To turn on or off the system-level status lock for synchronization and CAL on a ThreatConnect instance, your user account must have a System role of Administrator.
- To turn on or off the owner-level status lock feature for a ThreatConnect instance, your user account must have a System role of Administrator.
- To configure owner-level status locks for an Organization, your user account must have a System role of Administrator, Operations Administrator, or Accounts Administrator.
- To configure owner-level status locks for a Community or Source, your user account must have a System role of Administrator or Operations Administrator.
- To view whether there is a single-Indicator status lock for an Indicator in an Organization, your user account can have any Organization role.
- To view whether there is a single-Indicator status lock for an Indicator in a Community or Source, your user account must have a Community role of User, Commenter, Contributor, Editor, or Director for that Community or Source
- To configure a single-Indicator status lock for an Indicator in an Organization, your user account must have an Organization role of Standard User, Sharing User, Organization Administrator, or App Developer.
- To configure a single-Indicator status lock for an Indicator in a Community or Source, your user account must have a Community role of Editor or Director for that Community or Source.
- To configure a CAL status lock for a System Indicator confidence deprecation rule, your user account must have a System role of Administrator or Operations Administrator.
- To configure a CAL status lock for an Organization Indicator confidence deprecation rule in your home Organization, your user account must have an Organization role of Organization Administrator.
- To configure a CAL status lock for an Organization Indicator confidence deprecation rule in any Organization on your ThreatConnect instance, your user account must have a System role of Administrator, Operations Administrator, or Super User and an Organization role of Organization Administrator.
- To configure a CAL status lock for a Source Indicator confidence deprecation rule, your user account can have any System role except Read Only User and must have a Community role of Editor or Director in that Source.
- To view an Indicator’s activity log in an Organization, your user account can have any Organization role.
- To view an Indicator’s activity log in a Community or Source, your user account must have a Community role of User, Commenter, Contributor, Editor, or Director for that Community or Source.
Prerequisites
- To allow users in an Organization to set Indicator Status and configure single-Indicator status locks in any owner in which their System, Organization, or Community role gives them permission to do so, edit the Organization on the Organizations tab of the Account Settings screen and select the Allow users in this organization to change indicator status checkbox on the Permissions tab of the Organization Information window (must be a System Administrator, Operations Administrator, or Accounts Administrator to perform this action).ImportantThis setting applies to the ability of member users in an Organization to set Indicator Status and configure single-Indicator status locks in any owner, not to the ability of users to set Indicator Status and configure single-Indicator status locks in the Organization itself or any of the Communities and Sources it owns. For example, if the Allow users in this organization to change indicator status checkbox is cleared for Organization A and selected for Organization B, a Super User whose home Organization is Organization B (that is, they are a member of Organization B, not Organization A) can still set Indicator Status and configure single-Indicator status locks in Organization A. Similarly, if Organization A owns Community A, users in Organization A cannot set Indicator Status and configure single-Indicator status locks in Community A (or any other owner), but users in other Organizations that have the Allow users in this organization to change indicator status checkbox selected and are a member of Community A can set Indicator Status and configure single-Indicator status locks in Community A (as long as their Community role provides them with the permission to do so).
View Indicator Status
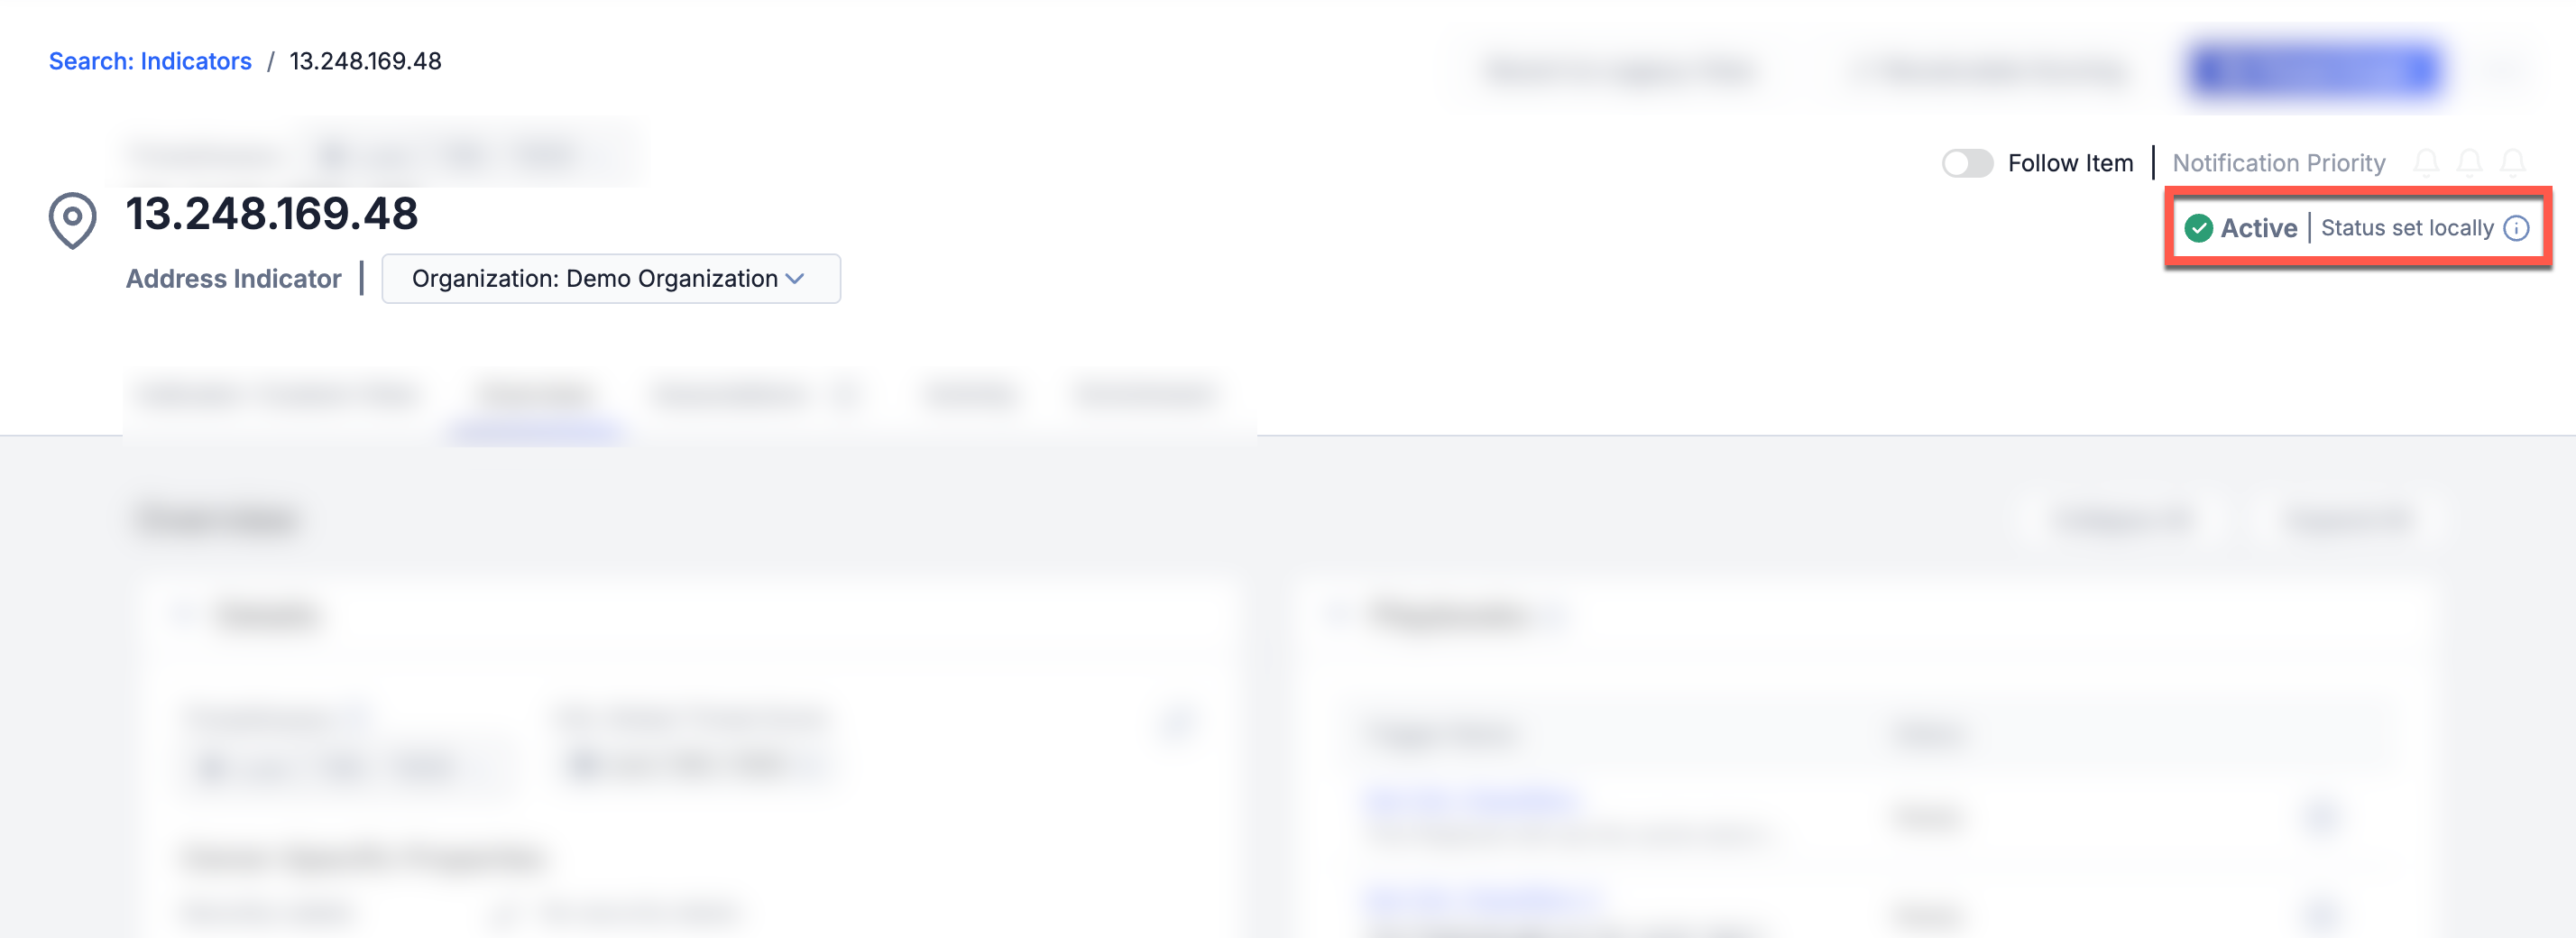
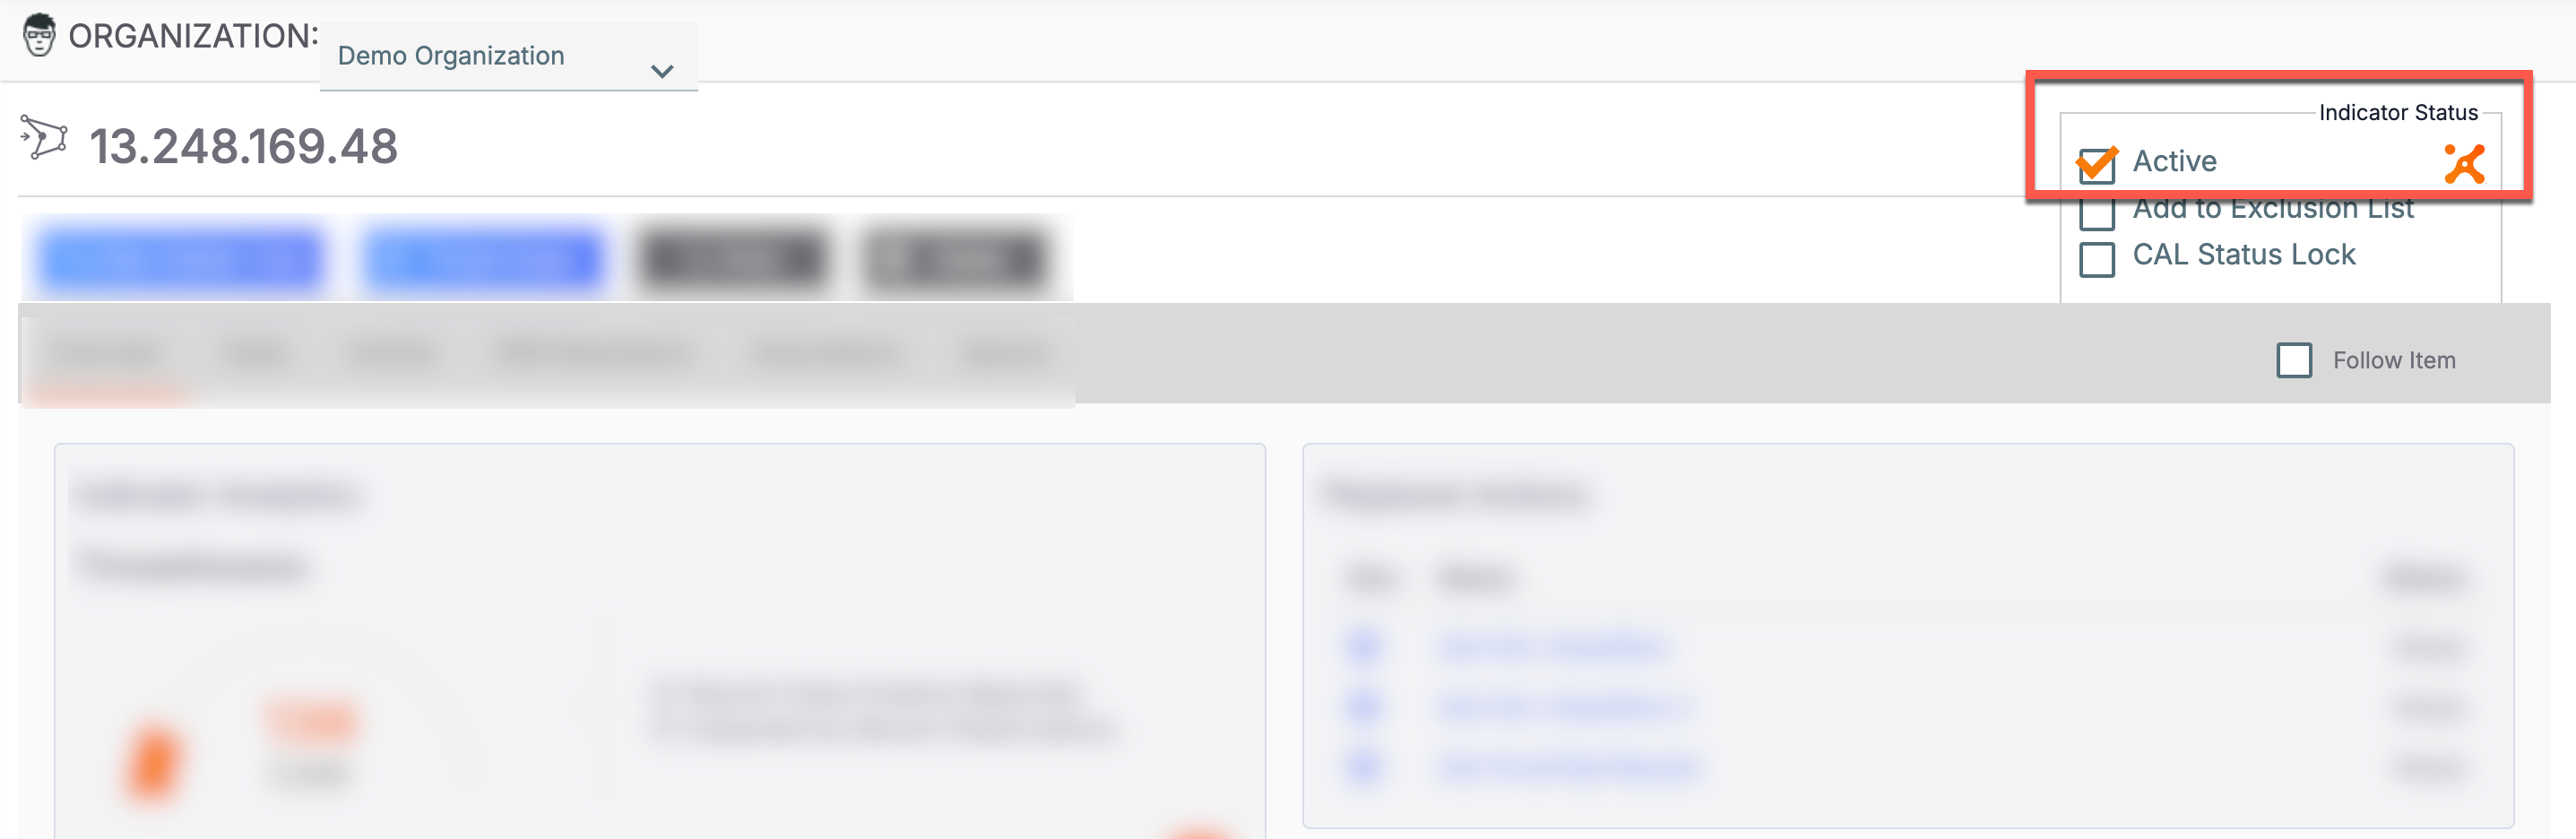
Indicator Status is displayed on an Indicator’s Details drawer (Figure 1), Details screen (Figure 2), and legacy Details screen (Figure 3). Each area shows whether an Indicator is active or inactive and whether its status was set locally (i.e., by a ThreatConnect user, operation, or process) or determined by CAL.
 icon represents locally set Indicator Status.
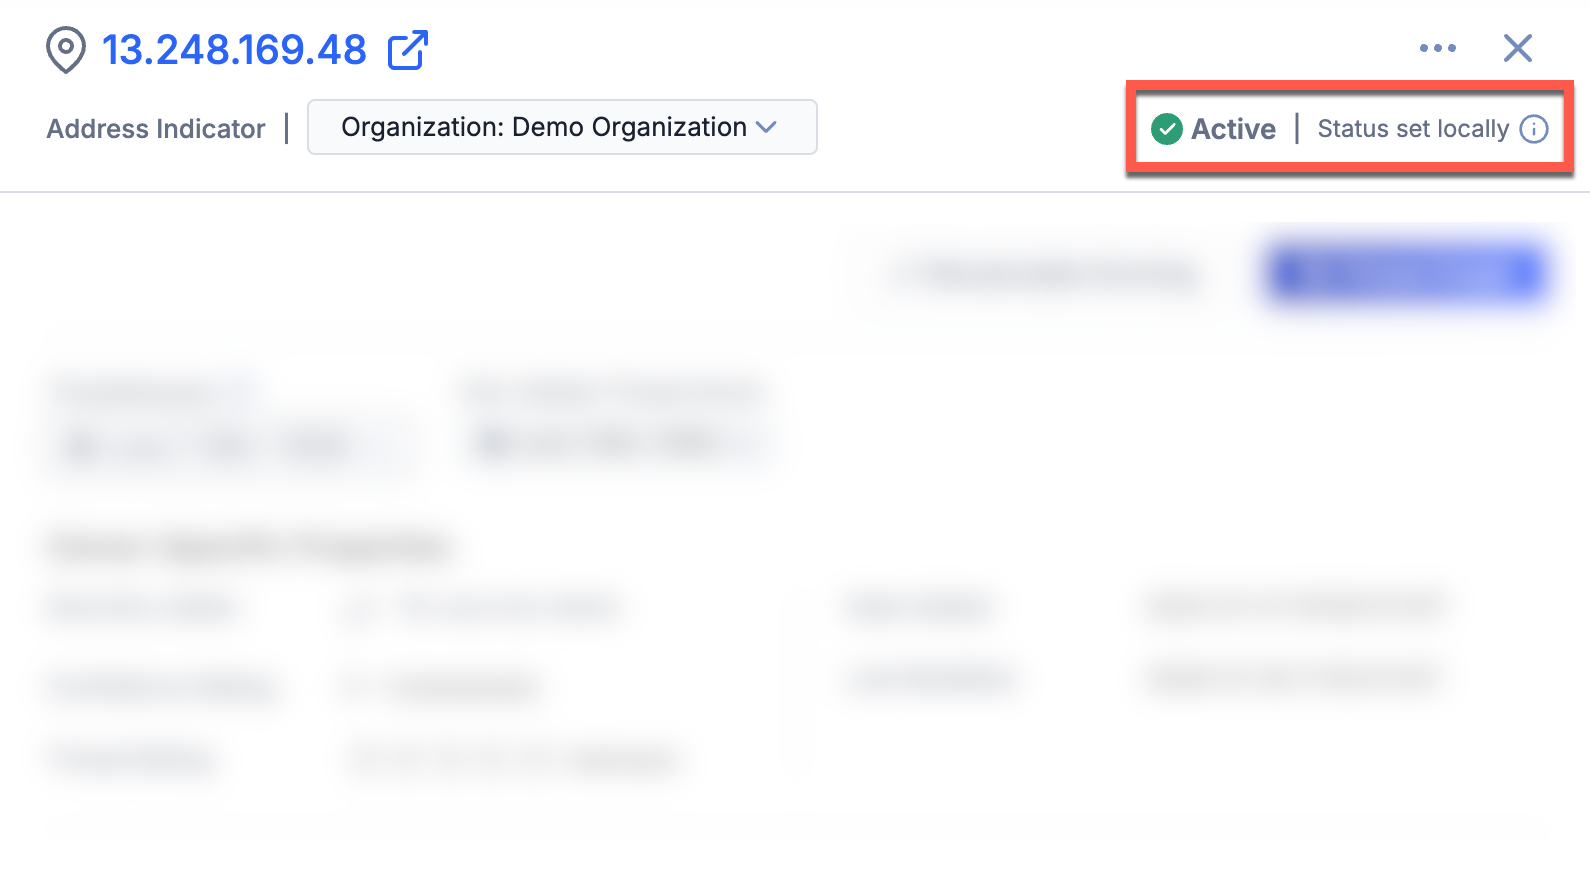
Set Indicator Status
Indicator Status can be set in the following ways:
- (Local) A ThreatConnect user manually sets Indicator Status.
- (Local) A ThreatConnect automated operation (e.g., a Playbook or a feed) sets Indicator Status.
- (Local) Indicator confidence deprecation sets Indicator Status.
- (Local) Synchronization sets Indicator Status.
- (CAL) CAL determines Indicator Status (that is, an Indicator’s status in ThreatConnect is updated to match the Indicator’s CAL Status).
ThreatConnect User Sets Indicator Status
You can manually set Indicator Status in the following areas of ThreatConnect:
- Details screen for an Indicator: From the Options⋯ menu at the top right, select Change Status to Active or Change Status to Inactive to set the Indicator’s status.
- Legacy Details screen for an Indicator: Select or clear the Active checkbox in the Indicator Status section at the top right to set the Indicator’s status.
- Search: Indicators screen: From the Options⋯ menu for an Indicator’s row, select Change Status to Active or Change Status to Inactive to set the Indicator’s status.
- Indicator import features:
- Document Parsing Import: On the Optional Data tab of the Import Intel - Document Parsing screen, select or clear the Active checkbox to set the status of all new Indicators being imported from the parsed text. Select the Update Existing Status checkbox to set the Indicator Status of all existing Indicators in the parsed text to the status indicated by the Active checkbox.
- Structured Indicator Import: In the comma-separated values (CSV) file for the import, include an Active column with one of the following values for each Indicator’s row:
- 0 or false: Set the Indicator Status to inactive (applies to new and existing Indicators).
- 1 or true: Set the Indicator Status to active (applies to new and existing Indicators).
- Blank (no Active column in the CSV file or no value provided in the Active column): If the Indicator is new, set the Indicator Status to active. If the Indicator exists in the owner, do not change the Indicator Status.
- Unstructured Indicator Import: On the Optional Data tab of the Import Indicators - Unstructured screen, select or clear the Active checkbox to set the status of all new Indicators being imported from the parsed text. Select the Update Existing Status checkbox to set the Indicator Status of all existing Indicators in the parsed text to the status indicated by the Active checkbox.
- API:NoteAny change made to Indicator Status via the v3, V2, or V2 Batch API will be attributed in the Indicator’s activity log to the corresponding API method rather than a manual change by a user.
- v3 API: Set the
activefield for an Indicator totrueorfalse. - V2 API: Set the
activefield for an Indicator totrueorfalse. - V2 Batch API: Set the
activefield for an Indicator totrueorfalse.
- v3 API: Set the
ThreatConnect Operation Sets Indicator Status
Automated ThreatConnect operations such as Playbooks and feeds leverage the v3, V2, and V2 Batch APIs to set Indicator Status.
Indicator Confidence Deprecation Sets Indicator Status
Indicator confidence deprecation is an automated process that lowers an Indicator’s Confidence Rating over time if the Confidence Rating is not being maintained through updates. Confidence deprecation rules can be configured to set Indicator Status to inactive when the Indicator’s Confidence Rating drops to 0.
Synchronization Sets Indicator Status
Synchronization refers to the propagation of Indicator Status across owners on a ThreatConnect instance. When an Indicator’s status changes in one Organization Community, or Source, synchronization updates the status of all versions of the Indicator in all other owners on the ThreatConnect instance to match.
CAL Determines Indicator Status
CAL Status
CAL maintains its own status (CAL Status) for the Address, ASN, CIDR, Email Address, File, Host, and URL Indicator types:
- Active: The available information suggests that there is value in tracking the Indicator.
- Inactive: The available information suggests that there is no value in tracking the Indicator.
- Unassigned: There is not enough information to determine a status.
When an Indicator has an assigned CAL Status (i.e., active or inactive), the Indicator’s status in ThreatConnect is updated to match.
How CAL Status Is Determined
CAL uses the factors listed in Table 1—including the Indicator’s type, specific metadata related to that type, and, for some factors, the recency of the metadata in CAL’s dataset—to determine CAL Status.
| Indicator Types | Factor | Recency Considered? |
|---|---|---|
| Address, ASN, CIDR, Email Address, File, Host, URL | Indicator’s CAL Global Threat Score | |
| Address, ASN, CIDR, Email Address, File, Host, URL | Number of malicious feeds reporting the Indicator | ✔ |
| Address, ASN, CIDR, Email Address, File, Host, URL | Number of “known good” feeds reporting the Indicator | ✔ |
| Address, ASN, CIDR, Email Address, File, Host, URL | Number of false positives tracked by CAL | ✔ |
| Address, ASN, CIDR, Email Address, File, Host, URL | Number of observations tracked by CAL | ✔ |
| Address, ASN, CIDR, Email Address, File, Host, URL | Safelist inclusion | |
| File | File reputation | |
| Address | DNS resolutions | ✔ |
| Address | DNS failures | ✔ |
| Address, Host | Weighted relationships between Hosts and Addresses | ✔ |
| CIDR | Known CIDR providers | |
| Host | Either seen on known domain generation algorithm (DGA) open-source intelligence (OSINT) feeds or classified by CAL’s AI DGA classification model | ✔ |
| Host | If sinkholed | ✔ |
| Host | Website rankings such as Cisco, Majestic, and Tranco | ✔ |
Status Locks
Synchronization uses significant system resources and can cause performance lags. Preventing synchronization from setting Indicator Status can maximize instance performance, as well as ensure data integrity within individual owners. Similarly, while it can be useful to leverage CAL analytics to determine Indicator Status, you may prefer to prevent CAL Status from overriding Indicator Status set by ThreatConnect users, automated ThreatConnect operations, or Indicator confidence deprecation.
Status locks provide control over Indicator Status changes by preventing CAL, synchronization, or both from setting Indicator Status:
- The system-level status lock prevents both CAL and synchronization from setting Indicator Status for all Indicators in all owners on a ThreatConnect instance.
- Owner-level status locks prevent CAL, synchronization, or both from setting Indicator Status for Indicators of specified types in specific owners on a ThreatConnect instance.
- The single-Indicator status lock prevents CAL Status from determining Indicator Status for specific Indicator object in an individual owner on a ThreatConnect instance.
- The CAL status lock for Indicator confidence deprecation prevents CAL Status from determining Indicator Status after the Indicator Status has been set to inactive by confidence deprecation.
System-Level Status Lock
The system-level status lock prevents CAL and synchronization from setting Indicator Status for all Indicators in all owners on a ThreatConnect instance. Follow these steps to turn on the system-level status lock for your ThreatConnect instance:
- From the Settings
 menu on the top navigation bar, select System Settings.
 - From the left sidebar on the Settings tab, select All or Feature Flags.
- Select the indicatorStatusLock checkbox.
- Click SAVE.
Owner-Level Status Locks
Owner-level status locks prevent CAL, synchronization, or both from setting Indicator Status in a single owner. When the owner-level status lock feature is turned on, you can configure separate status locks for synchronization and CAL for specified Indicator types in an individual Organization, Community, or Source.
Turn On Owner-Level Status Lock Feature
Follow these steps to turn on the owner-level status locks feature for your ThreatConnect instance:
- From the Settingsmenu on the top navigation bar, select System Settings.
- From the left sidebar on the Settings tab, select All or Feature Flags.
- Select the ownerIndicatorStatusLocksEnabled checkbox.
- Click SAVE.
Configure Status Locks for an Organization
Follow these steps to configure CAL and synchronization status locks for an Organization:
- From the Settingsmenu on the top navigation bar, select Account Settings.
- On the Organizations tab, click Edit
 in the Options column for the Organization in which you want to configure status locks.
 - Select the Permissions tab in the Organization Information window.
- Modify the following fields on the Permissions tab of the Organization Information window (Figure 4):
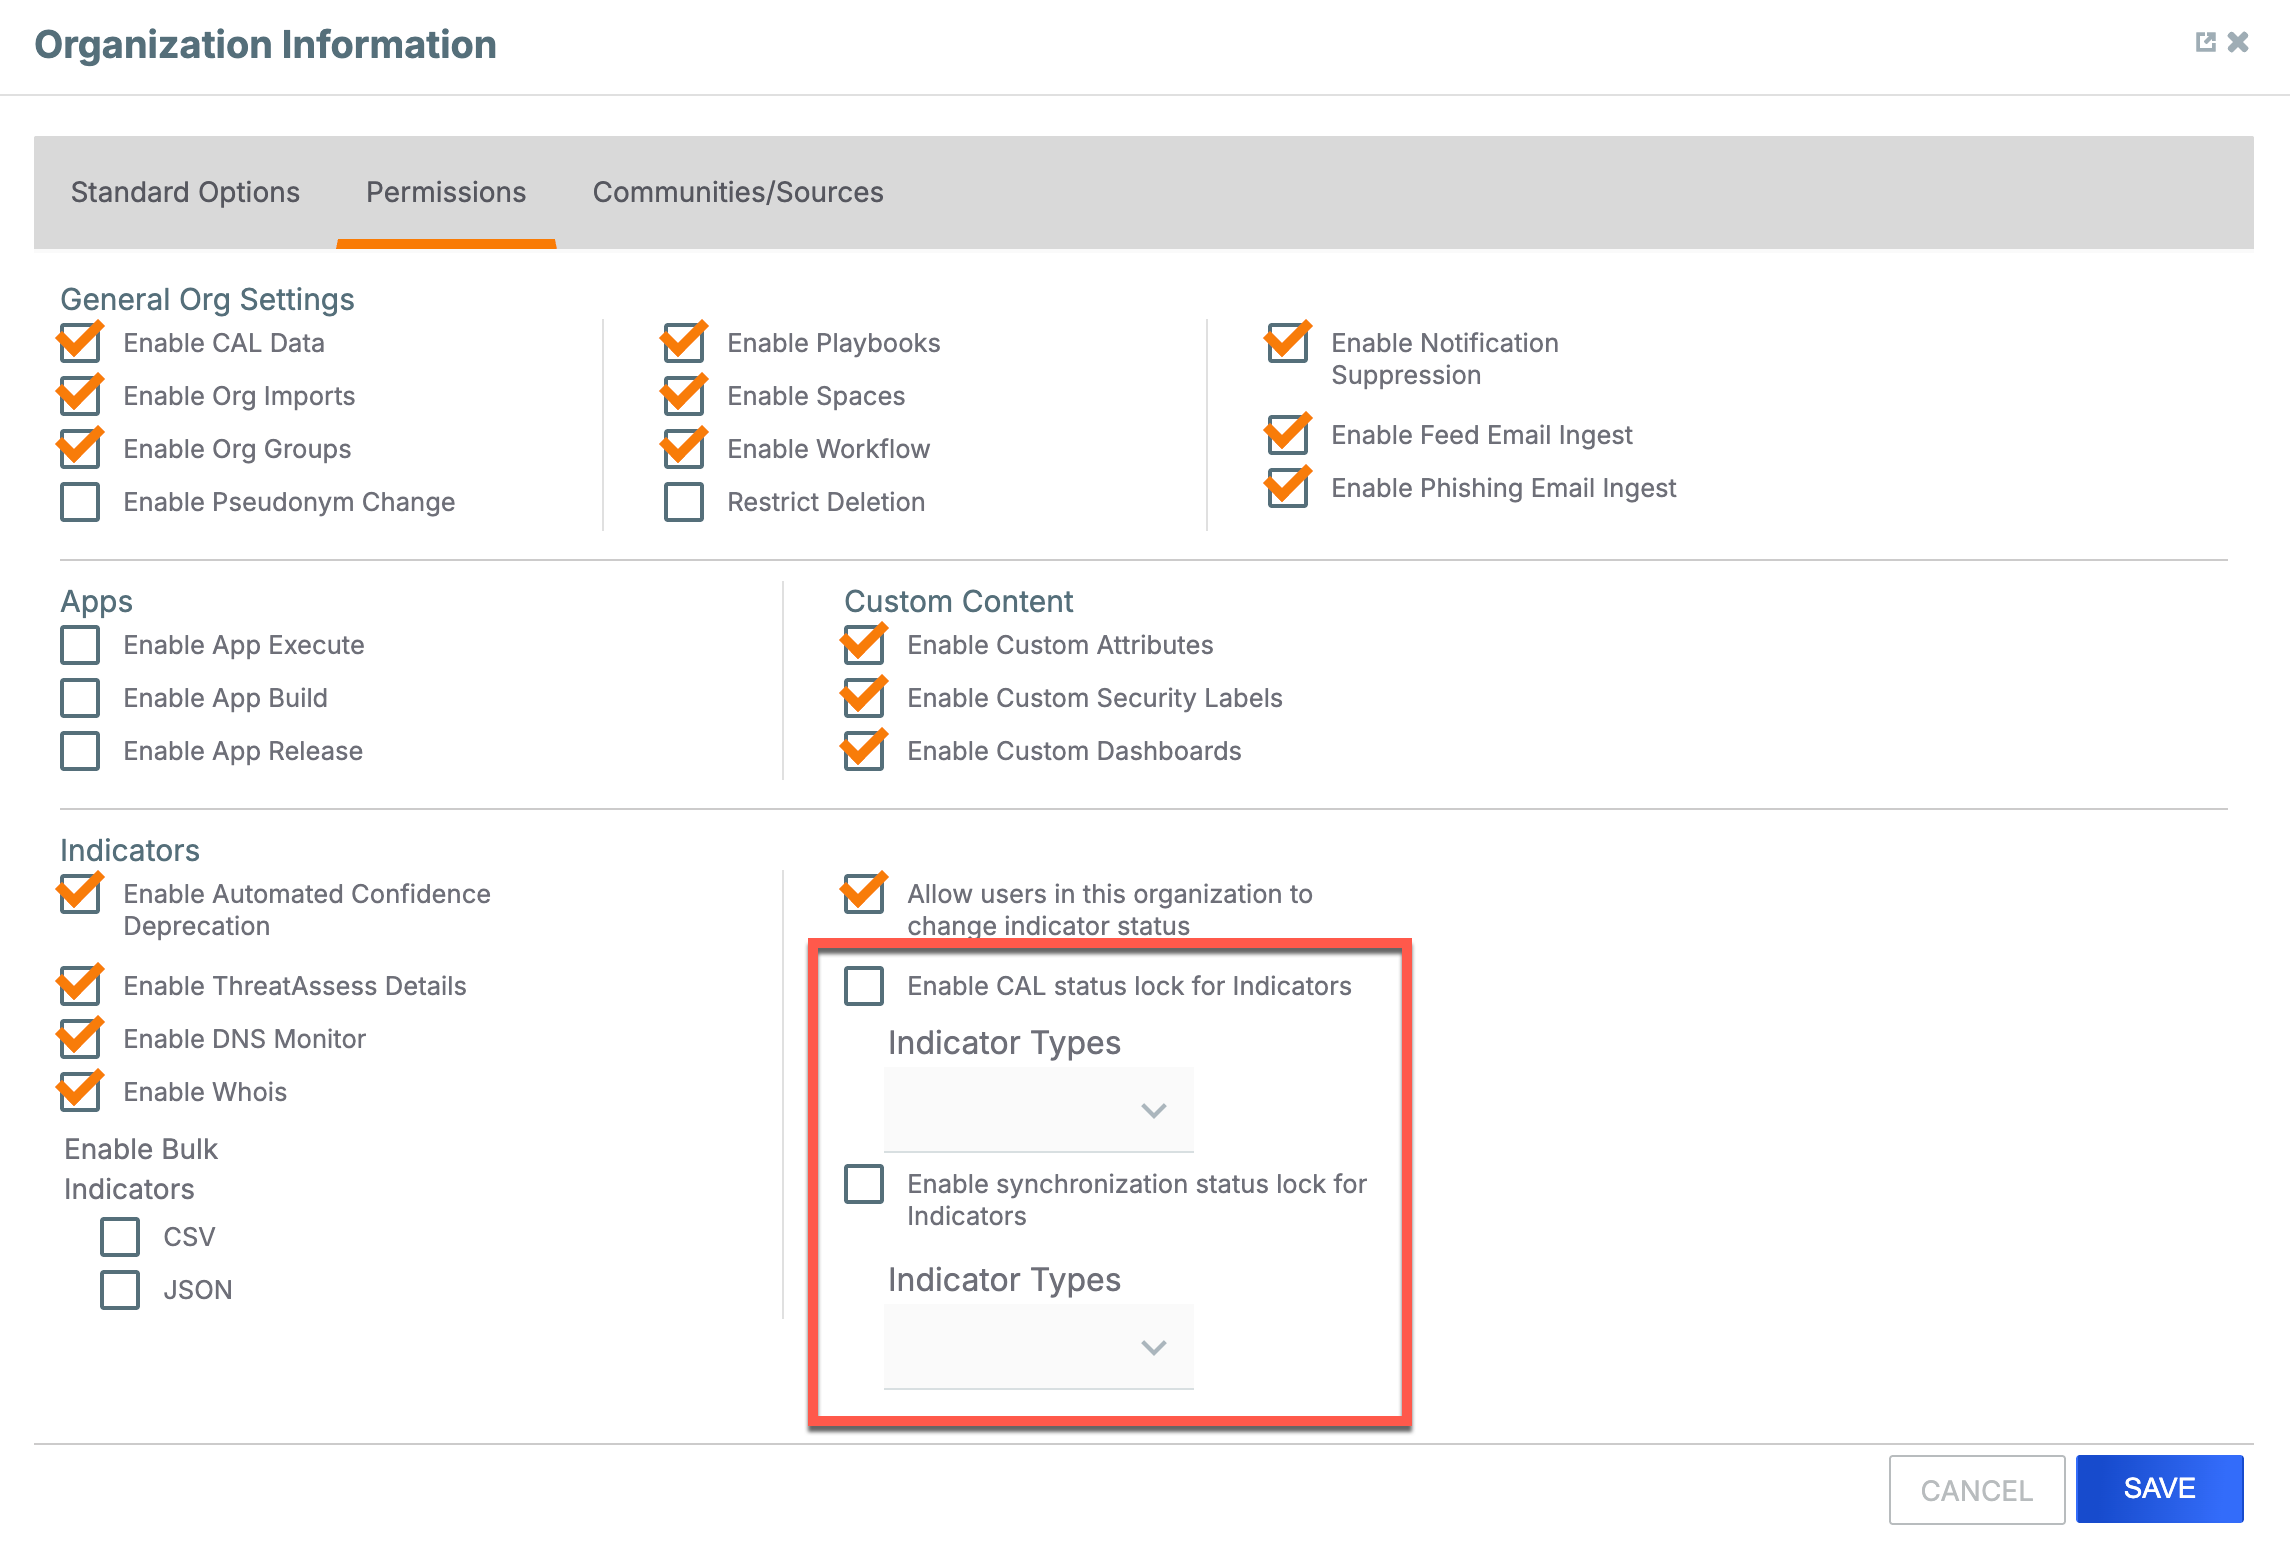
- Enable CAL status lock for Indicators: Select this checkbox to prevent CAL Status from determining the Indicator Status of Indicators in the Organization. When you select this checkbox, the Indicator Types dropdown underneath it will default to a value of All. To apply the CAL status lock to only a subset of Indicator types, clear the All checkbox and select only those Indicator types.
- Enable synchronization status lock for Indicators: Select this checkbox to prevent synchronization from setting the Indicator Status of Indicators in the Organization. When you select this checkbox, the Indicator Types dropdown underneath it will default to a value of All. To apply the synchronization status lock to only a subset of Indicator types, clear the All checkbox and select only those Indicator types.
- Click SAVE.
Configure Status Locks for a Community or Source
- From the Settingsmenu on the top navigation bar, select Account Settings.
- Select the Communities/Sources tab.
- Click Editin the Options column for the Community or Source in which you want to configure status locks.
- Modify the following fields on the Community/Source Information window (Figure 5):
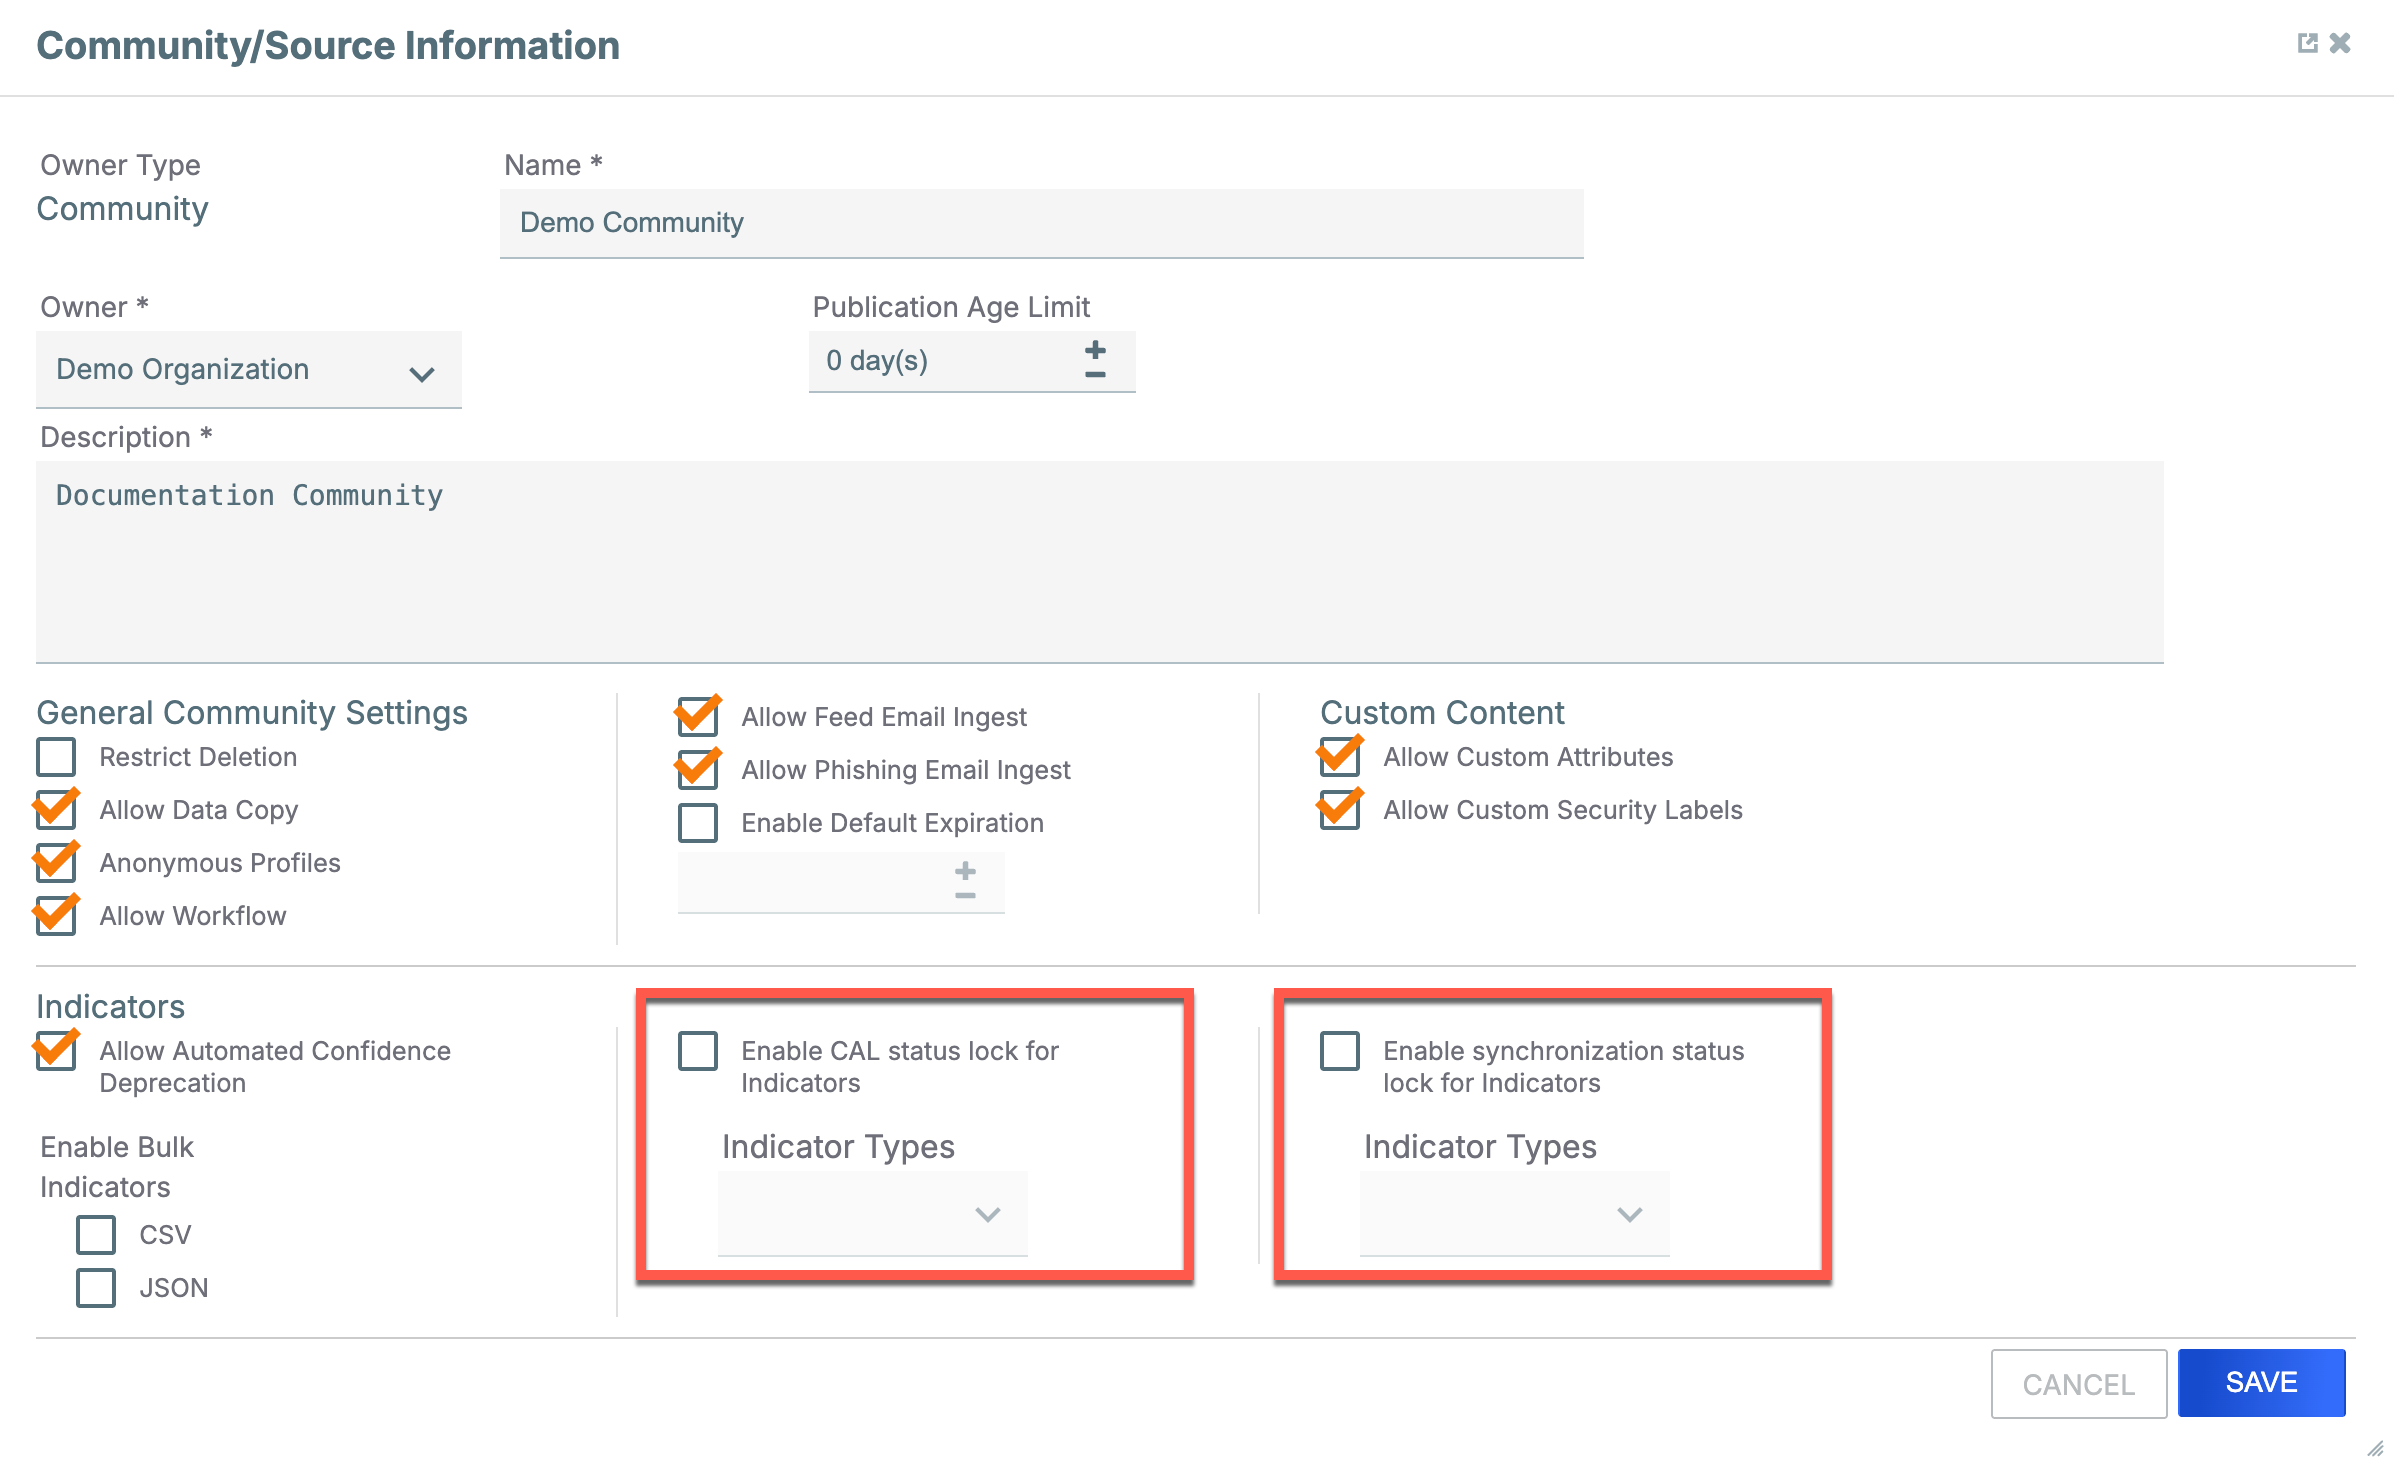
- Enable CAL status lock for Indicators: Select this checkbox to prevent CAL Status from determining the Indicator Status of Indicators in the Community or Source. When you select this checkbox, the Indicator Types dropdown underneath it will default to a value of All. To apply the CAL status lock to only a subset of Indicator types, clear the All checkbox and select only those Indicator types.
- Enable synchronization status lock for Indicators: Select this checkbox to prevent synchronization from setting the Indicator Status of Indicators in the Community or Source. When you select this checkbox, the Indicator Types dropdown underneath it will default to a value of All. To apply the synchronization status lock to only a subset of Indicator types, clear the All checkbox and select only those Indicator types.
- Click SAVE.
Single-Indicator Status Lock
The single-Indicator status lock prevents CAL Status from determining Indicator Status for a specific Indicator object in an individual owner on a ThreatConnect instance. When it is turned on, CAL Status will never determine Indicator Status for that Indicator—the Indicator Status will always be set locally. When it is not turned on and the system-level status lock and owner-level status lock for CAL for the Indicator’s type are not turned on (i.e., no CAL status locks are on), CAL Status will override locally set Indicator Status if the two statuses do not match.
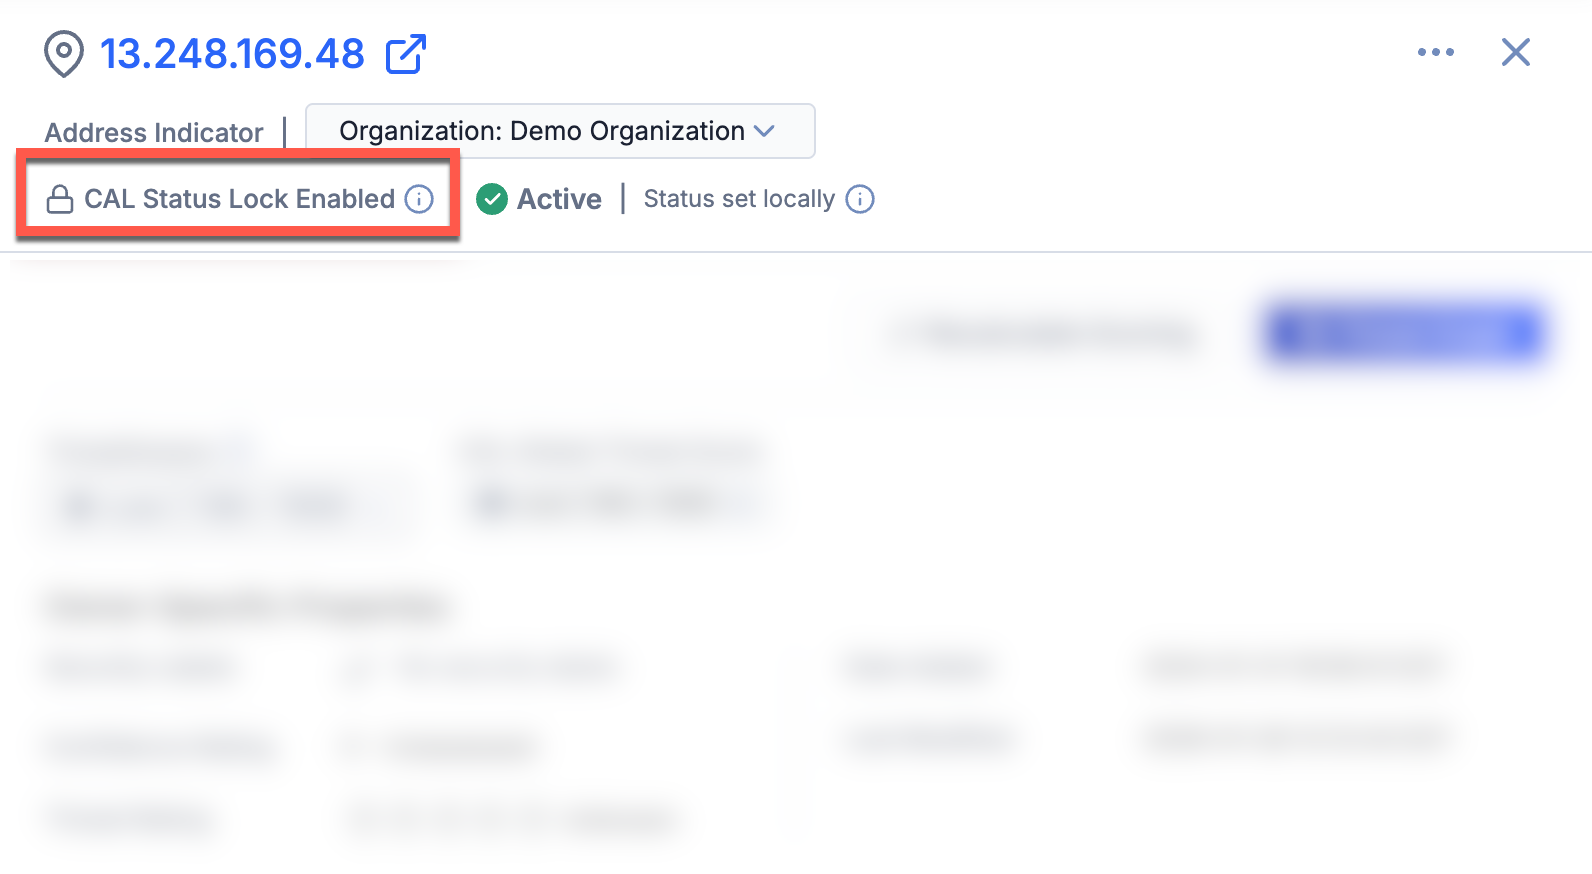
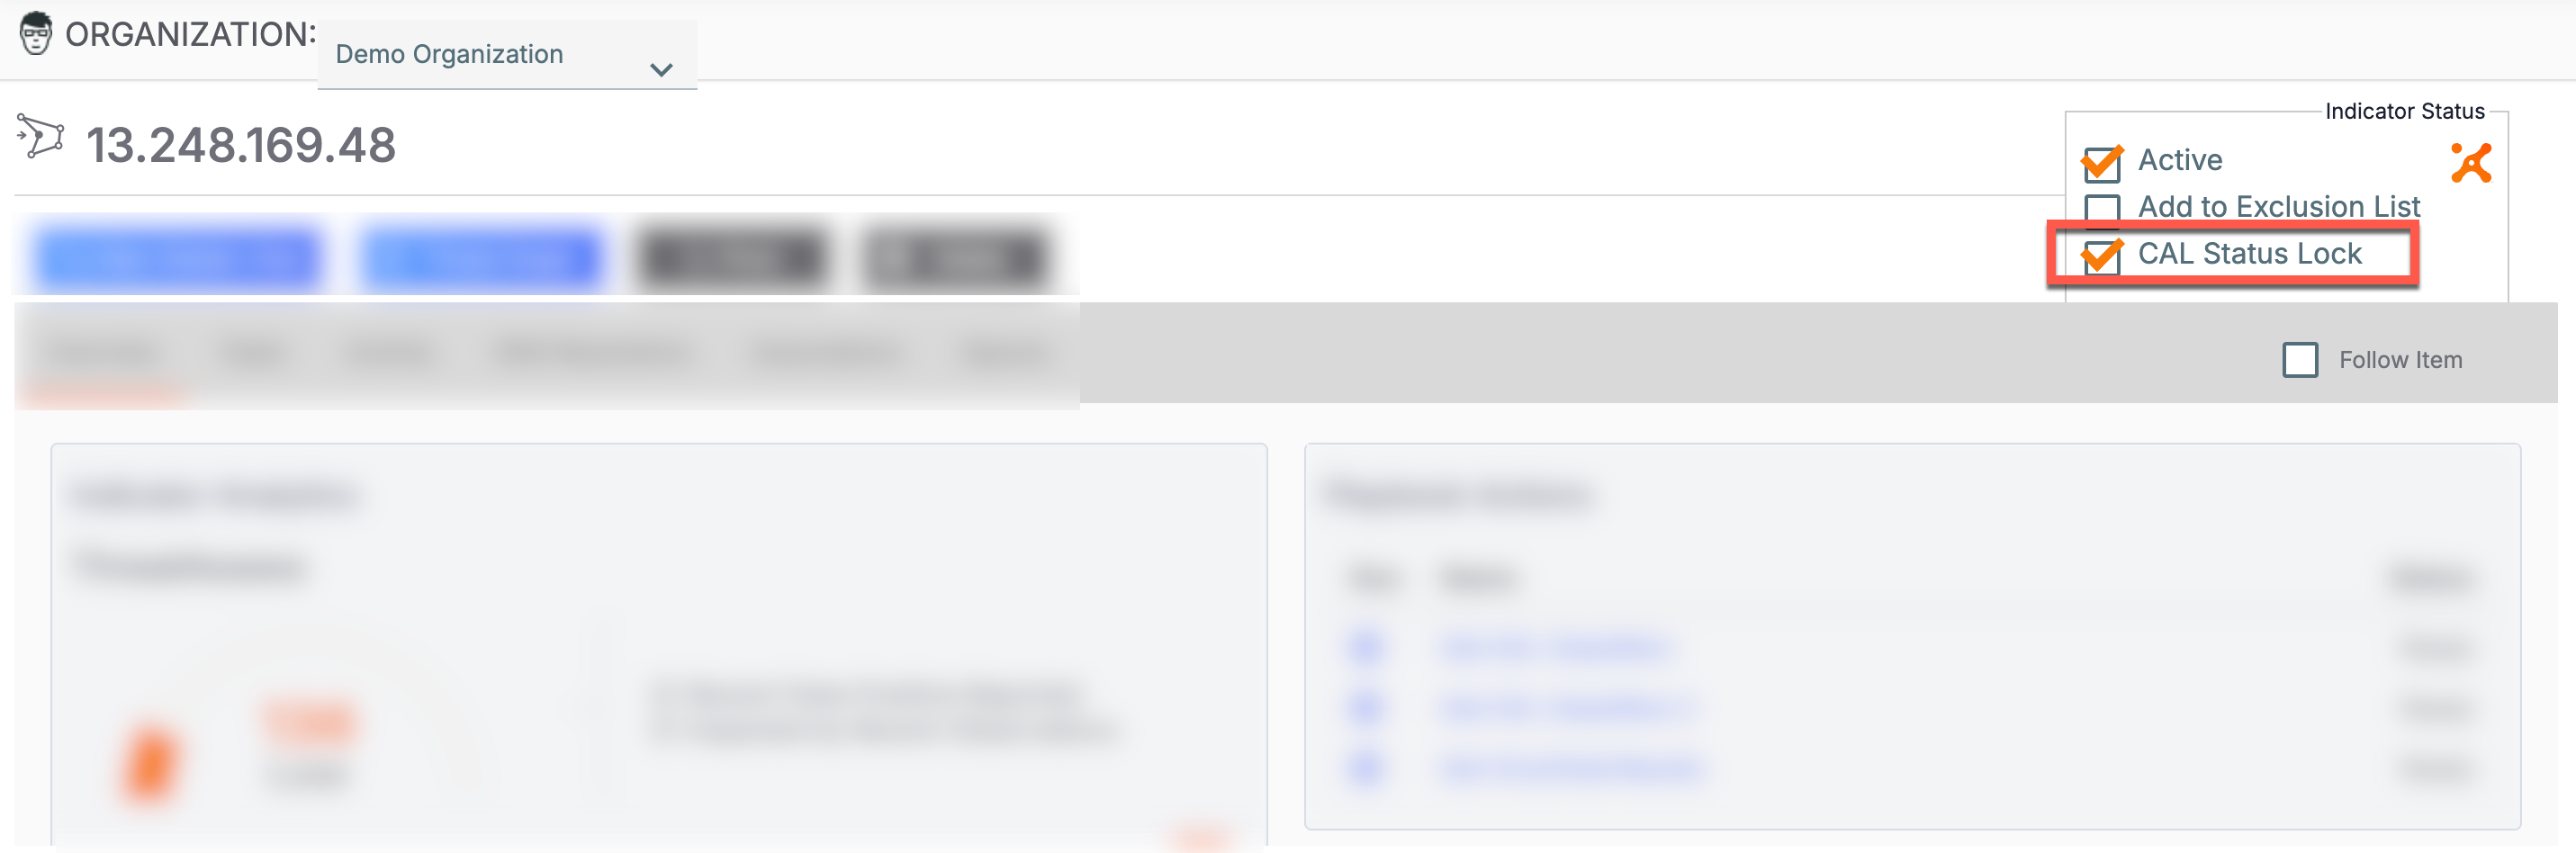
View Single-Indicator Status Lock
If the single-Indicator CAL status lock is turned on for an Indicator, you can view this information on the Indicator’s Details drawer (Figure 6), Details screen (Figure 7), and legacy Details screen (Figure 8).

Configure Single-Indicator Status Lock
You can configure a single-Indicator CAL status lock for an Indicator in the following areas of ThreatConnect:
- Details screen for an Indicator: From the Options⋯ menu at the top right, select Enable CAL Status Lock or Disable CAL Status Lock to configure a CAL status lock for the Indicator.
- Legacy Details screen for an Indicator: Select or clear the CAL Status Lock checkbox in the Indicator Status section at the top right to configure a CAL status lock for the Indicator.
- Search: Indicators screen: From the Options⋯ menu for an Indicator’s row, select Enable CAL Status Lock or Disable CAL Status Lock to configure a CAL status lock for the Indicator.
CAL Status Lock for Indicator Confidence Deprecation
When configuring a System, Organization, or Source confidence deprecation rule, you can set a status lock to prevent CAL from determining Indicator Status after the Indicator Status has been set to inactive by confidence deprecation. In other words, you can prevent CAL Status from overriding an inactive Indicator Status set by confidence deprecation. Each CAL status lock for confidence deprecation applies to Indicators of the type for which the confidence deprecation rule is configured in the owner in which the rule is configured.
Follow these steps to set a CAL status lock for a confidence deprecation rule:
- Create a new confidence deprecation rule or edit an existing confidence deprecation rule.
- Select Set Inactive from the Action at Minimum dropdown.
- Select the CAL Status Lock checkbox.
- Click SAVE.
Activity Log
Indicator activity logs (that is, the Activity tab on an Indicator’s Details screen or legacy Details screen) record entries when an Indicator’s status changes, including the time the Indicator Status was changed, the method that changed the status, and, when available, the username for the ThreatConnect user account that initiated the status change.
Table 2 provides example activity log messages for each type of Indicator Status change.
| Activity | Example Activity Log Message |
|---|---|
| Indicator Status is changed by CAL | Indicator bad.com status changed to active by CAL |
| Indicator Status is changed manually by a user | Indicator bad.com status changed to inactive manually by Alice Li |
| Indicator Status is changed via synchronization after a user manually changes the status of a copy of the Indicator in a different owner on the ThreatConnect instance | Indicator bad.com status synchronized to inactive due to manual change in another owner |
| Indicator Status is changed during import by a user in the ThreatConnect UI Example Using Document Parsing Import, a ThreatConnect user imports an Indicator into an owner in which the Indicator already exists. As part of the import configuration, the user changes the Indicator’s status in that owner. | Indicator bad.com status changed to active during import by Alice Li |
| Indicator Status is changed via synchronization after a user changes the status of a copy of the Indicator in a different owner during import in the ThreatConnect UI | Indicator bad.com status synchronized to active due to import in another owner |
| Indicator Status is changed using the ThreatConnect V2 API | Indicator bad.com status changed to inactive via v2 API |
| Indicator Status is changed via synchronization after the status of a copy of the Indicator in a different owner is changed using the ThreatConnect V2 API | Indicator bad.com status synchronized to inactive due to v2 API change in another owner |
| Indicator Status is changed using the ThreatConnect v3 API | Indicator bad.com status changed to active via v3 API |
| Indicator Status is changed via synchronization after the status of a copy of the Indicator in a different owner is changed using the ThreatConnect v3 API | Indicator bad.com status synchronized to active due to v3 API change in another owner |
| Indicator Status is changed to inactive via confidence deprecation | Indicator bad.com status changed to inactive due to deprecation |
| Indicator Status is changed to inactive via synchronization after confidence deprecation changes the status of a copy of the Indicator in a different owner to inactive | Indicator bad.com status synchronized to inactive due to deprecation |
| Indicator Status is changed using the ThreatConnect V2 Batch API | Indicator bad.com status changed to active due to v2 batch import |
| Indicator Status is changed via synchronization after the status of a copy of the Indicator in a different owner is changed using the ThreatConnect V2 Batch API | Indicator bad.com status synchronized to active due to v2 batch import in another owner |
Frequently Asked Questions (FAQ)
Why can’t I set Indicator Status on the Search: Indicators or Details screen? The option is grayed out.
The following are reasons that you may not be able to set Indicator Status:
- Users in your Organization are not allowed to set Indicator Status. That is, when configuring your Organization on the Account Settings screen, an administrator has cleared the Allow users in this organization to change indicator status checkbox on the Permissions tab of the Organization Information window. Contact your System Administrator for more information.
- If trying to set Indicator Status for an Indicator owned by an Organization, your user account does not have an Organization role that has permission to set Indicator Status (that is, Standard User, Sharing User, Organization Administrator, or App Developer).
- If trying to set Indicator Status for an Indicator owned by a Community or Source, your user account does not have a Community role that has permission to set Indicator Status in that Community or Source (that is, User, Commenter, Contributor, Editor, or Director).
What happens if there are no status locks for CAL turned on and I change the Indicator Status for an Indicator whose status is currently set by CAL?
When you change the Indicator Status for an Indicator whose status is currently set by CAL to a different value (e.g., the Indicator Status set by CAL is inactive, and you manually set the Indicator Status to active), the change triggers a medium-priority ThreatAssess refresh event. As part of this refresh event, ThreatAssess queries CAL for the latest CAL Status for the Indicator and triggers a synchronization back to the CAL Status. This process typically takes between one and five minutes. During that time window, the Indicator Status will display as being set locally to the value you set manually. Once the ThreatAssess refresh event completes, the Indicator Status will display as being set by CAL to the original value (that is, the previous Indicator Status, which matches the CAL Status). The Indicator’s activity log will record two entries: one for the manual status change and one for the status change by CAL.
However, if you change the Indicator Status to one that does not match the value set by CAL, but change it back before the ThreatAssess refresh event completes, the ThreatAssess refresh event will find nothing to change. In that case, the Indicator Status will not change again (because it now once again matches the CAL Status), and the Indicator Status will display as being set locally to the value you set manually (via the second manual change). The Indicator’s activity log will record two entries: one for the first manual status change and one for the second manual status change.
Can I turn on a system-level status lock that applies only to synchronization or only to CAL, but not both?
No. The indicatorStatusLock system setting turns off both synchronization and CAL status changes across all owners on a ThreatConnect instance. However, you can achieve the same effect by applying an owner-level status lock for synchronization or CAL for all Indicator types in each owner on your ThreatConnect instance. To do this, first turn on the owner-level status lock feature. Then turn on the synchronization or CAL status lock for each Organization on your ThreatConnect instance.
ThreatConnect® is a registered trademark, and CAL™ is a trademark, of ThreatConnect, Inc.
20074-01 v.07.A