Overview
A Workflow Case in ThreatConnect® is a single instance of an investigation, inquiry, or other procedure. Cases contain all required elements of a notable event in a logical structure and allow you to capture key evidence that your security team can use to determine an appropriate course of action. Cases can be created from a Workflow (i.e., a codified procedure for the steps to be taken in a Case) or without a Workflow (i.e., from scratch).
This article provides steps for creating a Workflow Case. It also describes how to apply a Workflow to an existing Case that was created without a Workflow.
Before You Start
User Roles
- To create a Workflow Case, your user account must have an Organization role of Standard User, Sharing User, or Organization Administrator.
Prerequisites
- To have access to Workflow, select the Enable Workflow checkbox on the Permissions tab of the Organization Information window for your Organization on the Organizations tab of the Account Settings screen (must be a System Administrator, Operations Administrator, or Accounts Administrator to perform this action).
Creating a Case
Follow these steps to create a Case:
- Click Workflow on the top navigation bar to display the Cases screen .
- Click New Case
 at the upper-right corner of the Cases screen.
 - Fill out the fields on the New Case drawer (Figure 1) as follows:
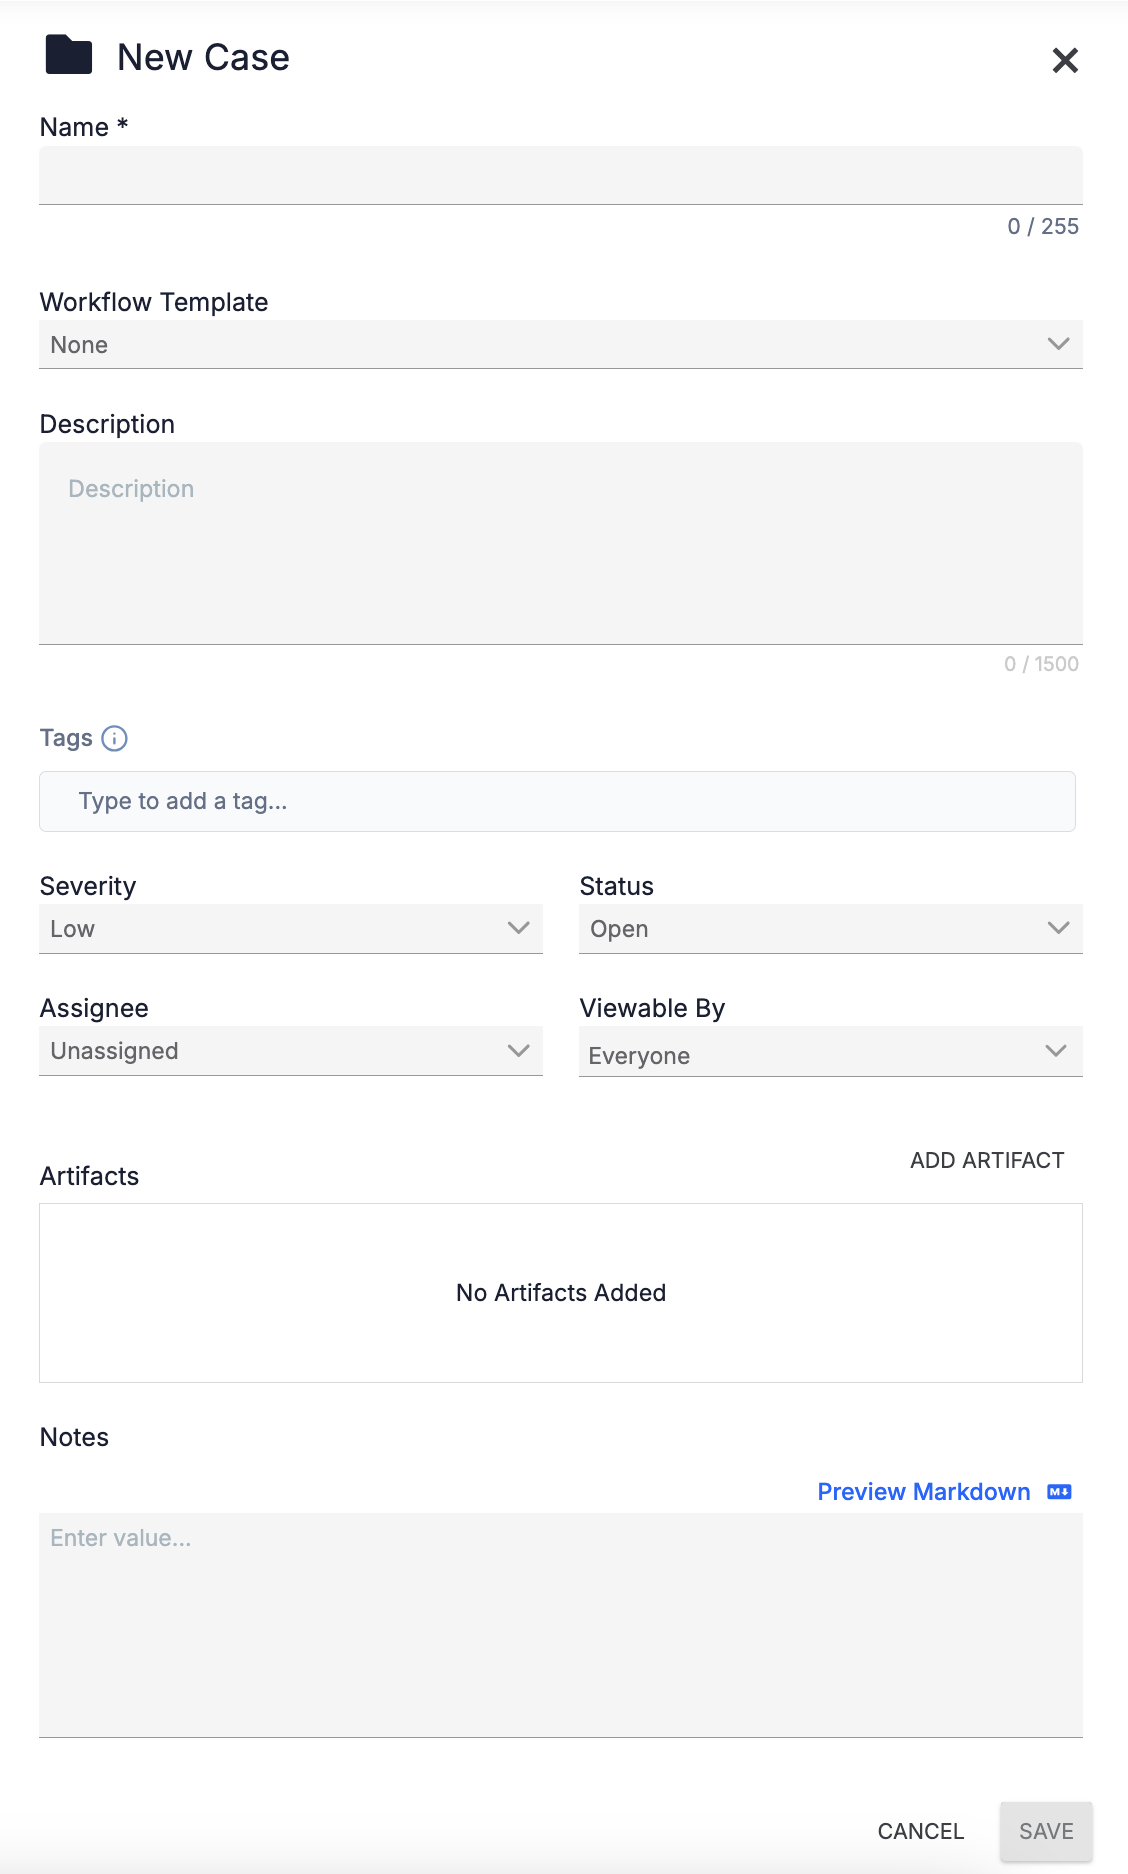
- Name: (Required) Enter a name for the Case.
- Workflow Template: (Optional) Select a Workflow that will determine the structure of the Case (i.e., the Phases and Tasks that define the Case, the Artifacts that are to be collected within the Case, etc.). To create a Case without a Workflow, select None.NoteCreating Cases from Workflows is recommended, as Workflows provide predetermined Phases, Tasks, and other settings for new Cases. Cases that do not have a Workflow applied to them do not have Phases. Instead, all Tasks are compiled in a single section.
- Description: (Optional) Enter a description for the Case. If you selected a Workflow from the Workflow Template dropdown, the Workflow’s description will automatically populate in this field auto and can be modified as desired.
- Tags: (Optional) Enter standard and ATT&CK® Tags to apply to the Case.
- Severity: (Optional) Select a severity for the Case.
- Status: (Optional) Select a status for the Case.
- Assignee: (Optional) Select the user or user group to which the Case will be assigned.
- Viewable By: (Optional) Select the users that will be able to view the Case. The default selection is Everyone (i.e., all users who can access the Workflow feature). NoteAssignee(s) are selected automatically in the Viewable By menu if the Everyone option is not selected
- Artifacts: (Optional) Click ADD ARTIFACT to add Artifacts to the Case.
- Notes: (Optional) Enter a Note, either in plain text or in Markdown. If using Markdown, click the Preview Markdown
 link to preview the text with the rendered Markdown formatting.NoteThe Note text box supports the Marked library (https://marked.js.org/).
- Click SAVE to create the Case.
Adding Artifacts to a Case
Follow these steps to add Artifacts to a Case you are creating:
- Click ADD ARTIFACT on the upper right of the Artifacts section of the New Case drawer (Figure 1).
- Fill out the fields in the Add Artifact section of the New Case drawer (Figure 2) as follows:
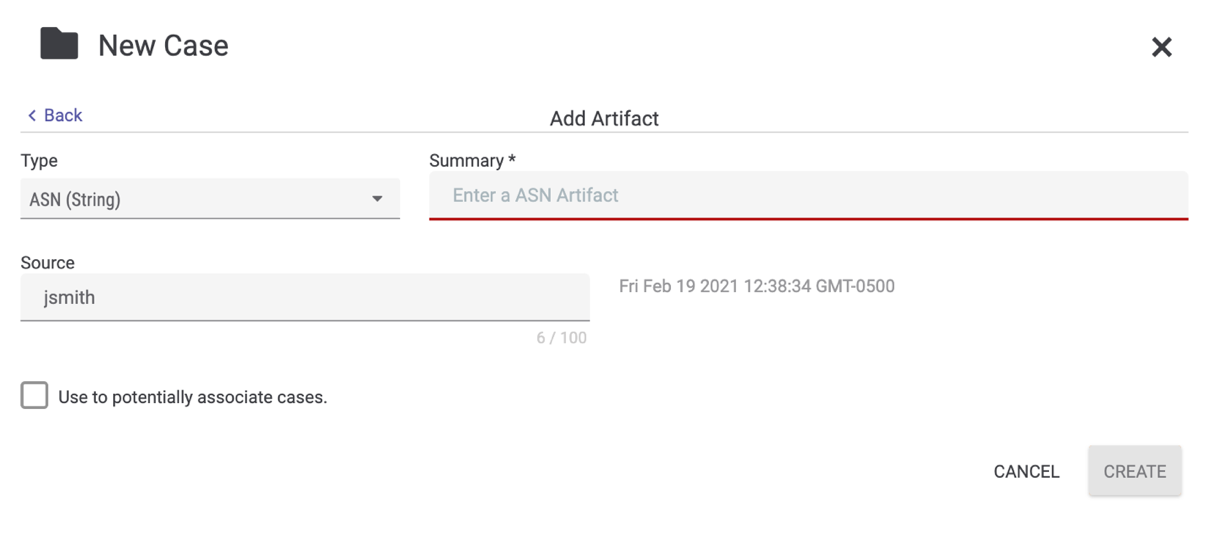
- Type: (Required) Select the Artifact’s type. Available Artifact types include all ThreatConnect Indicator types and other data types by ThreatConnect and your System Administrator.
- Summary: (Required) Enter the Artifact's summary. This field dynamically adjusts based on the data type and UI element the Artifact type supports. Possible UI elements for this field include a text box, a date selector, a date and time selector, a dropdown, and an area to upload a file.
- Source: (Optional) Enter the name of the user providing the Artifact’s details. Your username is the default value of the Artifact’s source and can be modified as desired.
- Use to potentially associate cases.: (Optional)Select this checkbox to allow ThreatConnect to use the Artifact to generate potential associations for Cases, Groups, and Indicators.NoteIf multiple Cases contain an Artifact with the same summary and type, and the Use to potentially associate cases. checkbox is selected for each copy of the Artifact, those Cases will be displayed in the Cases section of the Potential Associations card for each Case and in the CASES dropdown in the Links column of the Artifacts card for the Artifact.ImportantThe default setting for this checkbox may vary across Artifact types. Also, if a System Administrator has disallowed the Artifact type from being used to potentially associate Cases, then selecting this checkbox will have no effect.
- Click CREATE to create the Artifact and return to the rest of the New Case drawer.
Applying a Workflow After Creating a Case
You can apply a Workflow to a Case that was created without a Workflow if no Tasks have been added to the Case yet. Follow these steps to apply a Workflow to an existing Case:
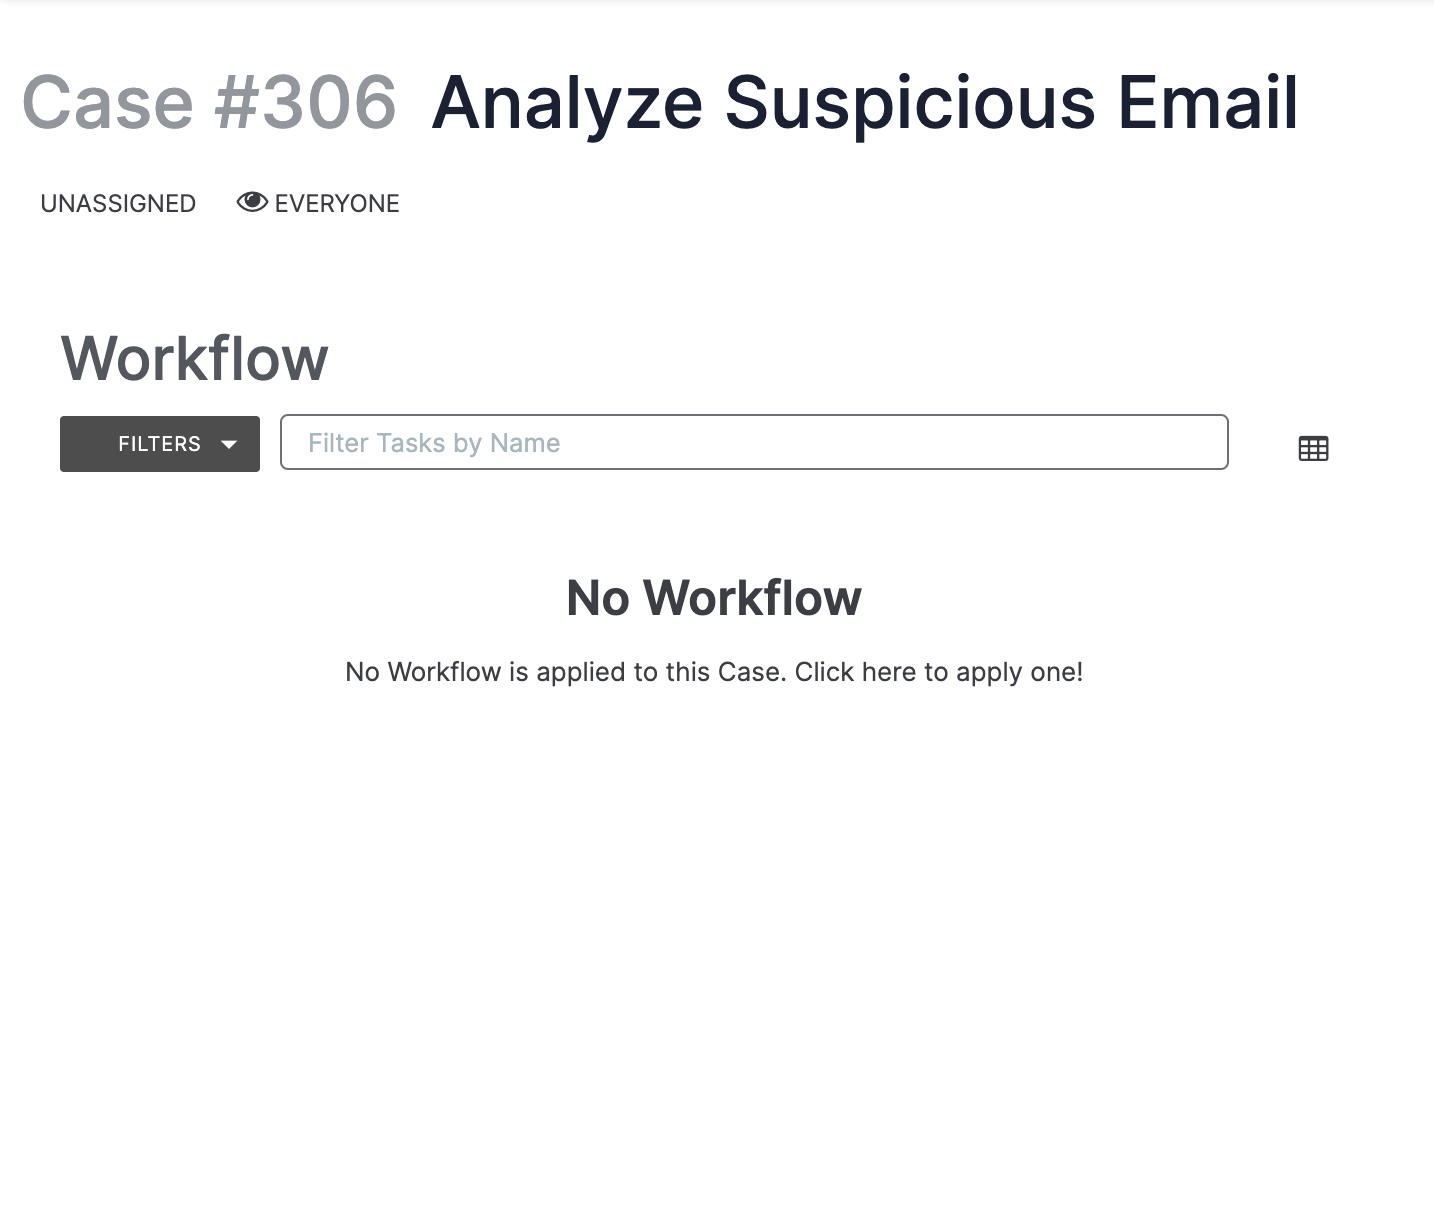
- Navigate to a case. If a Workflow has not been applied to the Case and no Tasks have been added to it, the Phases and Tasks section will display a message stating that no Workflow has been applied to the Case (Figure 3).
- Click the No Workflow message.
- Select a Workflow from the dropdown in the Assign Workflow window (Figure 4) and click ASSIGN to assign the selected Workflow to the Case.
.png)
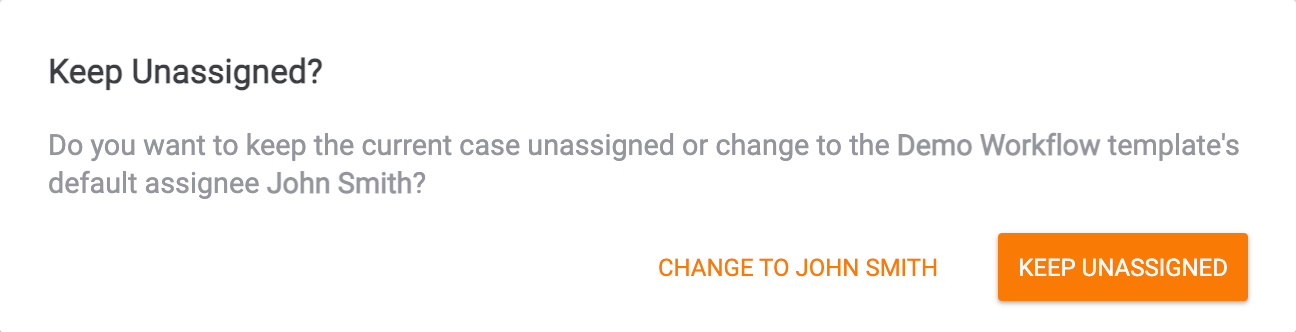
- If no user is assigned to the Case but the selected Workflow has a default assignee, you will be prompted to make a selection in the Keep Unassigned? window (Figure 5).
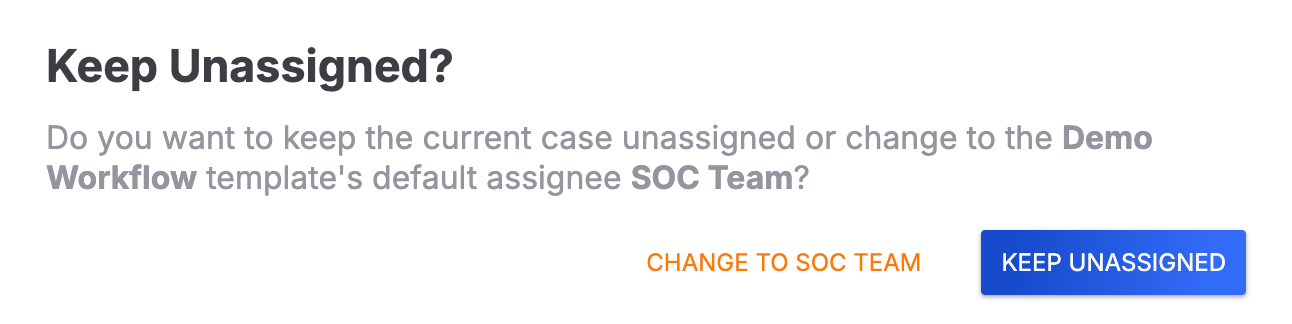
- KEEP UNASSIGNED: Click this button to keep the Case unassigned.
- CHANGE TO <name of default assignee>: Click this button to assign the Workflow’s default assignee to the Case.
- If a user is assigned to the Case and that user is different from the selected Workflow’s default assignee, the Keep Current Assignee? window will be displayed (Figure 6).
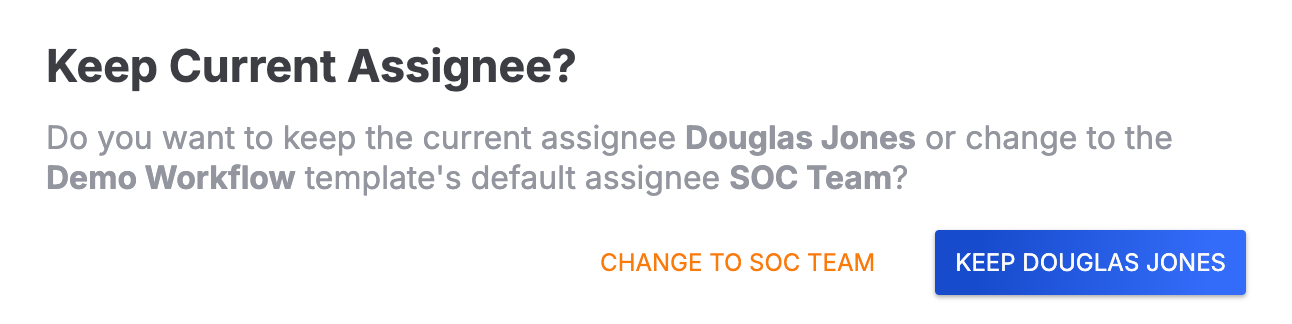
- CHANGE TO <name of default assignee>: Click this option to assign the Workflow's default assignee (user or user group) to the Case.
- KEEP <name of assignee>: Click this option to keep the Case unassigned.
If a user is assigned to the Case and that user is different from the selected Workflow’s default assignee, you will be prompted to make a selection in the Keep Current Assignee? window (Figure 7).
- CHANGE TO <name of default assignee>: Click this option to change the Case’s assignee to the Workflow’s default assignee (user or user group.
- KEEP <name of assignee>: Click this option to keep the current assignee of the Case.
After applying a Workflow to a Case, the Phases and Tasks section will be populated with the Phases and Tasks in the Workflow, and the Workflow’s name will be added to the Case’s header.
ThreatConnect® is a registered trademark of ThreatConnect, Inc.
MITRE ATT&CK® and ATT&CK® are registered trademarks of The MITRE Corporation.
20122-03 v.05.A