A Workflow Case in ThreatConnect® is a single instance of an investigation, inquiry, or other procedure. Cases contain all required elements of a notable event in a logical structure, and they allow you to capture key evidence that your security team can use to decide an appropriate course of action.
This article describes how to view, manage, and filter Workflow Cases on the Cases screen in ThreatConnect.
Viewing Cases
On the top navigation bar, hover the cursor over Workflow and select Cases. The Cases screen will be displayed (Figure 1).
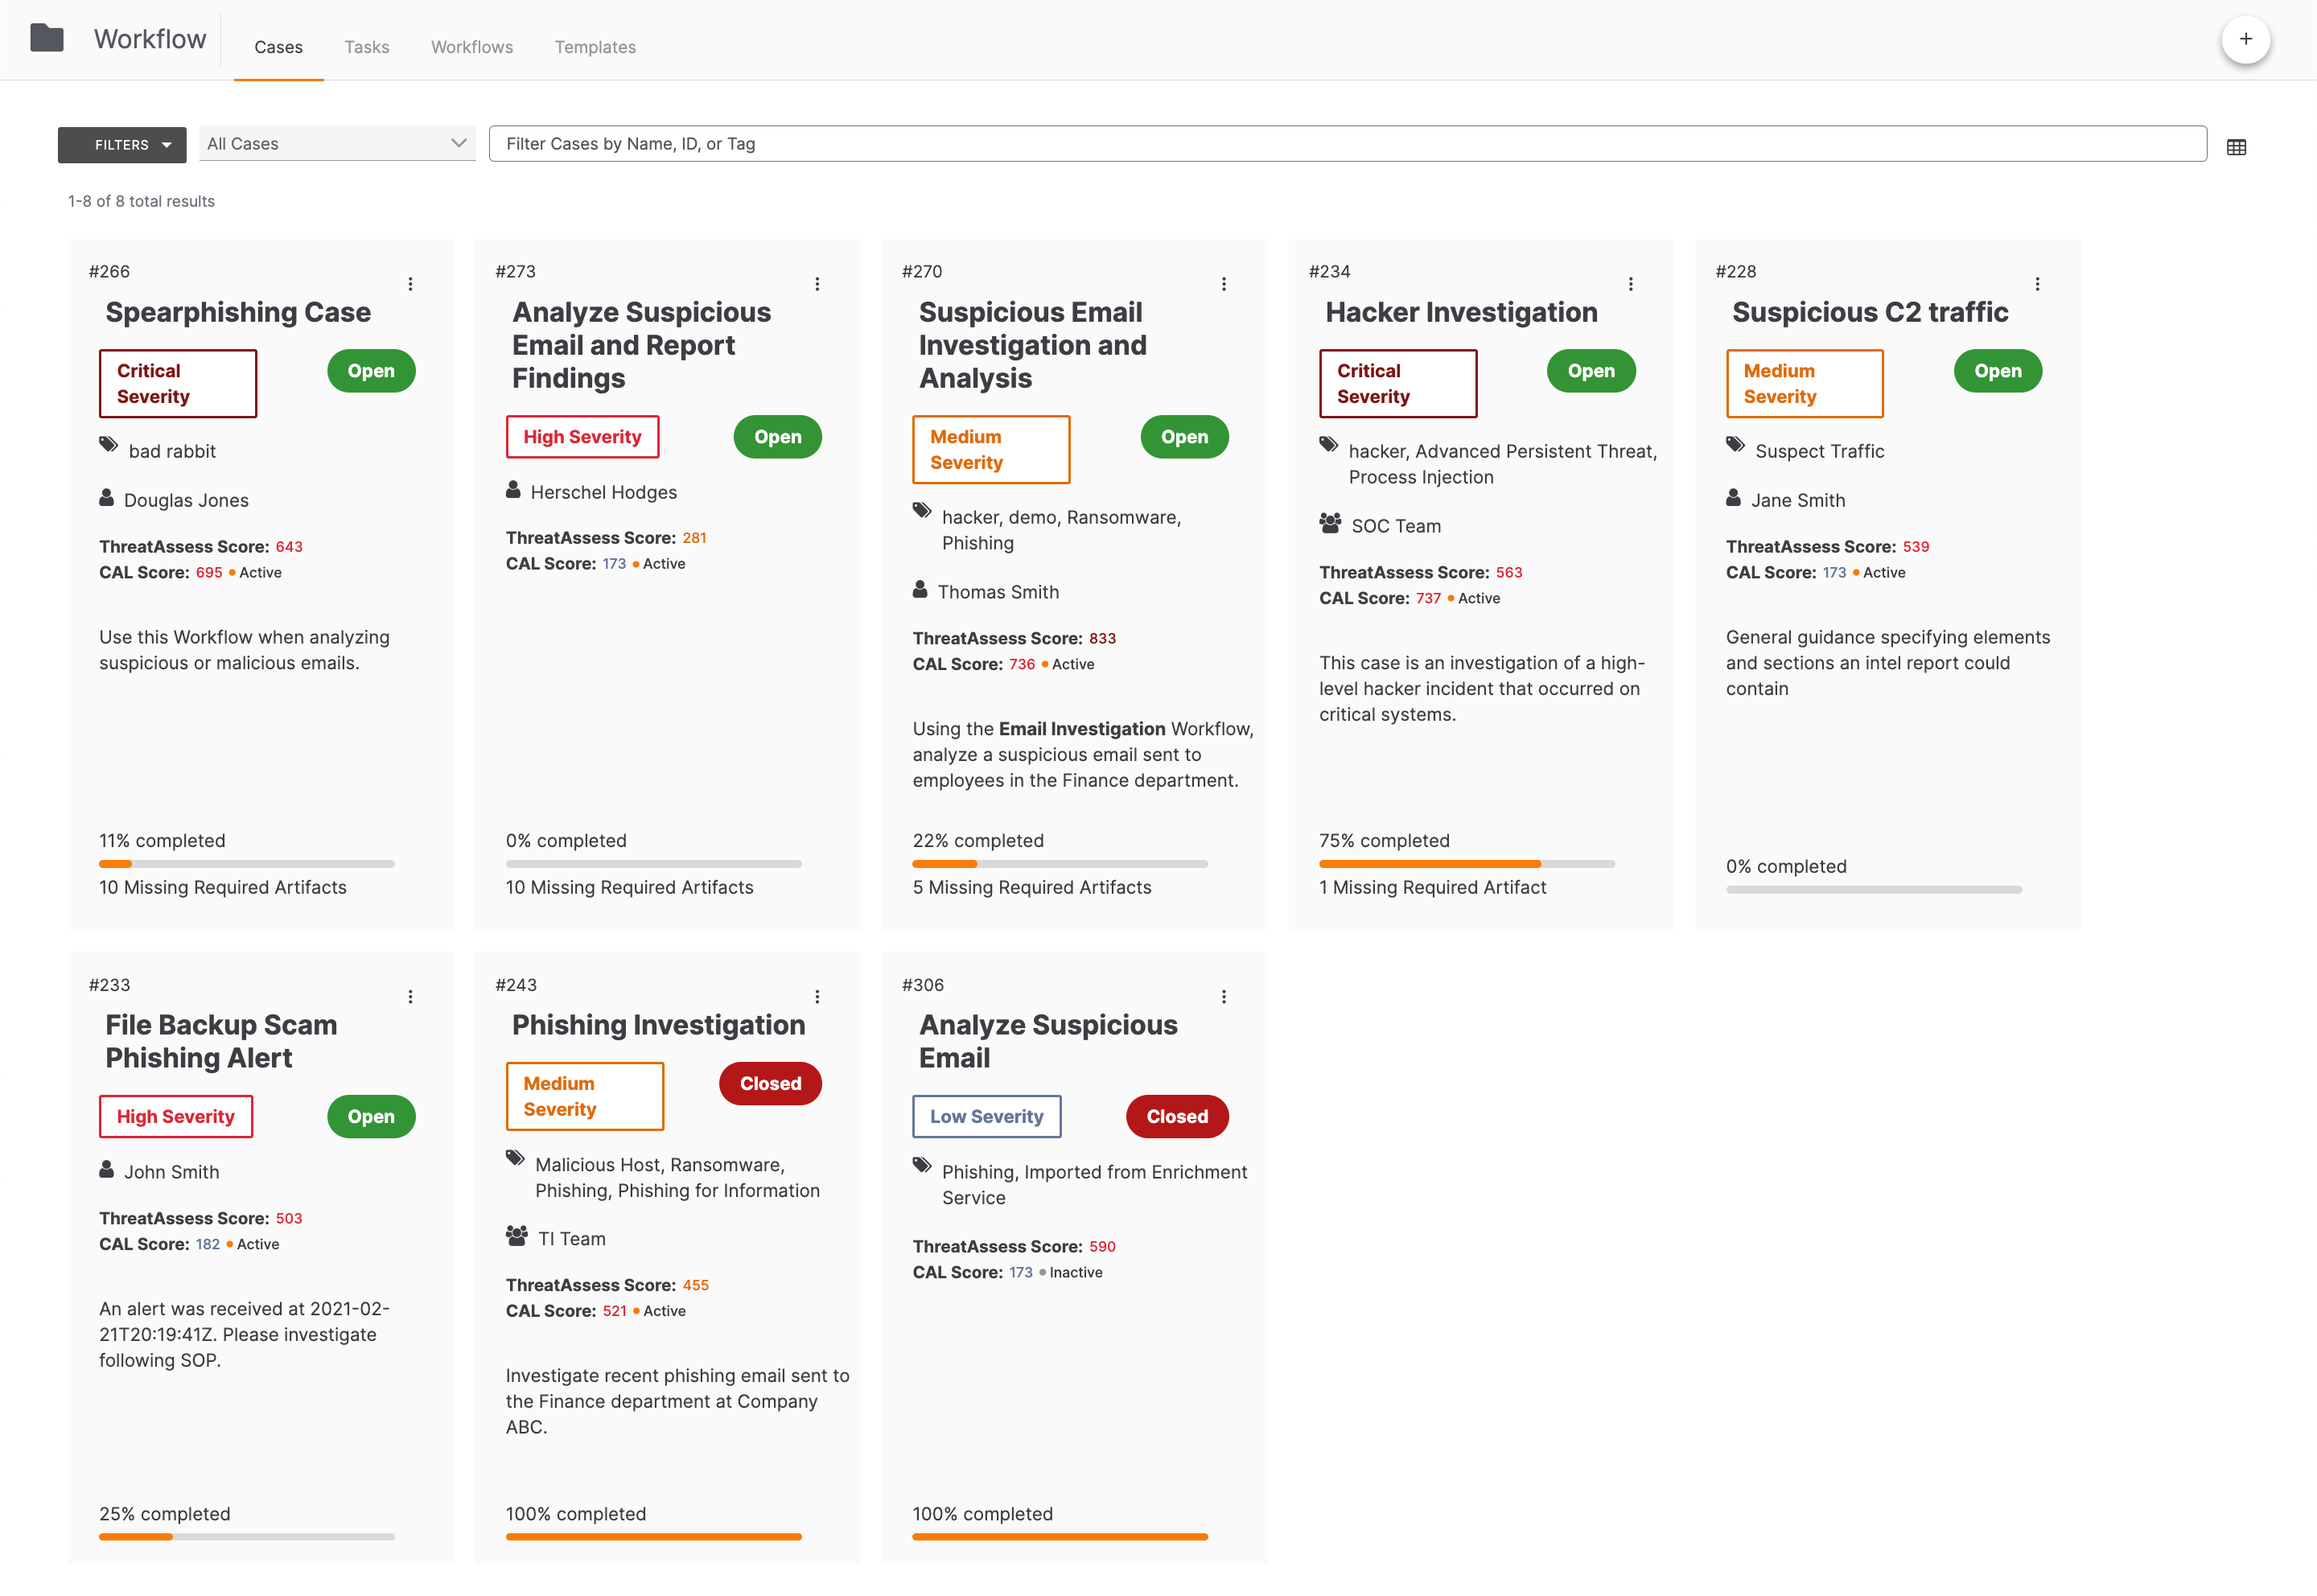
Two view options are available for the Cases screen: Grid View and List View. By default, the Cases screen is displayed in Grid View. To open a Case and view its full details, click on its card (in Grid View) or table row (in List View).
Grid View
In Grid View, Cases are displayed as a series of cards. Each card displays the following information for the corresponding Case (Figure 2):
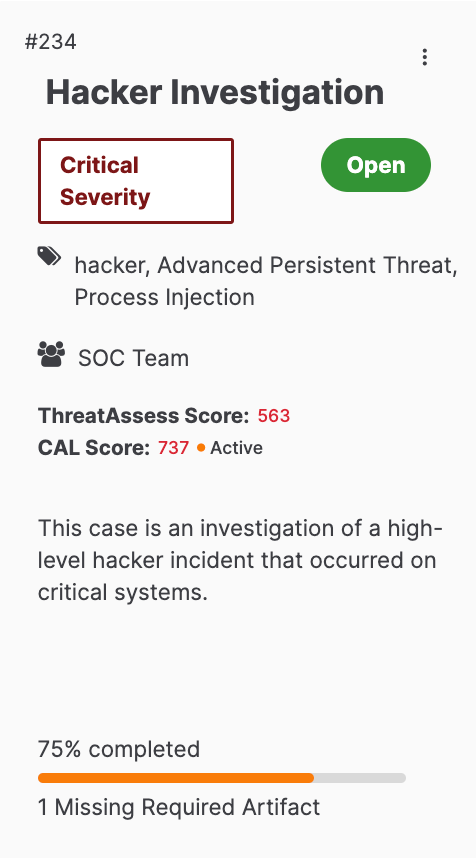
- Case ID: The Case’s ID number (234 in this example) is displayed at the upper-left corner of the card.
- Administrative options menu: Click the vertical ellipsis at the upper-right corner of the card to access a menu with administrative options for assigning and deleting the Case. See the “Case Administrative Options” section for more information.
- Name: The Case’s name (Hacker Investigation in this example) is displayed at the top of the card.
- Severity: The Case’s severity is displayed under the name in a corresponding color (maroon for Critical, red for High, orange for Medium, and gray for Low).
- Status: The Case’s status is displayed under the name in a corresponding color (green for Open, red for Closed).
- Tags: This section, denoted by the
 icon, displays the Tags that have been applied to the Case. These are the same standard Tag and ATT&CK® Tag objects used throughout ThreatConnect.
 - Assignee: This section displays the user (
 ) or user group (
 ) to which the Case is assigned.
 - ThreatAssess Score: This section displays the highest ThreatAssess score among the Case’s Artifacts with a ThreatAssess score. A value is displayed only when at least one of the Case’s Artifacts has a ThreatAssess score.
- CAL Score: This section displays the highest CAL™ score among the Case’s Artifacts with a CAL score and an active Indicator Status set by CAL. A value is displayed only when at least one of the Case’s Artifacts has a CAL score and an active Indicator Status set by CAL.
- Description: The text in the middle of the card displays the Case’s description.
- Percentage Complete: The bar at the bottom of the card shows the percentage of the Case’s Tasks that have been completed.
- # Missing Required Artifacts: This section displays the number of required Artifacts that have not been collected for the Case.
List View
While viewing the Cases screen in Grid View, click List View icon at the top right of the screen to toggle to List View (Figure 3).
 at the top right of the screen.
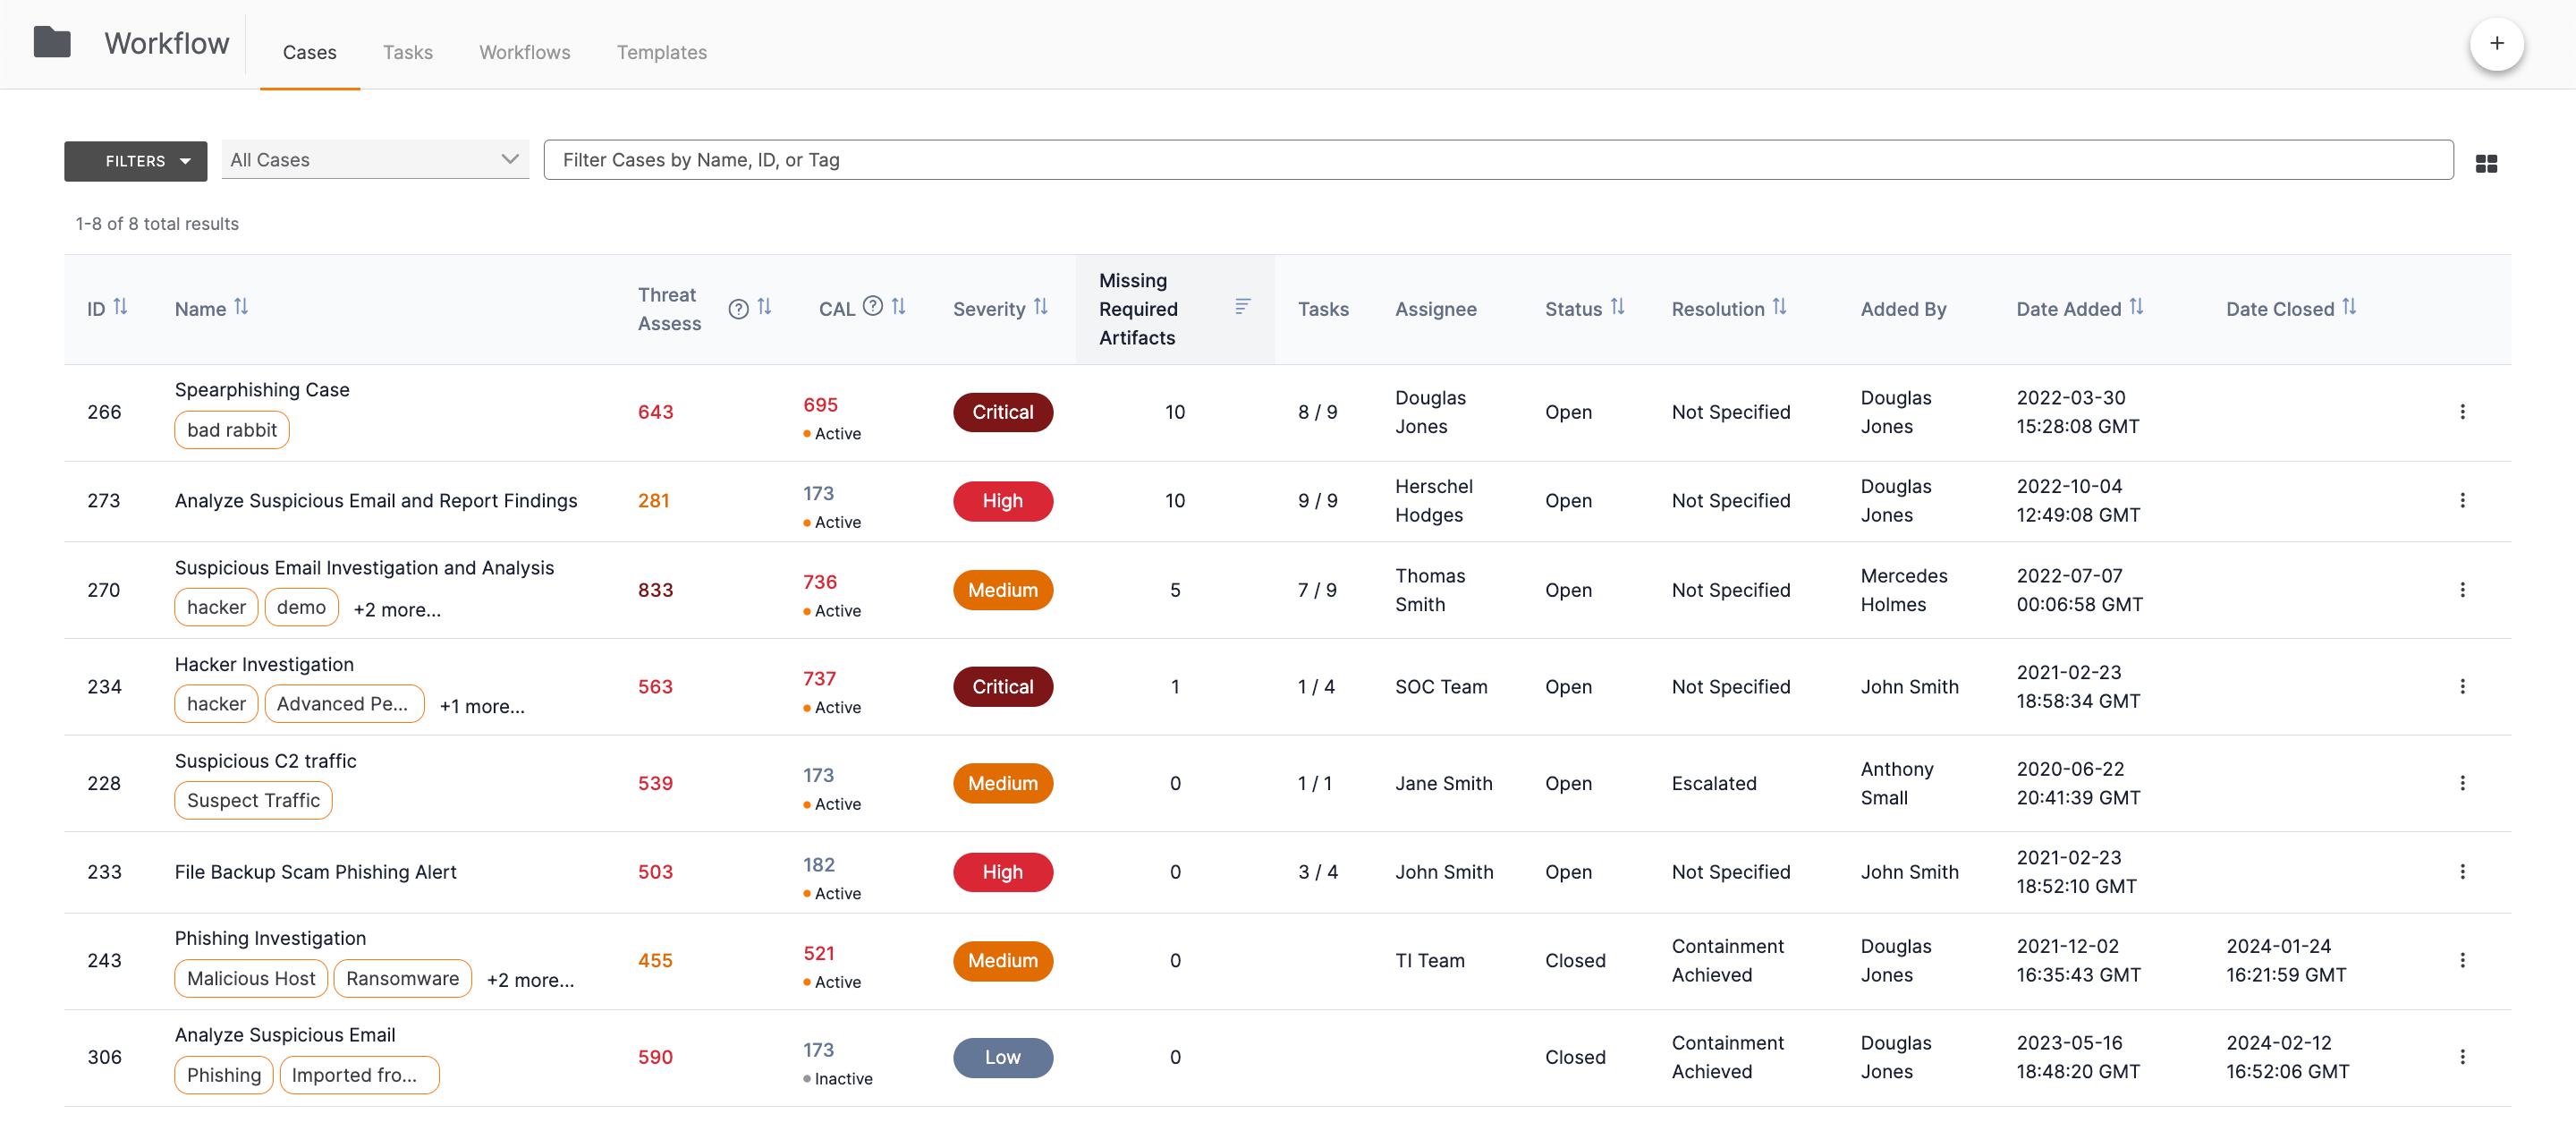
List View displays Cases in a paginated table with the following columns:
- ID: The Case’s ID number.
- Name: The Case’s name and the Tags applied to the Case. These are the same standard Tag and ATT&CK Tag objects used throughout ThreatConnect.
- ThreatAssess: The highest ThreatAssess score among the Case’s Artifacts with a ThreatAssess score. A value is displayed only when at least one of the Case’s Artifacts has a ThreatAssess score.
- CAL: The highest CAL score among the Case’s Artifacts with a CAL score and an active Indicator Status set by CAL. A value is displayed only when at least one of the Case’s Artifacts has a CAL score and an active Indicator Status set by CAL.
- Severity: The Case’s severity, which is displayed in a corresponding color (maroon for Critical, red for High, orange for Medium, and gray for Low).
- Missing Required Artifacts: The number of required Artifacts that have not been collected for the Case.
- Tasks: The number of Tasks remaining out of the total number of Tasks in the Case. If all Tasks in a Case have been completed, or if no Tasks have been added to a Case, no value will be displayed in this column for the Case.
- Assignee: The user or user group to which the Case is assigned.
- Status: The Case’s status.
- Resolution: The Case’s resolution.
- Added By: The name of the user who created the Case.
- Date Added: The date and time when the Case was created.
- Date Closed: The date and time when the Case was closed.
- Administrative options menu: Click the vertical ellipsis in this column to access a menu with administrative options for assigning and deleting the Case. See the “Case Administrative Options” section for more information.
In List View, you can sort Cases by the ID, Name, ThreatAssess, CAL, Severity, Missing Required Artifacts, Status, Resolution, Date Added, and Date Closed column headings. By default, Cases are arranged in decreasing order of severity, denoted by the down arrow next to the Severity column heading. Sorting preferences will persist when you navigate away from the Cases screen or log out of ThreatConnect.
Case Administrative Options
Click the vertical ellipsis at the upper-right corner of a Case while in Grid View (Figure 2) or in the rightmost column of a Case while in List View (Figure 3) to display a dropdown menu with the following administrative options: Assign and Remove.
Assign
Select Assign from the administrative options menu to to update the Case’s assignee. A Case may be assigned to a user or user group.
Remove
Select Remove from the administrative options menu to remove (i.e., delete) the Case.
Filtering Cases
On the Cases screen, you can use the FILTERS selector and search bar to filter Cases. You can also use several preset filters to set the default display for the Cases screen. Filter settings will persist when you navigate away from the Cases screen or log out of ThreatConnect.
FILTERS Selector
The FILTERS selector provides the following options for filtering Cases:
- Severity: Use this option to filter Cases by their severity.
- Status: Use this option to filter Cases by their status.
- Resolution: Use this option to filter Cases by their resolution.
- Assignee: Use this option to filter Cases by the user or user group to which they are assigned.
- Date Added: Use this option to filter Cases by the date and time when they were created.
- Date Closed: Use this option to filter Cases by the date and time when they were closed.
- View cases that have: Select one or more of the following filter options from the dropdown menu:
- ThreatAssess Score: Select this checkbox to only display Cases that contain at least one Artifact with a ThreatAssess score.
- Active CAL Score: Select this checkbox to only display Cases that contain at least one Artifact with a CAL score and an active Indicator Status in CAL.
- Missing Required Artifacts: Select this checkbox to only display Cases where at least one required Artifact needs to be collected.
After configuring the desired filters, click the APPLY button on the FILTERS selector. To reset the filters, click the CLEAR button on the FILTERS selector.
When filters are applied, an orange circle is displayed at the upper-left corner of the FILTERS selector. This element alerts you to the fact that you might be viewing an “incomplete” set of data.
Default Display Options
The dropdown to the right of the FILTERS selector provides the following default display options for the Cases screen:
- All Cases: Select this option to display all Cases in your Organization.
- All Open Cases: Select this option to display only Cases with a status of Open.
- My Open Cases: Select this option to display only Cases with a status of Open that are assigned to you or a user group to which you belong.
- My Closed Cases: Select this option to display only Cases with a status of Closed that are assigned to you or a user group to which you belong.
- My Cases: Select this option to display only Cases, regardless of status, that are assigned to you or a user group to which you belong.
- My High Severity Open Cases: Select this option to display only Cases with a severity level of High and a status of Open that are assigned to you or a user group to which you belong.
- My Regular Open Cases: Select this option to display only Cases with a severity level of Medium or Low and a status of Open that are assigned to you or a user group to which you belong.
If you used the FILTERS selector to filter Cases and the selector's configuration matches one of the default display options (e.g., My Open Cases), then that option will be displayed in the dropdown. Otherwise, a selection of Custom will be displayed in the dropdown.
Filtering Cases by Name, ID, or Tag
To filter Cases by name, ID number, or applied Tags, use the search bar at the top of the Cases screen.
ThreatConnect® is a registered trademark, and CAL™ is a trademark, of ThreatConnect, Inc.
MITRE ATT&CK® and ATT&CK® are registered trademarks of The MITRE Corporation.
20122-02 v.05.B