Overview
The Playbooks feature lets you automate cyberdefense tasks via a drag-and-drop interface in ThreatConnect®. The interface uses Triggers (tools that create an event that initiates the actions defined within a Playbook, such as creating a new IP address Indicator or sending a phishing email to an inbox) to pass data to Apps, which perform a variety of functions, including data enrichment, malware analysis, and blocking actions.
The Playbooks screen lists all Playbooks, including Playbook Components and Workflow Playbooks, available in your Organization. On this screen, you can perform a variety of actions, including creating Playbooks, searching for and opening Playbooks, importing and exporting Playbooks, cloning Playbooks, and deleting Playbooks.
Before You Start
User Roles
- To view Playbooks, your user account can have any Organization role.
- To create, import, clone, delete, and export Playbooks, your user account must have an Organization role of Standard User, Sharing User, Organization Administrator, or App Developer.
Prerequisites
- To have access to Playbooks and the Playbooks screen, turn on the Playbooks system setting for your ThreatConnect instance on the System Settings screen (must be a System Administrator to perform this action).
Viewing Playbooks and Components
Click Playbooks on the top navigation bar to open the Playbooks screen and view all Playbooks and Components in your Organization (Figure 1).

The Playbooks screen displays Playbooks and Components in a paginated table with the following columns:
- Type: The type of Playbook object and whether it is active and available for execution, as indicated by a
 . The following icons represent each type of Playbook object that the Playbooks screen may display:
 represents a standard Playbook.
 represents a Playbook Component.
 represents a Workflow Playbook.
- Name: The name and, if provided, description of the Playbook or Component. Click on the name to open the Playbook or Component in the Playbook Designer. If there is a WebHook or MailboxTrigger in the Playbook, the Trigger’s URL endpoint (WebHook) or target mailbox (Mailbox) will be displayed under the Playbook’s name. (Components and Workflow Playbooks do not have URL endpoints or target mailboxes associated with them.) If you hover over any part of a row containing an active Playbook with a WebHook Trigger, two icons will be displayed to the right of the endpoint:
- Copy Endpoint
 : Click this icon to copy the Trigger’s URL endpoint.
 - Execute Endpoint
 : Click this icon to execute the Playbook.
- Copy Endpoint
- Version: The version number of the Playbook or Component.
- Trigger: The type of Trigger used in the Playbook. For Components, this column displays a value of “Component.” For Workflow Playbooks, this column displays a value of “Workflow.” If the Playbook does not have a Trigger (e.g., if it is not yet fully designed and configured), then this column will be blank.
- Labels: The labels that have been applied to the Playbook or Component. Labels are keywords that are used to classify Playbooks and Components. For example, labels such as “In Design” and “QA” can be used to track the development or status of Playbooks, and labels such as “Enrichment” and “Reporting” can be used to make filtering by Playbook type more manageable.
- Log Level: The Playbook’s log level. Components do not have log levels.
- Updated: The date and time when the Playbook or Component was last updated.
- ROI: Click the graph
 icon in this column to open a window with the Playbook’s return on investment (ROI) metrics. This window will display no data for Components, as Components do not have ROI metrics.
 - ⋮ menu : Click the ⋮ menu for a Playbook or Component to access the following administrative options: Clone, Delete, Export, and Import New Version.
Filtering Playbooks and Components
You can filter Playbooks and Components with the following filter options at the top of the Playbooks screen:
- Name: Use this option to filter Playbooks and Components by name.
- Status: Use this option to filter Playbooks and Components by status (Active or Inactive).
- Type: Use this option to filter Playbooks by one or more Trigger types. To view only Components, select Component in the dropdown. To view only Workflow Playbooks, select Workflow in the dropdown.
- Label: Use this option to filter Playbooks by one or more labels.
Creating Playbooks
On the Playbooks screen, you can create standard Playbooks, Playbook Components, and Workflow Playbooks. Follow these steps to create a standard Playbook:
- Click Playbooks on the top navigation bar.
- Hover over NEW at the upper-left corner of the Playbooks screen and select Create Playbook.
- Fill out the fields on the Create Playbook window (Figure 2) as follows:
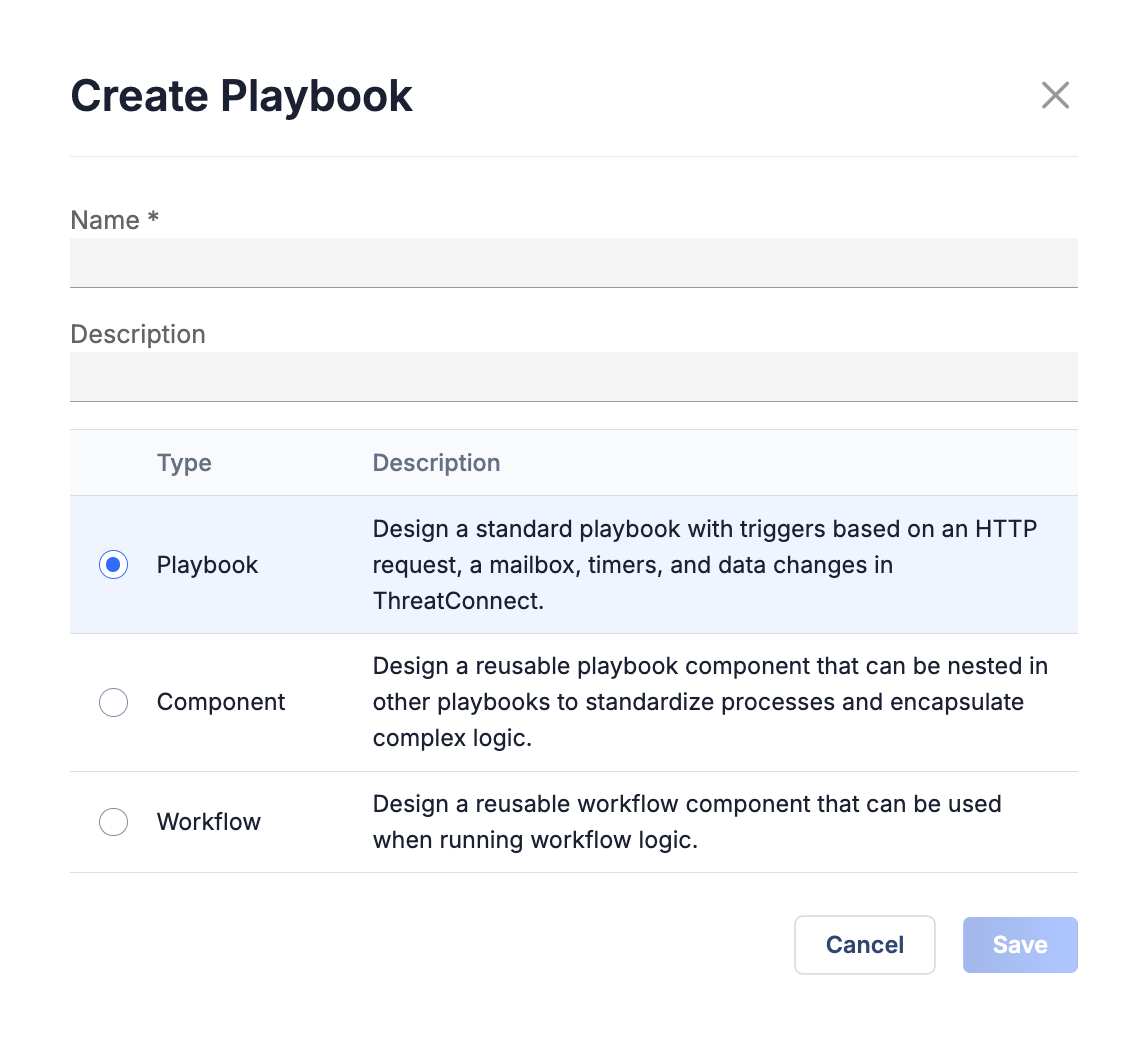
- Name: Enter a unique name for the Playbook.
- Description: (Optional) Enter a description of the Playbook.
- Type: Leave Playbook selected.
- Click Save on the Create Playbook window to create the Playbook and open it in the Playbook Designer.
Importing Playbooks and Components
You can import Playbooks and Components using a Playbook file or Share Token. Additionally, you can import a new version of an existing Playbook or Component.
Importing Playbook Files
Follow these steps to import a Playbook or Component by uploading a Playbook file (.pbxz or .pbx) saved on your local drive:
- Click Playbooks on the top navigation bar.
- Hover over NEW at the upper-left corner of the Playbooks screen and select Import Playbook.
- Locate and select a .pbxz or .pbx file to upload. If importing a .pbxz file, the Import Playbook drawer will open after selecting the file (Figure 3). If importing a .pbx file, the Playbook or Component will open in the Playbook Designer automatically.
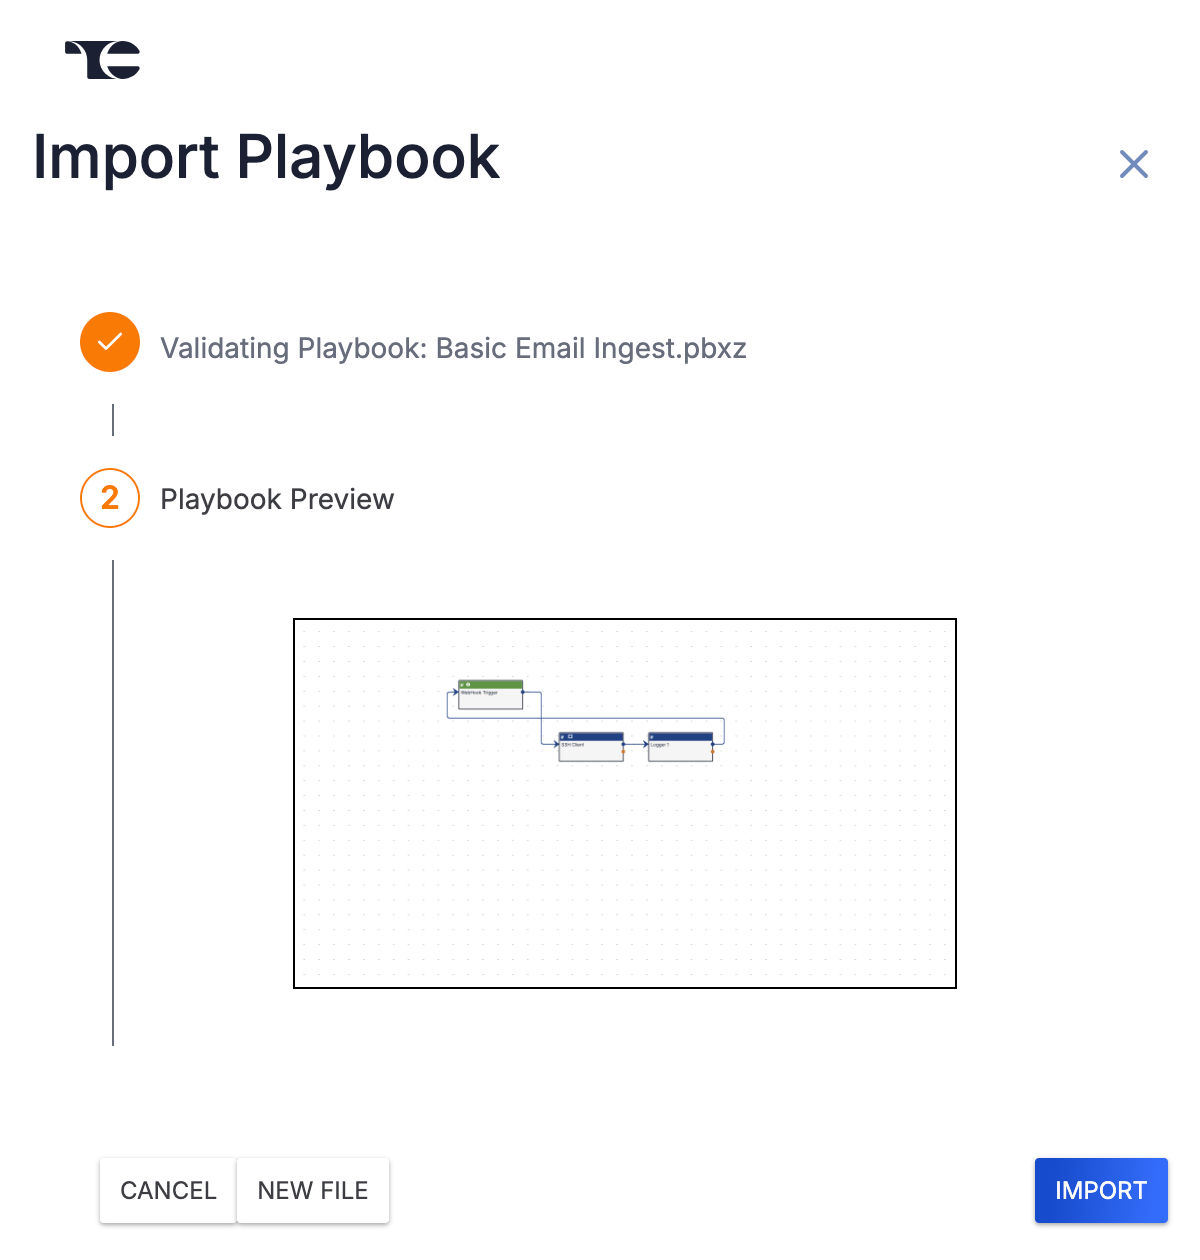
- (Optional) Review the preview image of the Playbook or Component that will be imported on the Playbook Preview step. To select a different Playbook file to import, click NEW FILE on the Import Playbook drawer.HintClick on the preview image to expand it.
- Click IMPORT on the Import Playbook drawer to import the selected .pbxz file as a new Playbook or Component and open it in the Playbook Designer.ImportantDepending on the configuration of the Playbook or Component you are importing, the Import Playbook drawer may display one or more additional steps that you must review before you can click IMPORT. See the “Additional Import Steps” section for more information.
Importing Shared Playbooks and Components
Follow these steps to import a shared Playbook or Component using its Share Token:
- Click Playbooks on the top navigation bar.
- Hover over NEW at the upper-left corner of the Playbooks screen and select Import Shared Playbook.
- On the Import Playbook drawer (Figure 4), enter the Share Token for the shared Playbook or Component in the Share Token box, and then click VERIFY.
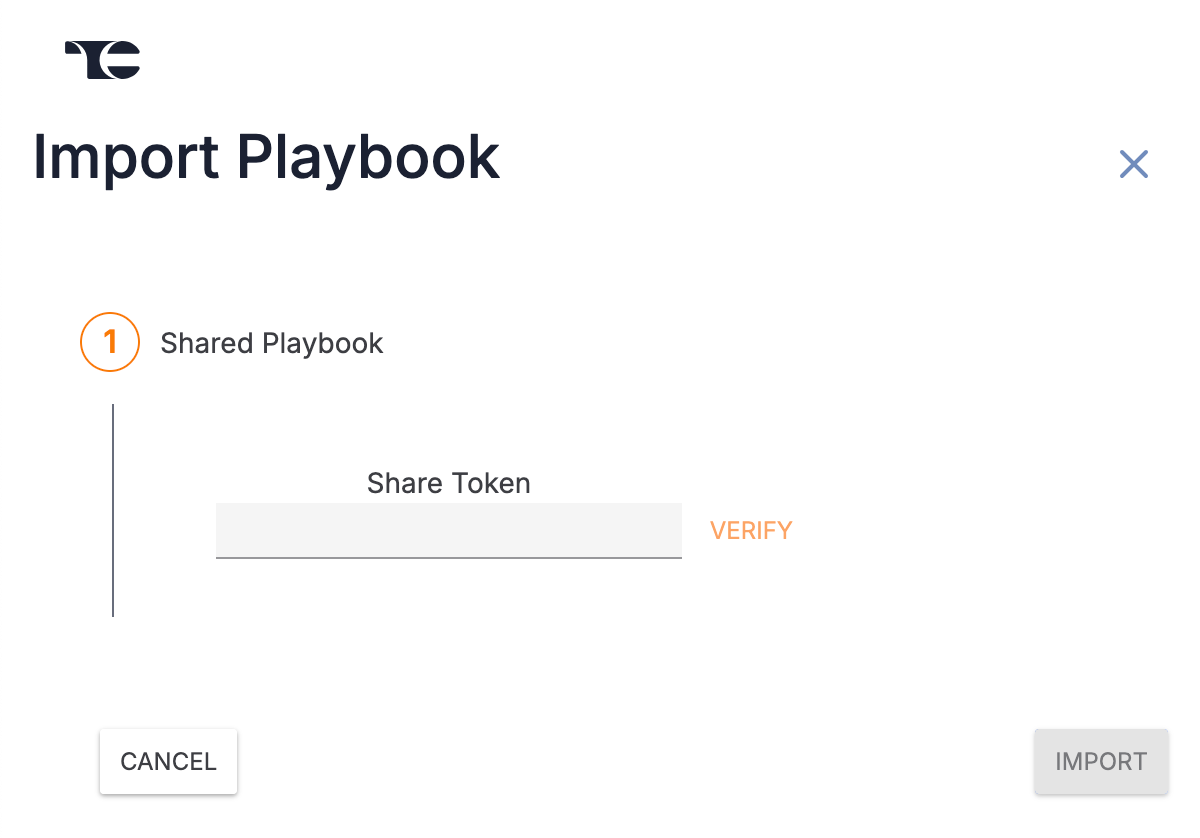
- If the Share Token is valid, the Import Playbook drawer will display the Playbook Preview step (Figure 5). If the Share Token is invalid, the Import Playbook drawer will display a message stating that ThreatConnect is unable to import the Playbook and asking you to confirm whether the token is valid.
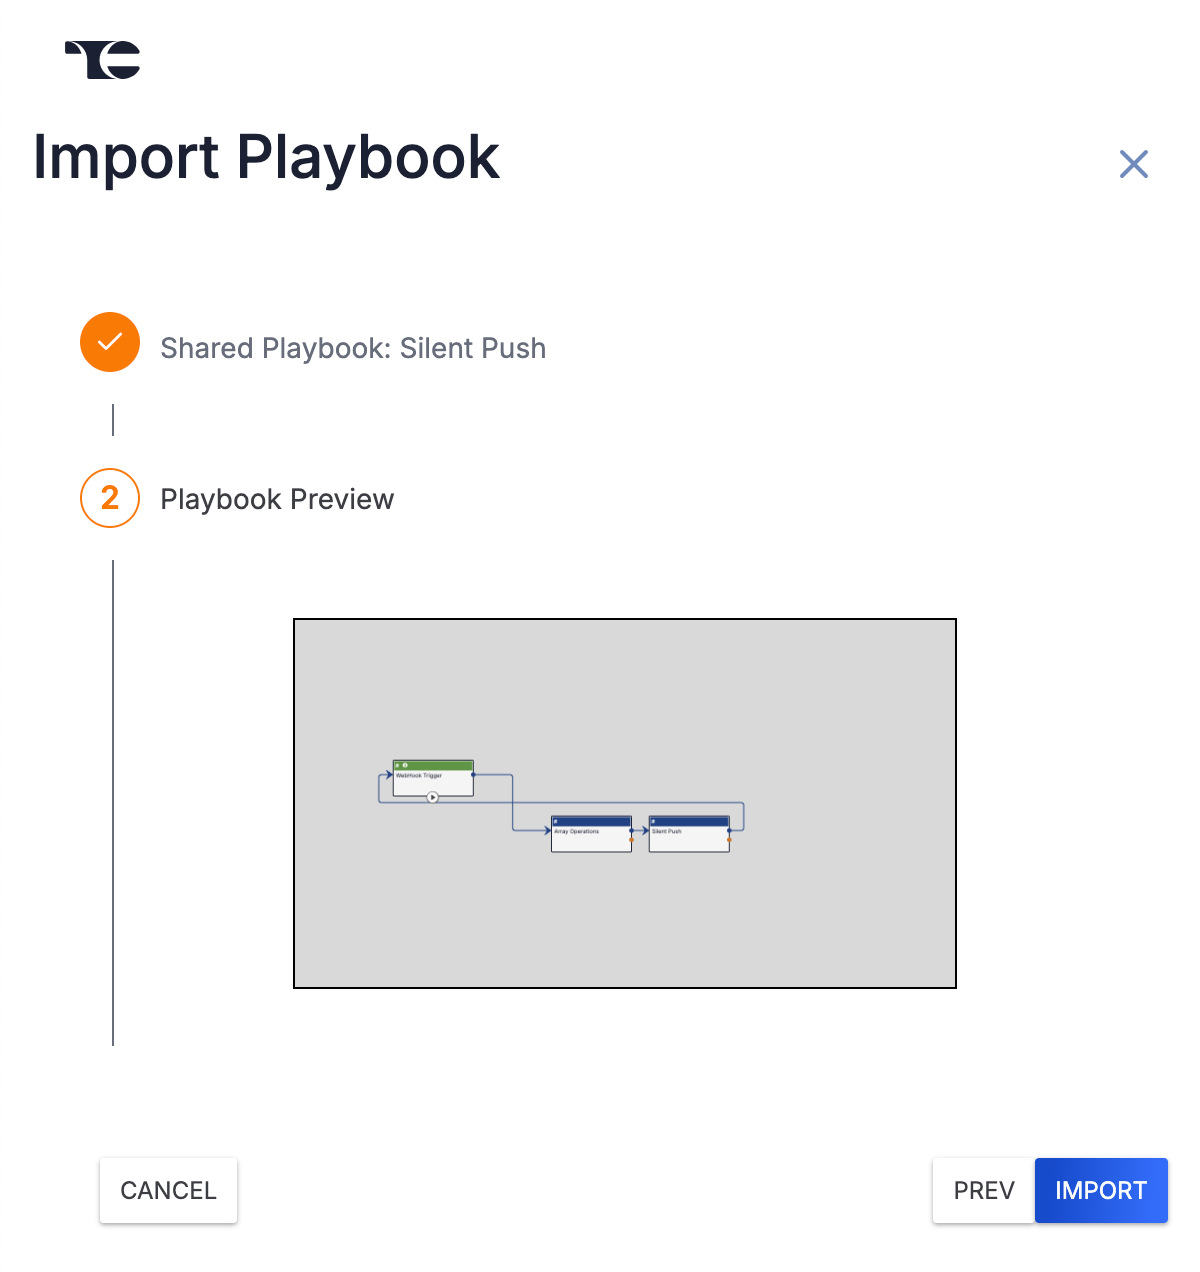
- (Optional) Review the preview image of the Playbook or Component that will be imported on the Playbook Preview step.HintClick on the preview image to expand it.
- Click IMPORT on the Import Playbook drawer to import the shared Playbook or Component as a new Playbook or Component and open it in the Playbook Designer.ImportantDepending on the configuration of the Playbook or Component you are importing, the Import Playbook drawer may display one or more additional steps that you must review before you can click IMPORT. See the “Additional Import Steps” section for more information.
Importing New Playbook and Component Versions
Follow these steps to import a new version of a Playbook or Component (that is, import a Playbook or Component from your local drive as a new version of an existing Playbook or Component):
- Click Playbooks on the top navigation bar.
- Click the ⋮ menu in the rightmost column for a Playbook or Component and select Import New Version.
- Locate and select a .pbxz or .pbx file to upload. If importing a .pbxz file, the Import Playbook Version drawer will open after selecting the file (Figure 6). If importing a .pbx file, the new version of the Playbook or Component will open in the Playbook Designer automatically.
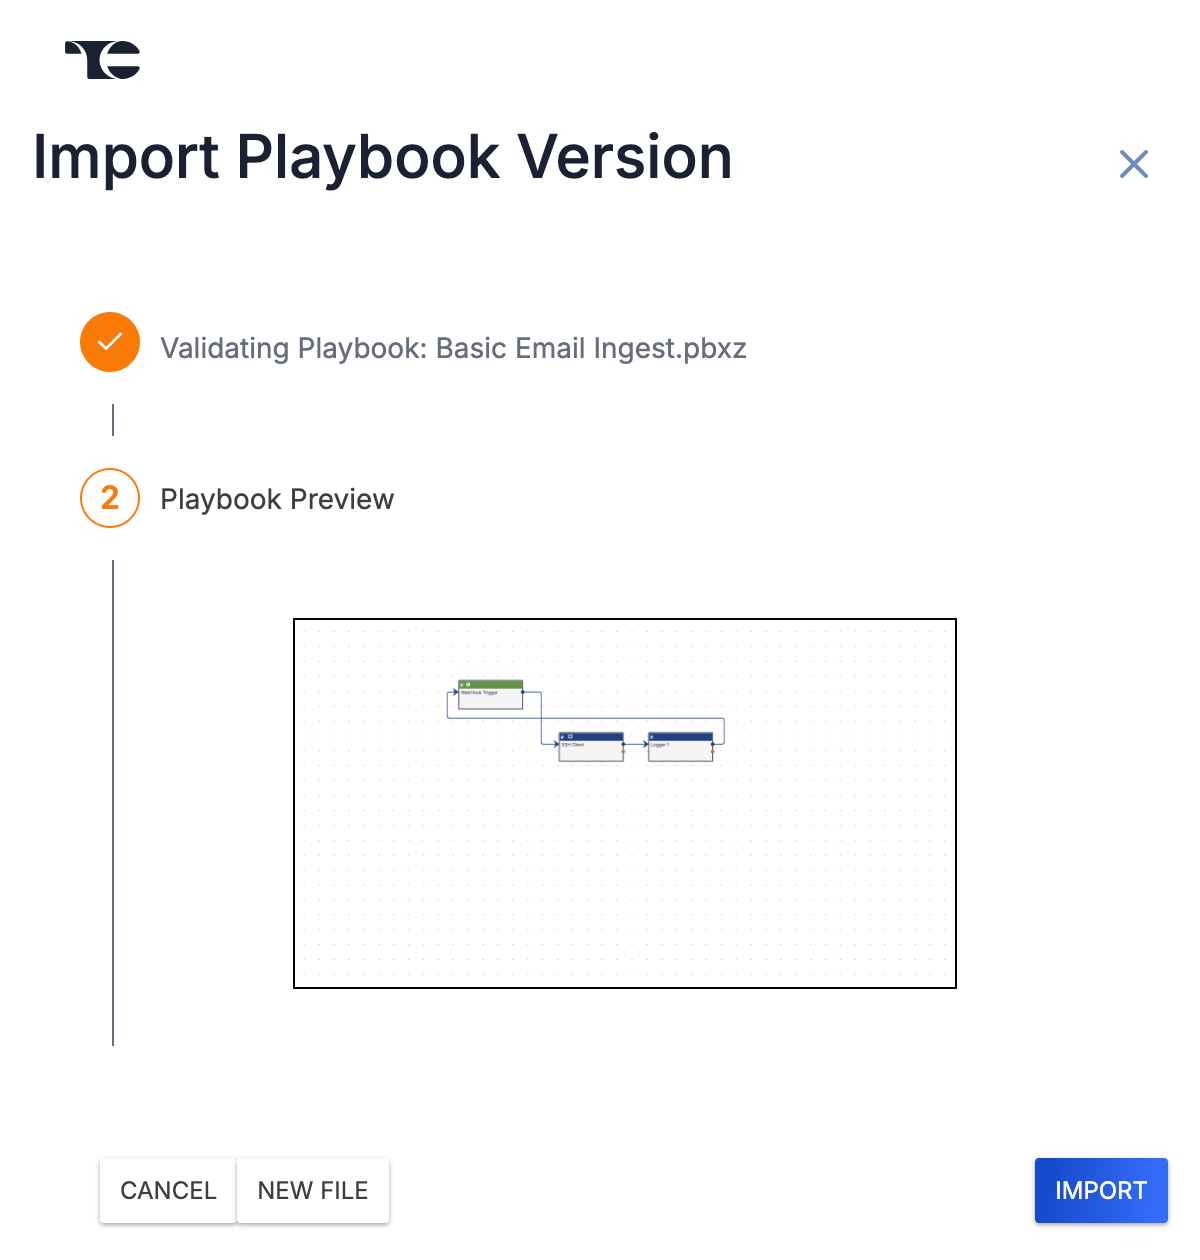
- (Optional) Review the preview image of the Playbook or Component that will be imported on the Playbook Preview step. To select a different Playbook file to import, click NEW FILE on the Import Playbook Version drawer.HintClick on the preview image to expand it.
- Click IMPORT on the Import Playbook Version drawer to import the selected .pbxz file as a new version of the Playbook or Component and open it in the Playbook Designer.ImportantDepending on the configuration of the Playbook or Component you are importing, the Import Playbook Version drawer may display one or more additional steps. See the “Additional Import Steps” section for more information.
Additional Import Steps
Depending on the configuration of the Playbook or Component you are importing, the Import Playbook or Import Playbook Version drawer may display one or more of the following additional steps:
- Components to Install: If importing a Playbook or Component that contains one or more Components, this step will list each Component that will be installed during the import process. All Components that do not already exist in your Organization will be imported. If a Component with the same name as a Component in the Playbook file being imported already exists in your Organization and is active, the Component in the Playbook file will not be imported, and the existing Component will be called by the Playbook when the Playbook is run.
- Missing Apps: If importing a Playbook or Component that contains one or more Apps that are not installed on your ThreatConnect instance, you will be prompted to install each App and grant your Organization permission to use the App.
- Trigger Services: If importing a Playbook with a Service Trigger, you will be prompted to select an existing Trigger Service to associate with the Service Trigger.
- Variables: If importing a Playbook or Component that uses one or more variables that do not exist in your Organization, you will be prompted to enter a value for each variable. These variables will be created as Organization-level variables in your Organization.
Cloning Playbooks and Components
Follow these steps to clone a Playbook or Component:
- Click Playbooks on the top navigation bar.
- Click the ⋮ menu in the rightmost column for a Playbook or Component and select Clone.
- Fill out the fields on the Clone Playbook window (Figure 7) as follows:
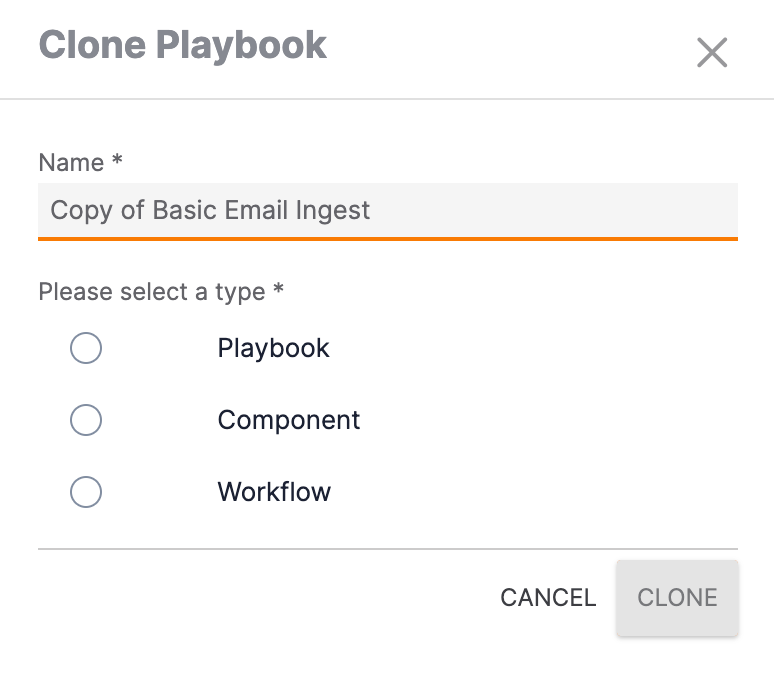
- Name: Enter a unique name for the new Playbook or Component. By default, the clone’s name will be Copy of <original Playbook or Component name>.ImportantWhen you clone a Playbook or Component, the default name for the clone is always Copy of <original Playbook or Component name>. If a Playbook or Component has previously been cloned and its name was not edited (i.e., its name was saved as Copy of <original Playbook or Clone name>), the name for any subsequent copies of the Playbook or Component will need to be manually edited.
- Please select a type: Select the type of object that the Playbook or Component will be cloned as (standard Playbook, Playbook Component, or Workflow Playbook).
- Name: Enter a unique name for the new Playbook or Component. By default, the clone’s name will be Copy of <original Playbook or Component name>.
- Click CLONE on the Clone Playbook window to create a clone (i.e., copy) of the Playbook or Component and open it in the Playbook Designer.
Deleting Playbooks and Components
Follow these steps to delete a Playbook or Component:
- Click Playbooks on the top navigation bar.
- Click the ⋮ menu in the rightmost column for a Playbook or Component and select Delete. Then click Delete on the Delete Playbook? or Delete Component? window.
Exporting Playbooks and Components
Follow these steps to export a Playbook or Component to a Playbook file (.pbxz):
- Click Playbooks on the top navigation bar.
- Click the ⋮ menu in the rightmost column for a Playbook or Component and select Export. If there are no encrypted parameters in the Playbook or Component, it will be downloaded as a Playbook file automatically. If there are encrypted variables in the Playbook or Component, the Export Playbook drawer will open (Figure 8).
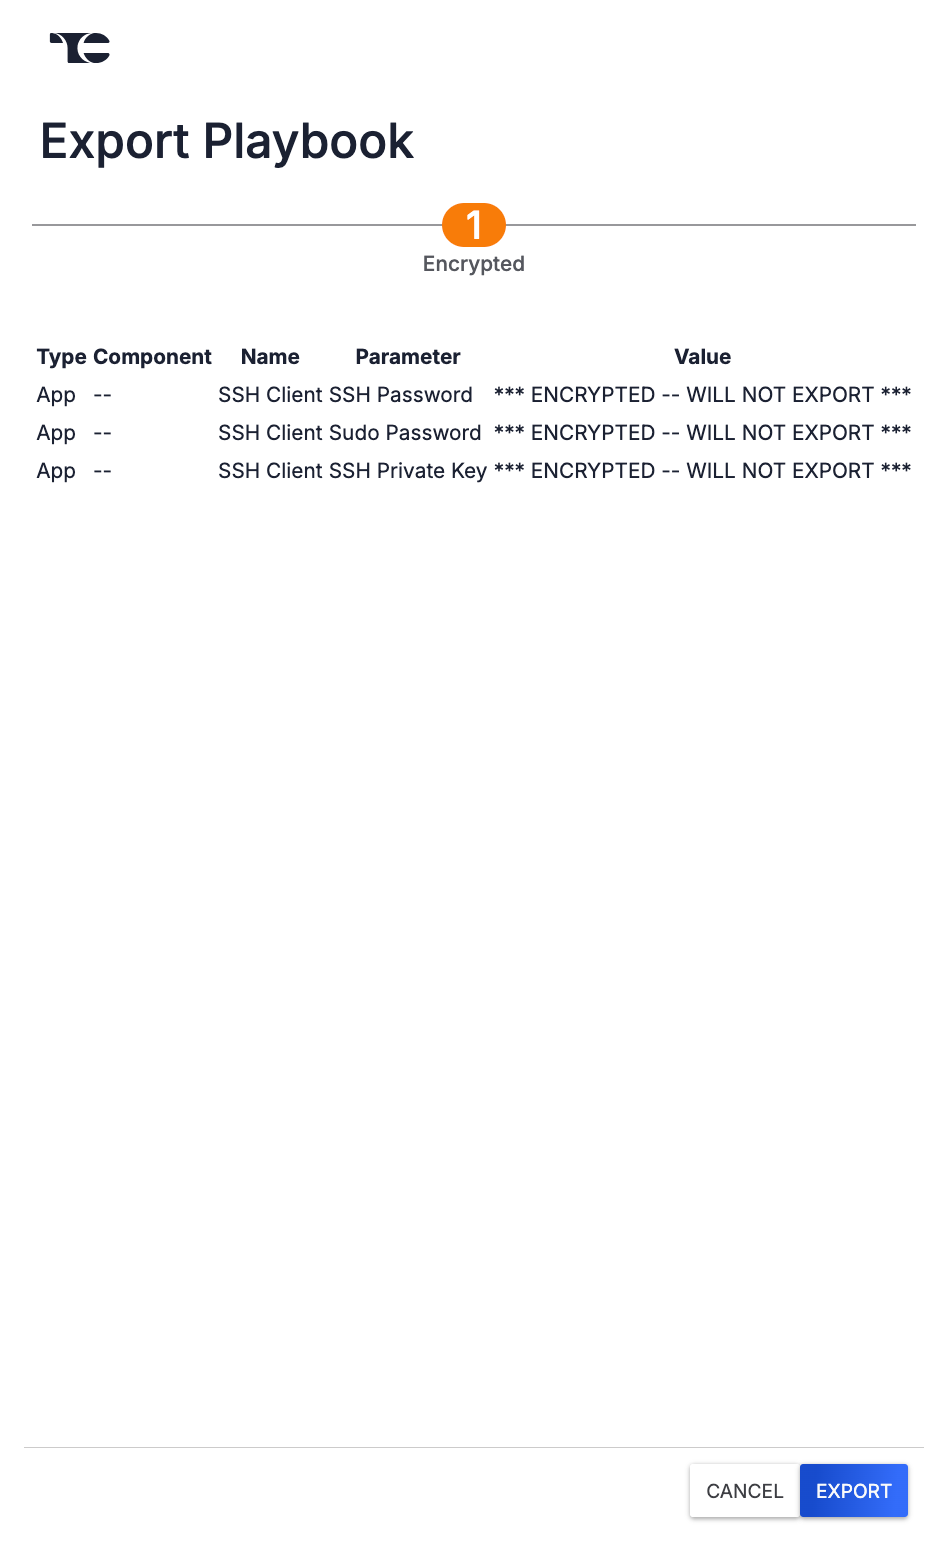
- Review the list of encrypted parameters, and then click EXPORT to download the Playbook or Component as a Playbook file.
ThreatConnect® is a registered trademark of ThreatConnect, Inc.
20112-01 v.03.A