Overview
The Threat Graph feature in ThreatConnect® provides a graph-based interface that you can use to discover, visualize, and contextualize associations and relationships between Indicators, Groups, Cases, and Tags. Within Threat Graph, you can import Indicators added to the graph that do not exist in ThreatConnect into one of your owners. This lets you further investigate and analyze Indicators of interest you come across while pivoting on relationships in Threat Graph.
Before You Start
User Roles
- To import Indicators into an Organization from Threat Graph, your user account must have an Organization role of Standard User, Sharing User, Organization Administrator, or App Developer.
- To import Indicators into a Community or Source from Threat Graph, your user account must have a Community role of Contributor, Editor, or Director for that Community or Source.
Importing Indicators Into an Owner
The Graph Objects drawer (Figure 1) provides two ways to import Indicators into one of your ThreatConnect owners from Threat Graph:
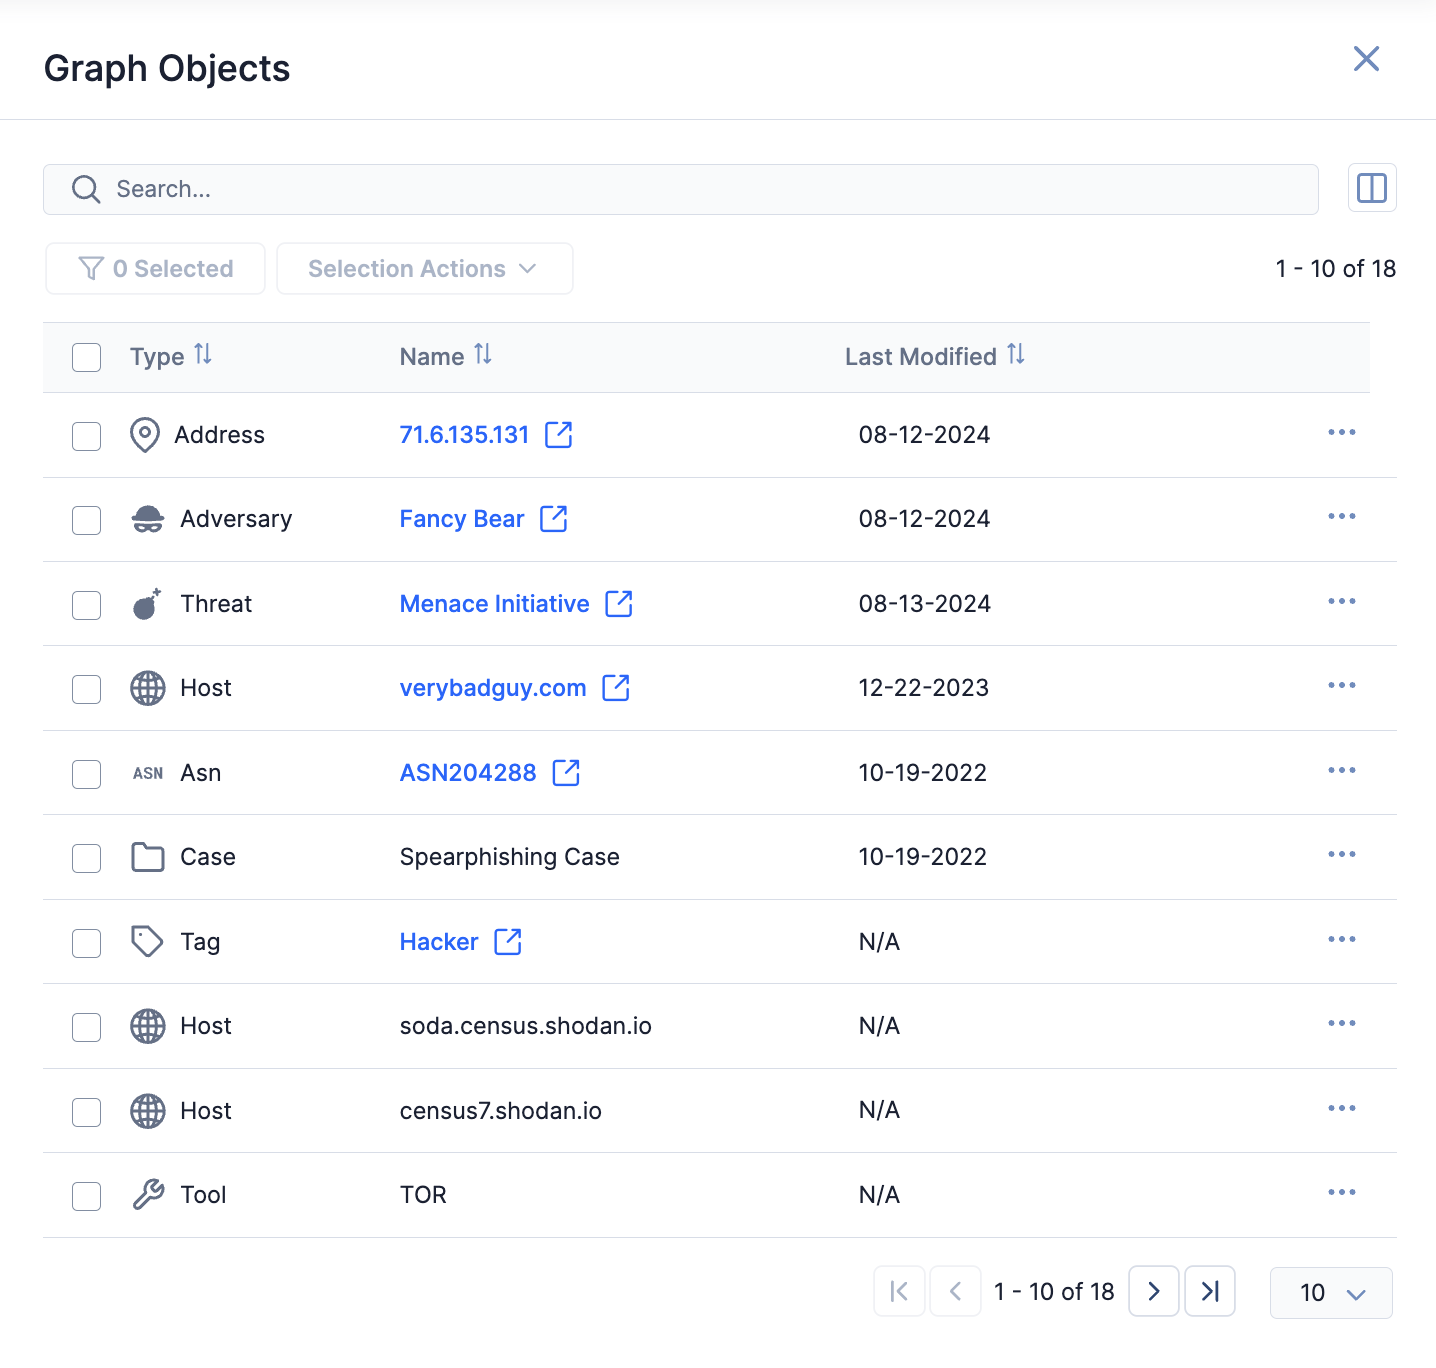
- The Selection Actions menu (import one or more Indicators)
- The Options (⋯) menu for an Indicator (import one Indicator)
Selection Actions Menu
Follow these steps to use the Selection Actions menu in the Graph Objects drawer to import one or more Indicators into one of your ThreatConnect owners from Threat Graph:
- Open Threat Graph.
- Ensure there is at least one node on the graph that corresponds to an Indicator. If there is no such node on the graph, pivot in ThreatConnect, CAL™, or an enrichment service to add one.
- Click View Table in the Threat Graph header to open the Graph Objects drawer.
- Select objects in the table on the Graph Objects drawer using the following methods:
- Select individual objects: Select the checkbox to the left of an object’s value in the Type column to select the object.
- Select multiple objects at once: Select the checkbox to the left of the Type column header to select all objects on the current table page.HintSelections on one page persist when you navigate to another page, allowing you to select items across multiple pages.
- Click Selection Actions at the top left of the Graph Objects drawer and select Add to an owner. Then select one of the following options in the Add to an owner submenu:
- Create New Group: Select this option to import the Indicators and associate them to a newly created Group.
- Add to Existing Group: Select this option to import the Indicators and associate them to a Group that already exists in one of your owners.
Options Menu
Follow these steps to use an Indicator’s ⋯ menu in the Graph Objects drawer to import the Indicator into one of your ThreatConnect owners from Threat Graph:
- Open Threat Graph.
- Ensure there is at least one node on the graph that corresponds to an Indicator. If there is no such node on the graph, pivot in ThreatConnect, CAL, or an enrichment service to add one.
- Click View Table in the Threat Graph header to open the Graph Objects drawer.
- On the Graph Objects drawer, click the ⋯ menu for an Indicator and select Add to an owner. Then select one of the following options in the Add to an owner submenu:
- Create New Group: Select this option to import the Indicator and associate it to a newly created Group.
- Add to Existing Group: Select this option to import the Indicator and associate it to a Group that already exists in one of your owners.
Importing Indicators Into a New Group
The Create New Group option in the Add to an owner submenu lets you import Indicators into one of your ThreatConnect owners from Threat Graph and associate them to a newly created Group.
After you select Create New Group, you must proceed through the following steps on the Create screen to create the Group that will be associated to the Indicators you are importing: Details (required), Associations (optional), and Attachments (optional).
Step 1: Enter Details About the Group
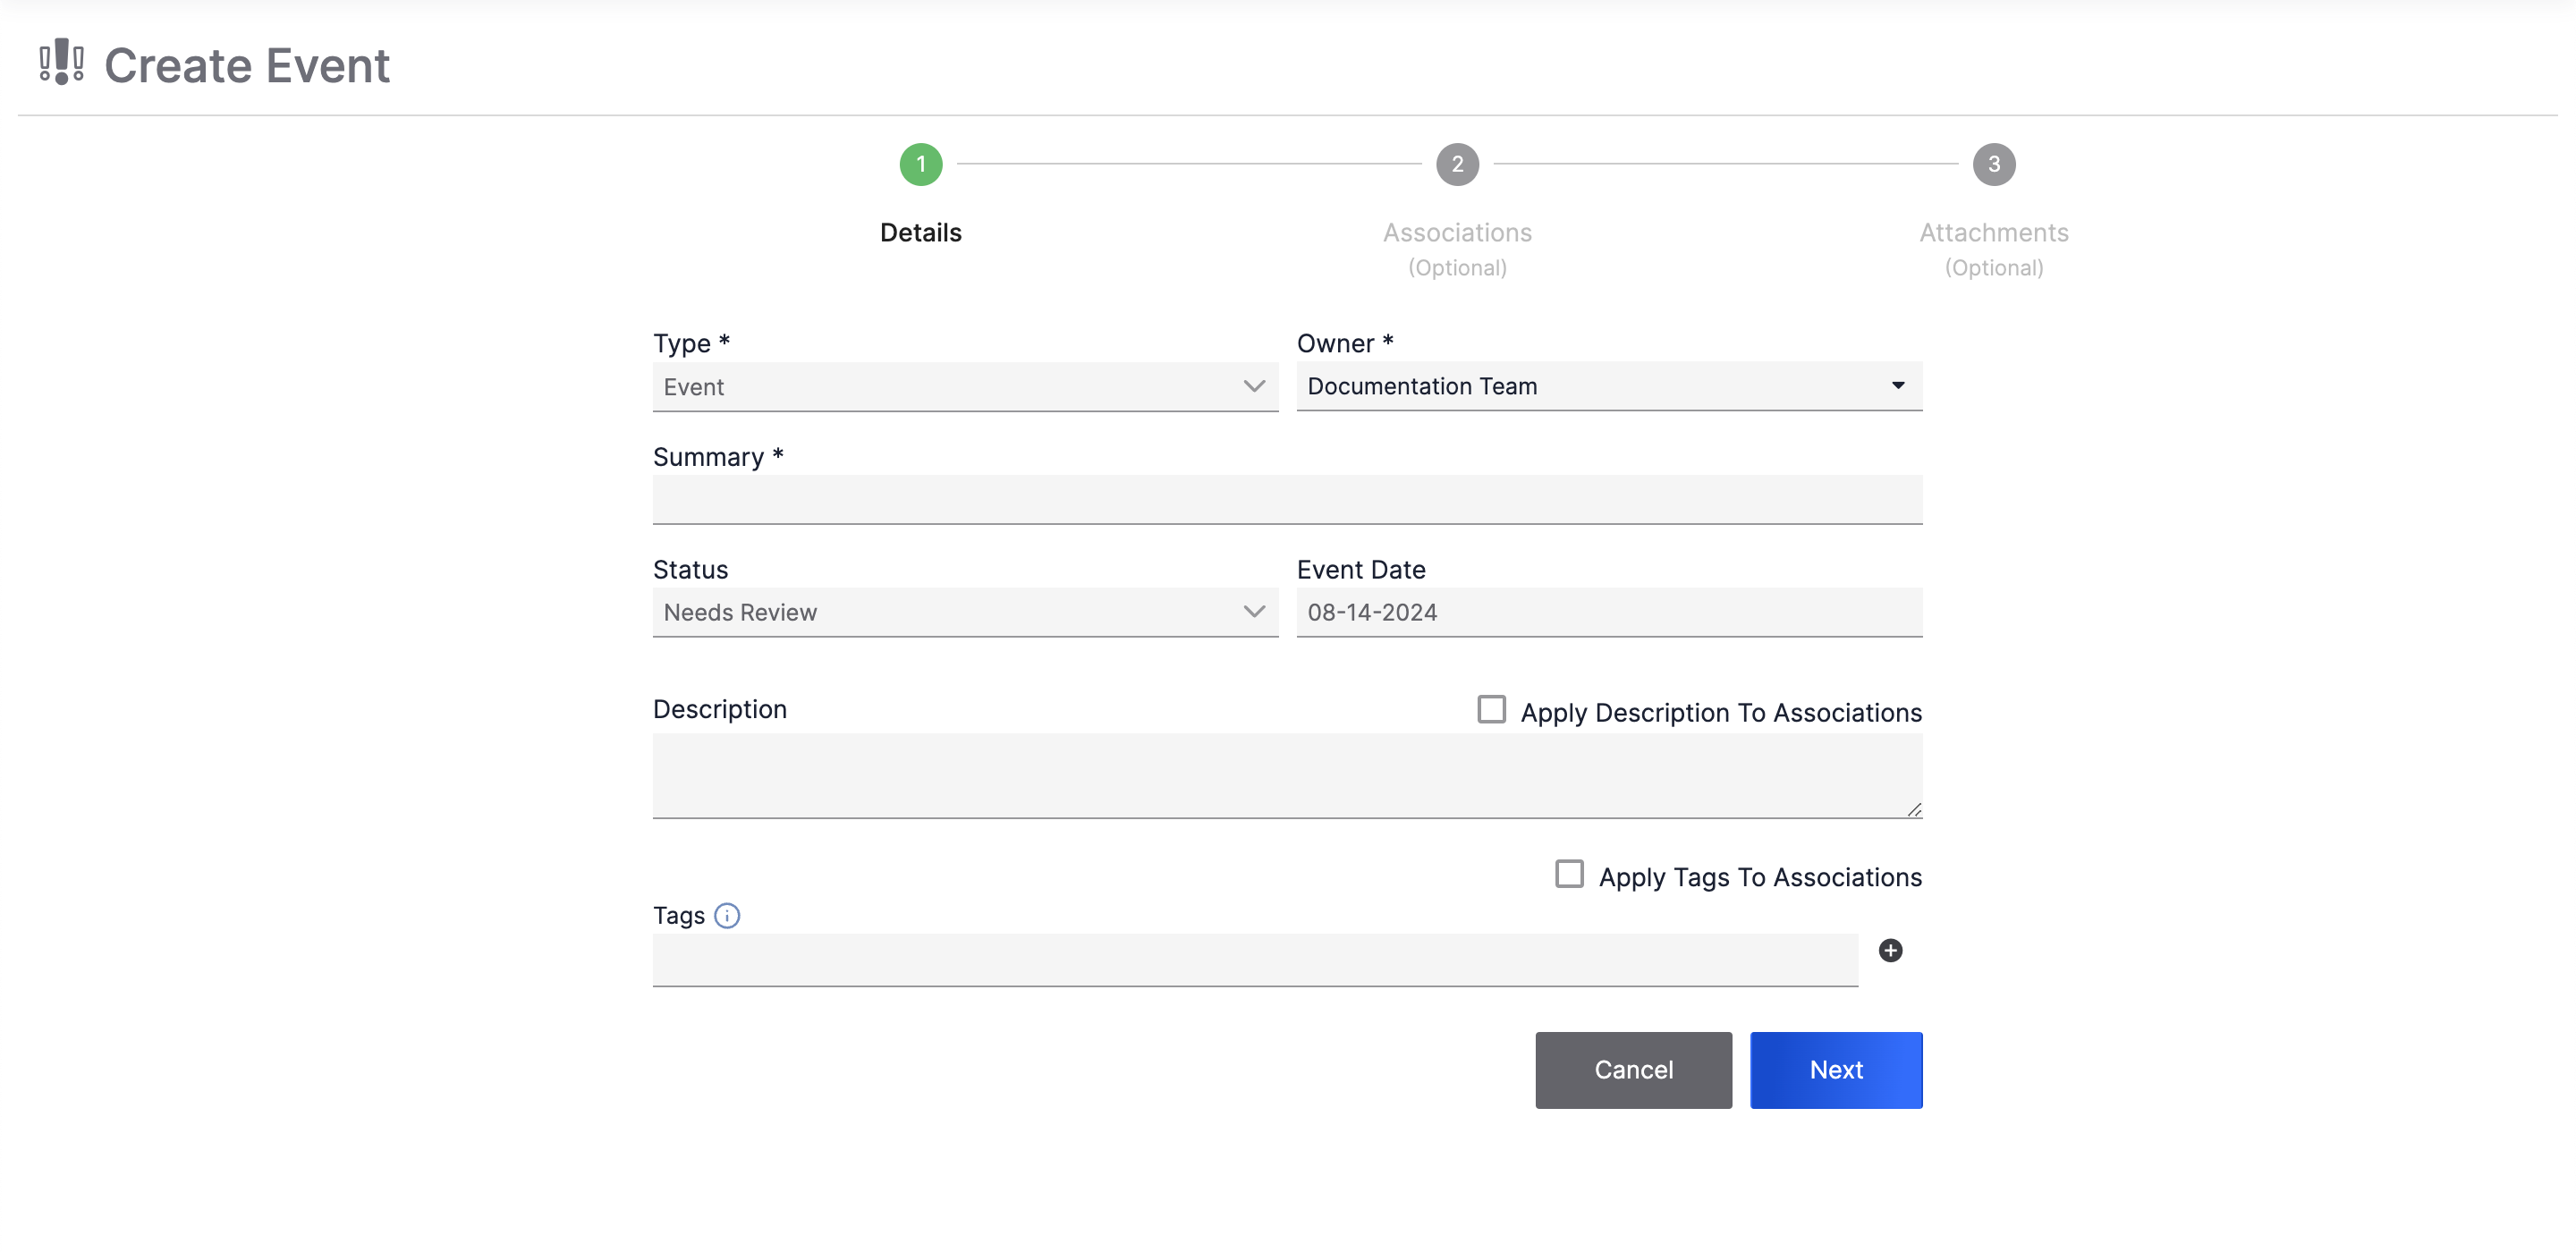
The Details step of the Create screen (Figure 2) is a required step where you enter basic information about the Group you are creating.
Follow these steps to fill out the fields on the Details step:
- Provide the following details for the Group:
- Type: By default, Event is selected. However, you can select another Group type from the dropdown. If you select a new Group type from the Type dropdown, the fields on the Details step will change based on the new Group type.
- Owner: Select the owner in which to create the Group.
- Summary: Enter a name for the Group.
- Description: (Optional) Enter a Description for the Group. To apply the Description to the Indicators that will be associated to the Group, select Apply Description To Associations.
- Tags: (Optional) Enter one or more Tags to apply to the Group. To apply the Tags to the Indicators that will be associated to the Group, select Apply Tags To Associations.
- Click Next to proceed to the optional Associations step.
Step 2: Enter Details About Associated Indicators (Optional)
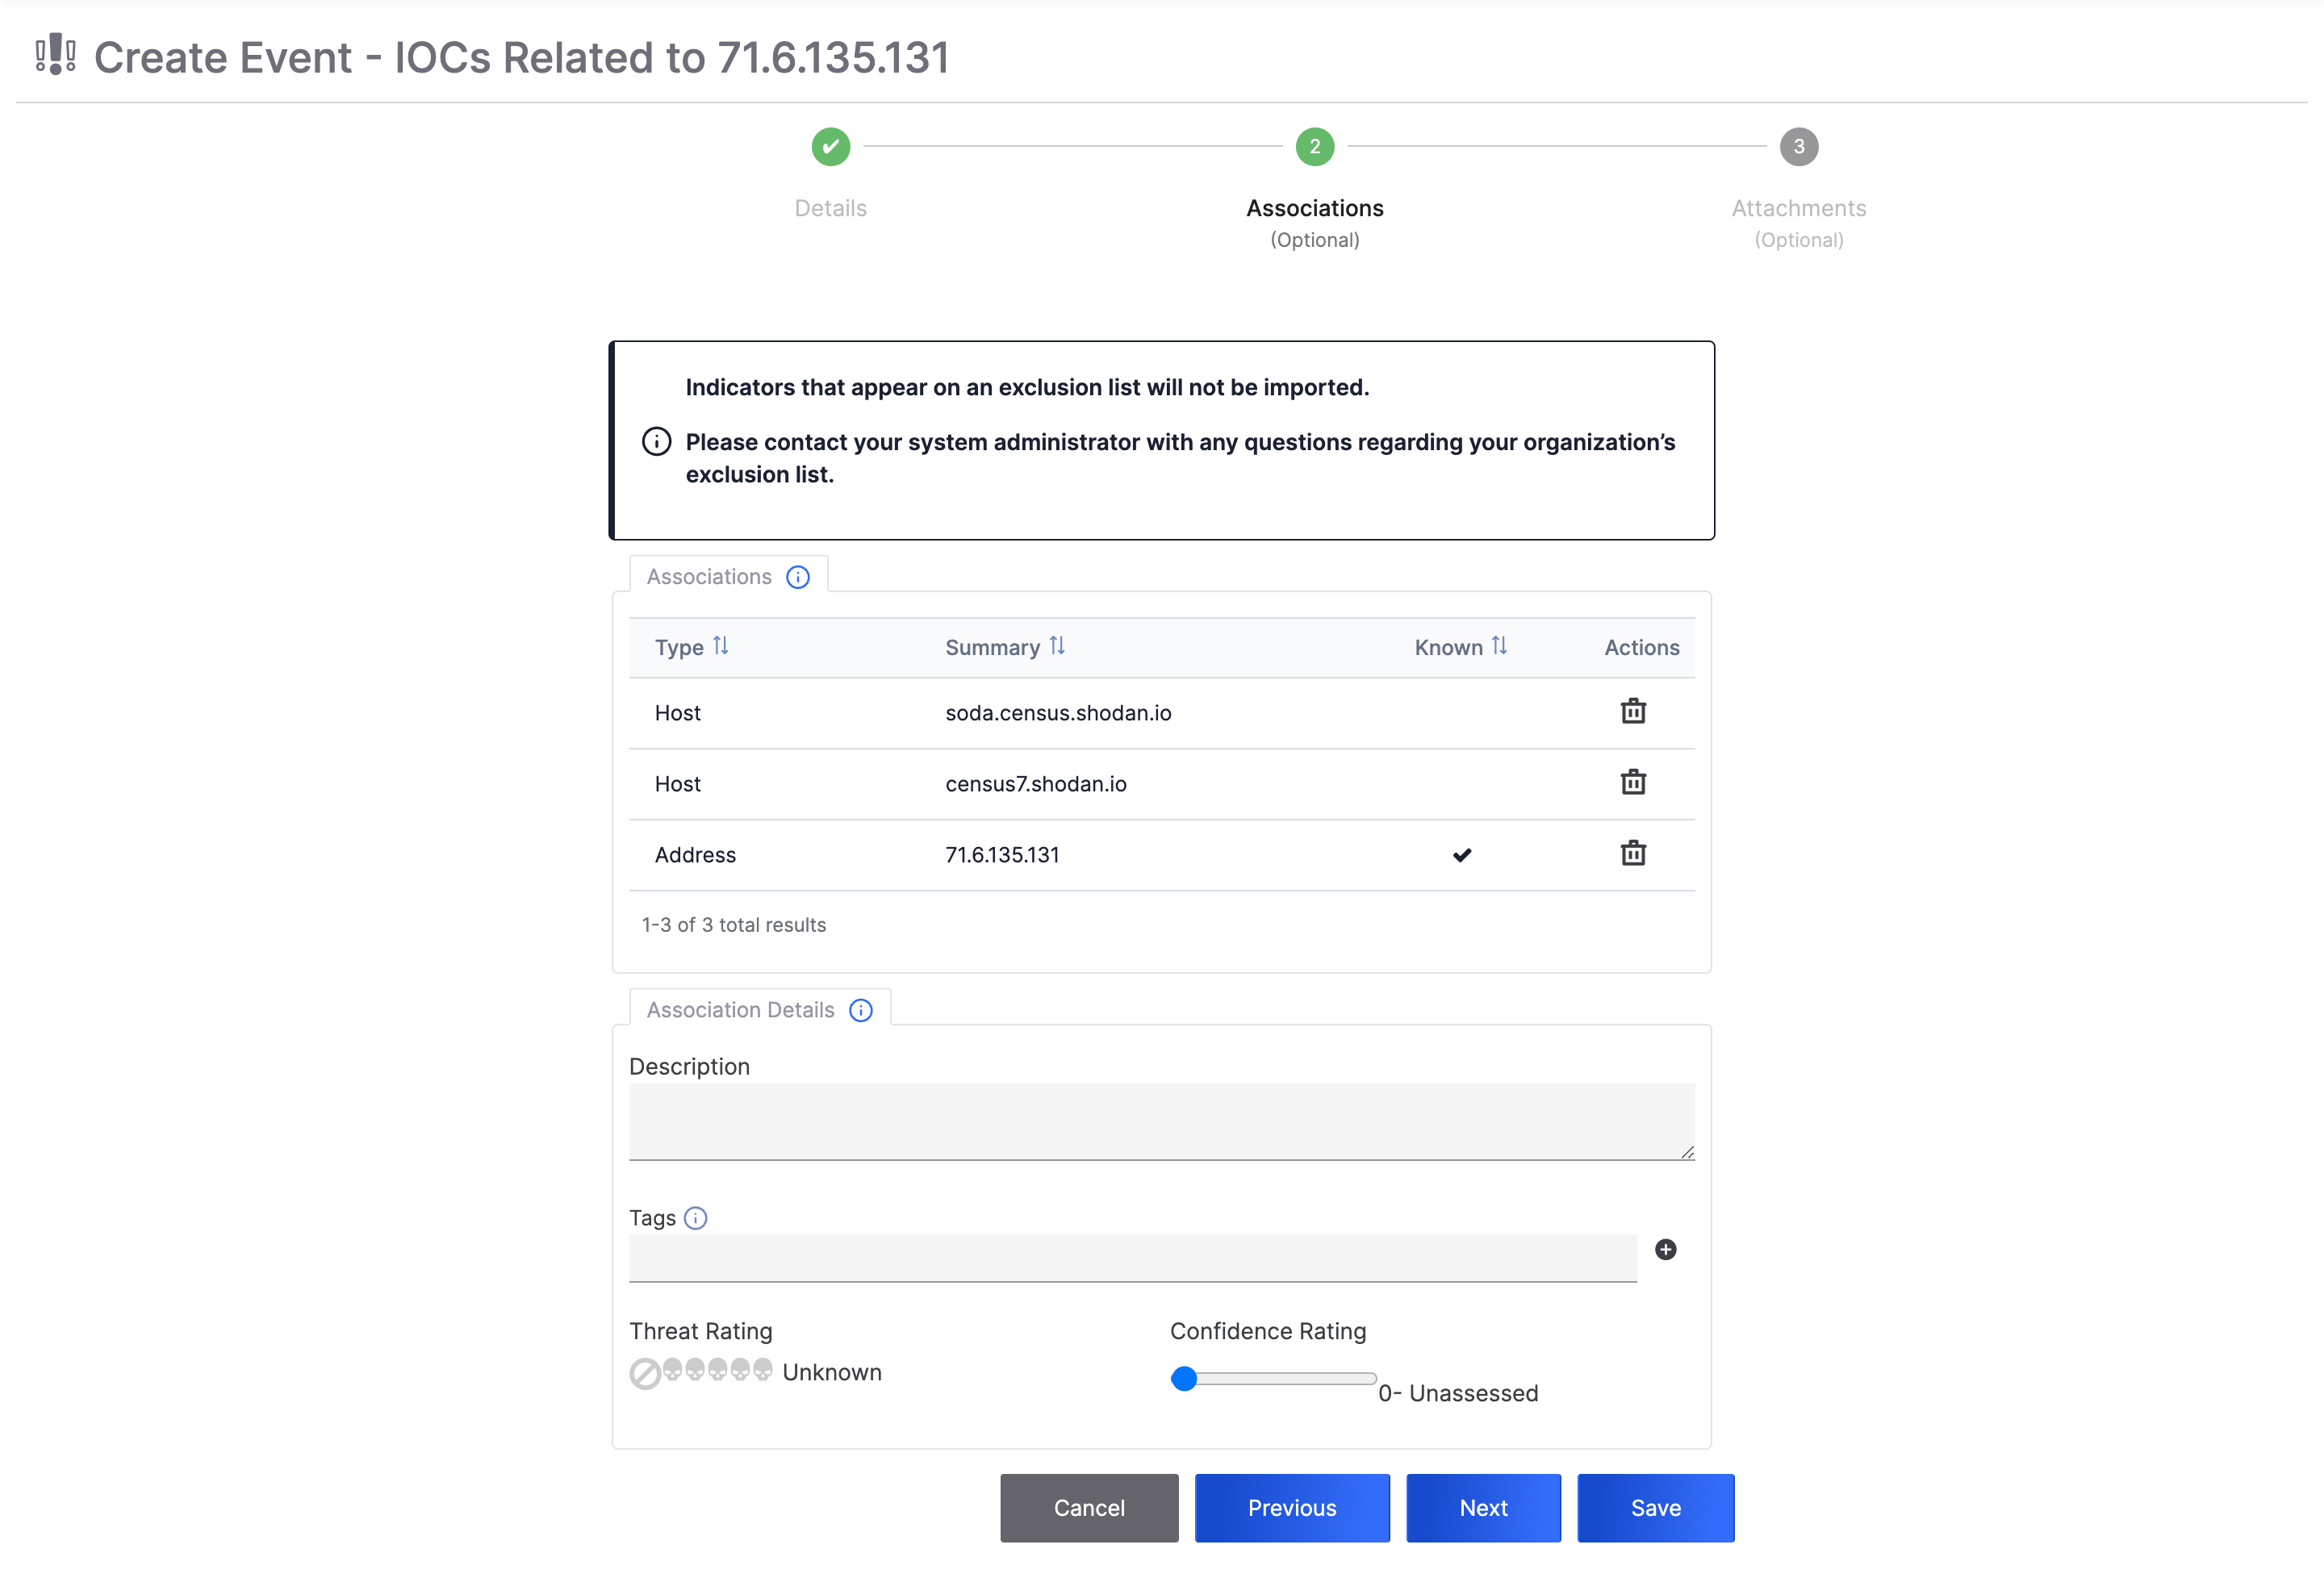
The Associations step of the Create screen (Figure 3) is an optional step where you can enter details about the Indicators you are importing and associating to the Group.
Follow these steps to fill out the fields on the Associations step:
- (Optional) On the Associations card, review the table containing the Indicators to be imported. If you no longer want to import an Indicator, click Delete
 in the Actions column for that Indicator.NoteThe table on the Associations card will include a Private column if your System Administrator turned on private Indicators for your ThreatConnect instance. To mark an Indicator as private, select the corresponding checkbox in the Private column.NoteA checkmark in the Known column indicates that the corresponding Indicator exists in at least one of your owners.
 - (Optional) On the Association Details card, provide the following details for all Indicators to be imported:ImportantIf an Indicator to be imported already exists in the ThreatConnect owner into which you are importing data, that copy of the Indicator will be updated based on the information entered on the Associations step. In this scenario, the values for the existing Indicator’s default Description, Threat Rating, and Confidence Rating will be replaced with the values entered for those options on this step, and Tags entered on this step will be applied in addition to any Tags that are already applied to the existing Indicator.
- Description: Enter a default Description for the Indicators.
- Tags: Enter one or more Tags to apply to the Indicators.
- Threat Rating: Use the skull icons to set the Threat Rating for the Indicators.
- Confidence Rating: Use the slider to set the Confidence Rating for the Indicators.
- Click Next to proceed to the optional Attachments step, or click Save to create the Group, import the selected Indicators, and associate the Indicators to the Group you created.
Step 3: Upload File Attachments to the Group (Optional)
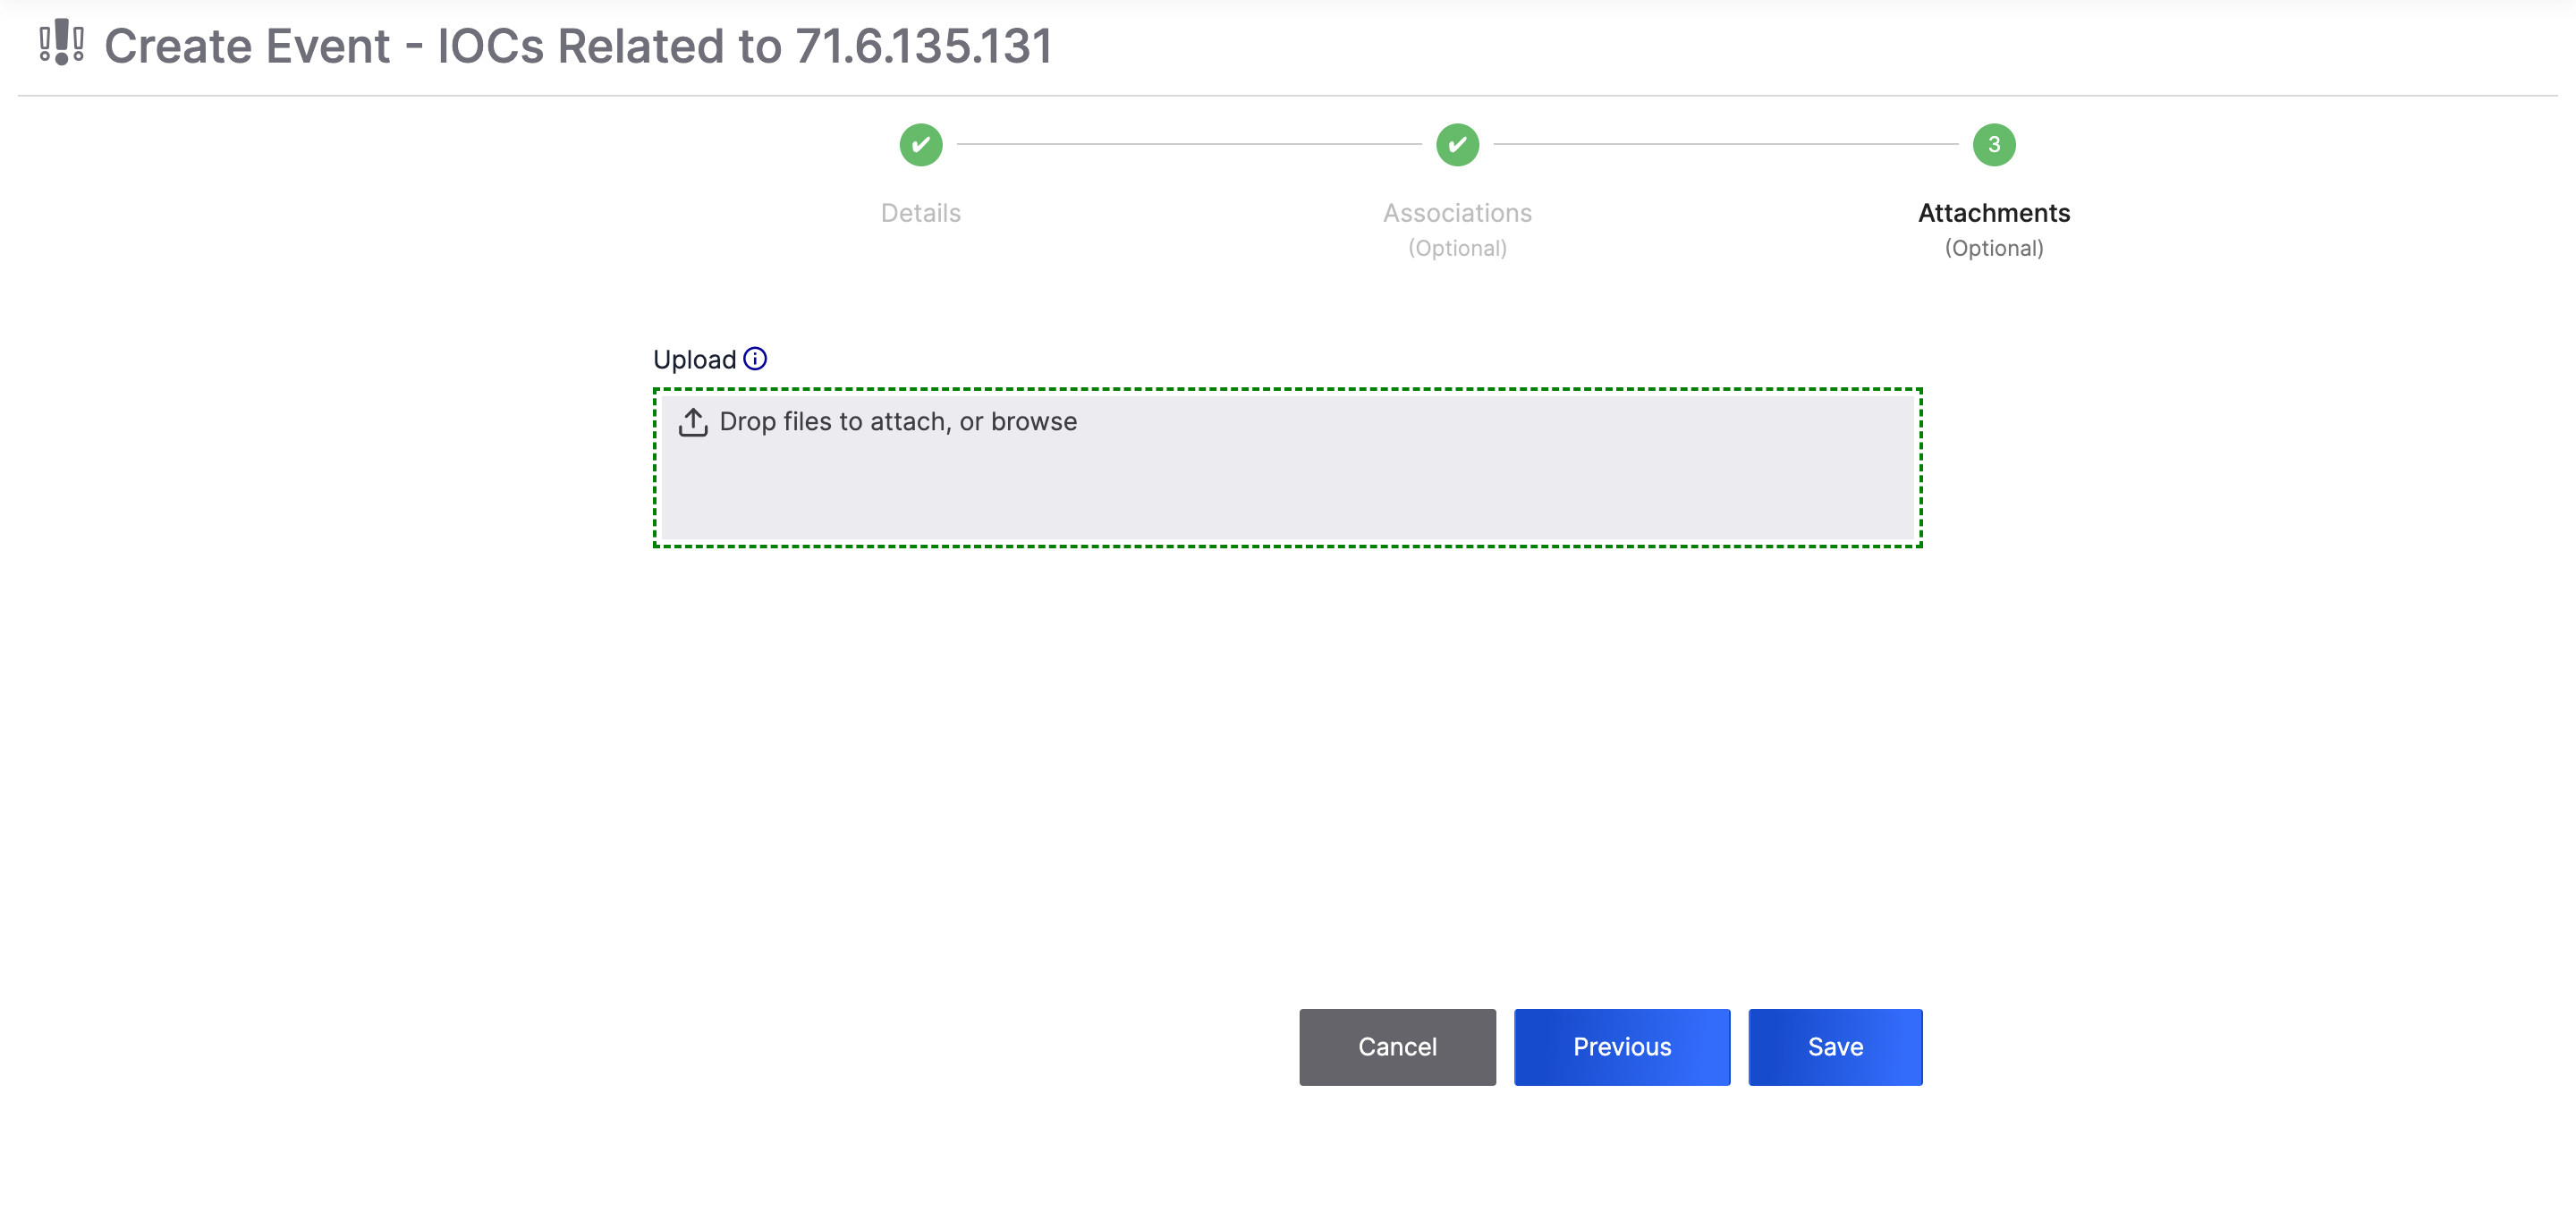
If you click Next on the Associations step, you will proceed to the optional Attachments step of the Create screen (Figure 4). Here, you can upload and attach related files to the Group.
Follow these steps to proceed through the Attachments step:
- Upload one or more files for which Document Groups will be created and associated to the Group being created.
- After a file is uploaded, its filename will be displayed below the file upload area, along with an Add to Malware Vault checkbox. Leave this checkbox cleared unless you are uploading a malware file.
- Click Save to create the Group, import the selected Indicators, and associate the Indicators to the Group you created.
After you complete the Indicator import and Group creation processes, the Group’s Details screen will open. You can view the Indicators that were imported and associated to the Group in the following locations on the Details screen:
- The Indicator Associations card on the Associations tab (new Details screen)
- The Associated Indicators section on the Associations card when the card is in table view (legacy Details screen)
Importing Indicators Into an Existing Group
The Add to Existing Group option in the Add to an owner submenu lets you import Indicators into one of your ThreatConnect owners from Threat Graph and associate them to an existing Group.
After you select Add to Existing Group, you must proceed through the following steps on the Import to Existing Group screen to select an existing Group to associate to the Indicators you are importing: Select Group (required) and Associations (optional).
Step 1: Select an Existing Group
The Select Group step of the Import to Existing Group screen (Figure 5) is a required step where you select an existing Group to associate to the Indicators you are importing.
.png)
Follow these steps to proceed through the Select Group step:
- Select the Group to associate to the Indicators you are importing.NoteYou can filter Groups by their name using the search bar at the top of the screen, and you can open a Group’s Details screen by clicking Open in New Tab
 to the right of the Owner column.
 - Click Next to proceed to the optional Associations step.
Step 2: Enter Details About Associated Indicators (Optional)
The Associations step of the Import to Existing Group screen (Figure 6) is an optional step where you can enter details about the Indicators you are importing and associating to the Group.
.png)
Follow these steps to fill out the fields on the Associations step:
- (Optional) On the Associations card, review the table containing the Indicators to be imported. If you no longer want to import an Indicator, click Deletein the Actions column for that Indicator.NoteThe table on the Associations card will include a Private column if your System Administrator turned on private Indicators for your ThreatConnect instance. To mark an Indicator as private, select the corresponding checkbox in the Private column.NoteA checkmark in the Known column indicates that the corresponding Indicator exists in at least one of your owners.
- (Optional) On the Association Details card, provide the following details for all Indicators to be imported:ImportantIf an Indicator to be imported already exists in the ThreatConnect owner into which you are importing data, that copy of the Indicator will be updated based on the information entered on the Associations step. In this scenario, the values for the existing Indicator’s default Description, Threat Rating, and Confidence Rating will be replaced with the values entered for those options on this step, and Tags entered on this step will be applied in addition to any Tags that are already applied to the existing Indicator.
- Description: Enter a default Description for the Indicator(s).
- Tags: Enter one or more Tags to apply to the Indicator(s).
- Threat Rating: Use the skull icons to set the Threat Rating for the Indicator(s).
- Confidence Rating: Use the slider to set the Confidence Rating for the Indicator(s).
- Click Save to import the Indicators and associate them to the selected Group.
After you complete the Indicator import process, the Details screen for the existing Group you selected will open. You can view the Indicators that were imported and associated to the Group in the following locations on the Details screen:
- The Indicator Associations card on the Associations tab (new Details screen)
- The Associated Indicators section on the Associations card when the card is in table view (legacy Details screen)
ThreatConnect® is a registered trademark, and CAL™ is a trademark, of ThreatConnect, Inc.
20117-14 v.01.A