Overview
Document Parsing Import leverages the CAL™ Doc Analysis Service to parse an unstructured file or a text block to identify Groups with known aliases in CAL and Indicators and import them into ThreatConnect®. When parsing Groups, this import engine also extracts and imports explicit MITRE ATLAS™ techniques and tactics and MITRE ATT&CK® Enterprise techniques, sub-techniques, tactics, malware, tools, intrusion sets, and courses of action, as well as Common Vulnerabilities and Exposures (CVE®s), from the provided content. In addition, if AI-powered features for Document Parsing Import are enabled on your ThreatConnect instance, it leverages MITRE ATT&CK AI Classification to extract and import implicit MITRE ATT&CK Enterprise techniques and sub-techniques from the content.
Document Parsing Import provides flexible customization options for your ingested data. For example, you can determine whether to create associations between imported objects, create associations between imported objects and existing objects that match imported objects, update existing objects with data ingested for imported objects, and add security Labels and Tags to imported and existing objects. In addition, when importing from a file, you can create a Document Group for the file and associate it to imported and existing objects so you can track the connection between the objects and their source.
Before You Start
User Roles
- To access Document Parsing Import, your user account must have an Organization role of Standard User, Sharing User, Organization Administrator, or App Developer.
- To use Document Parsing Import to import Groups and Indicators into an Organization, your user account must have an Organization role of Standard User, Sharing User, Organization Administrator, or App Developer.
- To use Document Parsing Import to import Groups and Indicators into a Community or Source, your user account must have a Community role of Contributor, Editor, or Director for that Community or Source.
Prerequisites
- The availability of Document Parsing Import depends on the selected level for the CALServices dropdown on the Settings tab of the System Settings screen (must be a System Administrator to configure this setting):
- Disable CAL Services or CAL Context: Document Parsing Import is not available.
- CAL Data Processing: Document Parsing Import is available, but AI-powered features are not available.
- CAL AI Processing: Document Parsing Import, including AI-powered features, is available.
- To be able to create cross-owner associations between imported objects and existing Groups that match Groups parsed by Document Parsing Import, select the crossOwnerAssociationEnabled checkbox on the Settings tab of the System Settings screen (must be a System Administrator to perform this action).
MITRE and CVE Parsing
Document Parsing Import parses explicit MITRE ATLAS™ techniques and tactics and MITRE ATT&CK® Enterprise techniques, sub-techniques, tactics, malware, tools, intrusion sets, and courses of action, as well as CVEs, from the provided content and imports them into ThreatConnect according to the mapping in Table 1. Parsing of explicit content refers to identification of words and phrases in the text content that exactly match MITRE ATLAS and MITRE ATT&CK Enterprise entity (technique, sub-technique, etc.) terms or CVE-IDs.
| Parsed Group Type | ThreatConnect Group Type |
|---|---|
| MITRE ATLAS technique | Attack Pattern |
| MITRE ATLAS tactic | Tactic |
| MITRE ATT&CK Enterprise technique | Attack Pattern |
| MITRE ATT&CK Enterprise sub-technique | Attack Pattern |
| MITRE ATT&CK Enterprise tactic | Tactic |
| MITRE ATT&CK Enterprise malware | Malware |
| MITRE ATT&CK Enterprise tool | Tool |
| MITRE ATT&CK Enterprise intrusion set | Intrusion Set |
| MITRE ATT&CK Enterprise course of action | Course of Action |
| CVE | Vulnerability |
If AI-powered features for Document Parsing Import are enabled on your ThreatConnect instance, implicit MITRE ATT&CK Enterprise techniques and sub-techniques are also parsed from the content and imported into ThreatConnect. Parsing of implicit content refers to identification of techniques and sub-techniques from sentences in the text content, even if the technique or sub-technique name is not explicitly mentioned.
The CEO was sent a malicious email with graphics and links to malicious websites that were blue and green.The following Attack Pattern Groups are created:
- T1566 - Phishing
- T1566.002 - Phishing: Spearphishing Link
Access Document Parsing Import
You can access the Document Parsing Import feature in the following areas of ThreatConnect:
- Top navigation bar: Import
 menu
menu - Search: Groups and Search: Indicators screen: + Create & Import > Import
Import Groups and Indicators From an Unstructured File or Text Block
Follow these steps to use Document Parsing Import to import Groups and Indicators from an unstructured file or text block:
- Open Document Parsing Import.
- Fill out the fields on the Import tab of the Import Intel - Document Parsing screen (Figure 1) as follows:
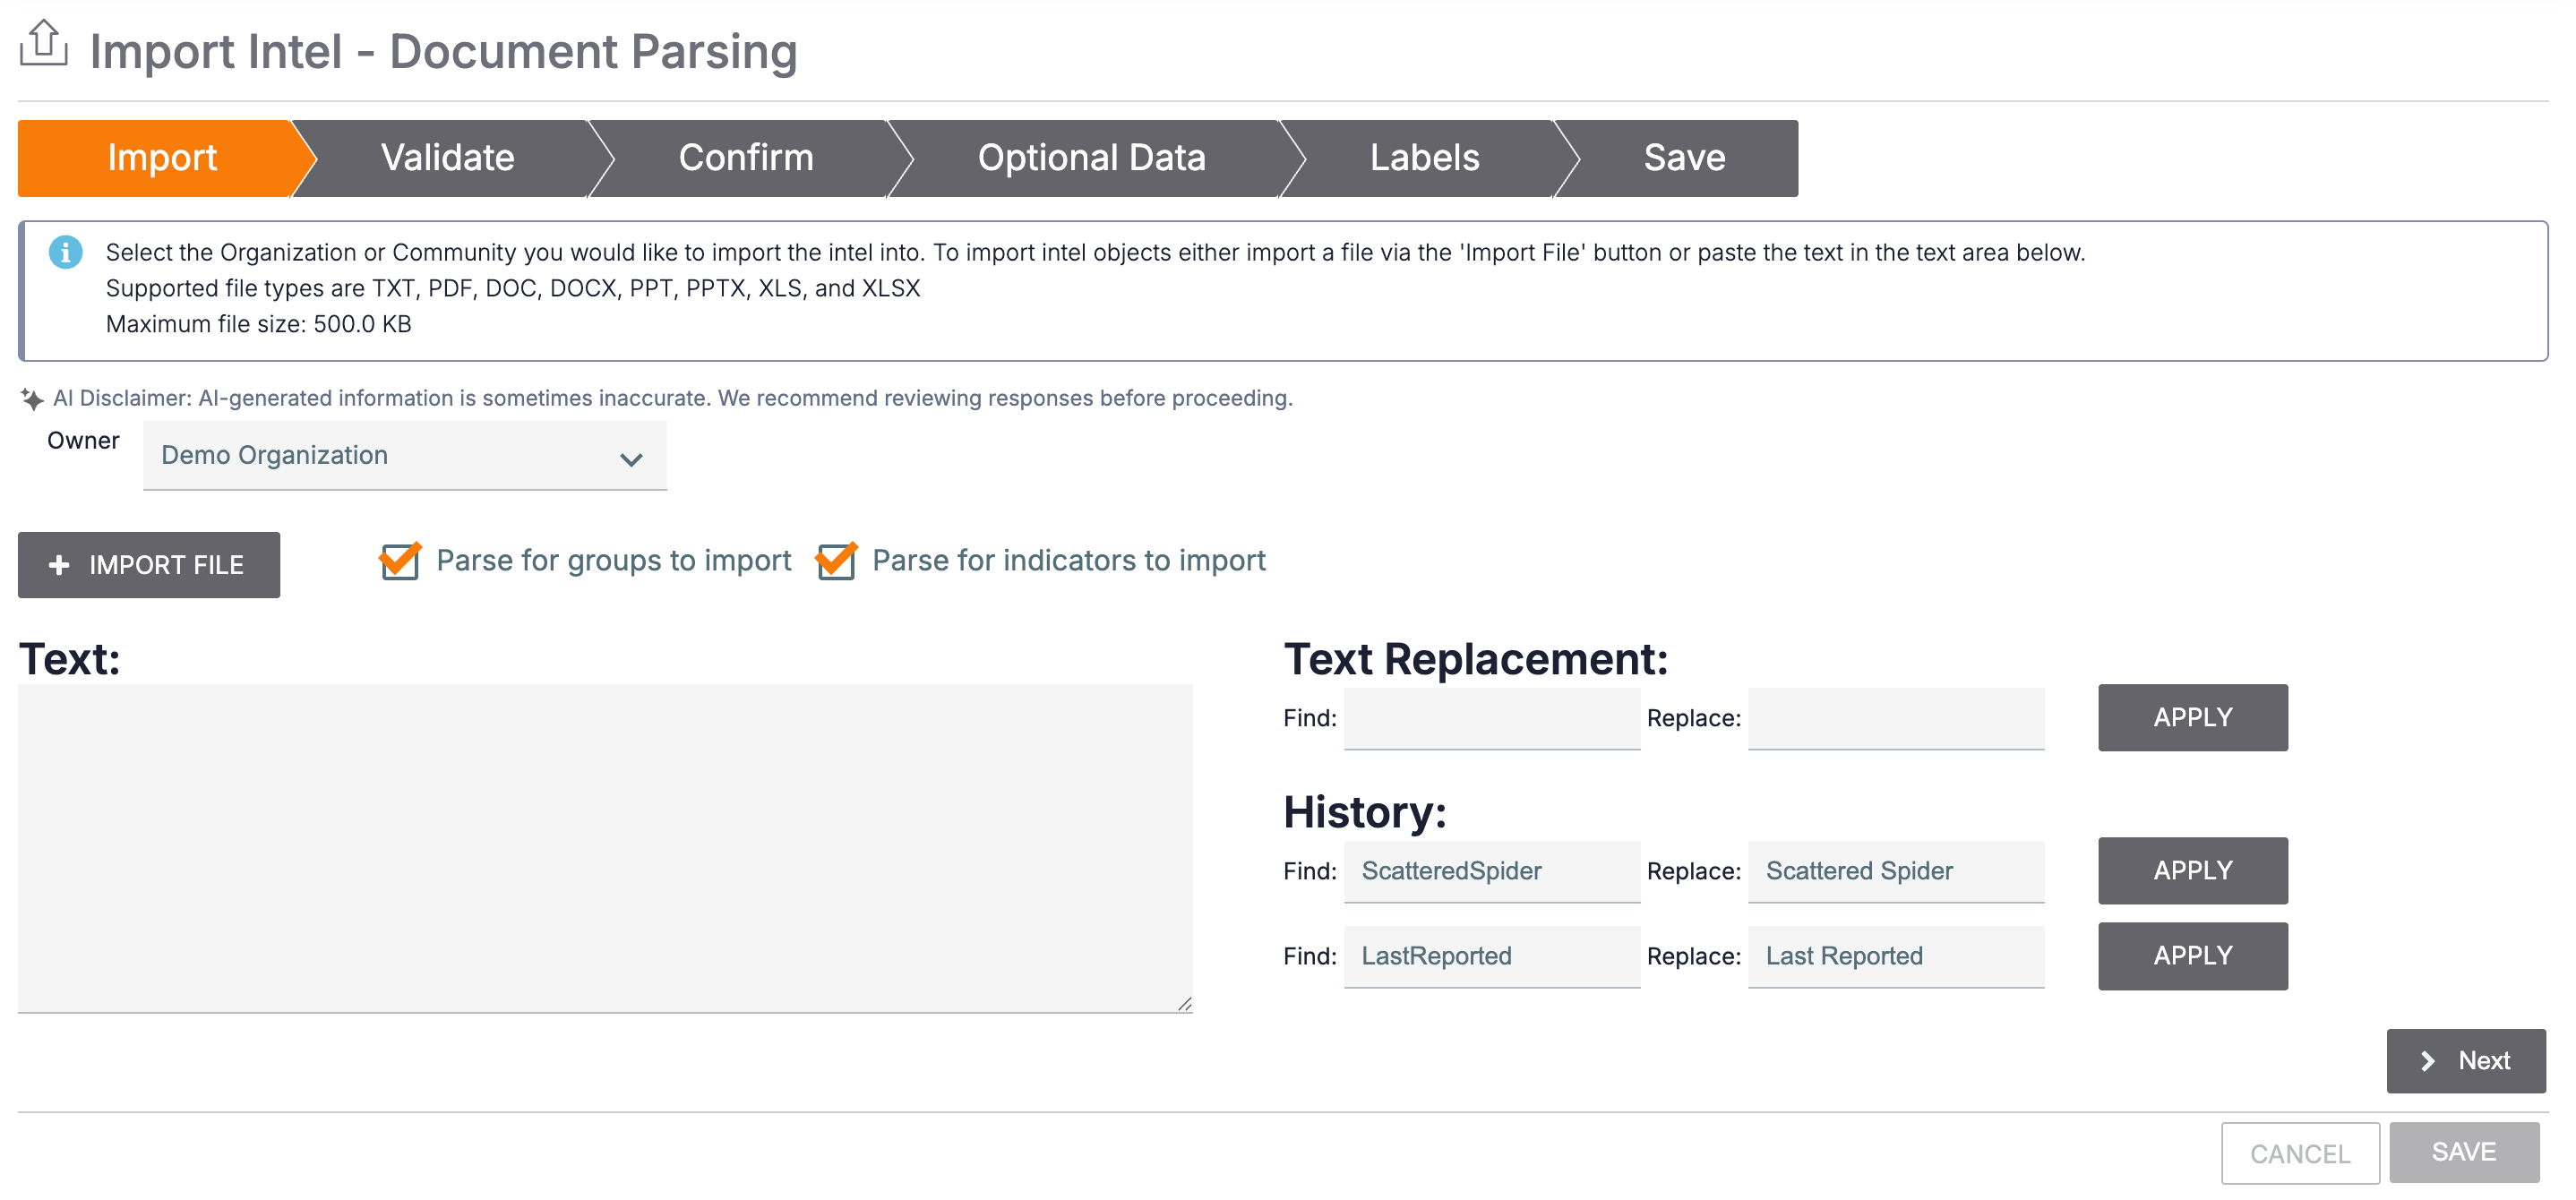
- Owner: Select the owner to import parsed Groups and Indicators into.
- + IMPORT FILE: If you want to import objects from a file, click this button and select a file to upload.
- Text: If you imported a file, its contents will be displayed in this box. Alternatively, you may enter text directly into the box.
- Parse options: You must select at least one of the following checkboxes to proceed with the import:
- Parse for groups to import: Select this checkbox to parse the text displayed in the Text: box for Groups.
- Parse for indicators to import: Select this checkbox to parse the text displayed in the Text: box for Indicators.NoteParsed Indicators are automatically refanged if the version in the Text: box is defanged.NoteDocument Parsing Import parses only the following Indicator types: Address, ASN, CIDR, Email Address, File, Host, and URL. It does not parse any other Indicator types, including custom Indicator types.
- Text Replacement: Use the Find: and Replace: fields to configure bulk changes to the Text: box contents. Click APPLY to apply the changes.
- History: If you used text replacement during previous Document Parsing Import or Unstructured Indicator Import sessions, this section will be added to display your six most recent Find: and Replace: values. Click APPLY for a Find:/Replace: pair to perform text replacement using those values.
- Click Next.
- Fill out the fields on the Validate tab of the Import Intel - Document Parsing screen (Figure 2) as follows:
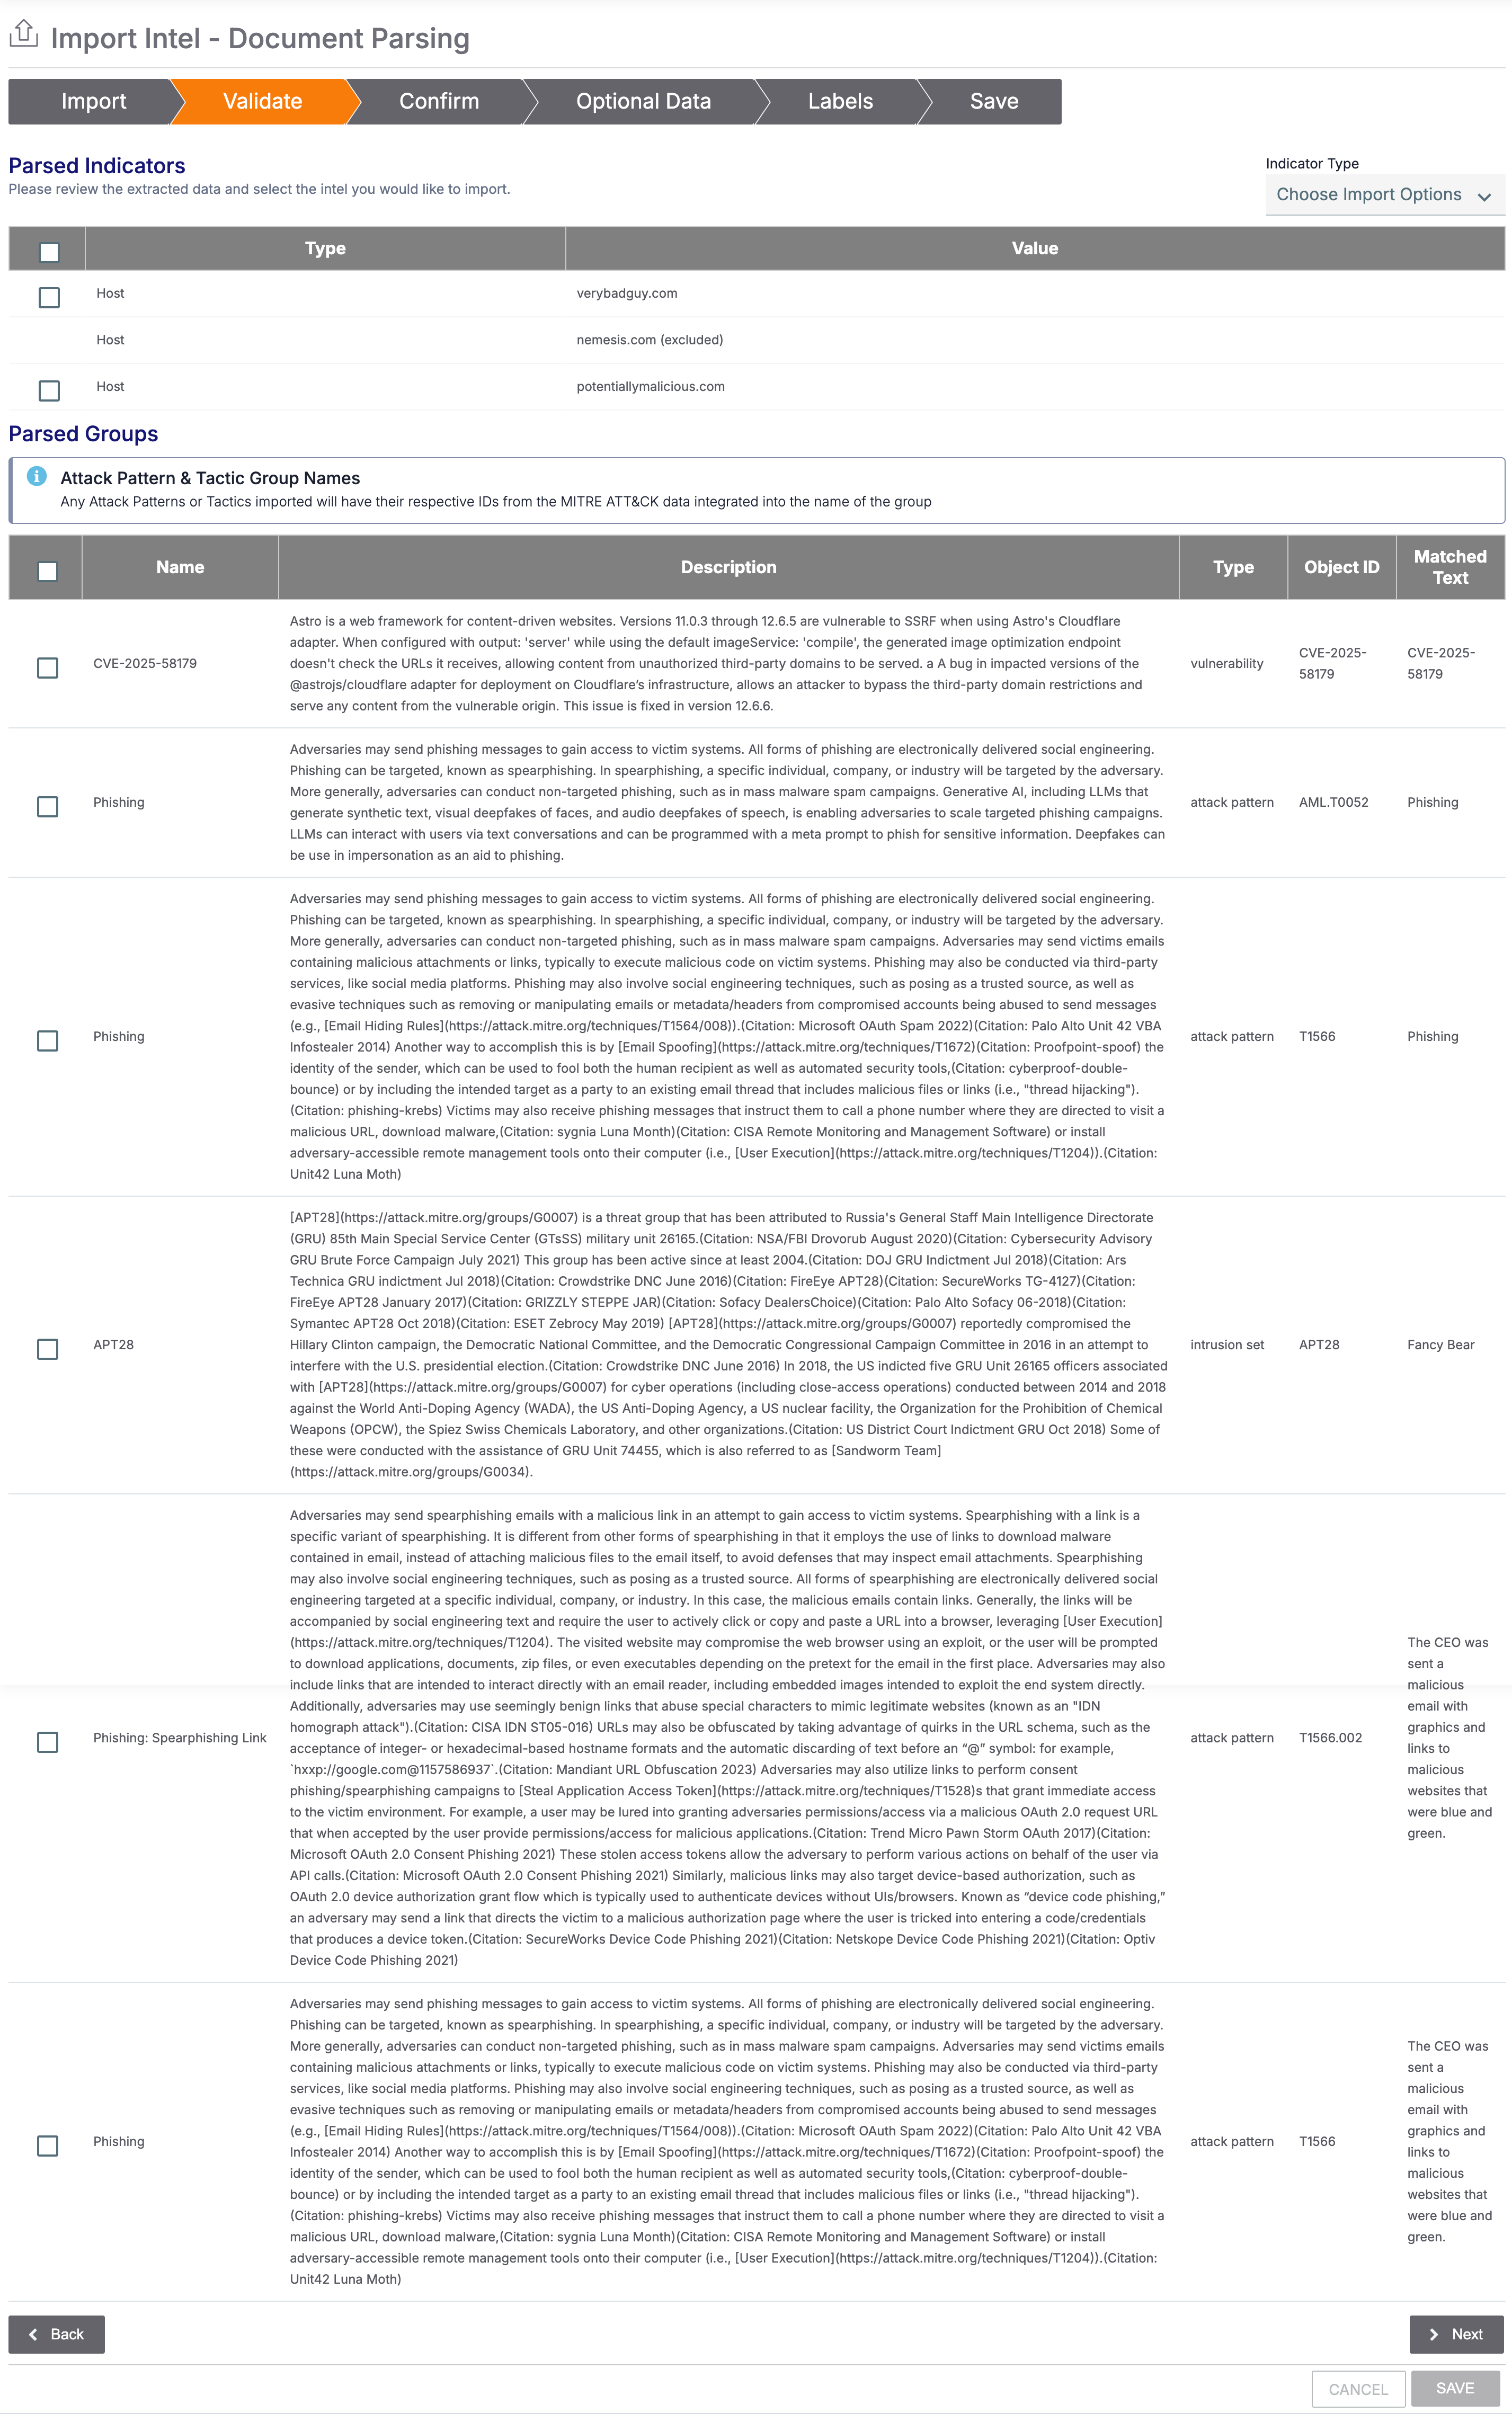
- Parsed Indicators: This section displays Indicators parsed from the text. Select the checkbox for each Indicator you want to import into the owner.HintUse the Indicator Type dropdown to filter the parsed Indicators by Indicator type.NoteIndicators on your ThreatConnect instance’s systemwide exclusion list and on the CAL Safelist are not included in the table. Indicators on the exclusion list for the owner into which you are importing data are included in the table, labeled with (excluded), and cannot be selected for import.NoteIf your ThreatConnect instance supports private Indicators, a Private column is available for selection of Indicators to mark as private.
- Parsed Groups: This section displays Groups parsed from the text, including the Group’s name, CAL’s description for the Group, the Group type, the object ID (the Name/Summary for Groups with known aliases in CAL or the MITRE ID number for MITRE ATLAS and ATT&CK objects), and the part of the text that matched to the Group. Select the checkbox for each Group you want to import into the owner.ImportantCAL updates its CVE database every 24 hours. If your parsed text includes a newly assigned CVE-ID from the last 24 hours, CAL may not yet have data on the corresponding CVE, even if the CVE exists as a Vulnerability Group in one of your ThreatConnect owners. In this case, the row for that CVE will not have a name or description, and you will not be able to import the CVE as a Vulnerability with Document Parsing Import. If this happens, clear the checkbox for the CVE, proceed with the rest of the import, and then either create a new Vulnerability Group for the CVE using the Create & Import > Create feature on the Search: Groups screen or wait up to 24 hours and try the Document Parsing Import again.NoteThe Object ID and Name columns are combined to form the name/summary for Groups that are MITRE objects.NoteAs part of the import, the CAL Matched Text and CAL Object ID attributes are added to the selected Groups and populated with the value of the Matched Text and Object ID fields, respectively, for the Group.
- Click Next.
- Parsed Indicators: This section displays Indicators parsed from the text. Select the checkbox for each Indicator you want to import into the owner.
- Fill out the fields on the Confirm tab of the Import Intel - Document Parsing screen (Figure 3) as follows:
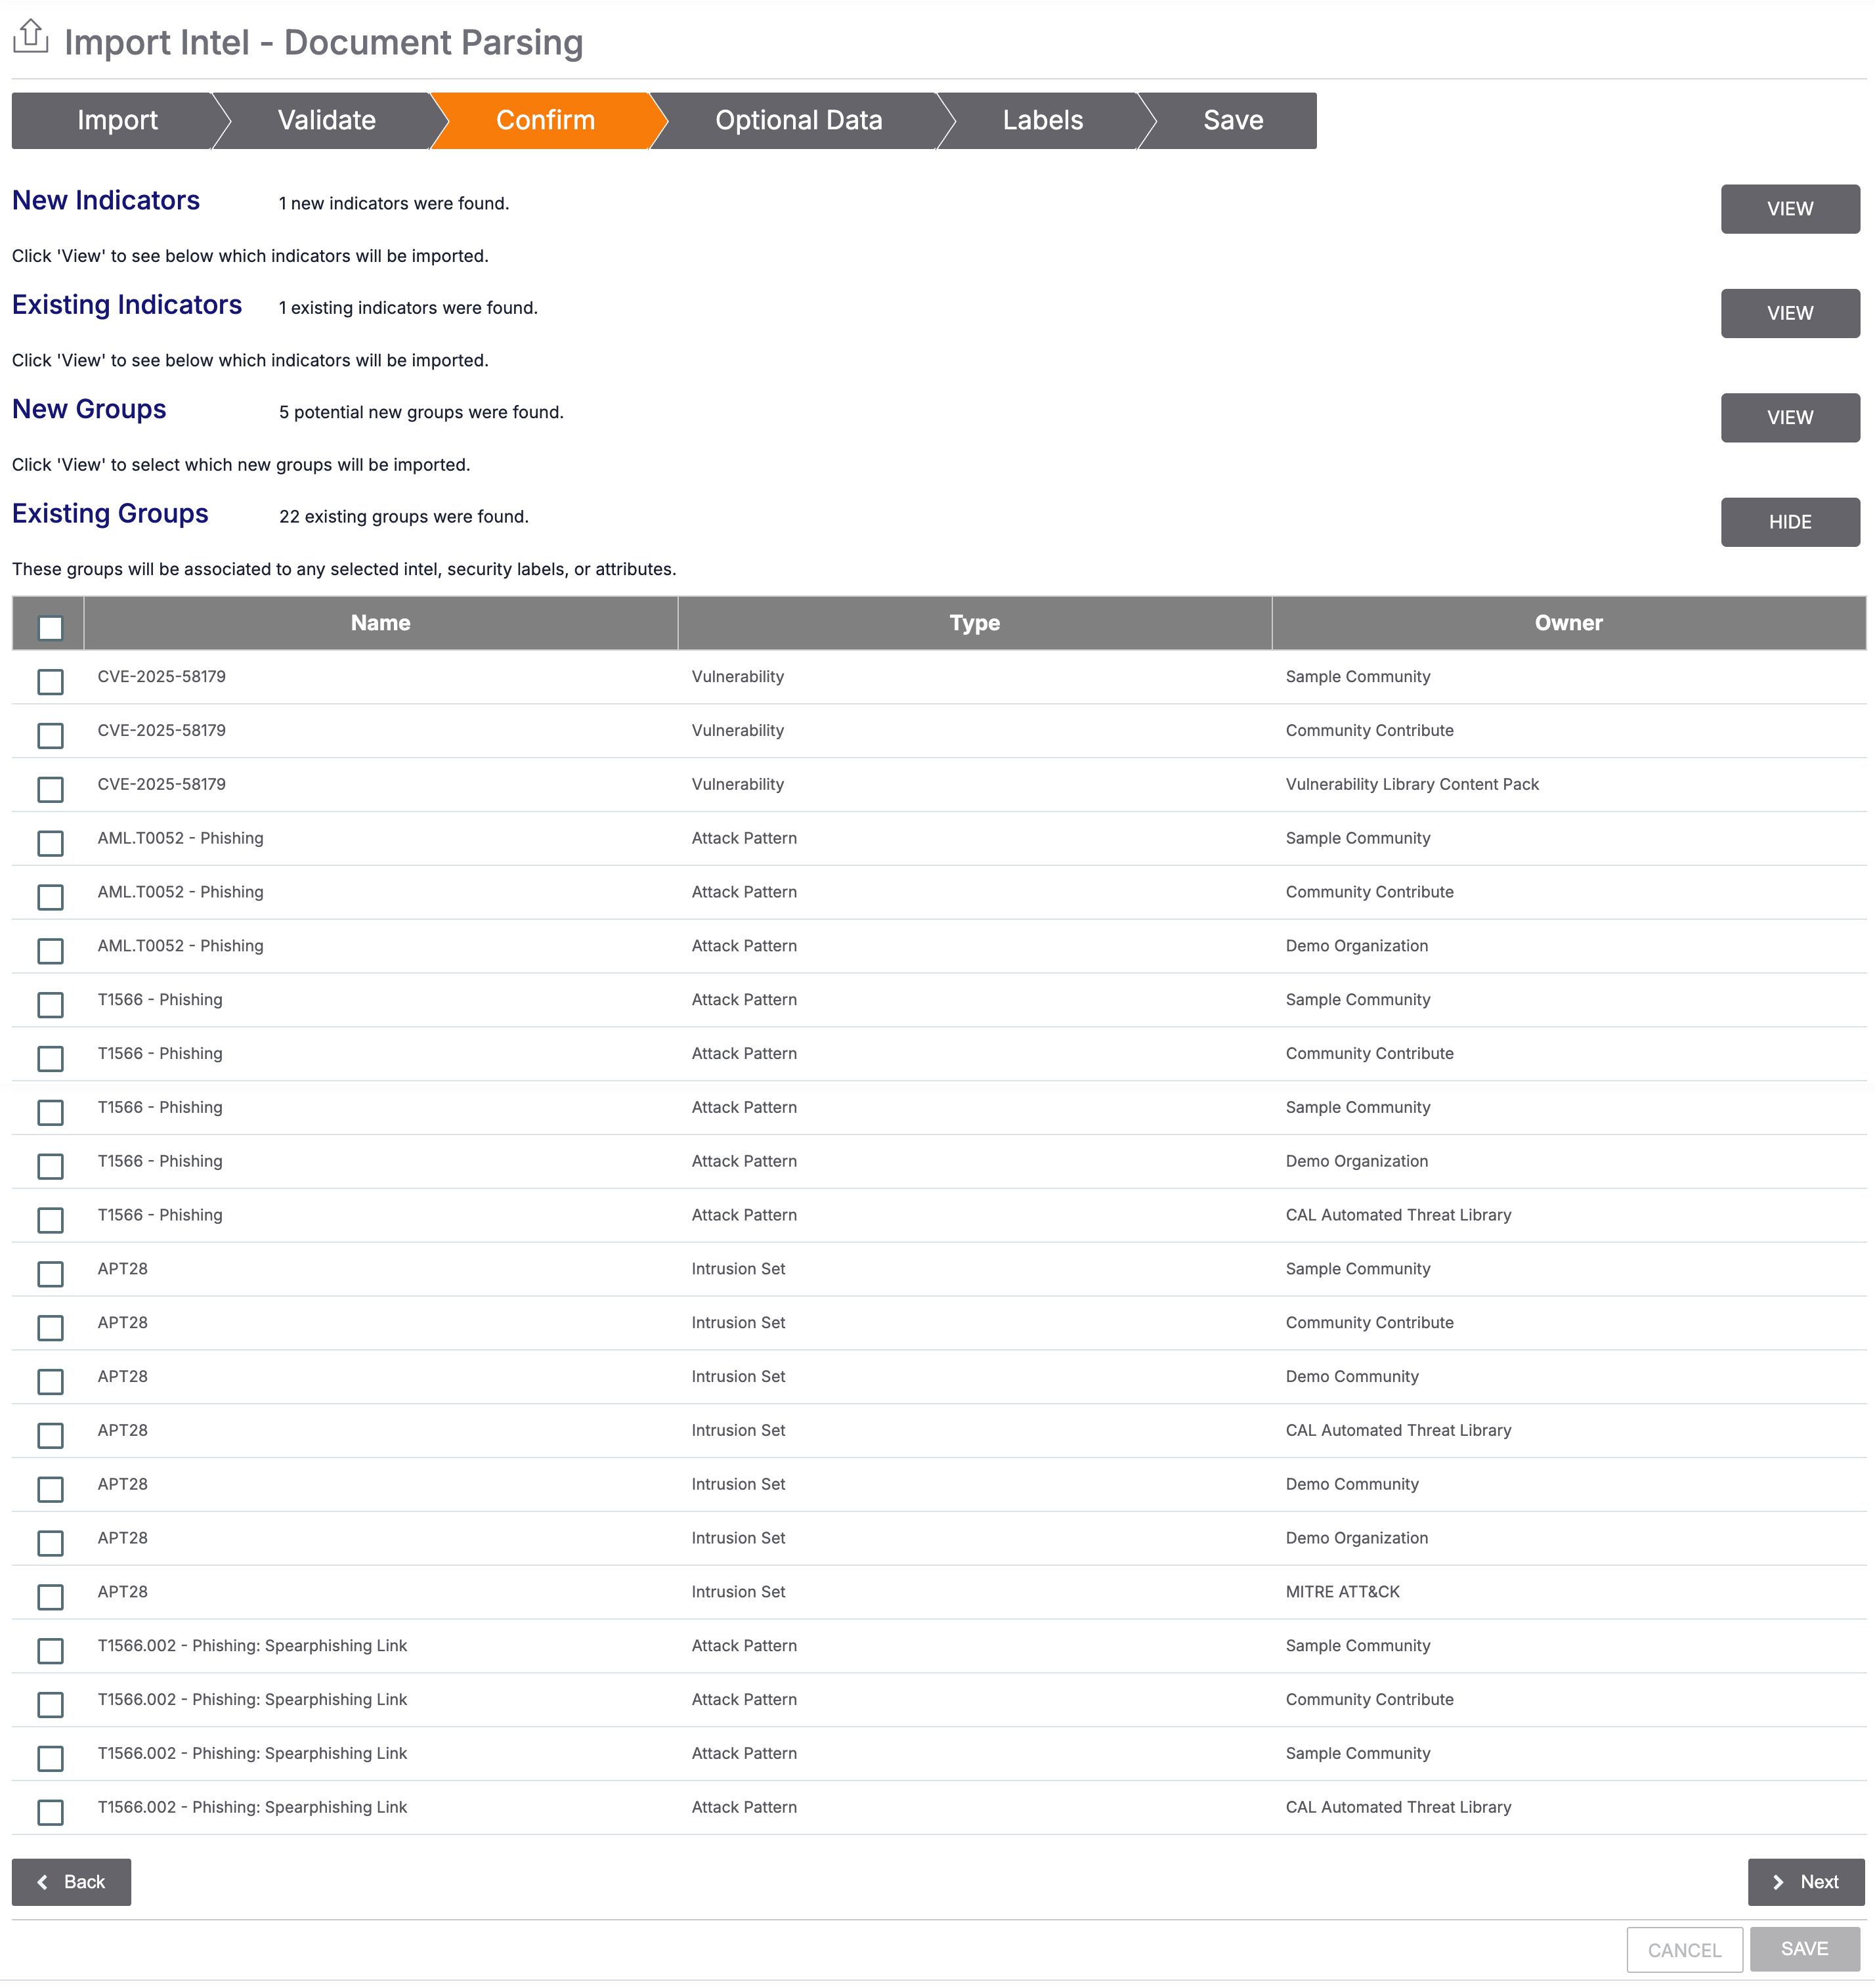
- New Indicators: Click VIEW button to view the new Indicators selected for import.
- Existing Indicators: Click VIEW button to view Indicators selected for import that already exist in the owner. When the import runs, the existing Indicators will be updated with the Description and Source attributes, threat rating, and confidence rating provided for Indicators on the Optional Data tab and the security labels and Tags provided on the Labels tab.
- New Groups: Click VIEW to view the new Groups selected for import.
- Existing Groups: Click VIEW to view a table of Groups in the owner whose name/summary matches the name of a Group selected for import. If cross-owner associations are enabled on your ThreatConnect instance, the table will also show matching Groups in all of your ThreatConnect owners. Select the existing Groups you want to update with the Description and Source attributes provided for Groups on the Optional Data tab and the security labels and Tags provided on the Labels tab.
- Click Next.
- Fill out the fields of the Optional Data tab of the Import Intel - Document Parsing screen (Figure 4) as follows:
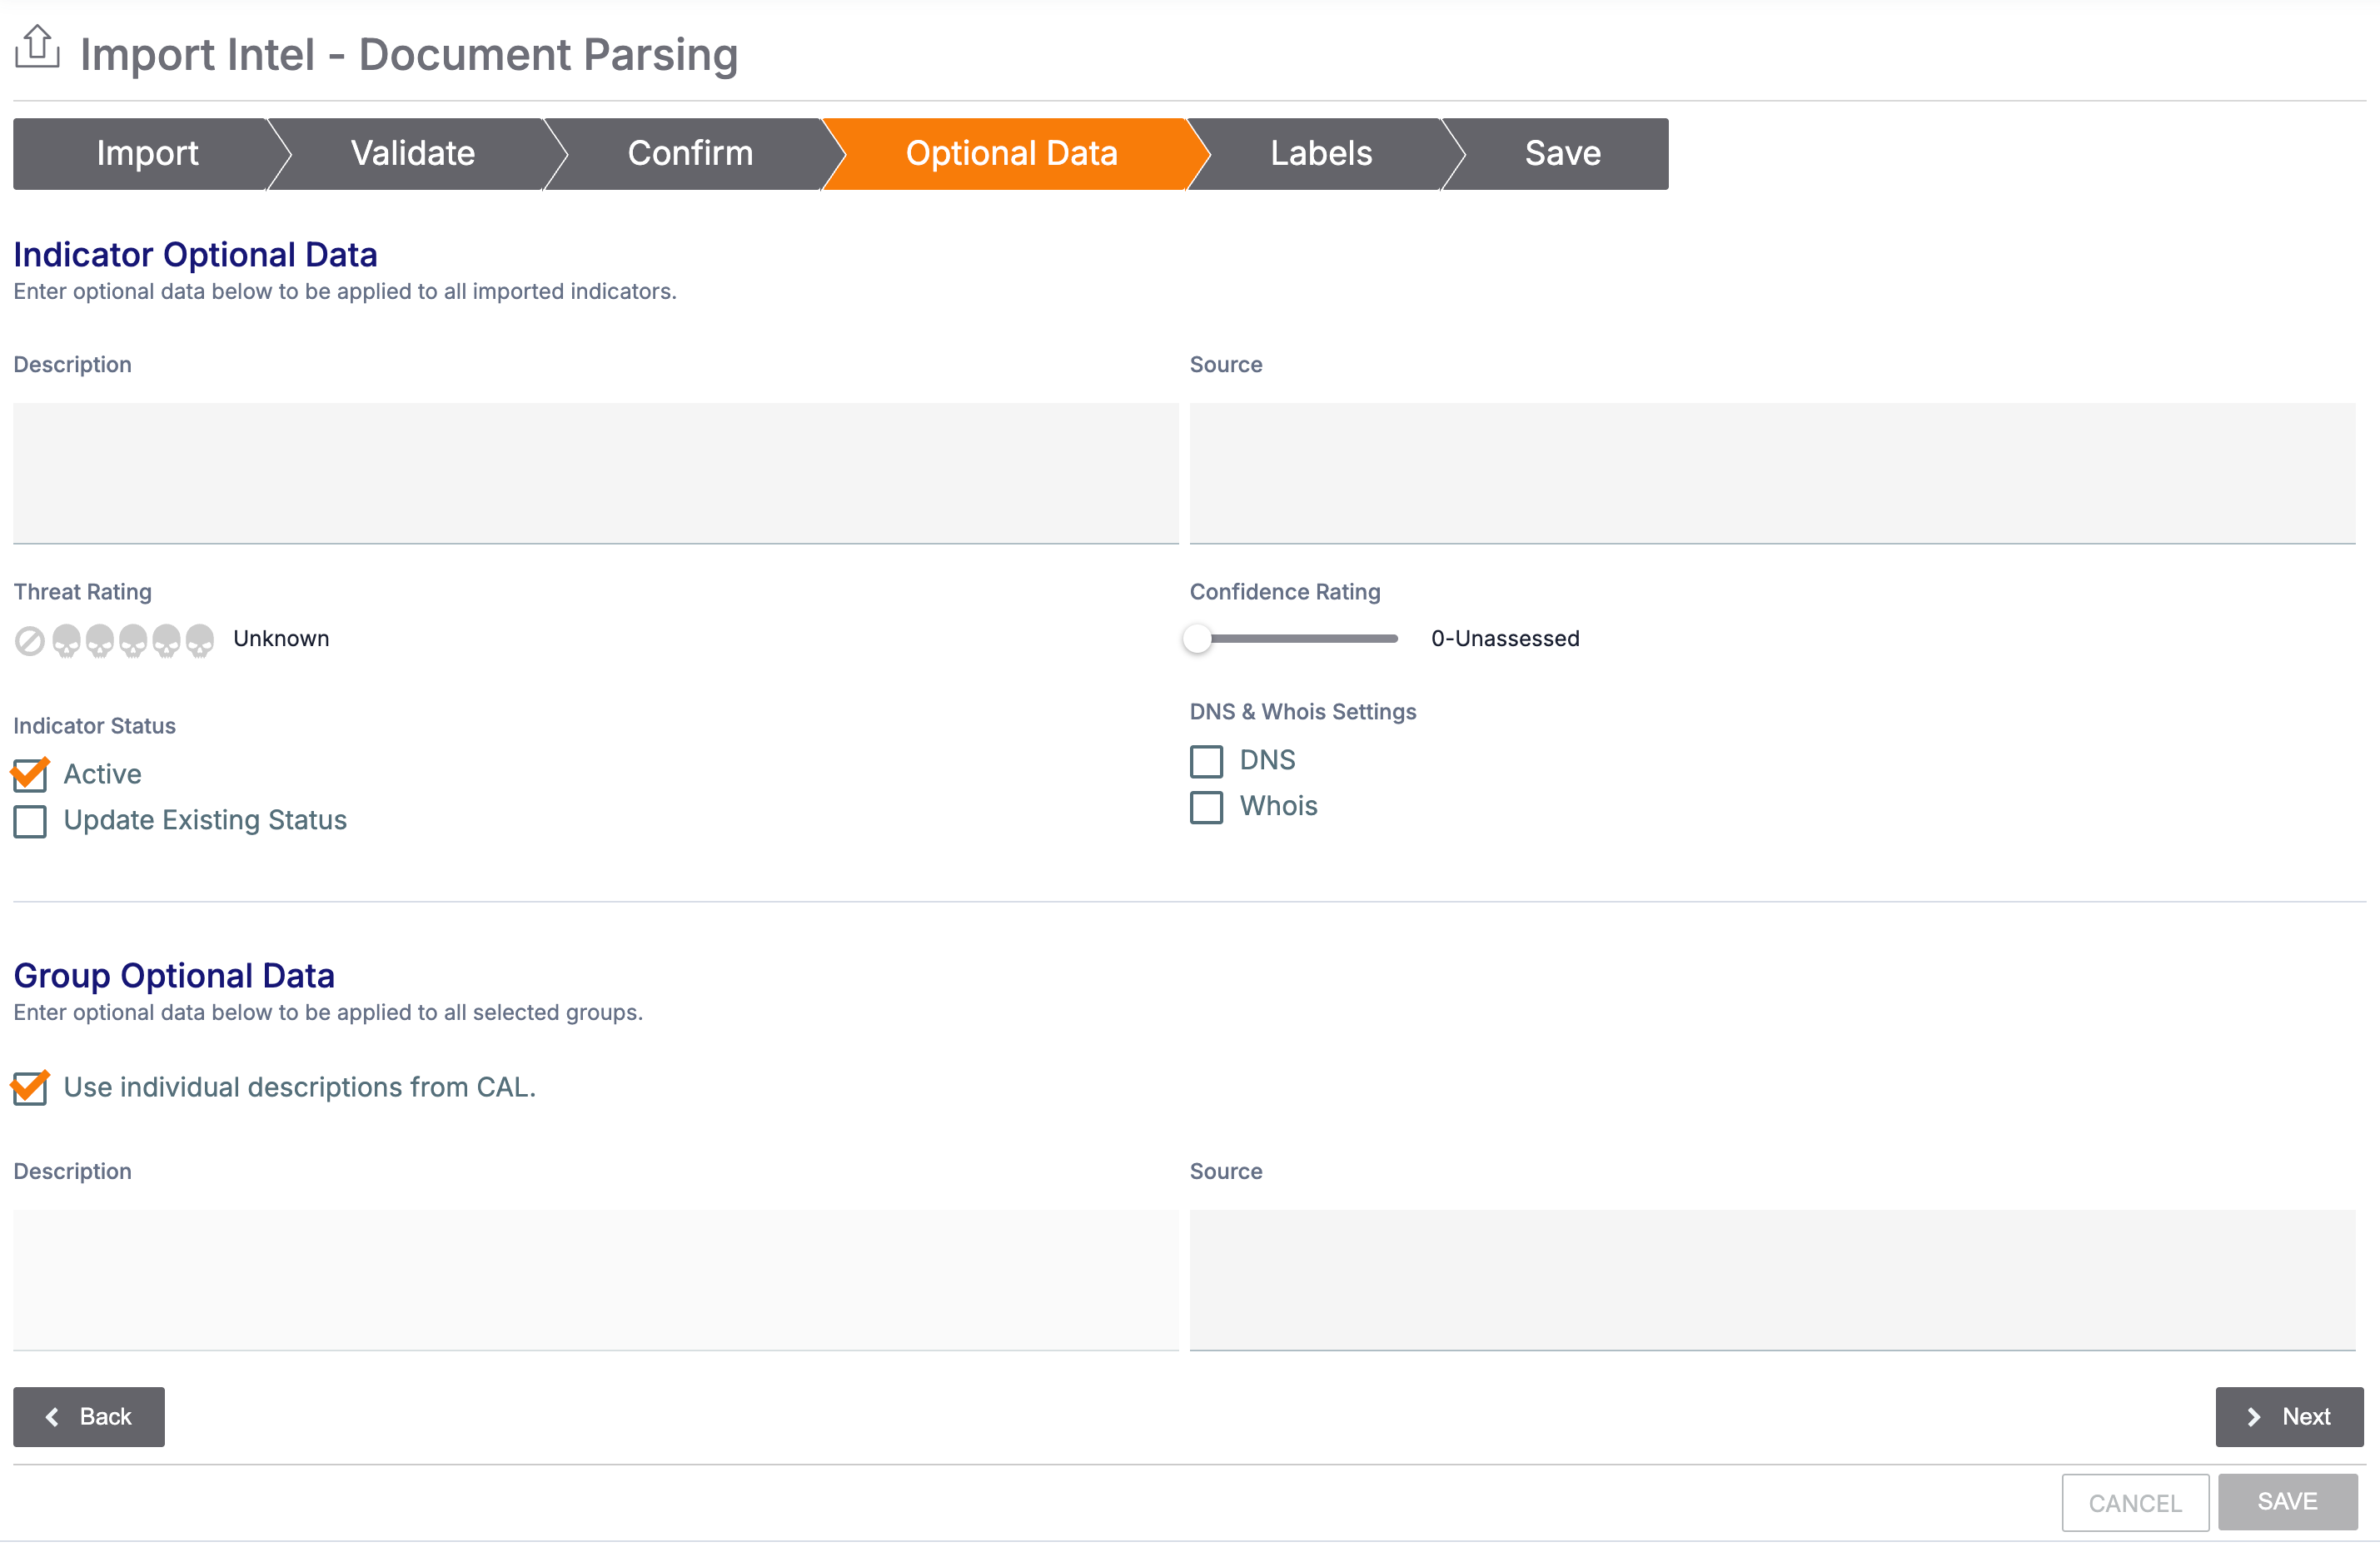
- Indicator Optional Data: Enter the following information to apply to all selected new and existing Indicators:ImportantFor existing Indicators, information entered in the fields in this section will replace existing data.NoteThis section is not displayed if you did not select any Indicators for import.
- Description: Enter a default Description for the Indicators.
- Source: Enter a default Source for the Indicators.
- Threat Rating: Select the threat rating for the Indicators.
- Confidence Rating: Set the confidence rating for the Indicators.
- Active: Select this checkbox to set the Indicator status of new Indicators to active, or clear the checkbox to set the Indicator status of new Indicators to inactive.
- Update Existing Status: Select this checkbox to update the Indicator status of existing Indicators to the status indicated by the Active checkbox.
- DNS: Select this checkbox to enable DNS resolution tracking for all new Host Indicators.
- Whois: Select this checkbox to enable WHOIS lookups for all new Host Indicators.
- Group Optional Data: Enter the following information to apply to all selected new and existing Groups:ImportantFor existing Groups, information entered in the fields in this section will replace existing data.NoteThis section is not displayed if you did not select any Groups for import.
- Use individual descriptions from CAL: Select this checkbox to have CAL provide the default Description for each Group.
- Description: If you did not select the Use individual descriptions from CAL checkbox, enter a default Description for the Groups.
- Source: Enter a default Source for the Groups.
- Click Next.
- Indicator Optional Data: Enter the following information to apply to all selected new and existing Indicators:
- Fill out the fields on the Labels section of the Import Intel - Doc Analysis screen (Figure 5) as follows:
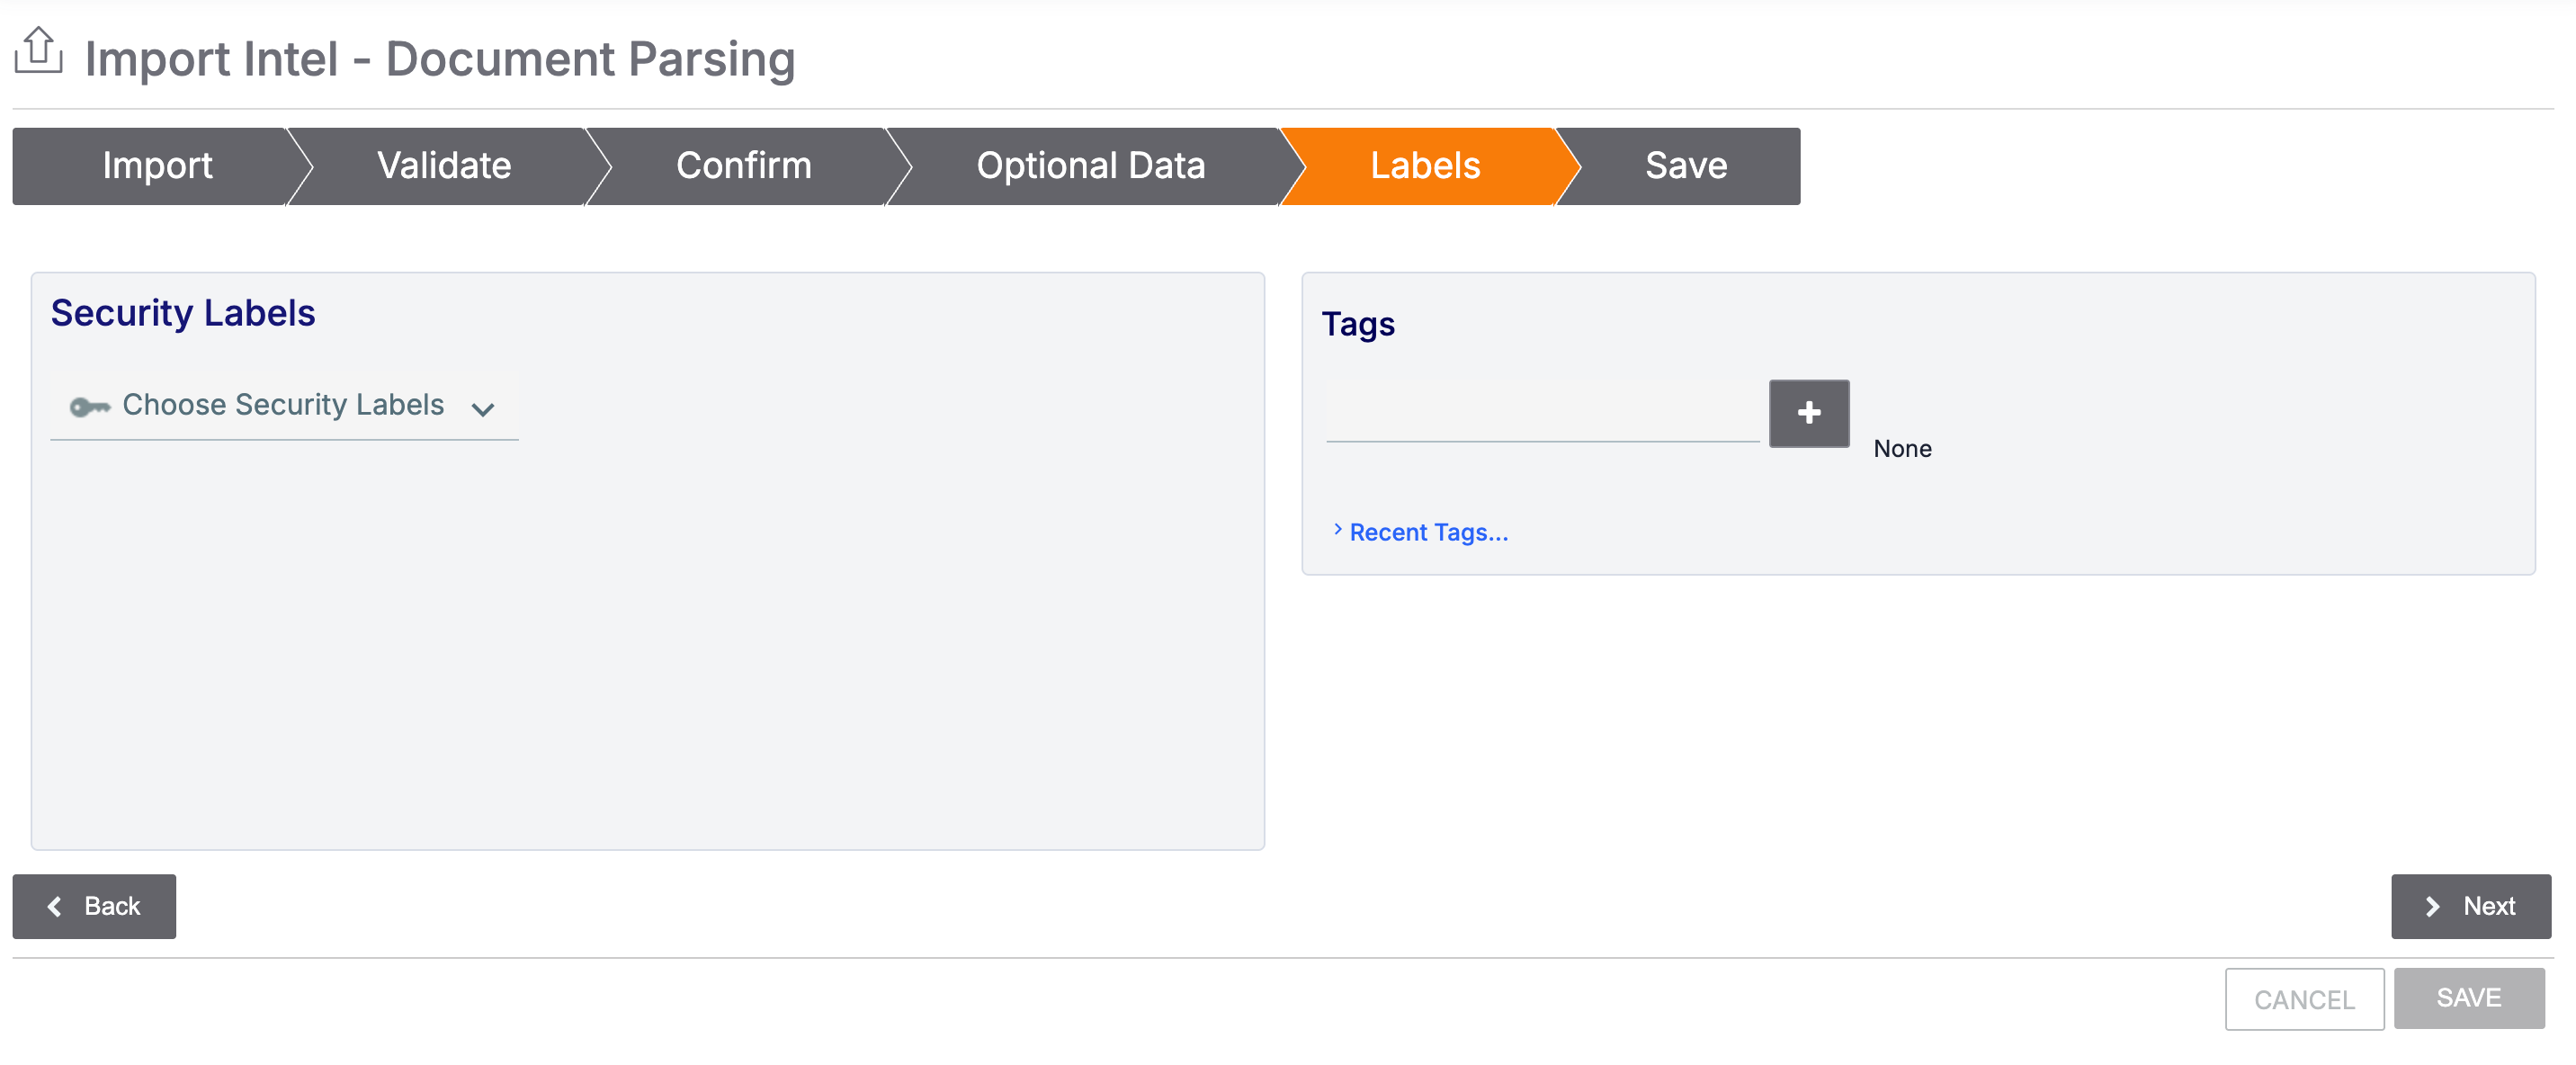
- Security Labels: Select security labels to apply to all selected new and existing Groups and Indicators.ImportantFor existing Groups and Indicators, the selected security labels will be added to the object. Existing security labels will not be removed.
- Tags: Enter Tags to apply to all selected new and existing Groups and Indicators.ImportantFor existing Groups and Indicators, the Tags will be added to the object. Existing Tags will not be removed.ImportantWhen entering text in the Tags field, click on a suggested Tag or click + to add the Tag. Added Tags are displayed in a bubble to the right of the Tags field. If a Tag is not displayed in that area, then it will not be added to the selected Groups and Indicators.NoteSynonymous Tags in a Tag normalization rule will be converted to their main Tag after you complete the import. Tags that match an ATT&CK Tag will be applied as the ATT&CK Tag after you complete the import.
- Click Next.
- Security Labels: Select security labels to apply to all selected new and existing Groups and Indicators.
- Fill out the fields on the Save tab of the Import Intel - Document Parsing screen (Figure 6) as follows:
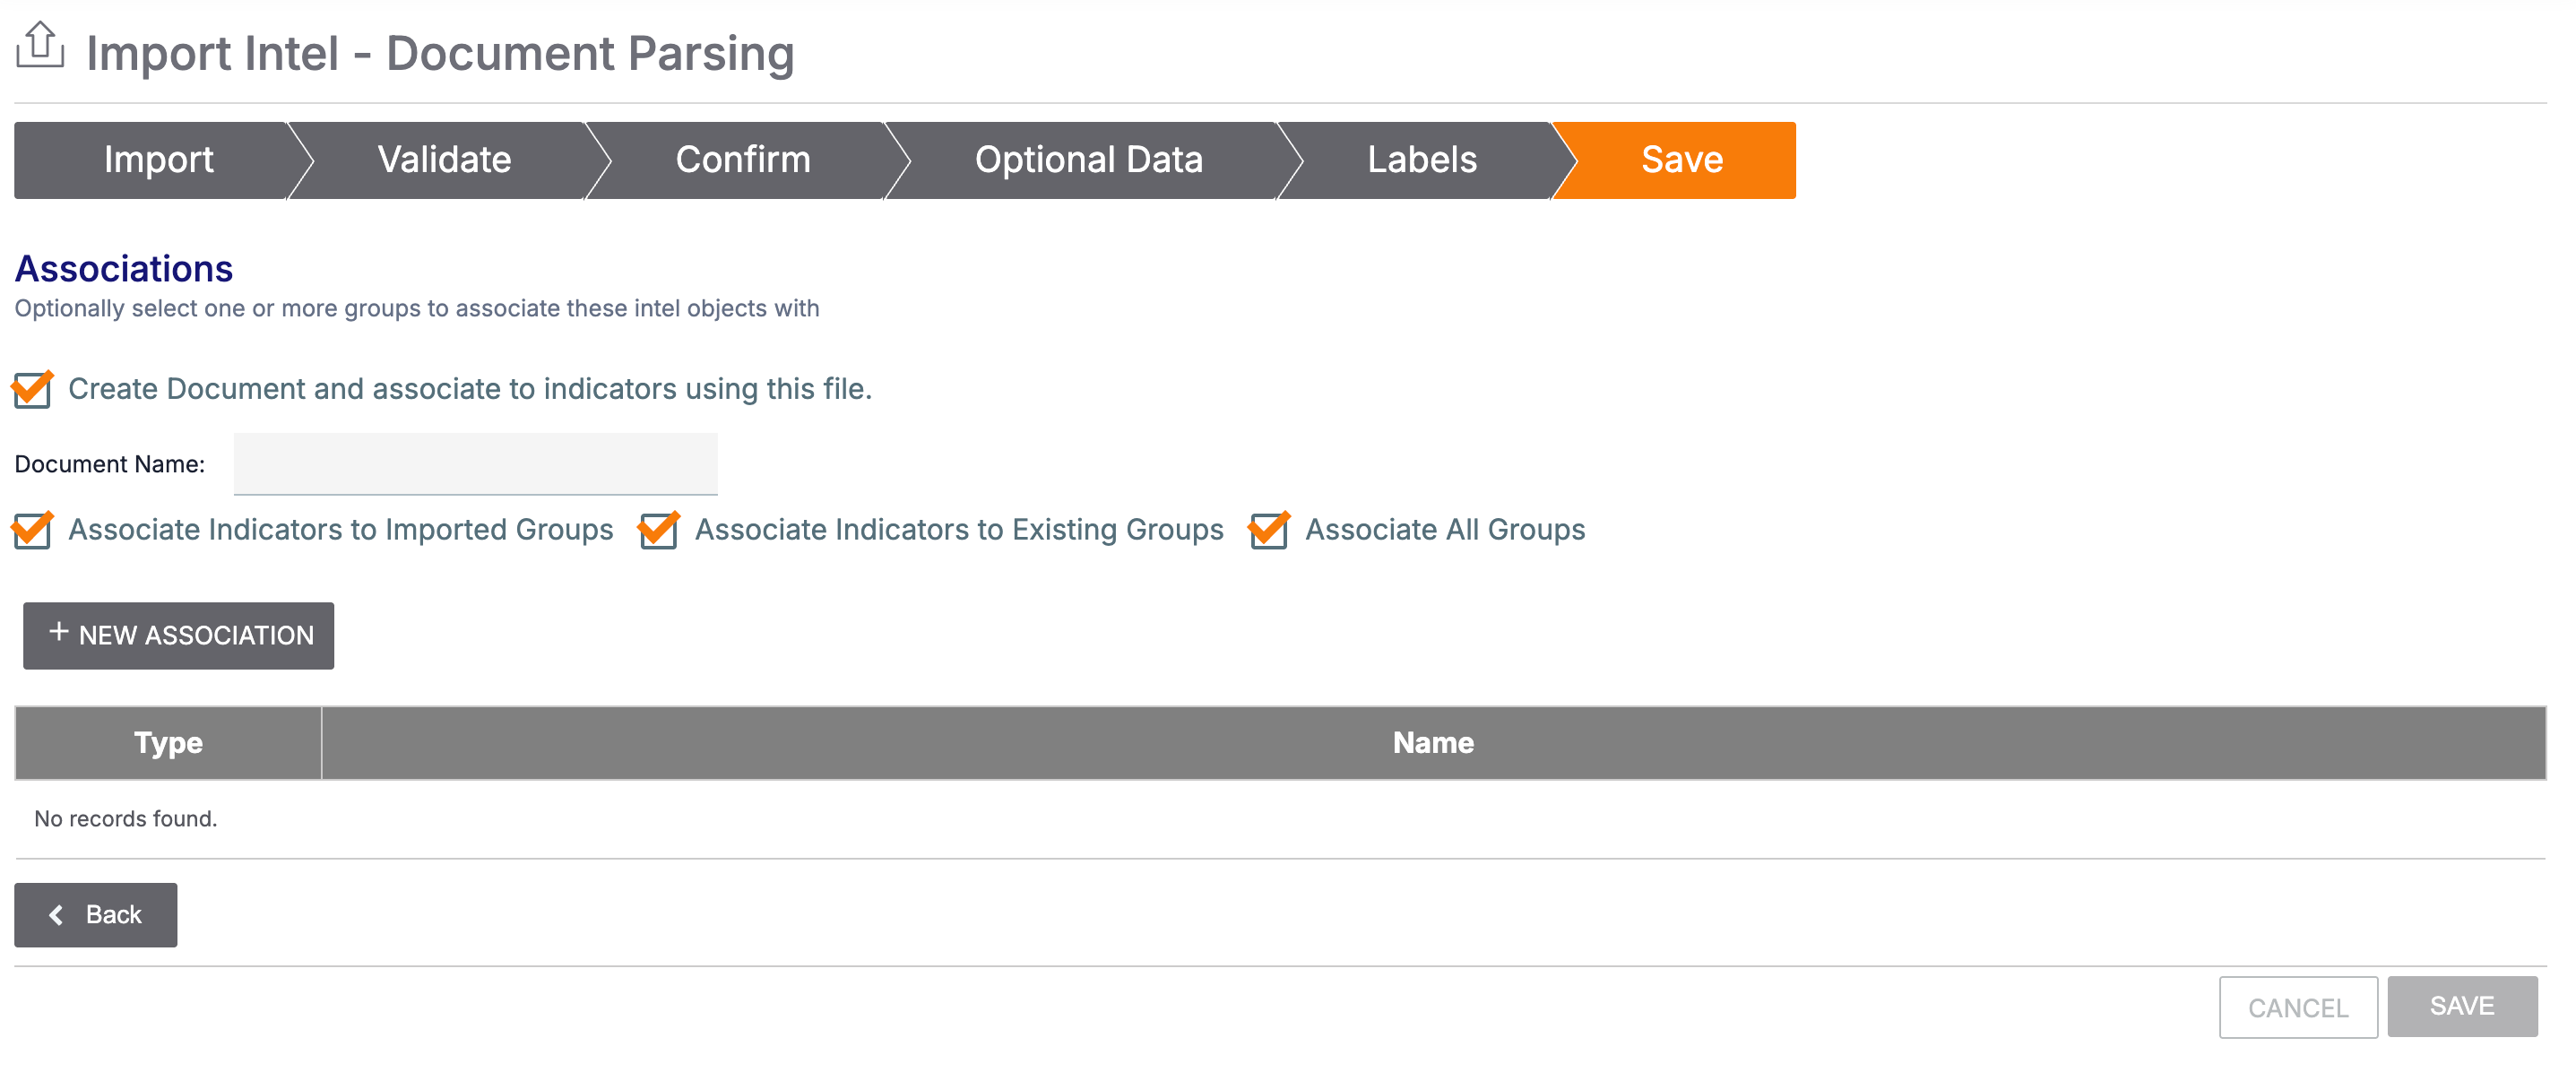
- Create Document and associate to indicators using this file.: Select this checkbox to create a Document Group for the source file and associate it to selected new and existing Groups and Indicators.NoteThis checkbox is not displayed if you did not import a file on the Import tab.
- Document Name: Enter Document Group’s name/summary.NoteThis checkbox is not displayed if you did not select the Create Document and associate to indicators using this file. checkbox.
- Associate Indicators to Imported Groups: Select this checkbox to associate all selected Indicators with all selected new Groups. Note that this operation also creates second-level (i.e., indirect) associations between all selected Indicators.
- Associate Indicators to Existing Groups: Select this checkbox to associate all selected Indicators with the existing Groups selected in the tables on the Confirm and Save tabs. Note that this operation also creates second-level (i.e., indirect) associations between all selected Indicators.
- Associate All Groups: Select this checkbox to associate all Groups with each other:
- New Groups
- Existing Groups selected in the tables on the Confirm and Save tabs
- The Document Group created if you selected the Create Document and associate to indicators using this file. checkbox
- + NEW ASSOCIATION: Click this button to select existing Groups in your Organization to associate with the selected new Groups and the selected new and existing Indicators. Selected Groups are added to the table.NoteYou can select only Groups of a single type at a time. To select Groups of multiple types, repeat the + NEW ASSOCIATION operation for each Group type.ImportantYou cannot remove Groups from the table on the Save tab. If you want to remove a Group in the table, click CANCEL and restart the import.
- Click Save to complete the Document Processing Import.
- Create Document and associate to indicators using this file.: Select this checkbox to create a Document Group for the source file and associate it to selected new and existing Groups and Indicators.
ThreatConnect® is a registered trademark, and CAL™ is a trademark, of ThreatConnect, Inc.
CVE®, MITRE ATT&CK®, and ATT&CK® are registered trademarks, and MITRE ATLAS™ is a trademark, of The MITRE Corporation.
20154-01 v.03.A