Structured Indicator Import
- 05 May 2023
- 7 Minutes to read
-
Print
-
DarkLight
-
PDF
Structured Indicator Import
- Updated on 05 May 2023
- 7 Minutes to read
-
Print
-
DarkLight
-
PDF
Article summary
Did you find this summary helpful?
Thank you for your feedback!
Overview
The ThreatConnect® import engine can extract Indicators from structured comma-separated values (CSV) files. It can also parse Indicators from an unstructured document, such as a TXT or PDF file, via the unstructured import option. Structured imports require that the CSV file meet a specified structure, which is described in this article.
Important
Before performing the import, create a Group with which to associate the imported Indicators, as it will not be possible to create the Group during the import process.
Note
Structured imports work with any Indicator type, including custom Indicator types, that accepts a single value and is marked as parsable. Note that any multivalue Indicator type is automatically marked as non-parsable. The only exception is the File Indicator, although only one value gets parsed out in the structured import.
Before You Start
| Minimum Role(s) | Organization role of Standard User |
|---|---|
| Prerequisites | None |
Performing a Structured Indicator Import
- On the top navigation bar, hover the cursor over Import and select Indicators. The Import Indicator screen will be displayed (Figure 1).
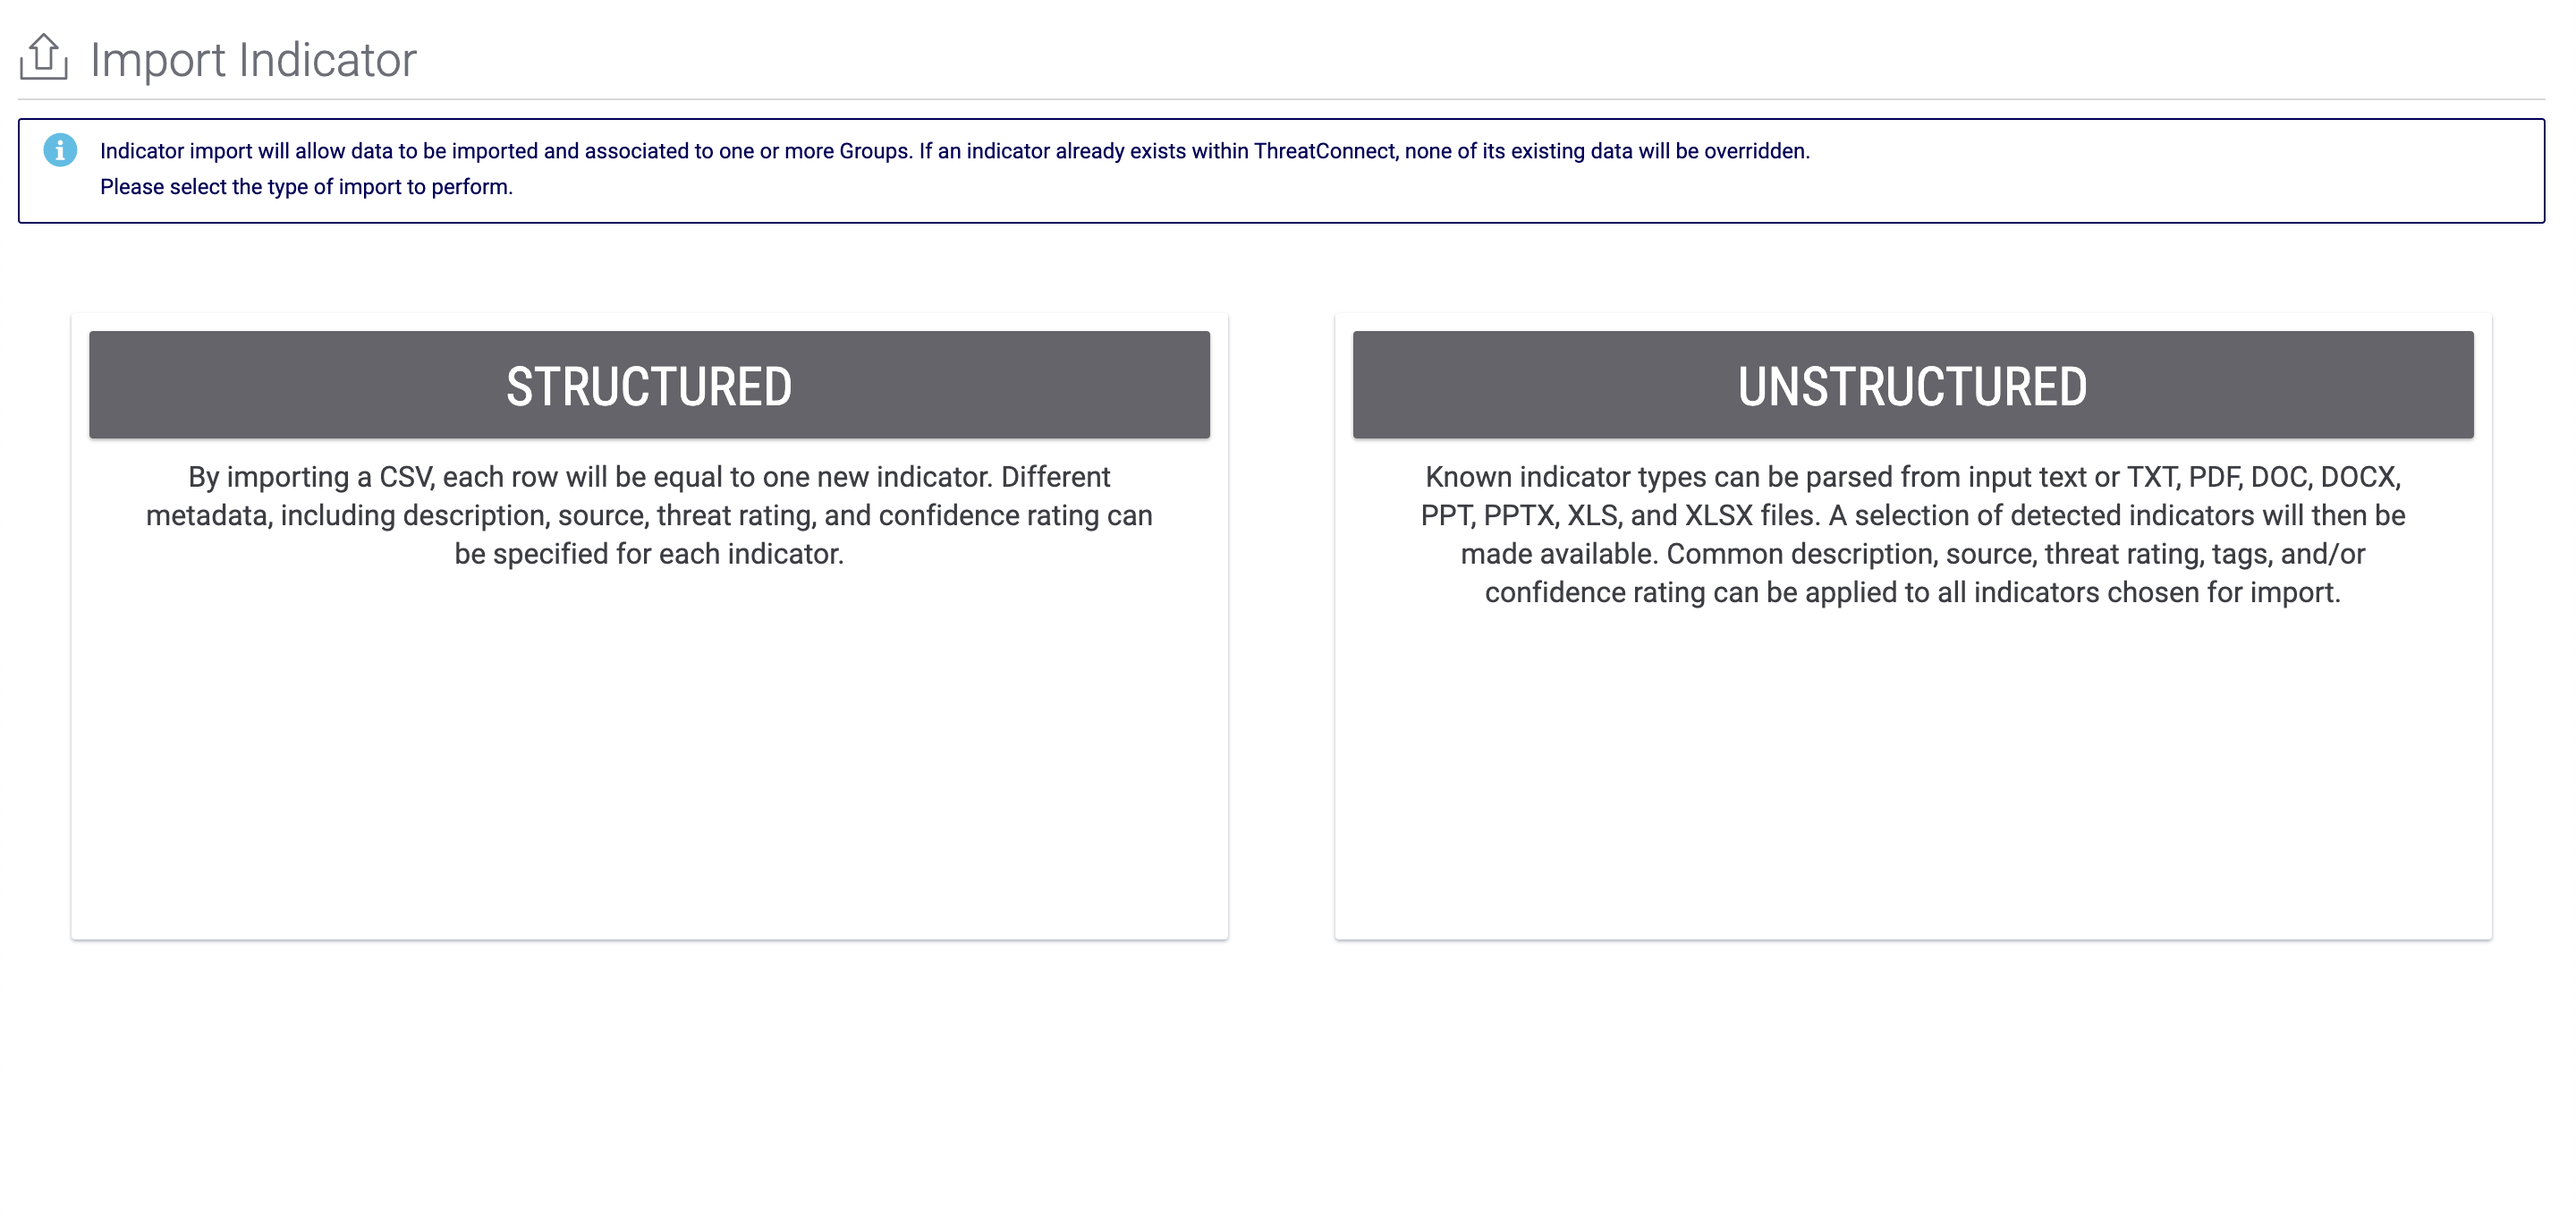
- Select STRUCTURED to display the Import Indicators - Structured screen (Figure 2).
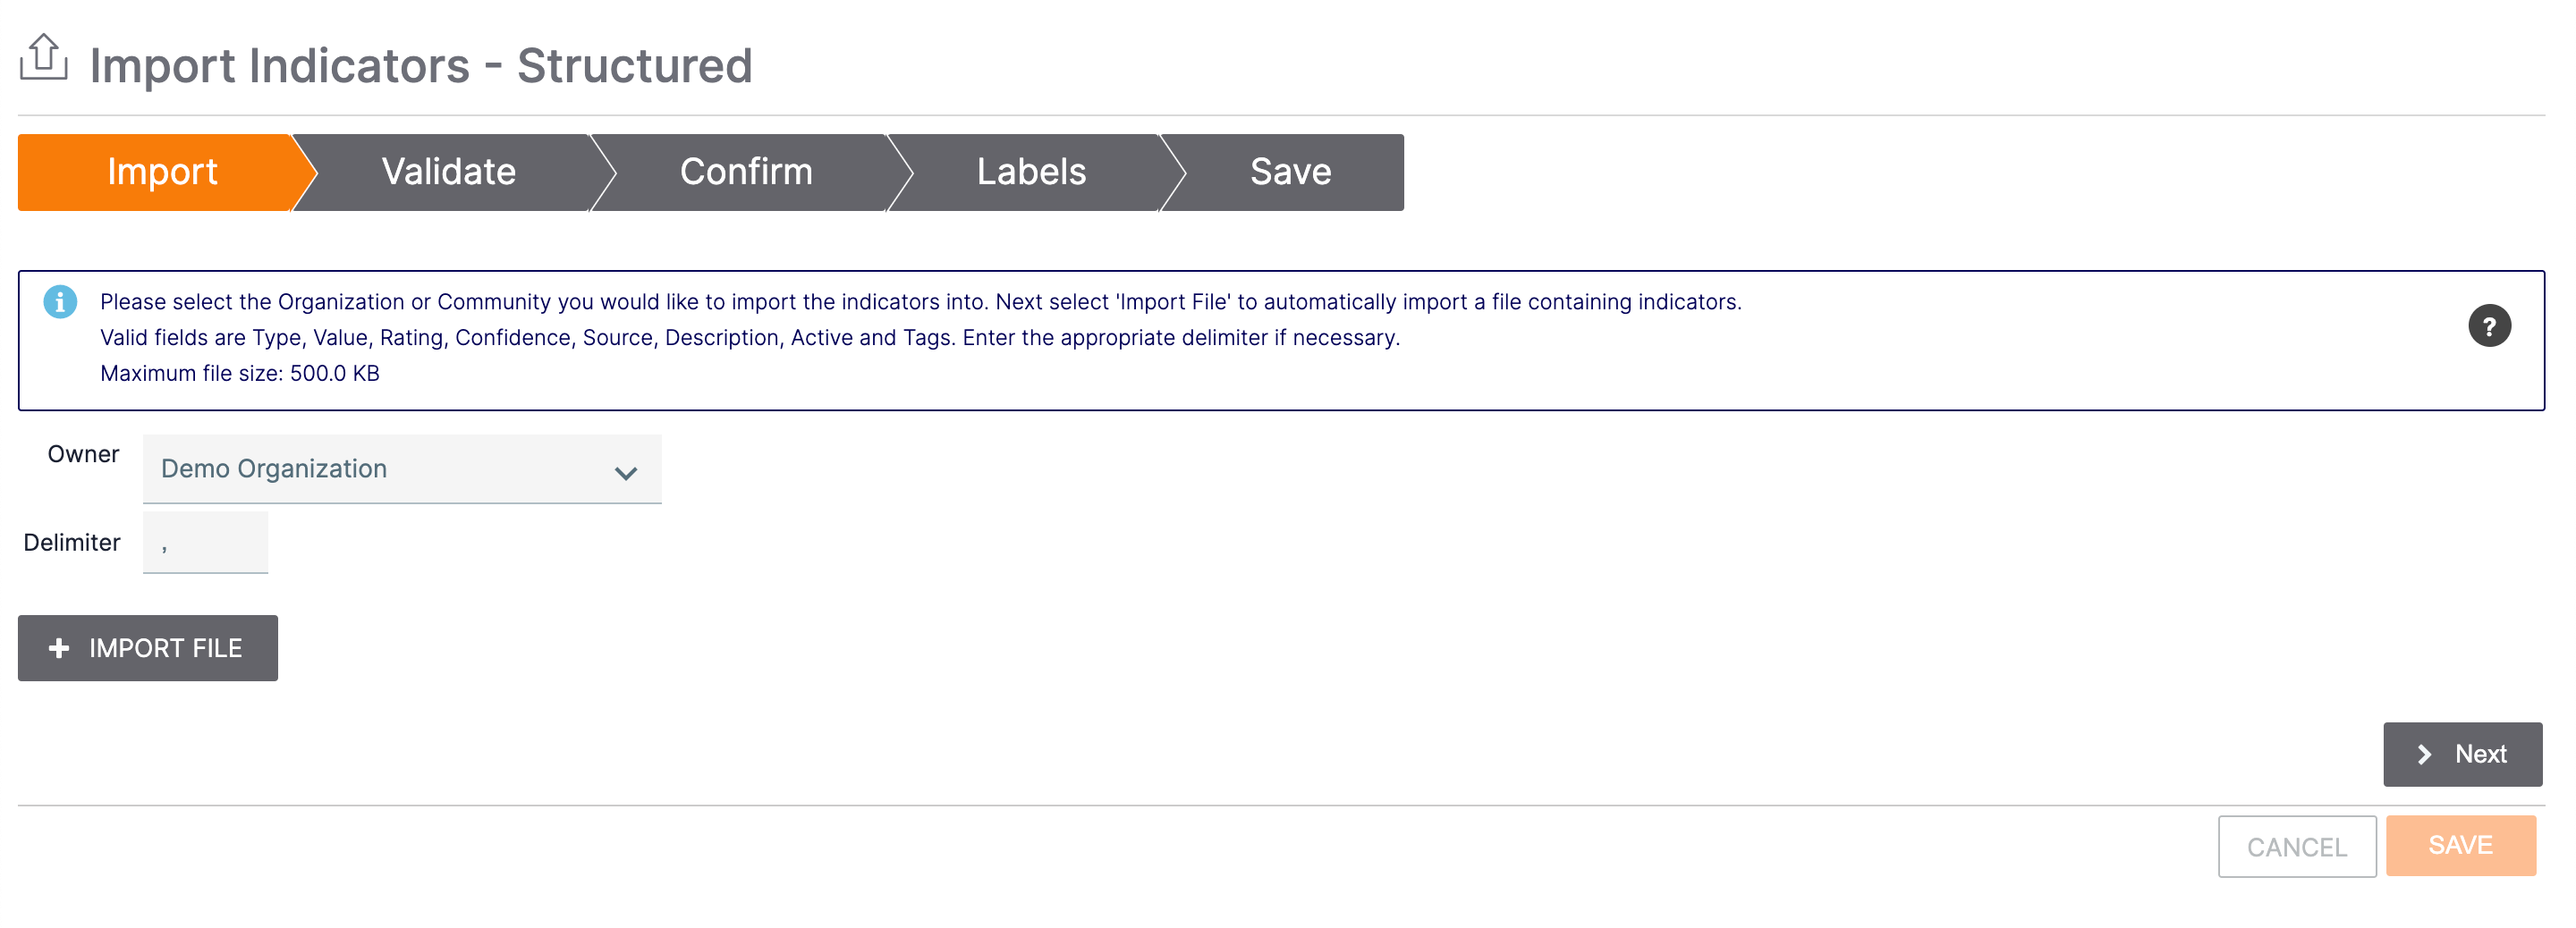
- Owner: Select an owner (Organization, Community, or Source) into which the Indicators will be imported.
- Delimiter: The default delimiter for the imported file is a comma. Click in the box to change the delimiter, if desired.
 icon: Click this icon to display the Import Help window, which explains the proper format to use when creating a CSV file. Note that you will need to scroll down the Import Help window to view all of its contents.NoteYou can set Indicator Status by creating an Active column in the CSV file. Each Indicator will be imported with its own individual status as indicated by the value provided in the Active column for that Indicator. Possible values for data in the Active column are 0 or false (sets Indicator Status to inactive; applies to both new Indicators and existing Indicators), 1 or true (sets Indicator Status to active; applies to both new Indicators and existing Indicators), and blank (no value provided; sets Indicator Status to active for new Indicators and leaves Indicator Status unchanged for existing Indicators). If no column for Indicator Status is provided, then all new Indicators will be imported as active, while the status for all existing Indicators will be left unchanged.
- + IMPORT FILE: Click this button to locate and select a CSV file containing Indicators to upload.
- After a file has been uploaded, a list of Detected Column Names will be displayed (Figure 3). This list displays all columns included in the CSV file; however, only valid columns (i.e., Type, Value, Rating, Confidence, Source, Description, Active, and Tags) will be included in the import. Later in the import process, on the Save screen (Figure 9), if you choose to create a Document Group from the CSV file and associate it to the imported Indicators, the entire CSV file, including any invalid columns, will be included in the Group.
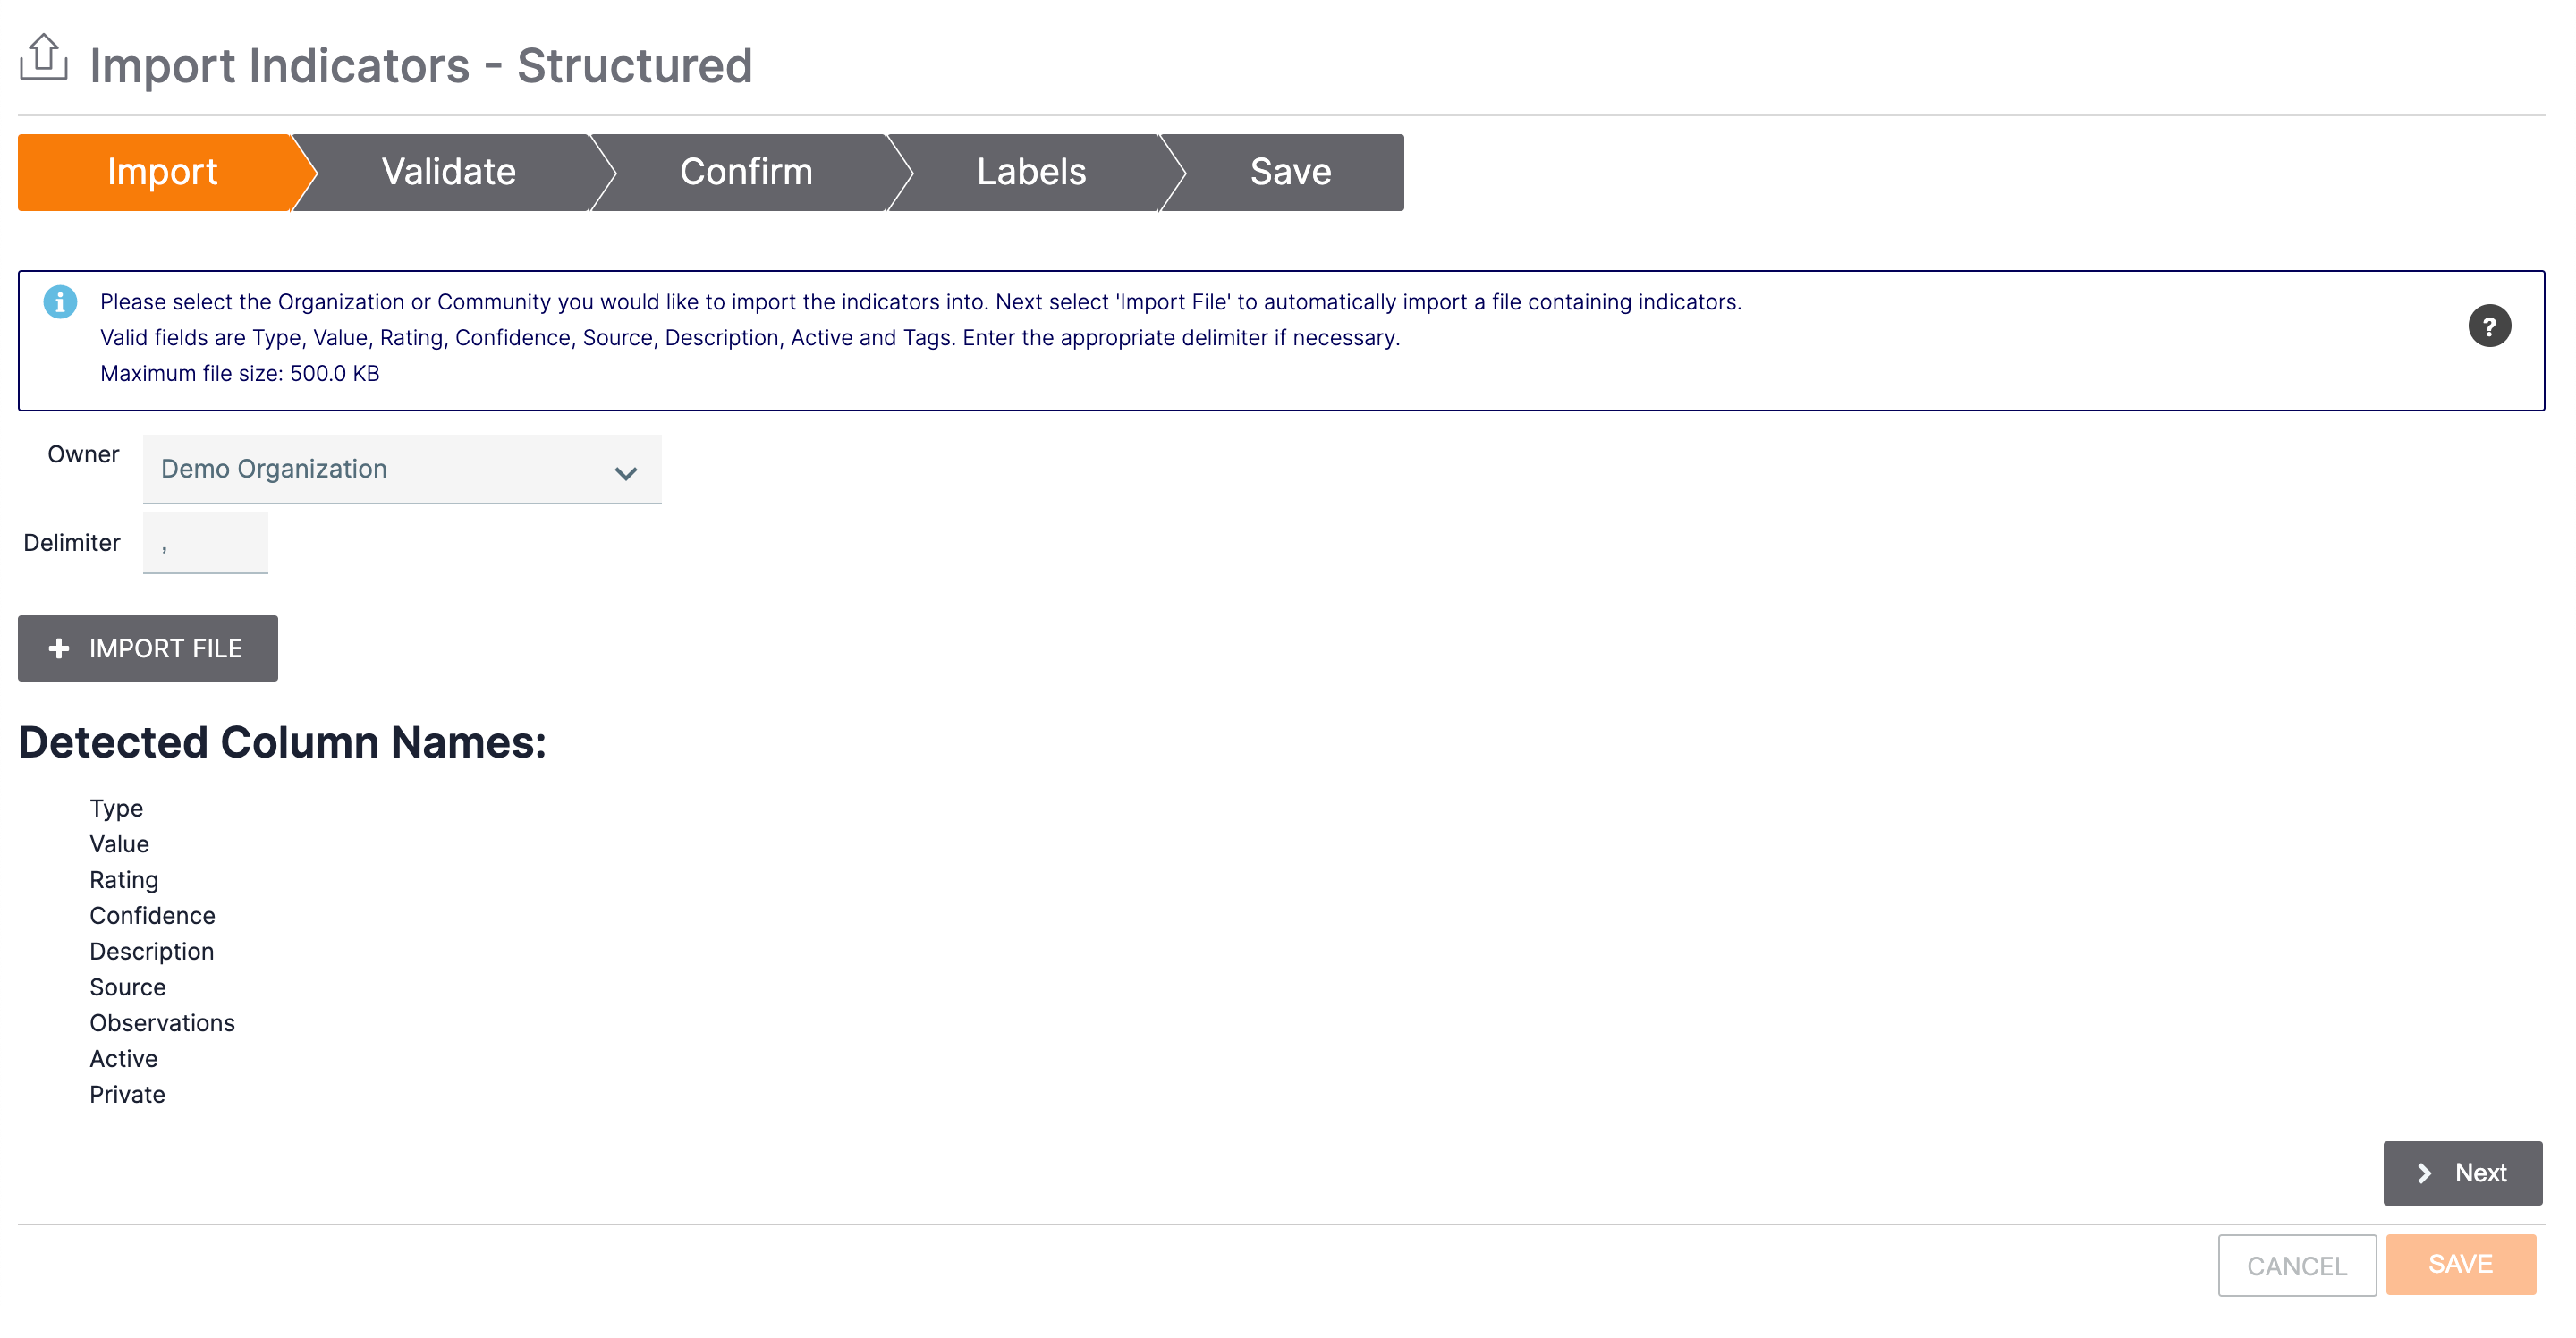
- Click the Next button.
- The Validate screen will be displayed (Figure 4). On this screen, you can view all Indicators included in the CSV file split into two categories: Valid and Invalid.

- Click the VIEW button for each category to display its respective Indicators. Figure 5 displays tables for both valid and invalid Indicators.
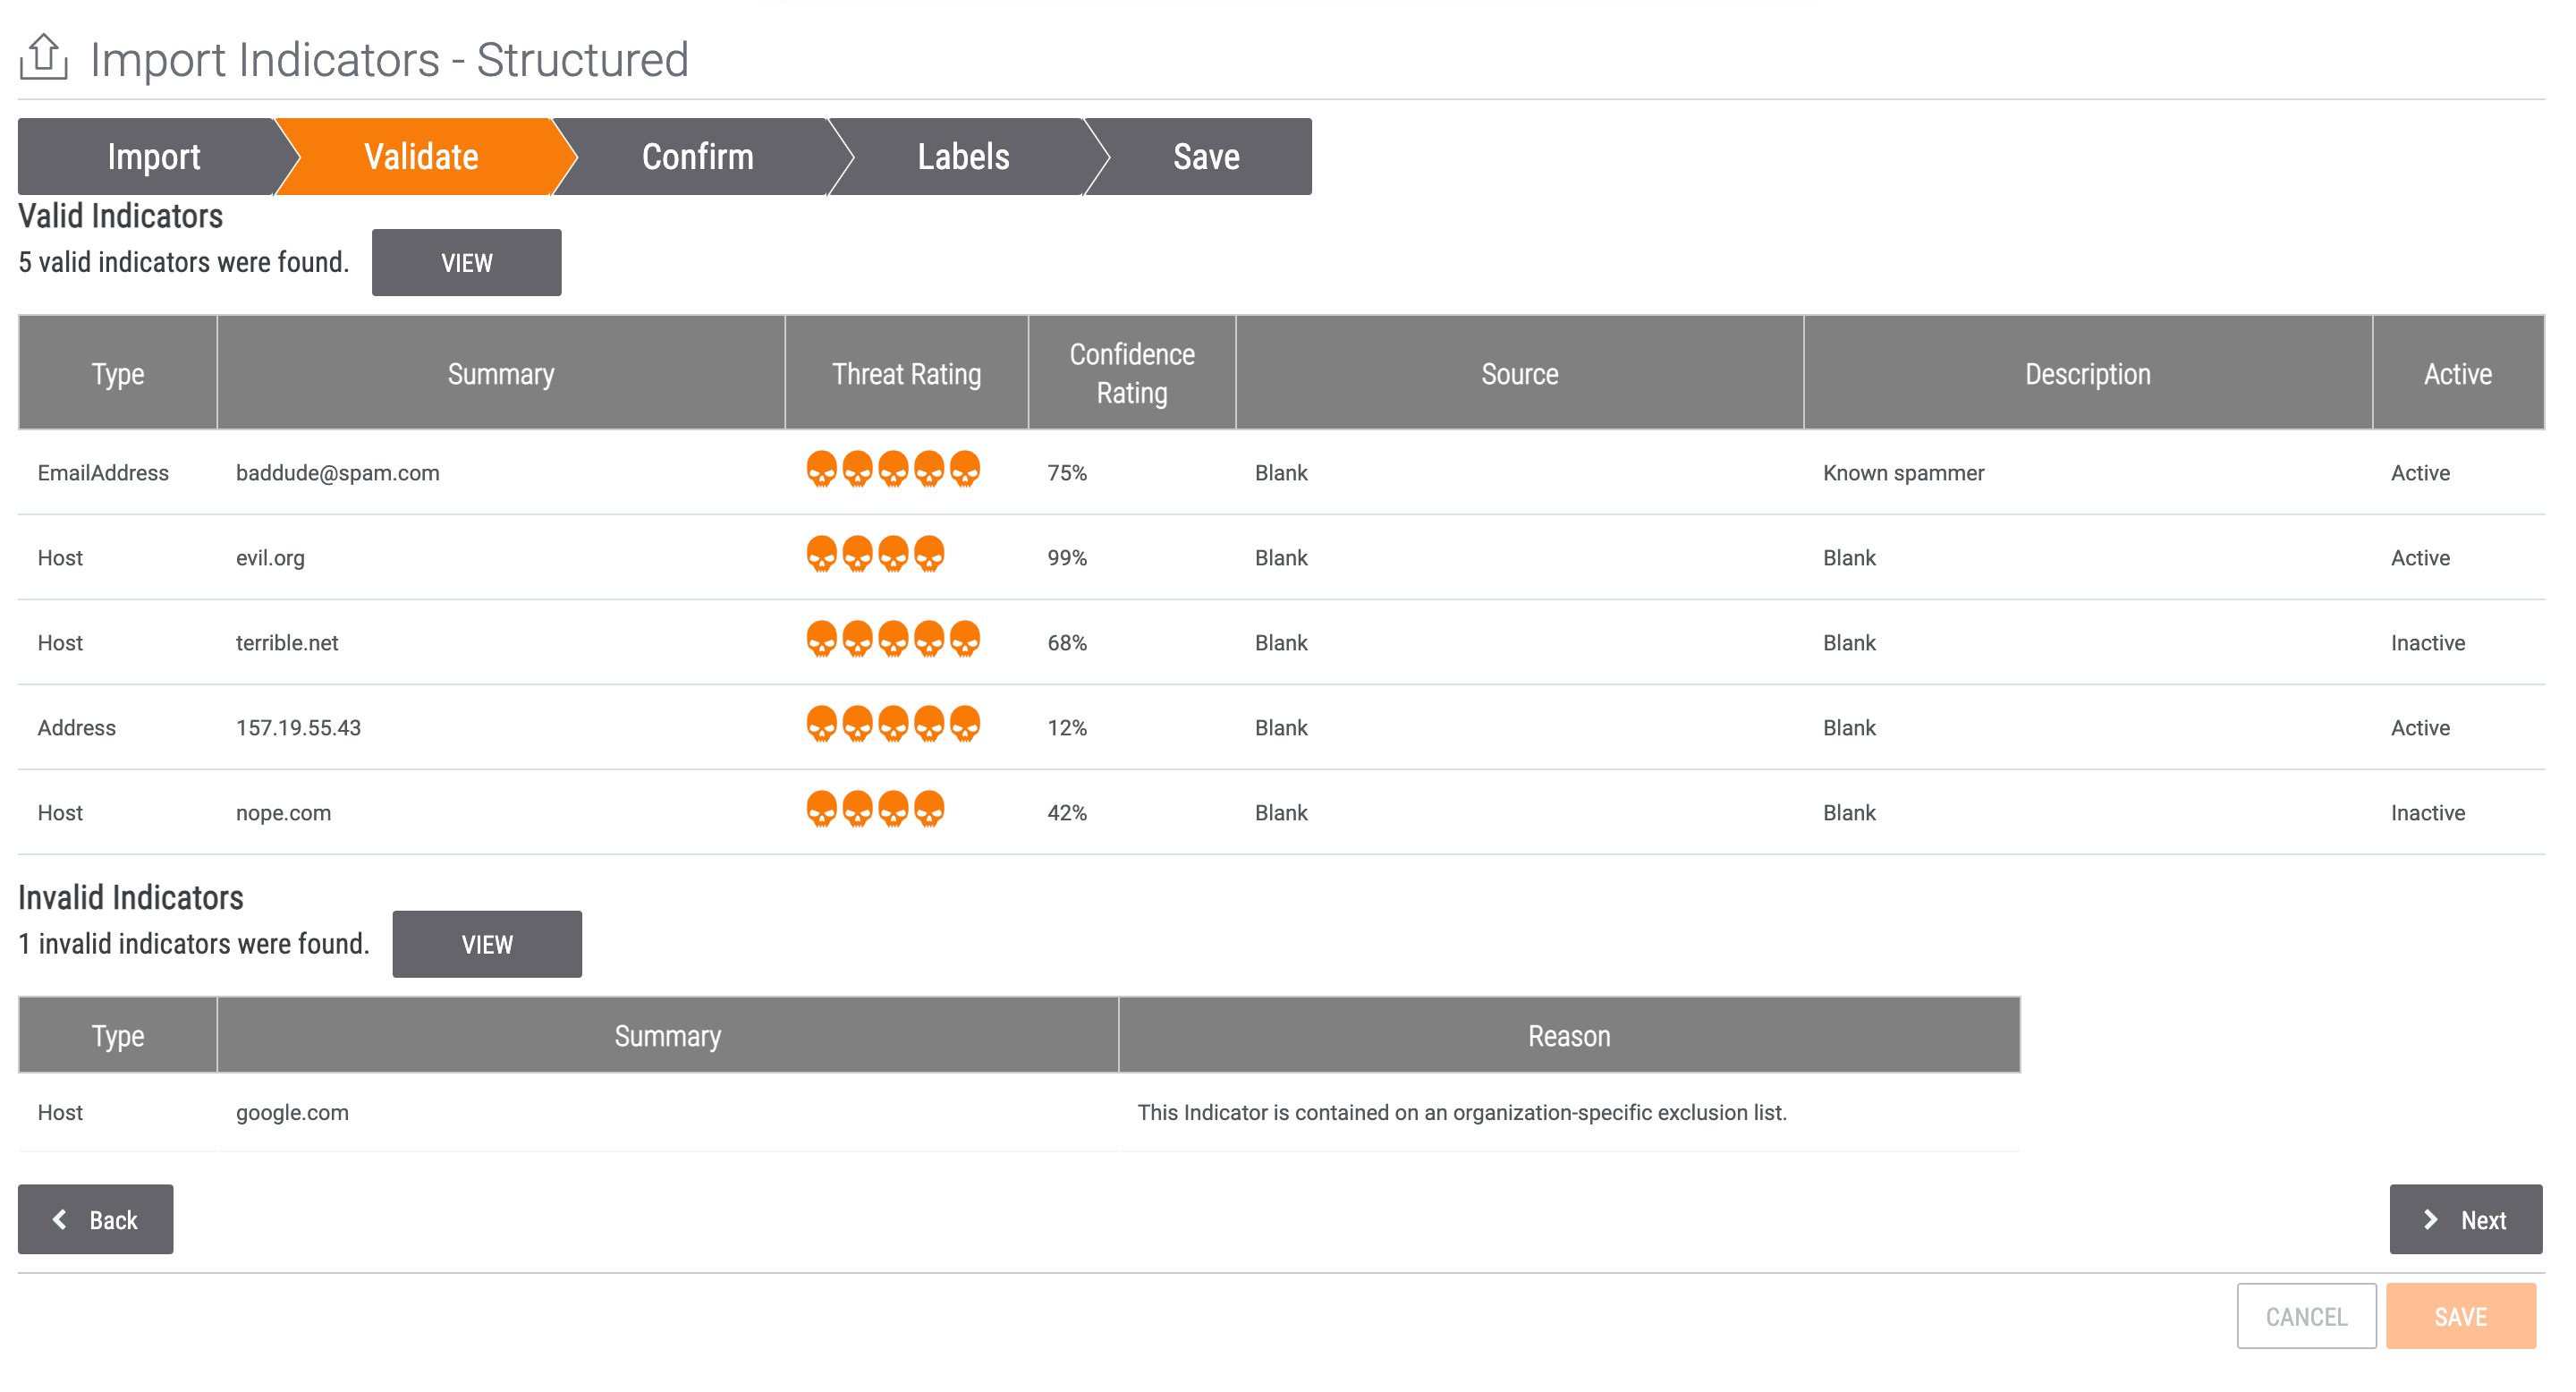
- The table in the Valid Indicators sections displays all valid Indicators and their values for some of the imported columns (e.g., Type, Summary, Threat Rating, Confidence Rating, Source, Description, and Active).ImportantIf the CSV file includes an Active column, but users are not permitted to change Indicator Status (that is, the Enable Indicator Status Change setting is turned off in Account Settings for the owner selected in Step 2; see ThreatConnect Account Administration Guide for more information), a message stating that all imported Indicators will have their Indicator Status set to active will be displayed at the top of the Validate screen, and the Active column will not be displayed when viewing valid Indicators.
- The table in the Invalid Indicators section displays all invalid Indicators. The Reason column displays a message stating why the Indicator is invalid. For example, reasons an Indicator may be designated as invalid include the Indicator being contained on a System-wide, Organization-specific, Community-specific, or Source-specific Indicator Exclusion List or an Indicator Type not being provided in the CSV file.
- Click the Next button.
- The table in the Valid Indicators sections displays all valid Indicators and their values for some of the imported columns (e.g., Type, Summary, Threat Rating, Confidence Rating, Source, Description, and Active).
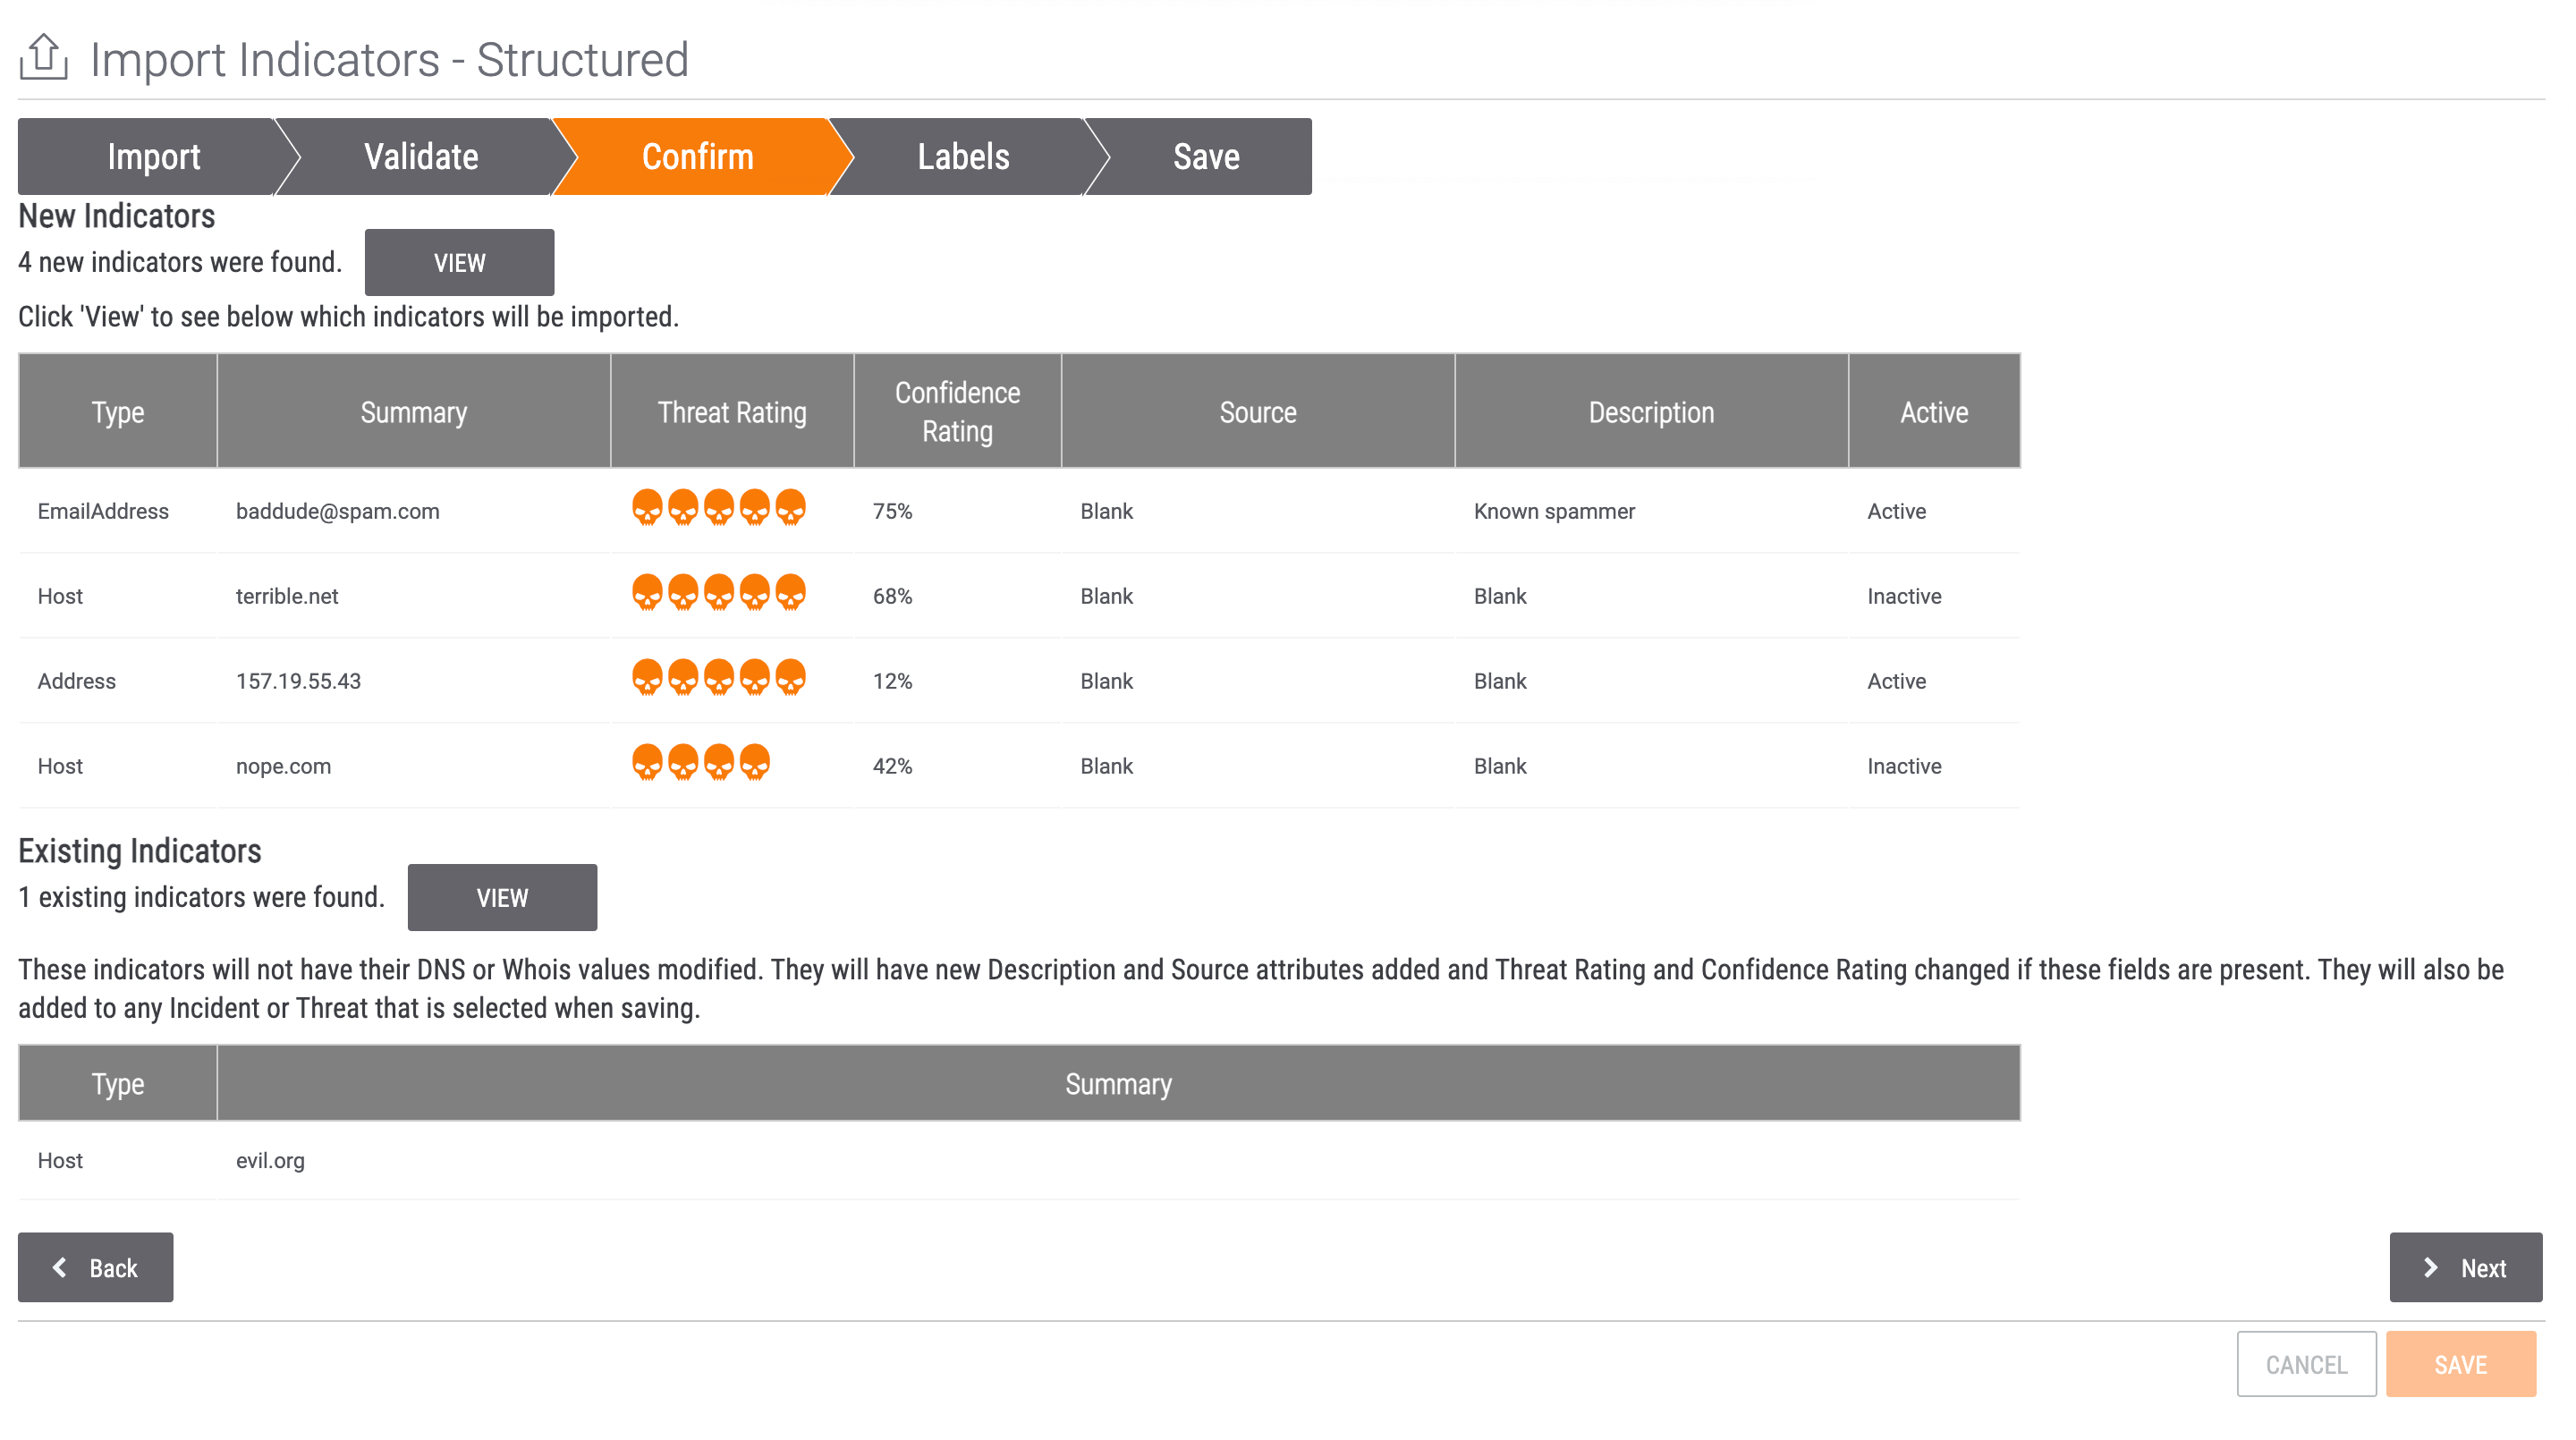
- The Confirm screen will be displayed (Figure 6). This screen displays all valid Indicators separated into two categories: New and Existing.

- Click the VIEW button for each category to display its respective Indicators. Figure 7 displays both new and existing Indicators.
 ImportantIf the CSV file includes an Active column, but users are not permitted to change Indicator Status (that is, the Enable Indicator Status Change setting is turned off in Account Settings for the owner selected in Step 2; see ThreatConnect Account Administration Guide for more information), then the Active column will not be displayed when viewing new Indicators. In this scenario, the Indicator Status for new Indicators will be set to active by default, and the Indicator Status for existing Indicators will not be updated.
- The table in the New Indicators sections displays all valid Indicators that will be imported and their values for some of the imported columns (e.g., Type, Summary, Threat Rating, Confidence Rating, Source, Description, and Active). If a System Administrator has enabled private Indicators in your ThreatConnect instance, a Private column will be displayed to the right of the Active column. Here, you can select the checkbox for each new Indicator that you want to mark as private.
- The table in the Existing Indicators section displays all valid Indicators that exist in the owner selected on the Import screen (Figure 2). The following fields will be updated for existing Indicators if the CSV file includes their corresponding column: Description, Source, Threat Rating, Confidence Rating, and Indicator Status. In addition, existing Indicators will be associated to Groups selected on the Save screen, as well as a Document Group containing the CSV file if one is created. (See Figure 9.)NoteIf the CSV file does not include a column for the Description, Source, Threat Rating, Confidence Rating, or Active fields, or if no value is present in a field’s corresponding column, that field will not be updated for an existing Indicator.
- Click the Next button.
- The Labels screen will be displayed (Figure 8).
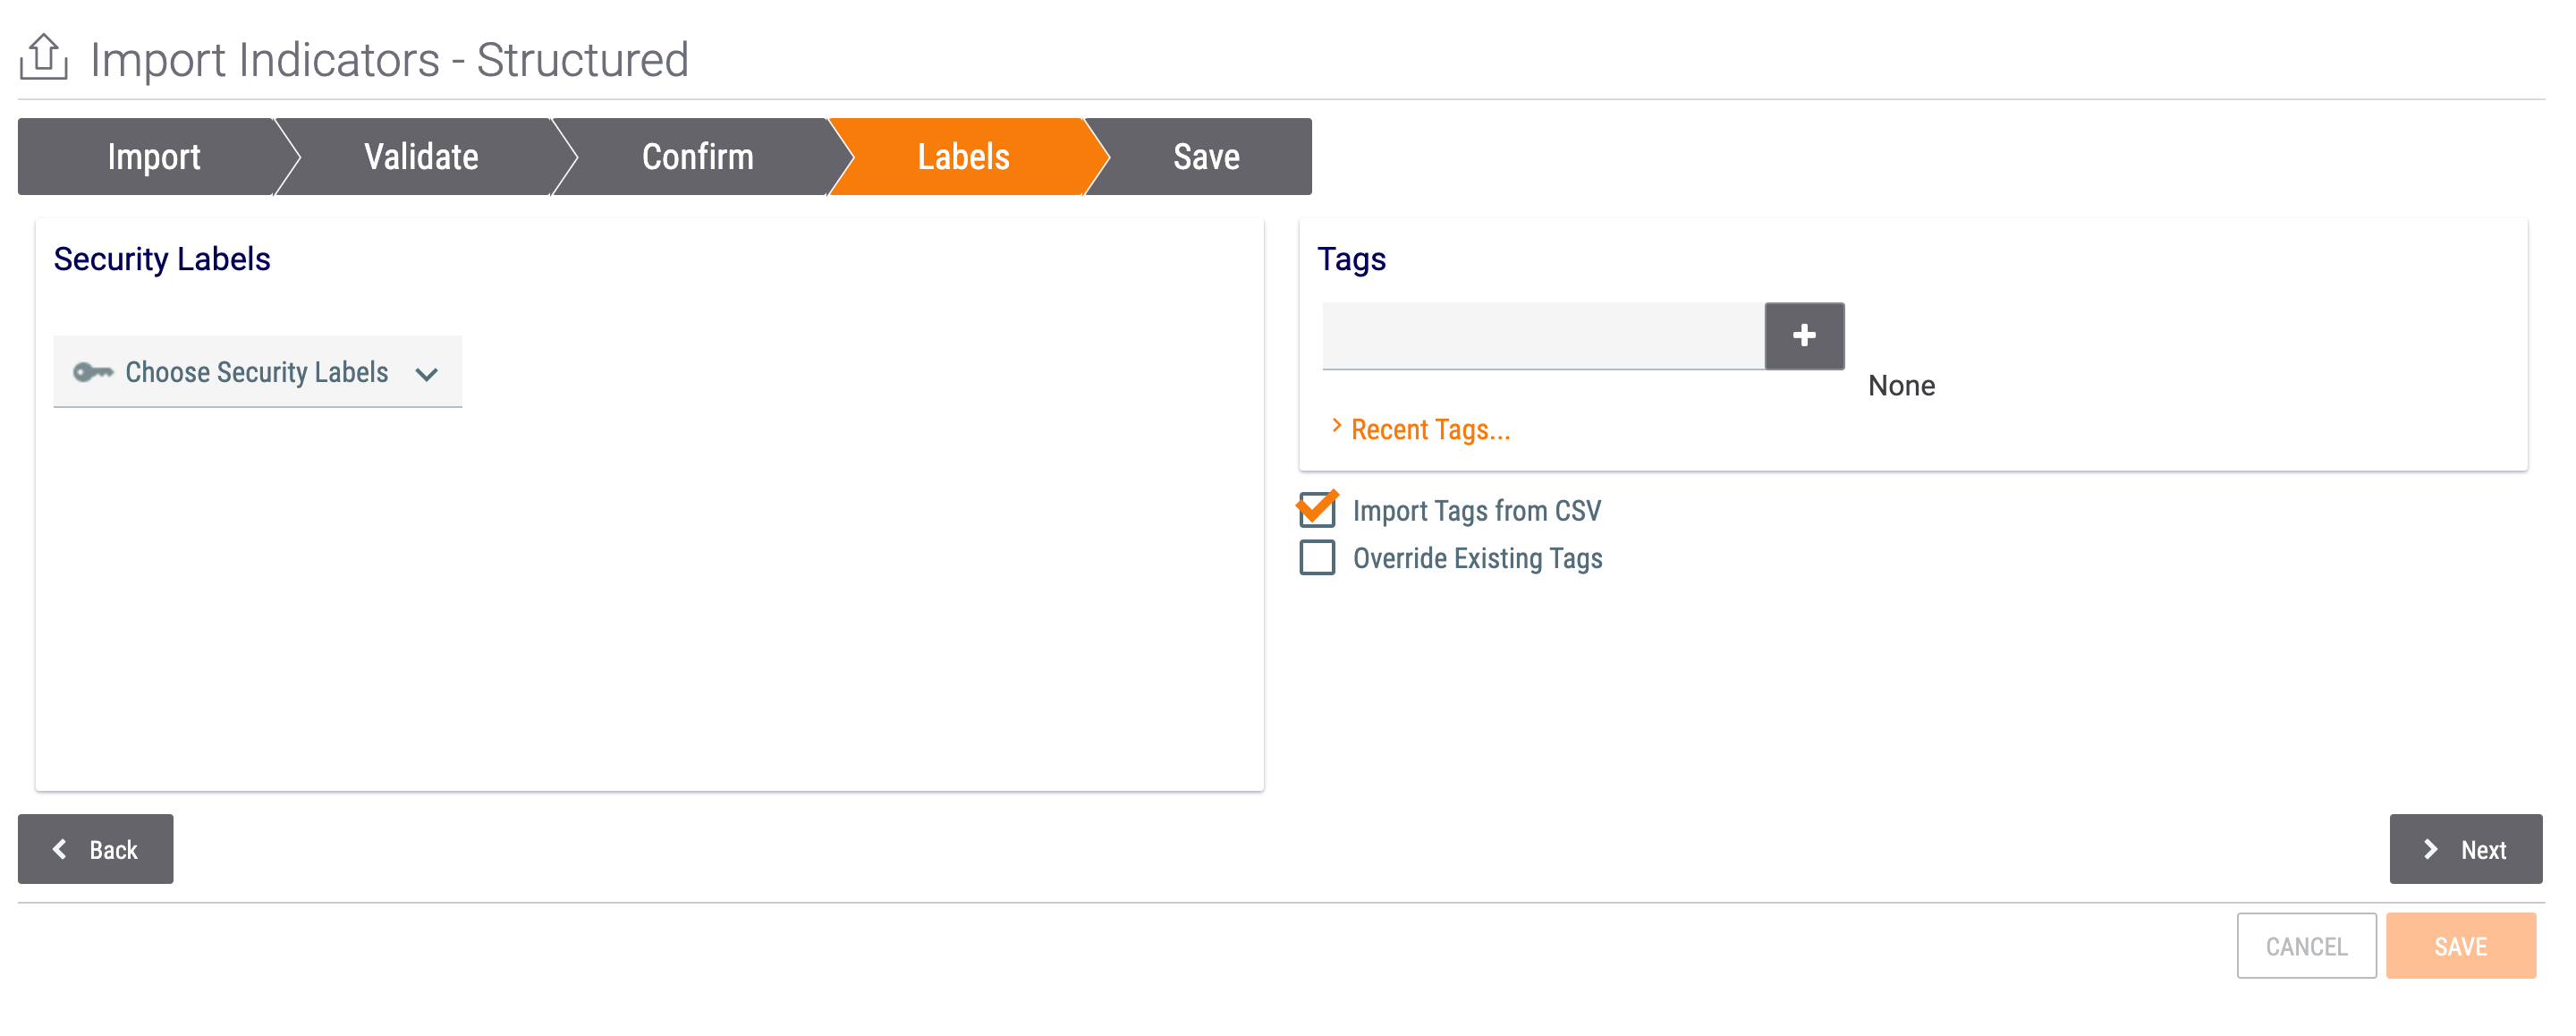
- Security Labels: Select Security Labels to apply to all new and existing Indicators.
- Tags: Enter Tags to apply all new and existing Indicators.
- Import Tags from CSV: Select this checkbox to import Tags included in the uploaded CSV file. If a value exists in the CSV file’s Tags column for an Indicator, a Tag will be created and applied to the Indicator upon import.
- Override Existing Tags: Select this checkbox to override existing Tags applied to existing Indicators with Tags included in the CSV file for the Indicators. If the Import Tags from CSV checkbox is cleared, then this checkbox will be grayed out.
- Click the Next button.
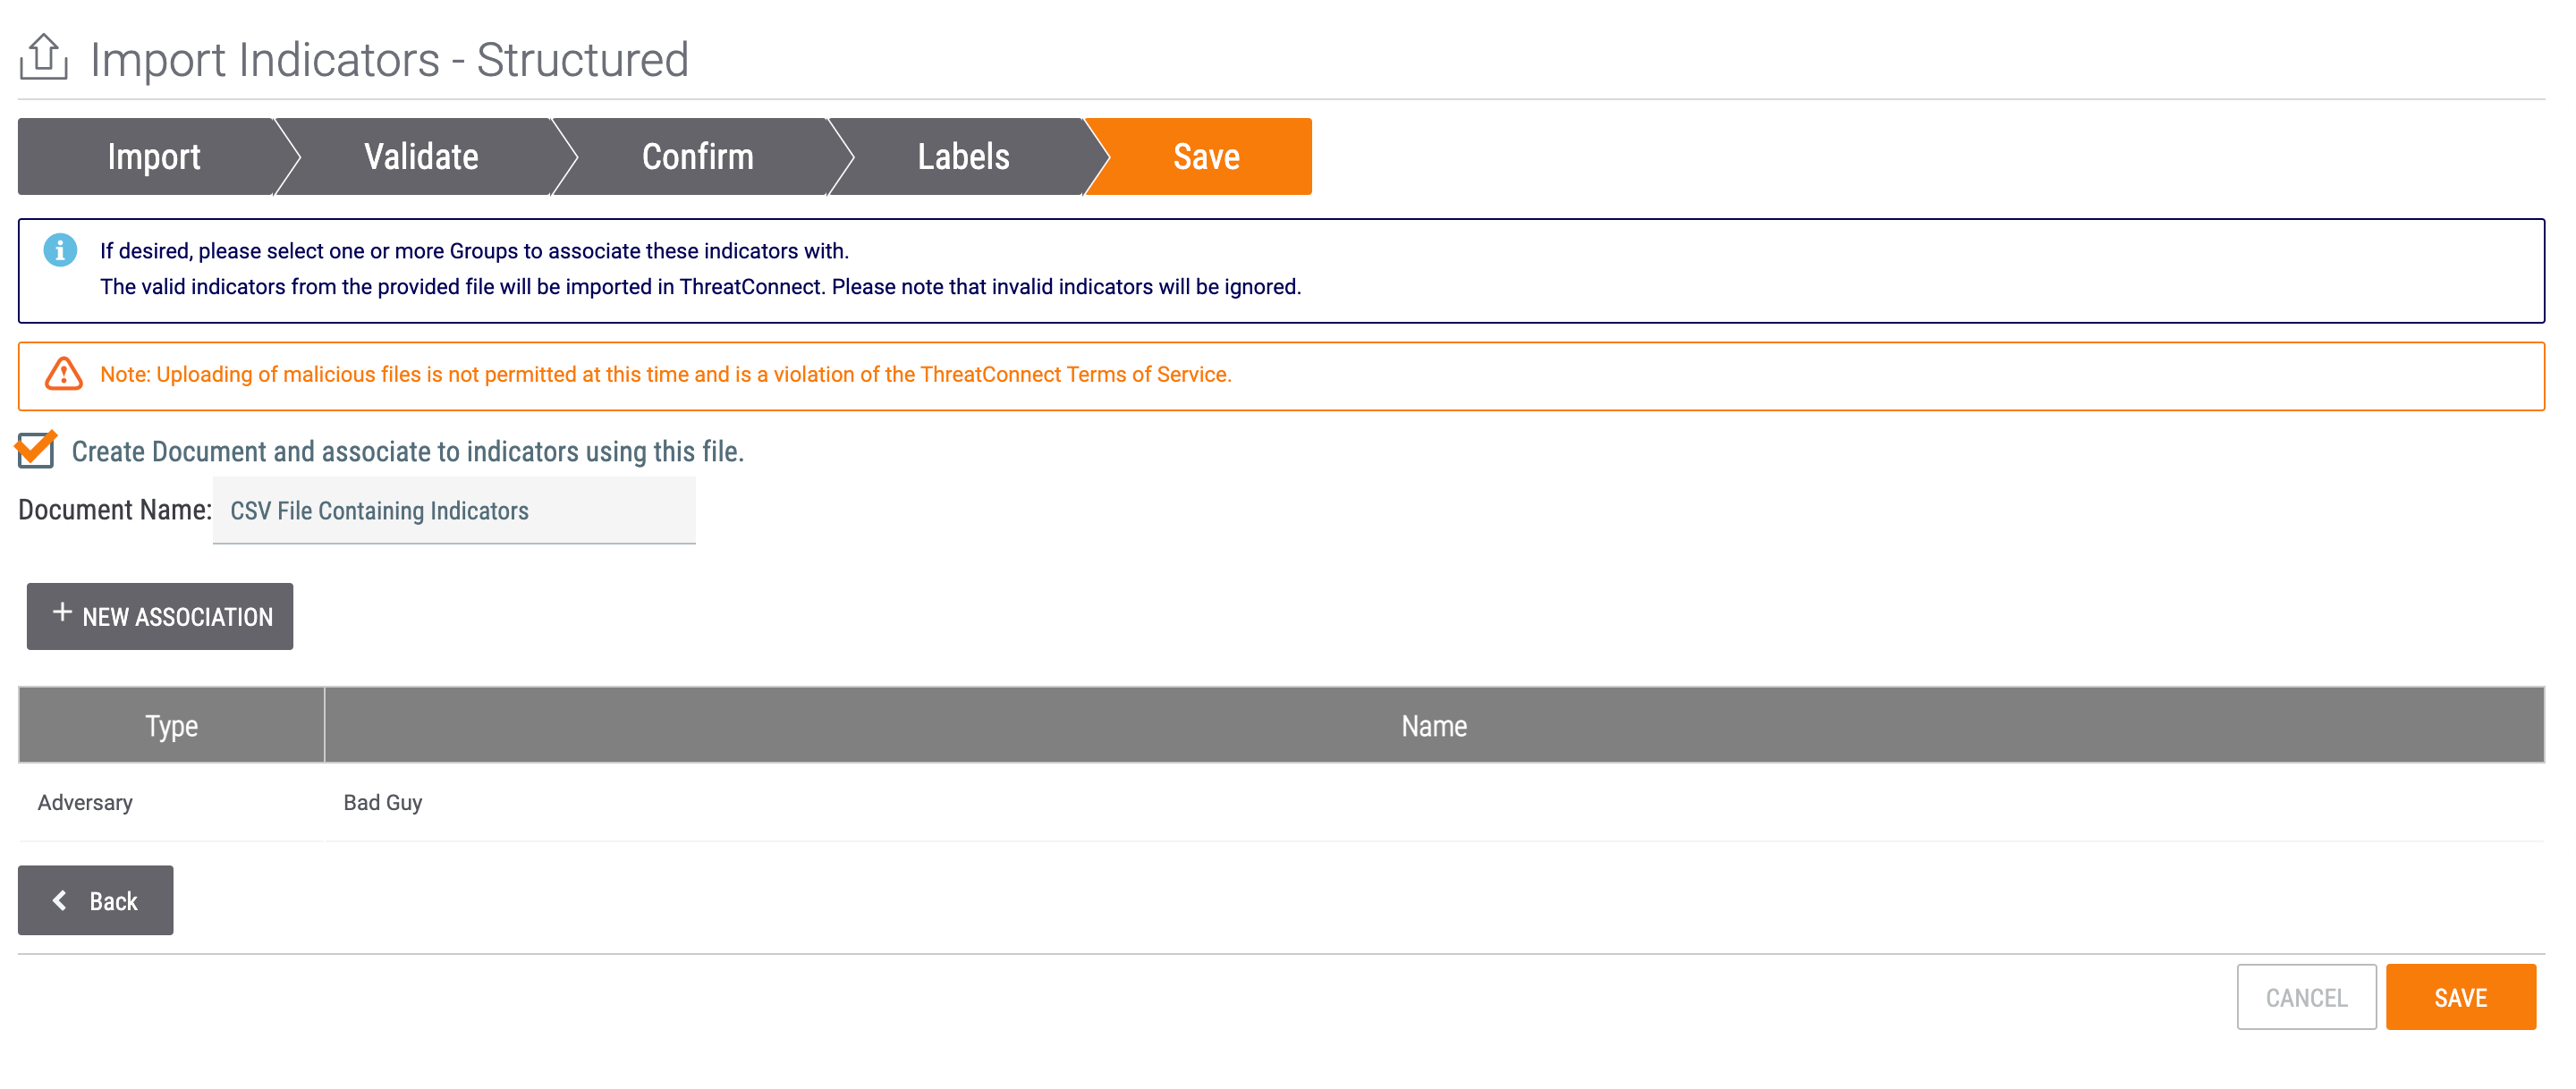
- The Save screen will be displayed (Figure 9).
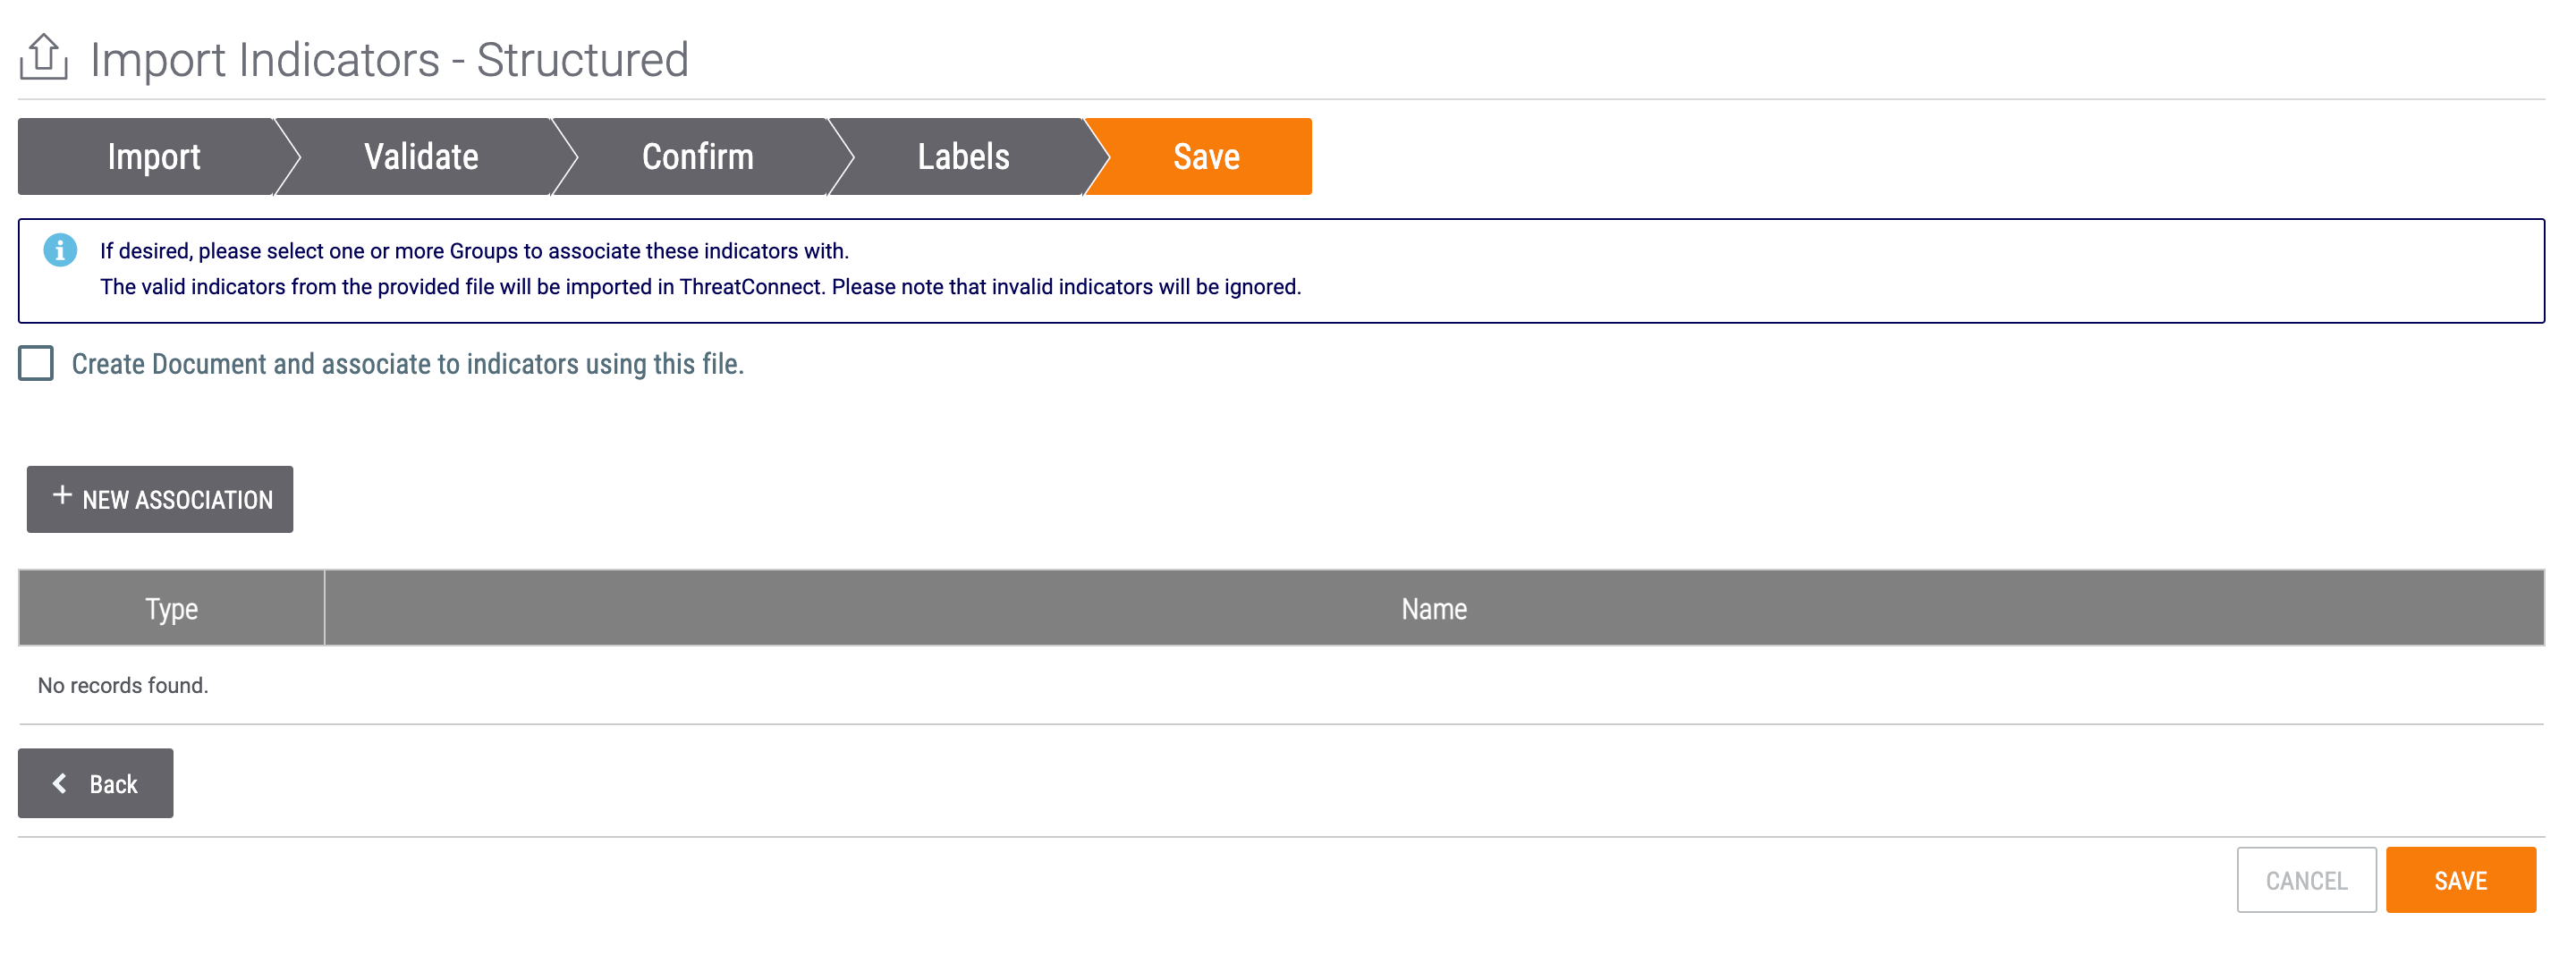
- Create Document and associate to indicators using this file.: Select this checkbox to create a Document Group containing the uploaded CSV file and associate it to all new and existing Indicators.
- Document Name: If you selected the Create Document and associate to indicators using this file. checkbox, a Document Name: field will be displayed automatically. Enter a name for the Document Group.
- + NEW ASSOCIATION: Click this button to associate all new and existing Indicators to existing Groups, if desired. It is highly recommended that Indicators be associated to a Group; otherwise, they are orphaned and provide minimal value to future analysis.
- If you do not want to associate all imported Indicators to existing Groups, click the SAVE button to complete the import process. Otherwise, follow Steps 10–12.
- Clicking the + NEW ASSOCIATION button will display the Select an Association window (Figure 10).

- Use the Select Type dropdown menu to select the type of Group to associate to all new and existing Indicators. After a Group type is selected (Adversary in this example), the Select an Association window will display all Groups of that type (Figure 11).
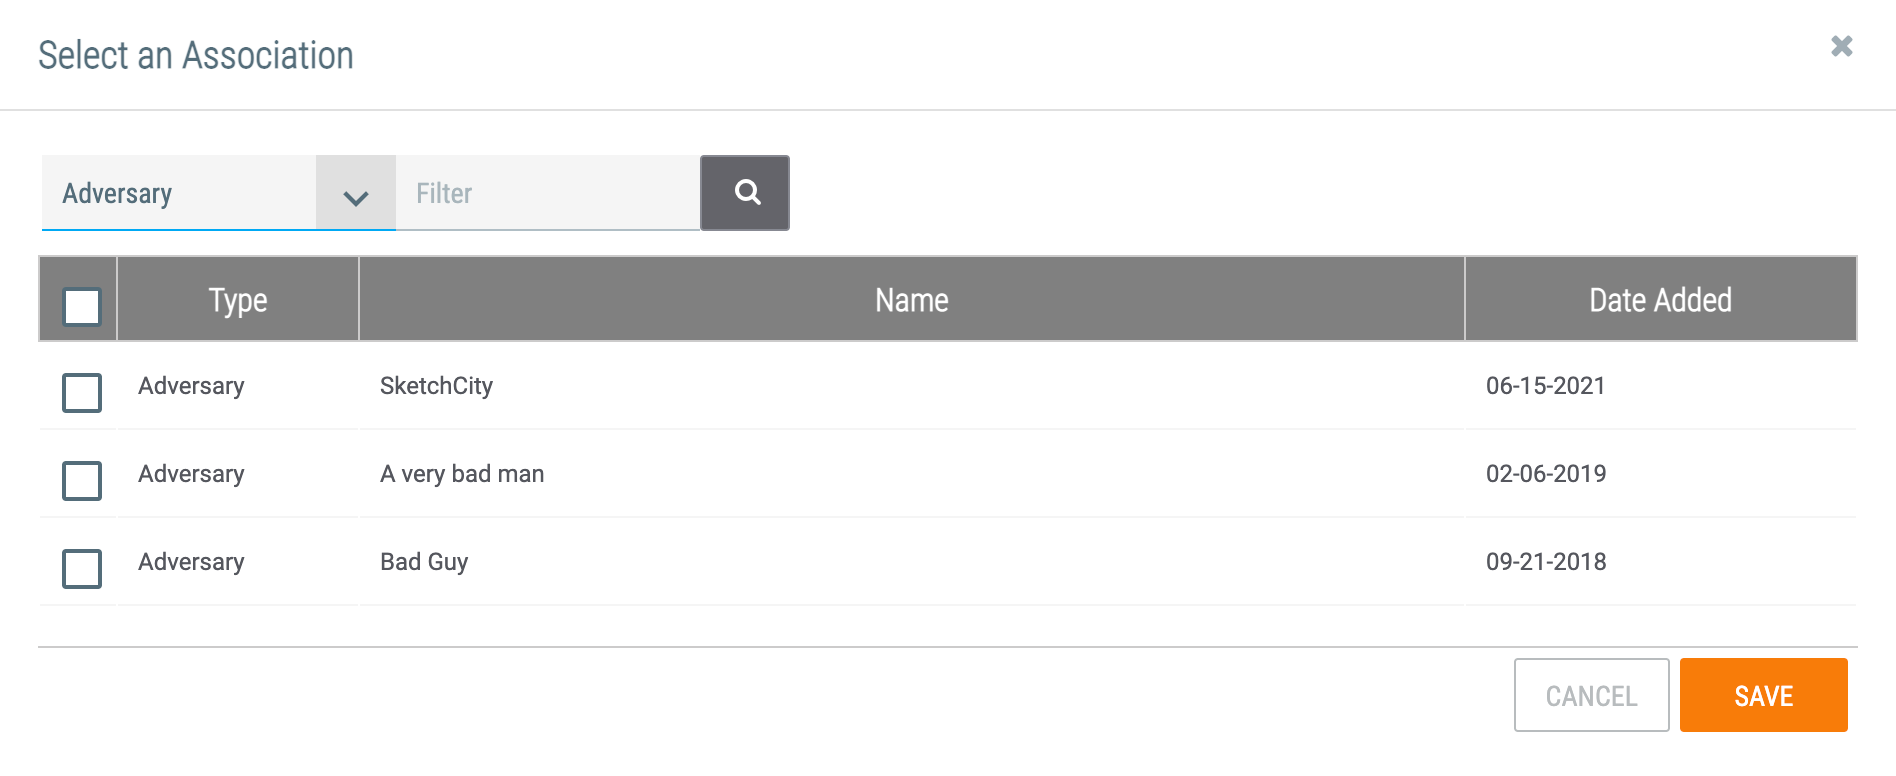
- Filter: If desired, enter a search term in this field and click Search
 to narrow the results.
 - Select the checkbox for each Group to associate to all new and existing Indicators.
- Click the SAVE button.NoteWhen associating Groups to new and existing Indicators, you can only associate Groups of a single type at a time. To associate more than one Group type to all imported Indicators, repeat Step 11 for each Group type.
- Filter: If desired, enter a search term in this field and click Search
- The Save screen will display the selected Group(s) to associate to the new and existing Indicators (Figure 12). Click the SAVE button to complete the import process.
 NoteOnce you have selected a Group for association and it is added to the table, you cannot remove it. The only way to remove a Group from the table is to click the CANCEL button and restart the Indicator import process.
ThreatConnect® is a registered trademark of ThreatConnect, Inc.
20010-01 v.09.C
Was this article helpful?


