Creating User Accounts
- 20 Sep 2024
- 11 Minutes to read
-
Print
-
DarkLight
Creating User Accounts
- Updated on 20 Sep 2024
- 11 Minutes to read
-
Print
-
DarkLight
Article summary
Did you find this summary helpful?
Thank you for your feedback
Overview
The following user account types can be created in ThreatConnect®: Application Programming Interface (API) users, TAXII™ users, ThreatConnect users with a variety of System and Organization roles, and read-only users (including read-only commenters). This article demonstrates how to view the membership of an Organization and how to create each kind of user account.
Before You Start
User Roles
- To create user accounts, your user account must have an Organization role of Organization Administrator or a System role of Administrator, Operations Administrator, or, if on an On-Premises or Dedicated Cloud instance, Accounts Administrator.
- To view information on user accounts other than your own on the Membership tab of the Organization Settings screen, your user account must have an Organization role of Organization Administrator or a System role of Administrator, Operations Administrator, or, if on an On-Premises or Dedicated Cloud instance, Accounts Administrator.
Viewing Membership for an Organization
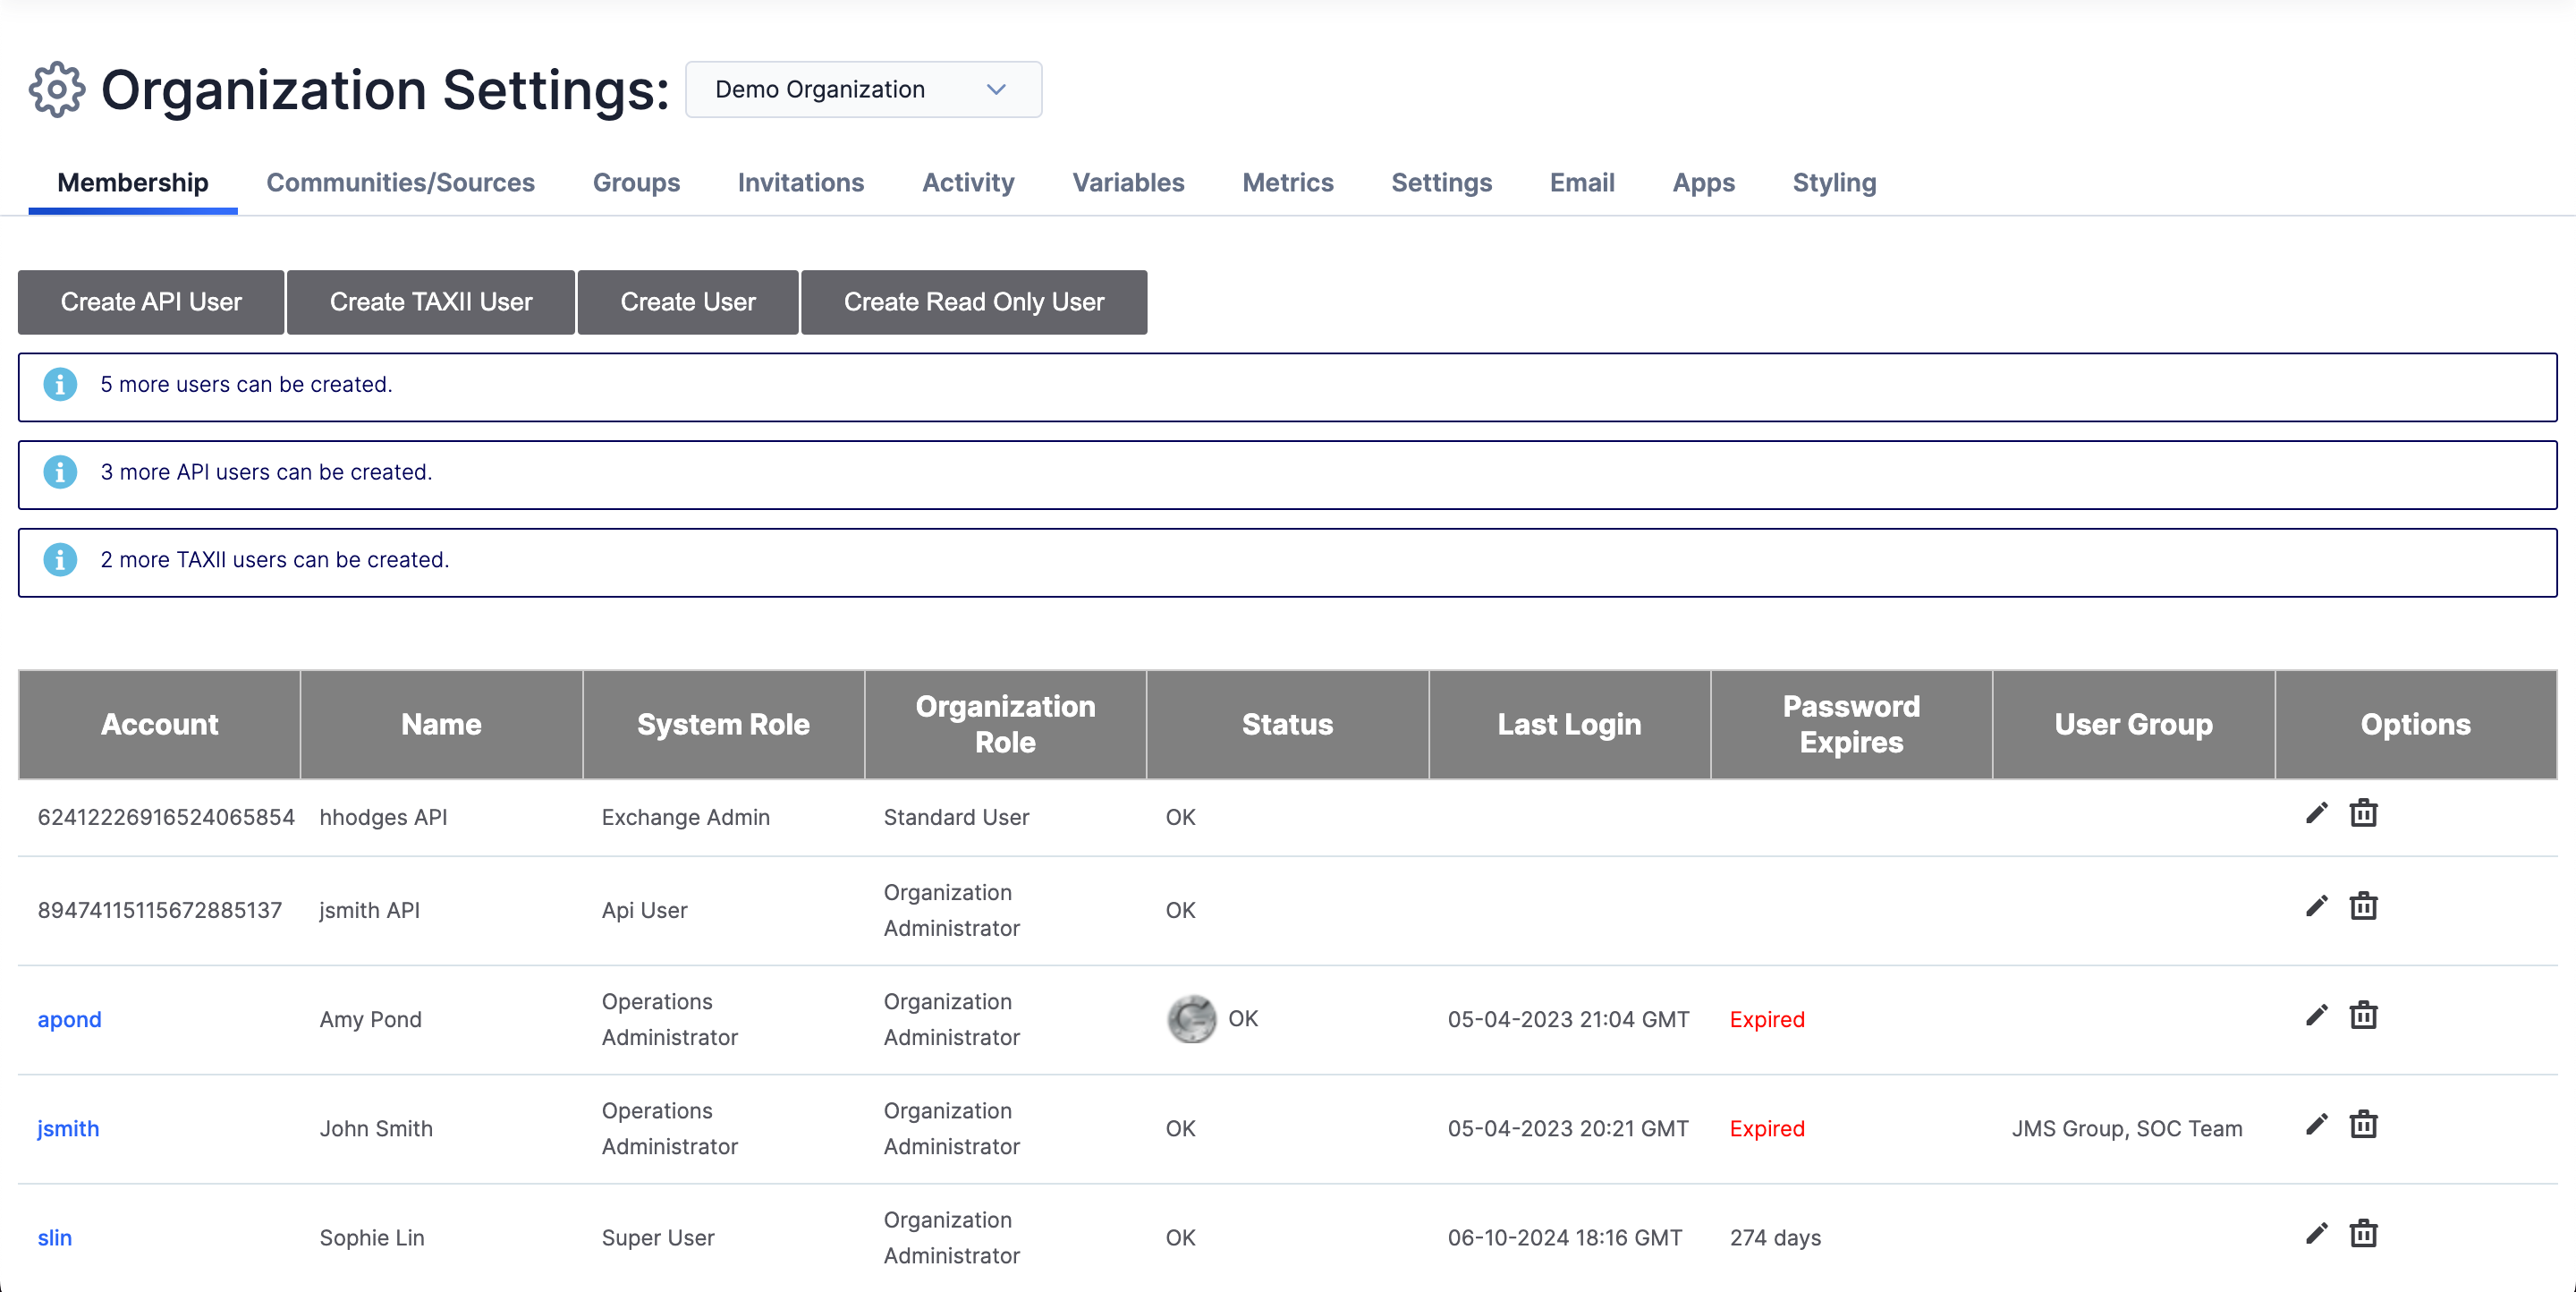
Hover over Settings on the top navigation bar and select Org Settings to display the Membership tab of the Organization Settings screen (Figure 1). The Membership tab includes a table listing all users in the Organization. Above the table, you can see how many more users of each type can be added to the Organization.
Note
Only users with a System role of Administrator or Operations Administrator can change the maximum number of users of each type for an Organization. To change user limits for an Organization, edit the Organization on the Organizations tab of the Account Settings screen. See the “Configure an Organization Account” section of ThreatConnect Account Administration Guide for more information.
Creating an API User
Follow these steps to create an API user account in ThreatConnect:
- Hover over Settingson the top navigation bar and select Org Settings.
- On the Membership tab of the Organization Settings screen (Figure 1), click Create API User.
- Fill out the fields on the API User Administration window (Figure 2) as follows:
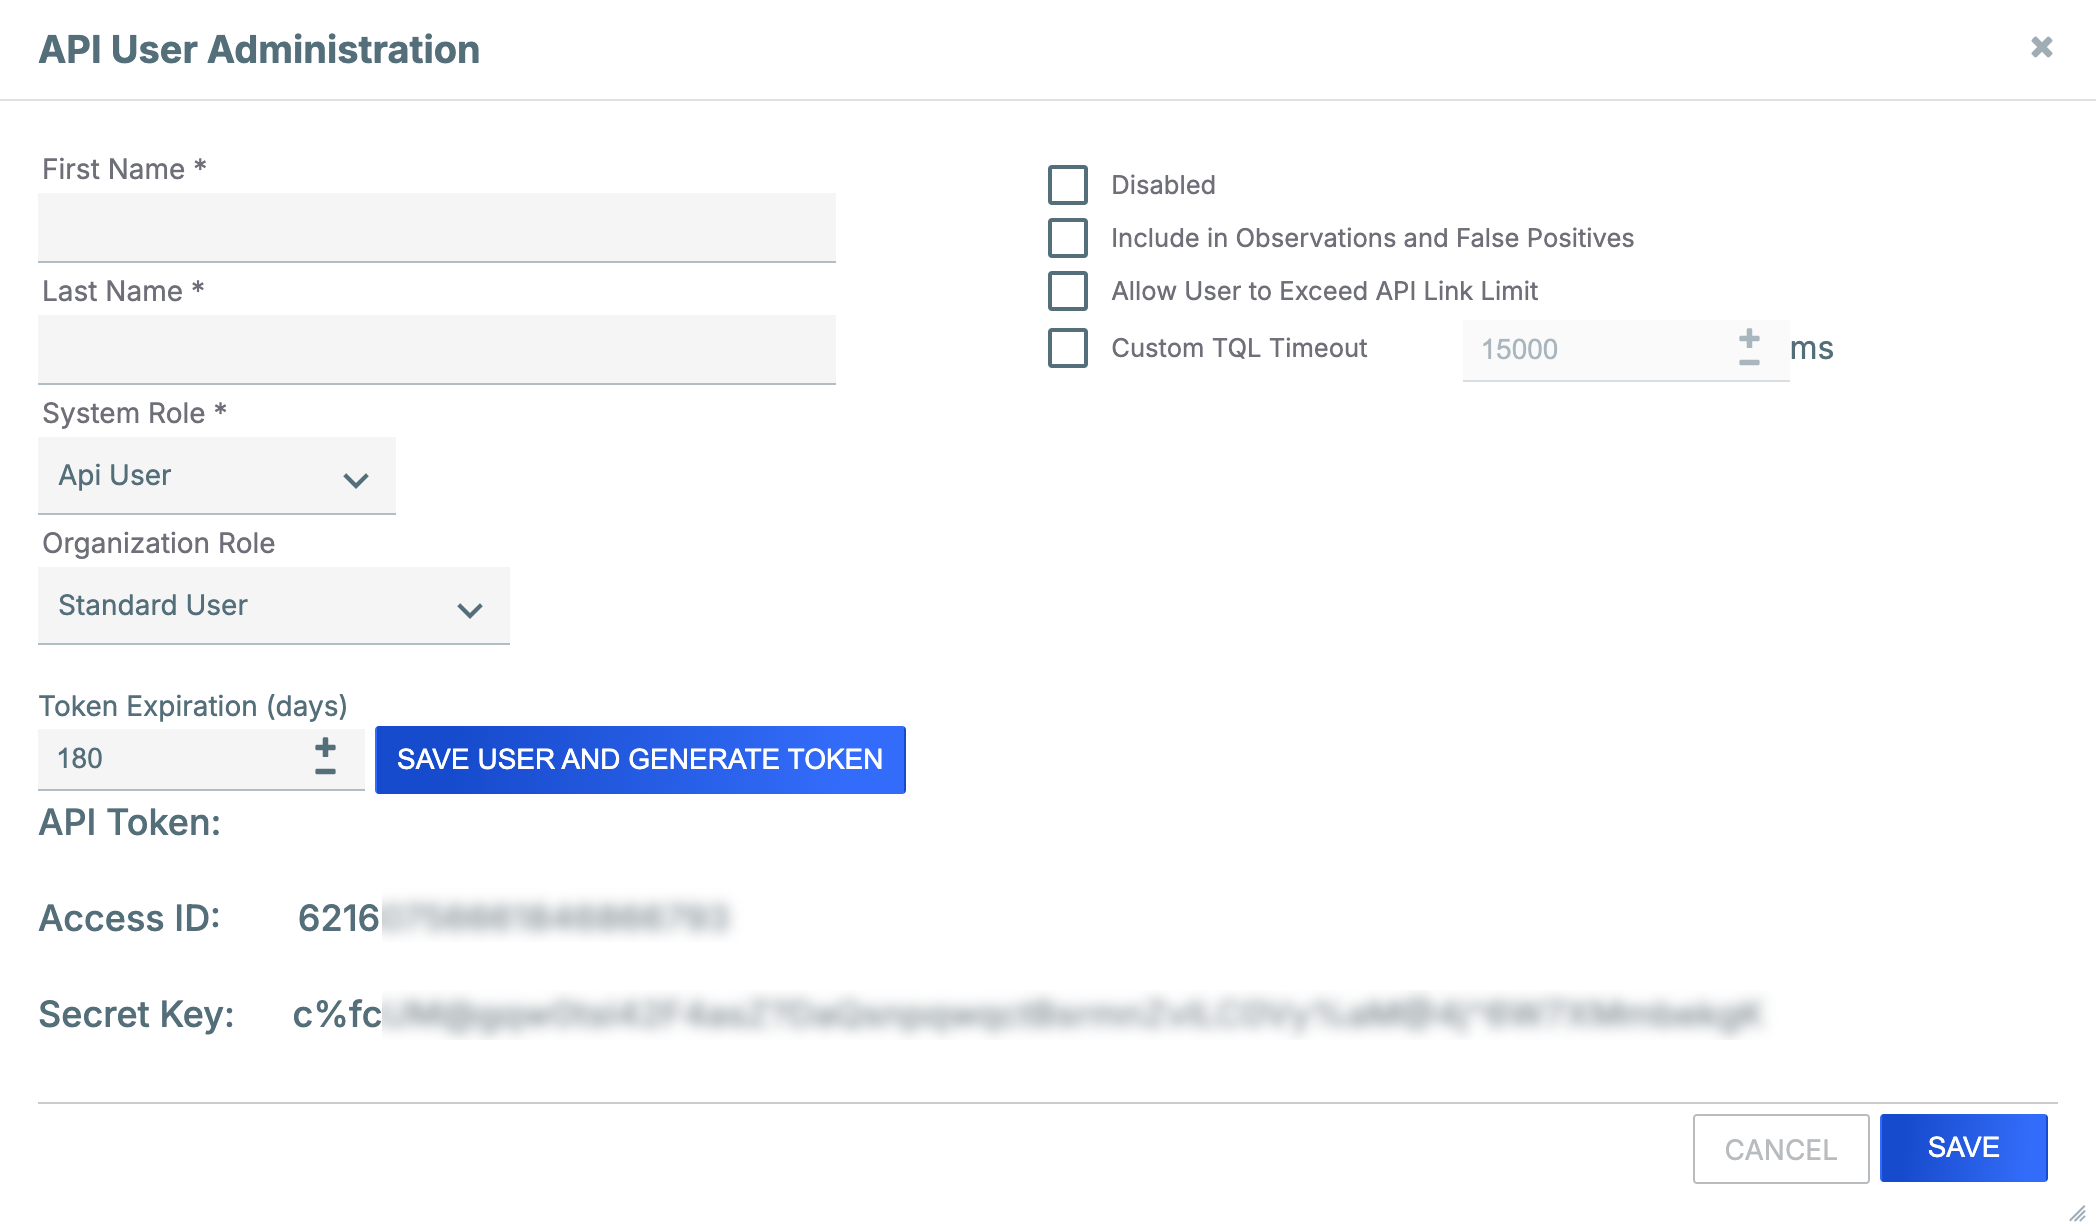
- First Name: Enter the API user’s first name.
- Last Name: Enter the API user’s last name.NoteThe API user’s first and last name will be displayed in areas of the Organization that log user activity or identify users who added or changed a threat intelligence object or Workflow Case.
- System Role: Select the API user’s System role. Available System roles for API users include the following:
- Api User: API users with this role can use all ThreatConnect v2 and v3 API endpoints, with the exception of the v3 API TC Exchange™ administration endpoints.
- Exchange Admin: API users with this role can use all ThreatConnect v2 and v3 API endpoints, including the v3 API TC Exchange administration endpoints.NoteThe System Role dropdown is available only when the user creating the account has a System role of Operations Administrator or Administrator. If the dropdown is not available, a System role of Api User will be assigned to the API user automatically.
- Organization Role: Select the API user’s Organization role.
- Token Expiration (days): (Optional) Enter the number of days until the API user’s token will expire.NoteIf the API user will be using an API token to authenticate API requests to ThreatConnect, you must click SAVE USER AND GENERATE TOKEN to create the API user’s account and token.
- Disabled: (Optional) Leave this checkbox cleared. When editing an existing API user, you can select this checkbox to disable the API user’s account, which is typically done when the API user no longer requires ThreatConnect access and the Administrator wishes to retain log integrity.
- Include in Observations and False Positives: (Optional) Select the checkbox to allow data provided by the API user to be included in observation and false-positive counts.
- Allow User to Exceed API Link Limit: (Optional) Select the checkbox to override the system-level limit on the number of association levels that can be retrieved at one time for intelligence items using the ThreatConnect v3 API.
- Custom TQL Timeout: (Optional) Select the checkbox to override the system-level ThreatConnect Query Language (TQL) query timeout for the API user, and then enter the maximum amount of time, in milliseconds, that TQL queries made by the API user will be allowed to run before timing out.NoteThe Custom TQL Timeout checkbox will be available only when the user creating the account has a System role of Operations Administrator or Administrator.
- Use one of the following methods to save and create the API user account:
- If the API user will be using their Access ID and Secret Key to authenticate API requests to ThreatConnect, record the Secret Key, as it will not be accessible after the API User Administration window is closed. Then click SAVE at the lower-right corner of the window.
- If the API user will be using their API token to authenticate API requests to ThreatConnect, click SAVE USER AND GENERATE TOKEN to the right of the Token Expiration (days) field on the API User Administration window.
Creating a TAXII User
- See Using the ThreatConnect TAXII Server for instruction on creating a TAXII user for the TAXII 1.x server.
- See the Creating a TAXII User for the TAXII 2.1 Server for instruction on creating a TAXII user for the TAXII 2.1 server.
Creating a User
Follow these steps to create a user account in ThreatConnect:
- Hover over Settingson the top navigation bar and select Org Settings.
- On the Membership tab of the Organization Settings screen (Figure 1), click Create User.
- Fill out the fields on the User Administration window (Figure 3) as follows:
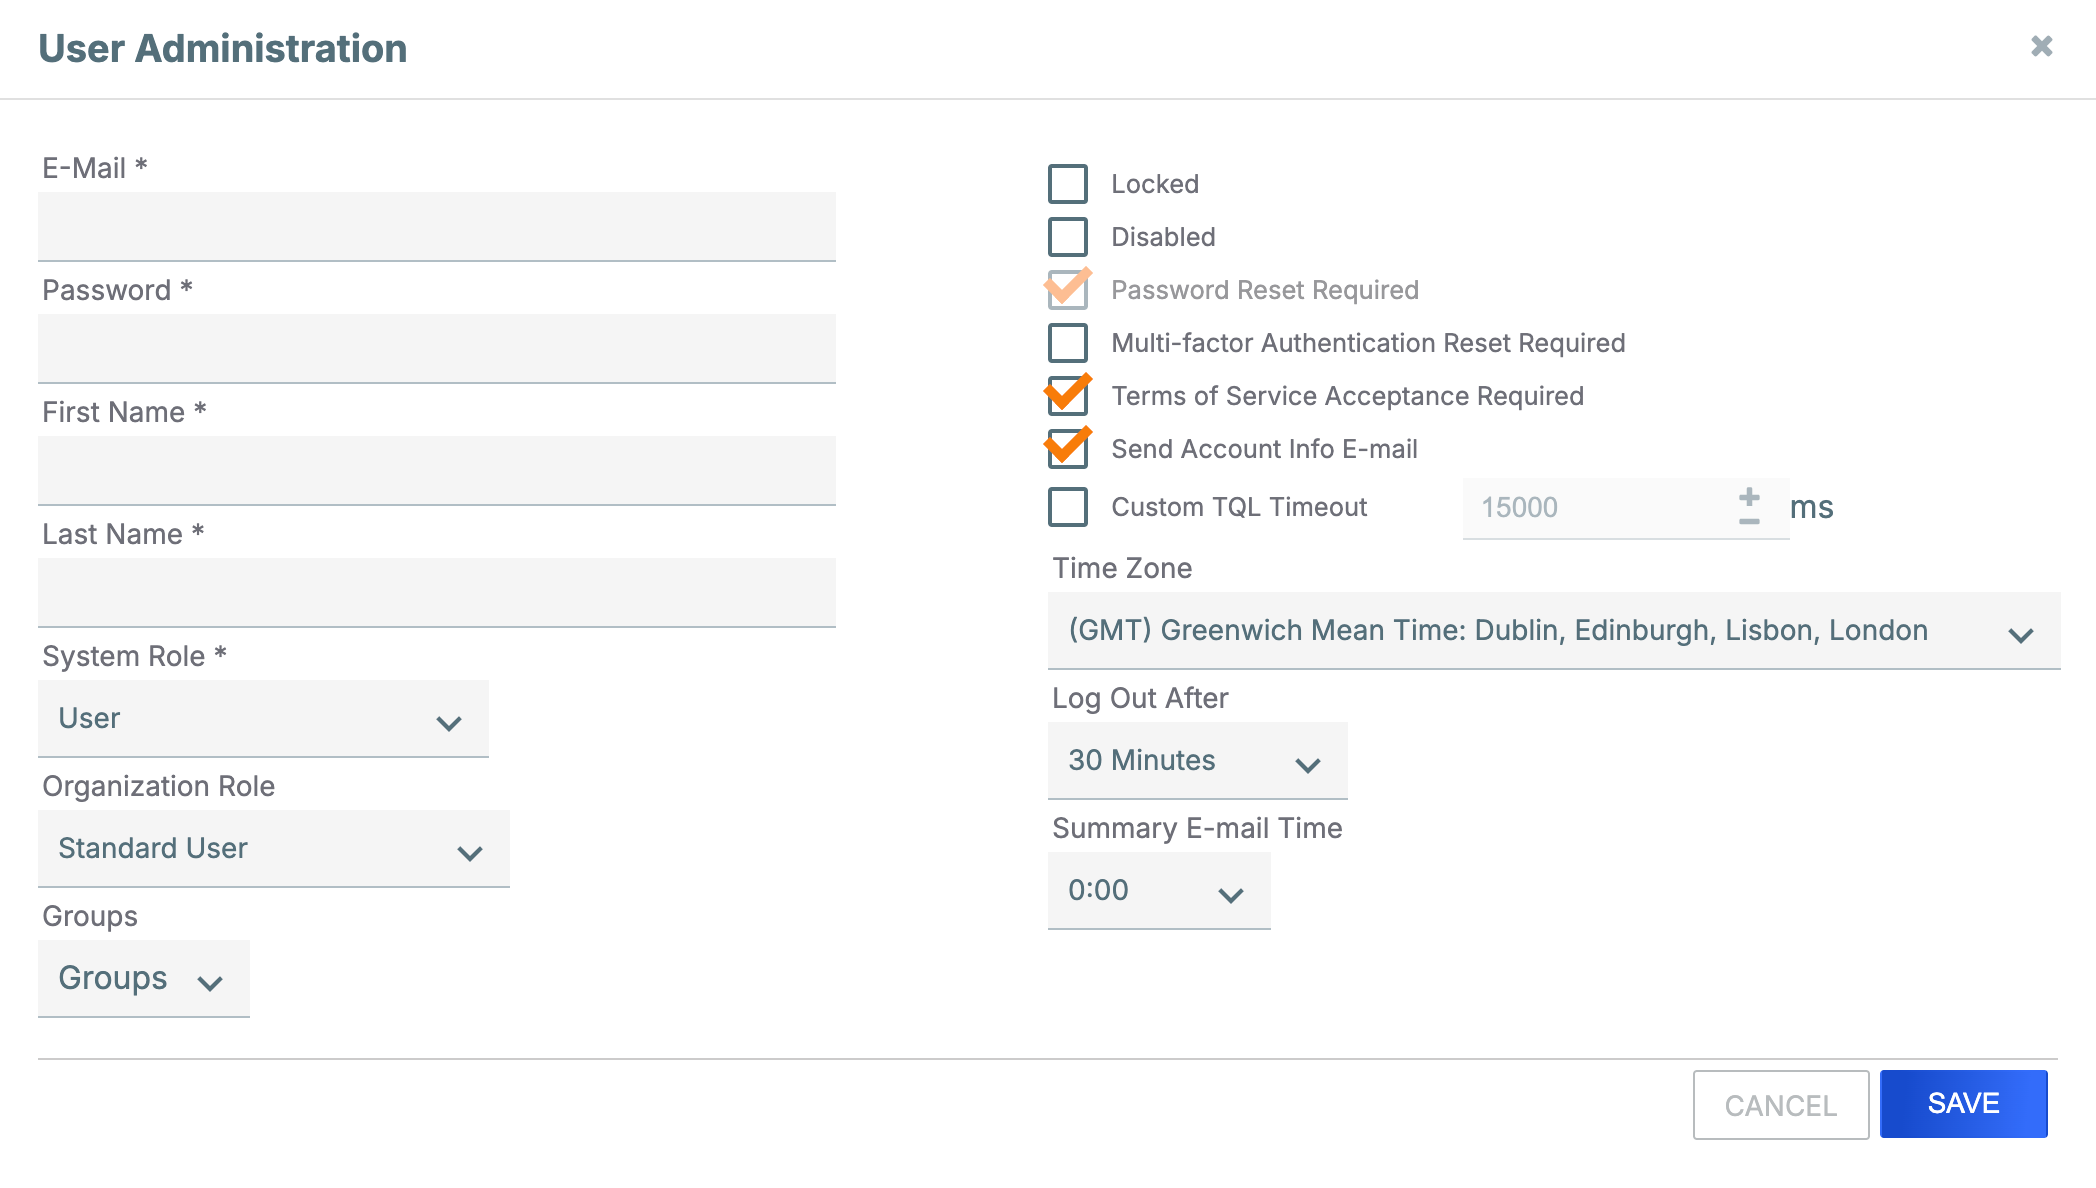
- E-Mail: Enter an email address. This address will be the name of the user account.
- Password: Enter the initial user password, which is subject to the ThreatConnect password policy defined within the system settings. The user will be prompted to change this password when they log into ThreatConnect for the first time.
- First Name: Enter the user’s first name.
- Last Name: Enter the user’s last name.NoteThe user’s first and last name will be displayed in areas of the Organization that log user activity or identify users who added, changed, or commented on a threat intelligence object or Workflow Case. In Communities that have profile anonymity turned off, the user’s first and last name will be displayed on posts they created on the Posts screen and to Community Directors when viewing users in member Organizations.
- System Role: Select the user’s System role.NoteThe System Role dropdown will be available only when the user creating the account has a System role of Administrator or Operations Administrator.
- Organization Role: Select the user’s Organization role.NoteIf you selected a System role of Super User, only an Organization role of Organization Administrator will be available in the Organization Role dropdown.
- Groups: (Optional) Select one or more user groups to which to add the user. User groups allow multiple users to be assigned to Workflow Cases and Tasks together.
- Locked: (Optional) Leave this checkbox cleared. When editing an existing user account that has been locked by ThreatConnect, you can clear this checkbox to unlock the account.
- Disabled: (Optional) Leave this checkbox cleared. When editing an existing user, you can select this checkbox to disable the user account, which is typically done when a user no longer requires ThreatConnect access and the Administrator wishes to retain log integrity.
- Password Reset Required: (Optional) Select this checkbox to require the user to change their account password the next time they log into ThreatConnect. This checkbox is selected by default upon account creation, and it is cleared once the password has been changed.
- Multi-Factor Authentication Reset Required: (Optional) Select this checkbox to require the user to configure multi-factor authentication (MFA) for their account or to reset MFA for a user who already has it configured (for example, if the user has lost their MFA token). An icon such as the Google Authenticator™
 logo will be displayed in the Status column for users who have MFA enabled.NoteMFA can be disabled for a user on the Authenticator tab of the User Profile screen for the user. To navigate to this screen, click on the user’s account name in the Account column of the Membership tab of the Organization Settings screen (Figure 1).ImportantIf a System Administrator has enforced MFA systemwide, then MFA may not be disabled for individual users.
 - Terms of Service Acceptance Required: (Optional) Select this checkbox to reset the “terms of service” flag so the user is presented with the terms of service again. It is selected by default when creating a new user.NoteThe Terms of Service Acceptance Required checkbox will be available only when the user creating the account has a System role of Operations Administrator or Administrator.
- Send Account Info E-mail: (Optional) Select this checkbox to send an email with the account information to the email address entered in the E-Mail field. It is selected by default when creating a new user.
- Custom TQL Timeout: (Optional) Select this checkbox to override the system-level ThreatConnect Query Language (TQL) query timeout for the user, and then enter the maximum amount of time, in milliseconds, that TQL queries made by the user will be allowed to run before timing out.NoteThe Custom TQL Timeout checkbox will be available only when the user creating the account has a System role of Operations Administrator or Administrator.
- Time Zone: (Optional) Select the time zone for the user.
- Log Out After: (Optional) Select the amount of time of inactivity after which the user will be logged out.
- Summary E-mail Time: (Optional) Select the time at which the user will receive daily summary emails of followed items or other notifications from ThreatConnect.
- Click SAVE on the User Administration window.
Creating a Read-Only User
Follow these steps to create a read-only user account in ThreatConnect:
- Hover over Settingson the top navigation bar and select Org Settings.
- On the Membership tab of the Organization Settings screen (Figure 1), click Create Read Only User.
- Fill out the fields on the User Administration window (Figure 4) as follows:
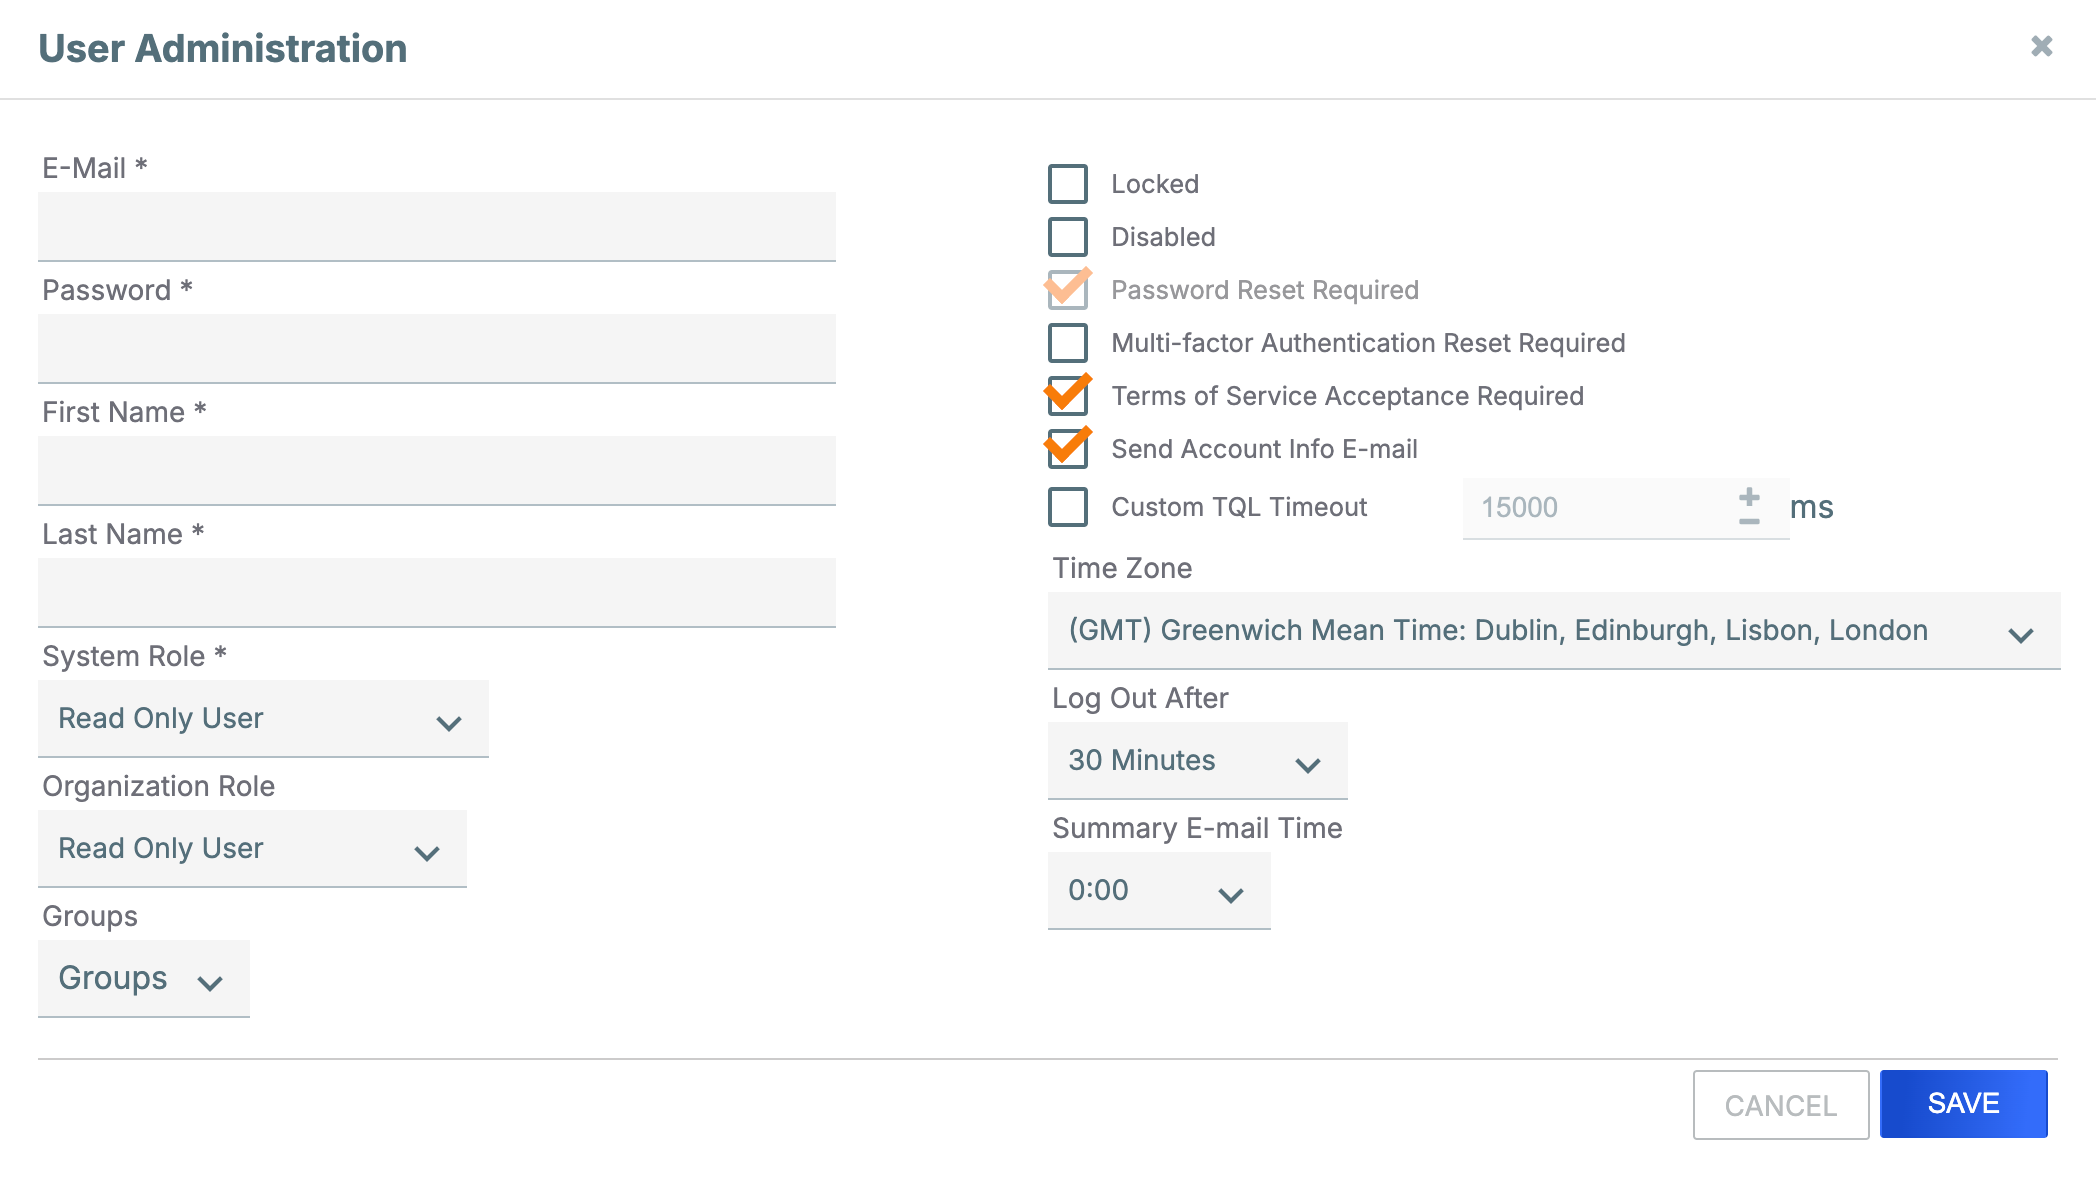
- E-Mail: Enter an email address. This address will be the name of the user account.
- Password: Enter the initial user password, which is subject to the ThreatConnect password policy defined within the system settings. The user will be prompted to change this password when they log into ThreatConnect for the first time.
- First Name: Enter the user’s first name.
- Last Name: Enter the user’s last name.NoteFor Read Only Commenters, the user’s first and last name will be displayed in areas of the Organization that log user activity or identify users who commented on a threat intelligence object or Workflow Case. In Communities that have profile anonymity turned off, the user’s first and last name will be displayed on posts they created on the Posts screen and to Community Directors when viewing users in member Organizations.
- System Role: Retain the default selection of Read Only User. Changing the selection will result in the creation of a different kind of user.NoteThe System Role dropdown will be available only when the user creating the account has a System role of Operations Administrator or Administrator. If the dropdown is not available, a System role of Read Only User will be assigned to the user automatically.
- Organization Role: Select an Organization role of Read Only User or Read Only Commenter.
- Groups: (Optional) Select user groups to which to add the user. User groups allow multiple users to be assigned to Workflow Cases and Tasks together.
- Locked: (Optional) Leave this checkbox cleared. When editing an existing user account that has been locked by ThreatConnect, clear this checkbox to unlock the account.
- Disabled: (Optional) Leave this checkbox cleared. When editing an existing user, you can select this checkbox to disable the user account, which is typically done when a user no longer requires ThreatConnect access and the Administrator wishes to retain log integrity.
- Password Reset Required: (Optional) Select this checkbox to require the user to change the account password upon next login. This checkbox is selected by default upon account creation, and it is cleared once the password has been changed.
- Multi-Factor Authentication Reset Required: (Optional) Select this checkbox to require the user to configure MFA for their account or to reset MFA for a user who already has it configured (for example, if the user has lost their MFA token). An icon such as the Google Authenticatorlogo will be displayed in the Status column for users who have MFA enabled.NoteMFA can be disabled for a user on the Authenticator tab of the User Profile screen for the user. To navigate to this screen, click on the user’s account name in the Account column of the Membership tab of the Organization Settings screen (Figure 1).ImportantIf a System Administrator has enforced MFA systemwide, then MFA may not be disabled for individual users.
- Terms of Service Acceptance Required: (Optional) Select this checkbox to reset the “terms of service” flag so the user is presented with the terms of service again. It is selected by default when creating a new user.NoteThe Terms of Service Acceptance Required checkbox will be available only when the user creating the account has a System role of Operations Administrator or Administrator.
- Send Account Info E-mail: (Optional) Select this checkbox to send an email with the account information to the email address entered in the E-Mail field. It is selected by default when creating a new user.
- Custom TQL Timeout: (Optional) Select this checkbox to override the system-level ThreatConnect Query Language (TQL) query timeout for the user, and then enter the maximum amount of time, in milliseconds, that TQL queries made by the user will be allowed to run before timing out.NoteThe Custom TQL Timeout checkbox will be available only when the user creating the account has a System role of Operations Administrator or Administrator.
- Time Zone: (Optional) Select the time zone for the user.
- Log Out After: (Optional) Select the amount of time of inactivity after which the user will be logged out.
- Summary E-mail Time: (Optional) Select the time at which the user will receive daily summary emails of followed items or other notifications from ThreatConnect.
- Click SAVE on the User Administration window.
ThreatConnect® is a registered trademark, and TC Exchange™ is a trademark, of ThreatConnect, Inc.
Google Authenticator™ is a trademark of Google LLC.
TAXII™ is a trademark of The MITRE Corporation.
20037-01 v.13.A
Was this article helpful?
