Overview
The urlscan.io built-in enrichment in ThreatConnect® lets you use the extensive URL scanning capabilities of urlscan.io directly within ThreatConnect, providing you with contextual information about a URL, its IP address, and the associated ASN that can assist in assessing the reputation, trustworthiness, and potential security implications of a URL and the hosting network to which it belongs.
This article describes how to enable the urlscan.io enrichment service in ThreatConnect, view data retrieved from urlscan.io on the Enrichment tab of a URL Indicator’s Details screen, and import Indicators from urlscan.io into ThreatConnect.
Before You Start
User Roles
- To enable and configure the urlscan.io enrichment, your user account must have a System role of Administrator.
- To view urlscan.io data on the Enrichment tab of an Indicator’s Details screen, your user account can have any Organization role.
- To retrieve data manually on the URLScan card on the Enrichment tab of an Indicator’s Details screen, your user account can have any Organization role.
- To import urlscan.io data into an Organization, your user account must have an Organization role of Standard User, Sharing User, Organization Administrator, or App Developer.
- To import urlscan.io data into a Community or Source, your user account must have a Community role of Contributor, Editor, or Director for that Community or Source.
Prerequisites
- A urlscan.io API key. To obtain a urlscan.io API key, create a free urlscan.io API user account at https://urlscan.io/user/signup/.
Enabling the urlscan.io Enrichment
Before you can retrieve data from urlscan.io, you must enable and configure the urlscan.io enrichment in ThreatConnect. Follow these steps to enable and configure the urlscan.io enrichment on your ThreatConnect instance:
- Hover over Settings
 on the top navigation bar and select System Settings.
 - Select the Indicators tab on the System Settings screen, and then click Enrichment Tools in the menu in the sidebar.
- Click Edit
 in the Options column for URLScan and fill out the fields on the Edit Vendor window (Figure 1) as follows:
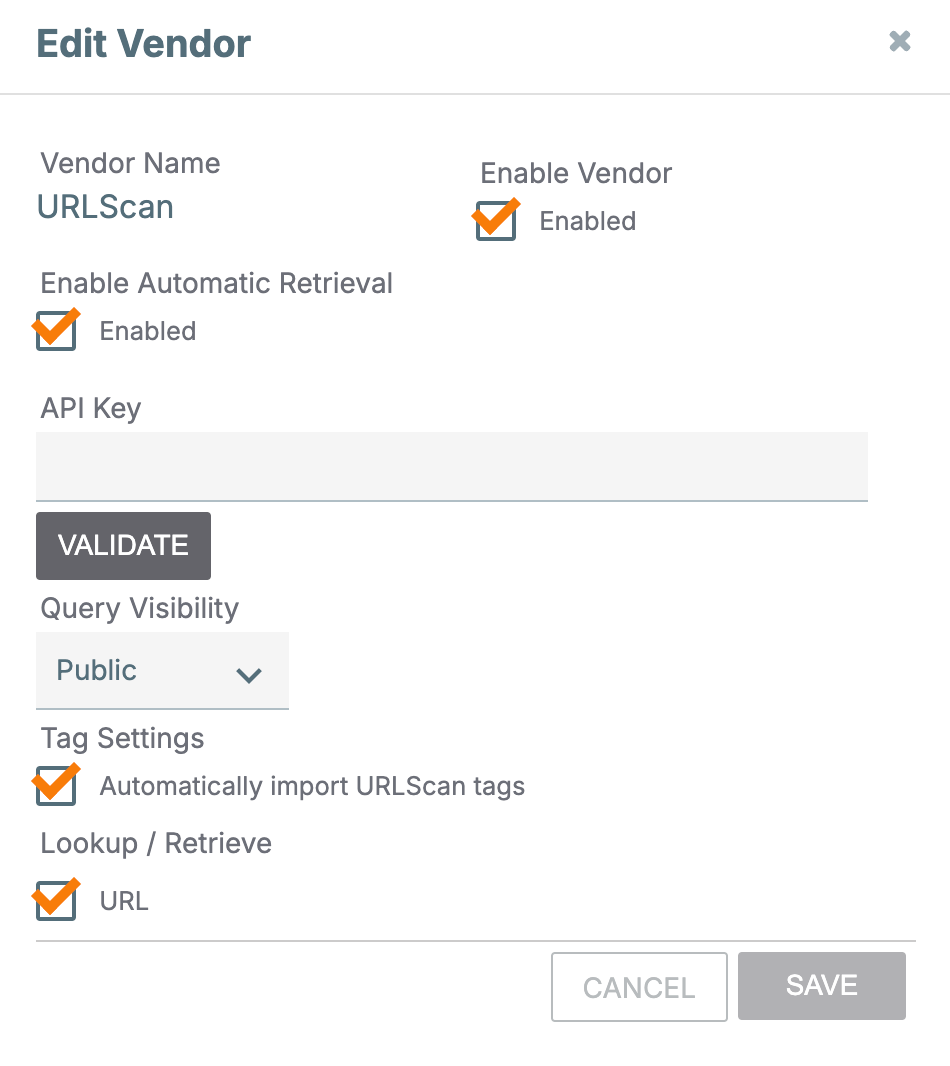
- Enable Vendor: Select this checkbox to enable urlscan.io.
- Enable Automatic Retrieval: Select this checkbox to enable automatic data retrieval for urlscan.io. If automatic data retrieval is enabled, urlscan.io data will automatically populate when a user opens a URL Indicator's Enrichment tab for the first time. This checkbox is selected by default.
- API Key: Enter the API key that will be used to retrieve data from urlscan.io.
- VALIDATE: After entering the urlscan.io API key, click this button to validate it. If the API key is accepted, the VALIDATE button’s label will change to VALID.
- Query Visibility: Select the visibility level for queries sent to urlscan.io. Available choices include Private, Public, and Unlisted.
- Tag Settings: Select Automatically import URLScan tags to import tags applied to a URL in urlscan.io into ThreatConnect as Tag objects and apply them to the corresponding URL Indicator being imported into ThreatConnect.NoteIf Automatically import URLScan tags is selected and a tag applied to a URL in urlscan.io exactly matches an ATT&CK® Tag in ThreatConnect, then that ATT&CK Tag will be applied to the URL Indicator in ThreatConnect; otherwise, a new standard Tag will be created and applied to the URL Indicator in ThreatConnect.
- Lookup/Retrieve: Select URL to retrieve data from urlscan.io for URL Indicators.
- Click SAVE on the Edit Vendor window to save the configuration for the urlscan.io enrichment.
When urlscan.io is enabled, a value of true will be displayed in the Enabled column for its entry on the Enrichment Tools screen.
Data Overview
The Overview section of the URLScan card (Figure 2) on the Enrichment tab of a URL Indicator’s Details screen provides a summary of data retrieved from urlscan.io for the Indicator and the date and time the data were last retrieved.
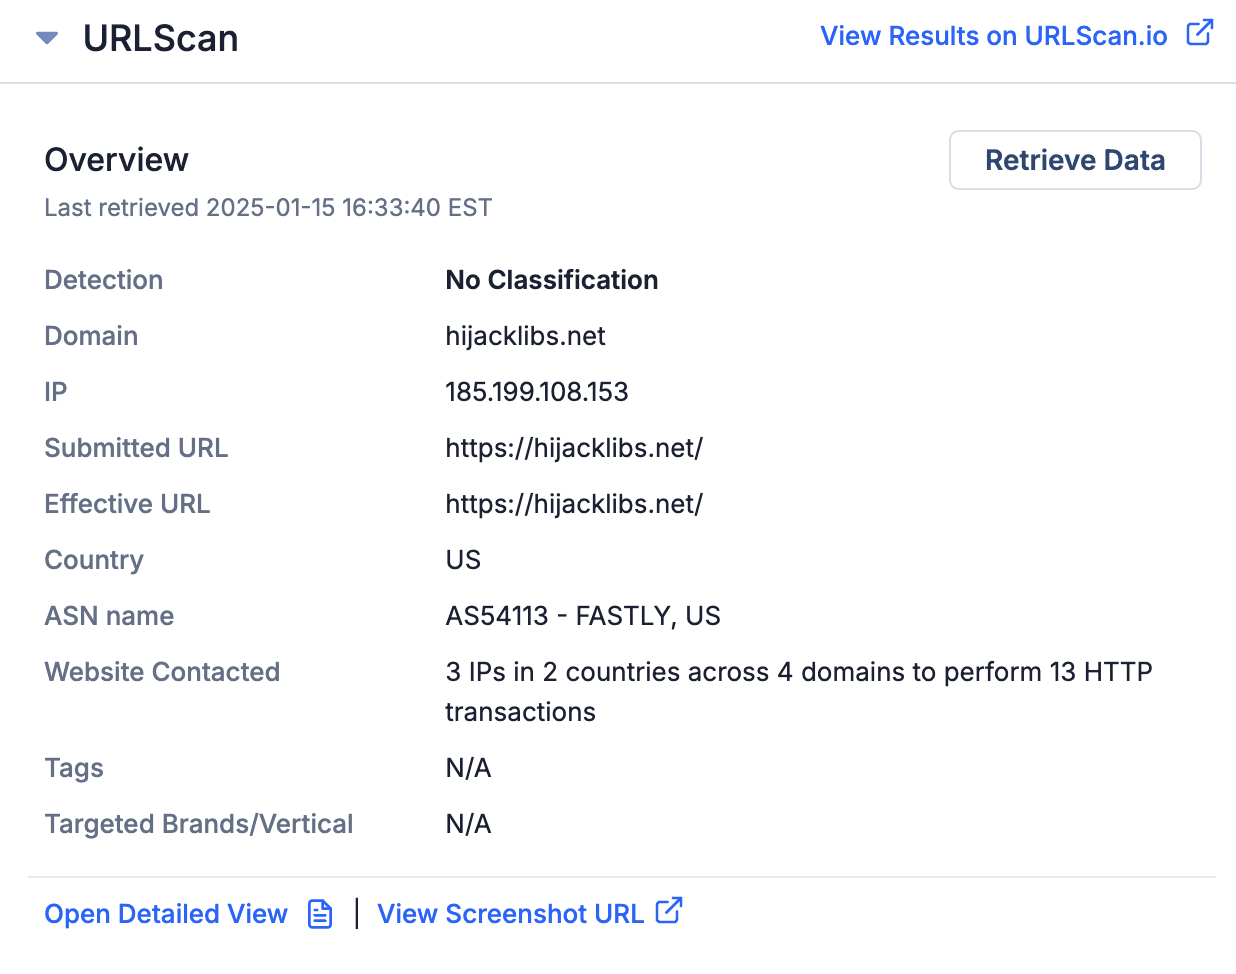
- Detection: This field specifies whether the scanned URL is malicious.
- Domain: The primary domain or subdomain contacted by the URL.
- IP: The primary IP address contacted by the URL.
- Submitted URL: The original URL that was submitted to urlscan.io.
- Effective URL: The URL of the primary webpage after redirection.
- Country: The country associated with the primary IP address contacted by the URL.
- ASN name: The primary autonomous system (AS) number and name contacted by the URL.
- Website Contacted: The number of unique IP addresses, countries, and domains or subdomains the URL contacted in order to perform the specified number of HTTP transactions.
- Tags: The tag(s) applied to the URL in urlscan.io.
- Targeted Brands/Vertical: The name and industry vertical of the brand(s) targeted by the URL.
Viewing Results on urlscan.io
To view the results for the URL Indicator on the urlscan.io website, click the View Results on URLScan.io link at the upper right of the URLScan card (Figure 2).
Viewing Screenshots of URLs
To view a PNG screenshot of the webpage associated with the URL Indicator, click the View Screenshot URL link at the bottom of the URLScan card (Figure 2).
URLScan Detailed View
Click Open Detailed View on the URLScan card to open the URLScan Detailed View drawer (Figure 3). This drawer displays cards with additional data retrieved from urlscan.io. The cards are collapsed by default. Figure 3 shows the URLScan Detailed View drawer with all available cards expanded.
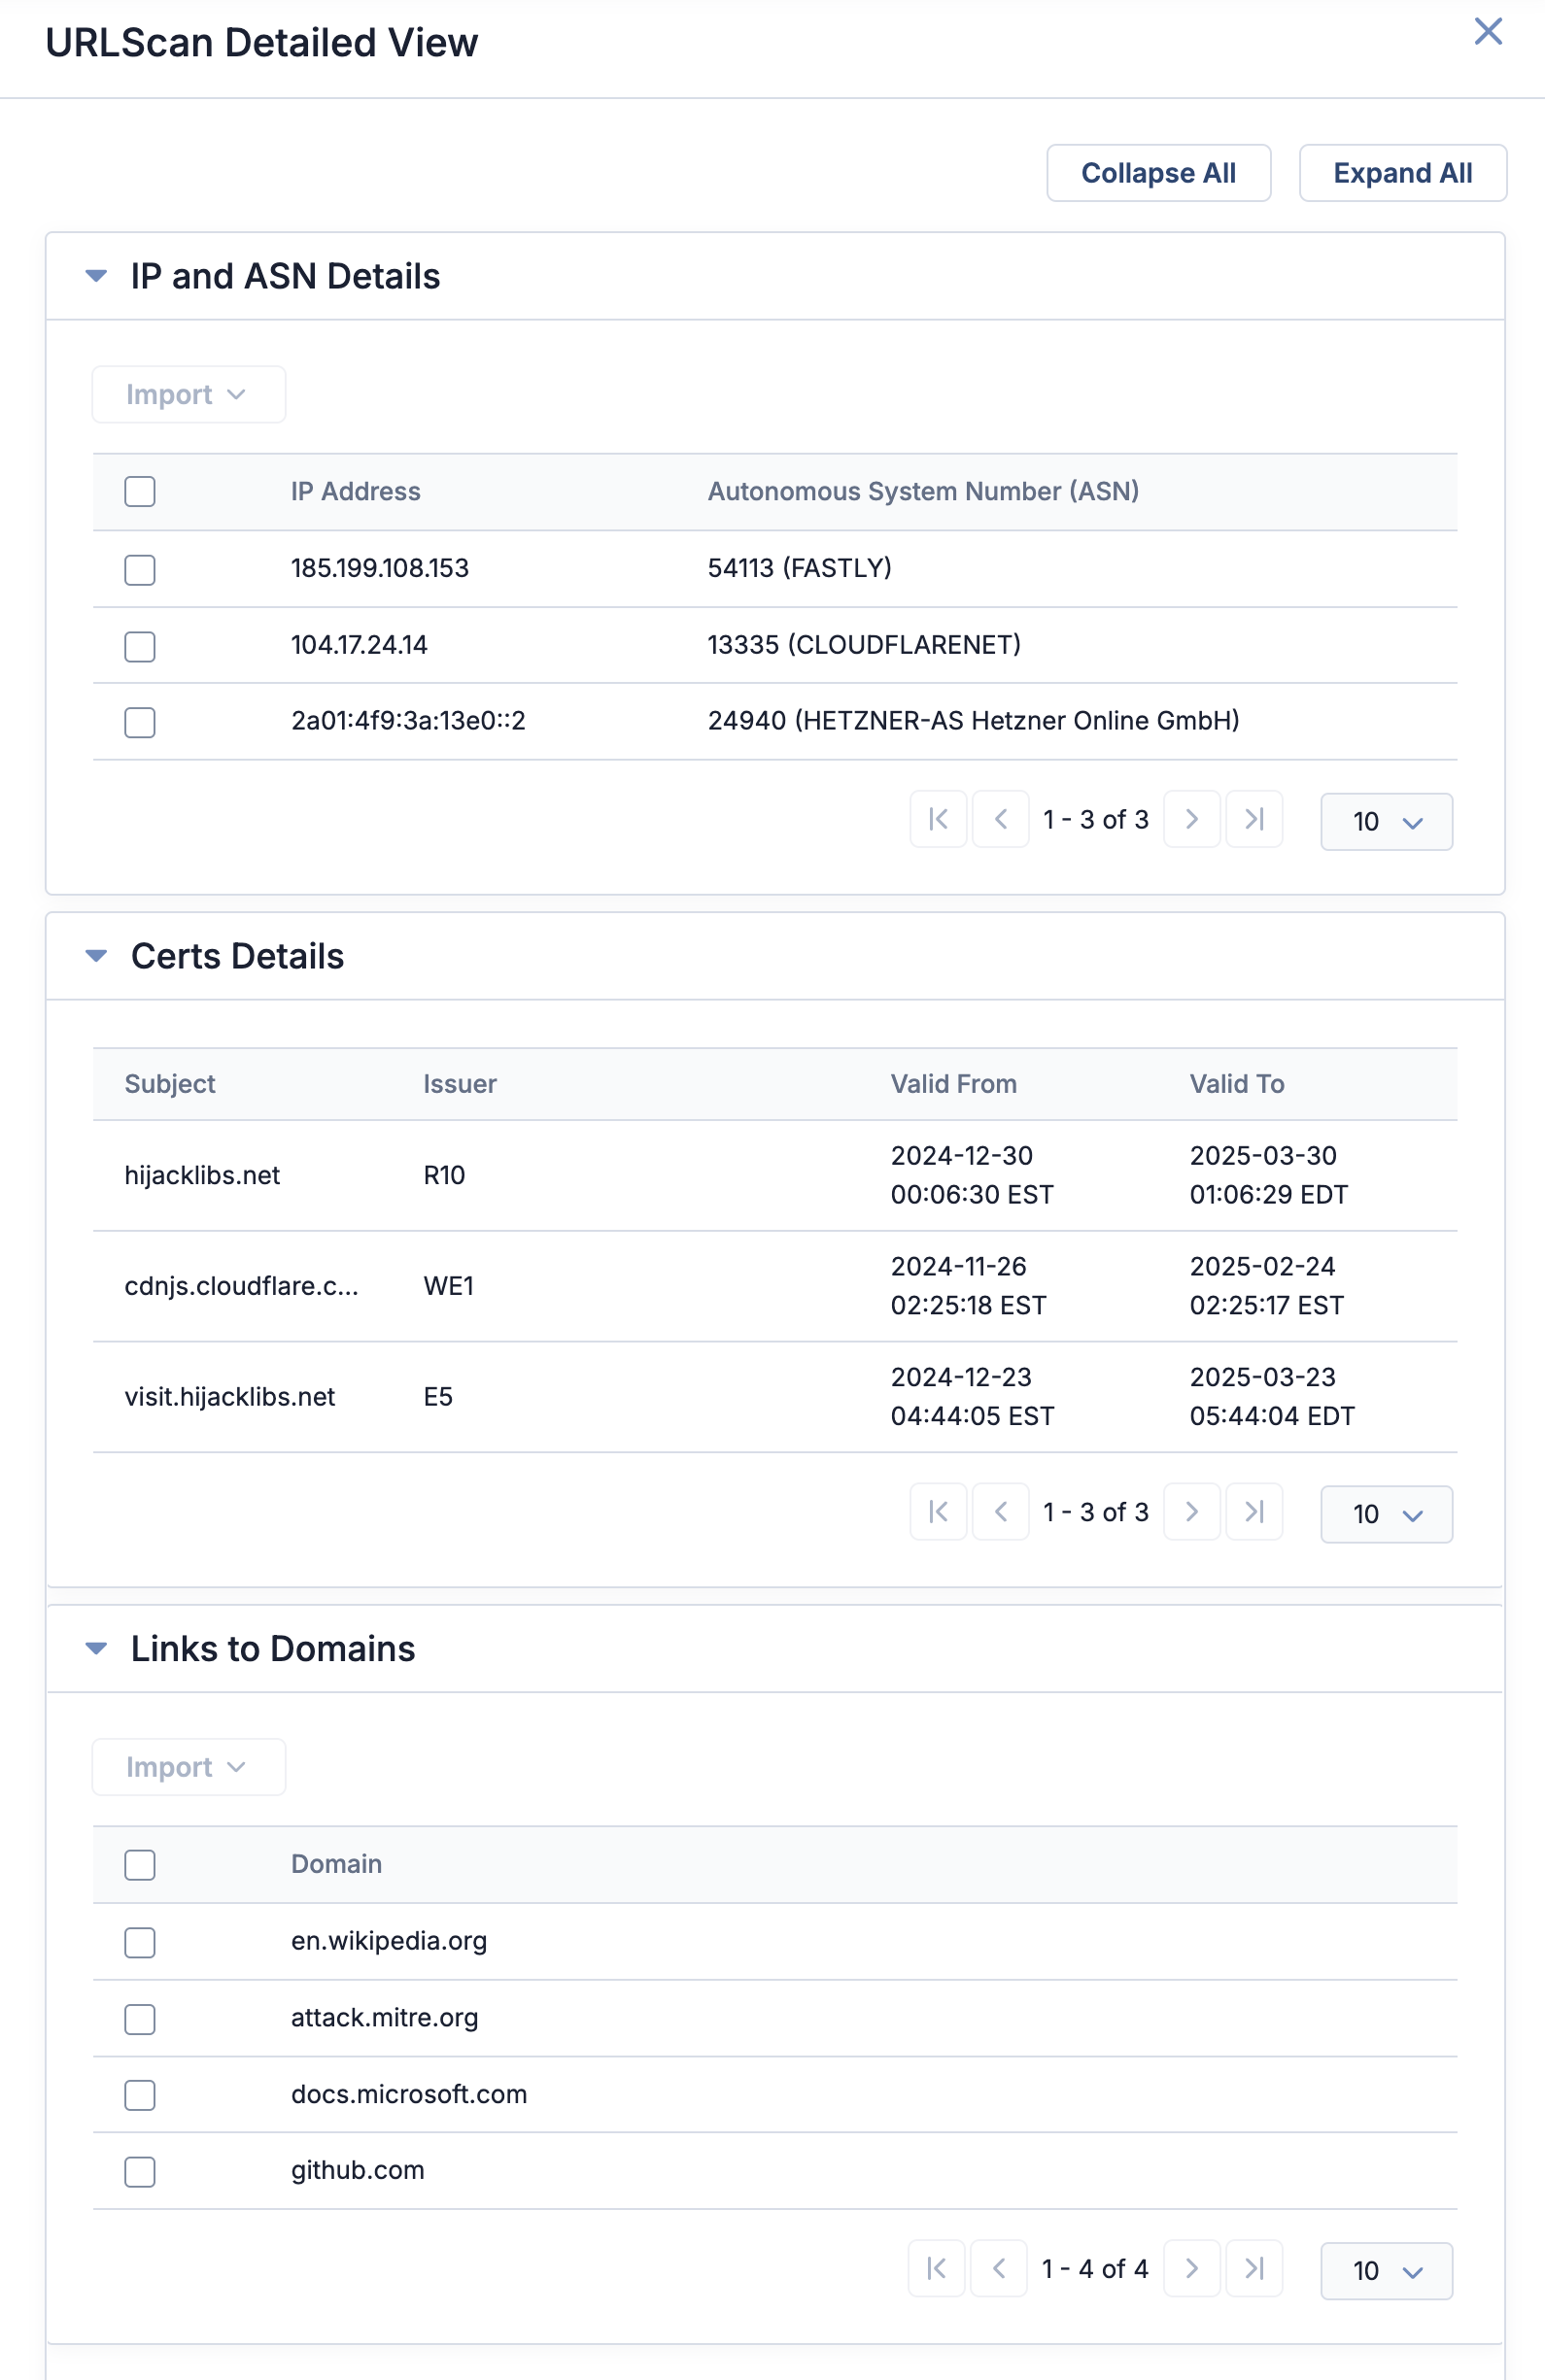
The URLScan Detailed View drawer displays the following cards:
- IP and ASN Details: All IP addresses and their corresponding Autonomous System Number (ASN) associated with the URL Indicator.
- Certs Details: Certificate details for all of the URL’s current SSL certificates. Details displayed include the subject for the certificate, the certificate’s issuer, and the start and end date of the certificate’s validity period.
- Links to Domains: A list of links present on the URL that lead to other domains or external websites. These links are sites that the URL is associated with or refers to.
Importing Indicators From urlscan.io Into ThreatConnect
You may import Indicators displayed on the IP and ASN Details and Links to Domains cards into ThreatConnect and associate them to a new or existing Group. You may also import Indicators displayed on these cards into ThreatConnect and associate them directly to the enriched Indicator (i.e., the Indicator whose Details screen you are viewing) via a custom association.
Follow these steps to import Indicators from urlscan.io into ThreatConnect:
- Expand one of the following cards on the URLScan Detailed View drawer (Figure 3) to view Indicators retrieved from urlscan.io that are related to the enriched Indicator:
- IP and ASN Details: Indicators on this card will be imported as Address Indicators.
- Links to Domains: Indicators on this card will be imported as Host Indicators.
- Select the checkbox for each Indicator to import into ThreatConnect, or select the checkbox in the table’s header to import all Indicators displayed on the current page in the table.ImportantIf a selected Indicator already exists in the ThreatConnect owner into which you are importing data, that copy of the Indicator will be updated based on the information entered and options configured during the import.
- Expand the Import dropdown at the top left of the card and select one of the following import options (Figure 4).
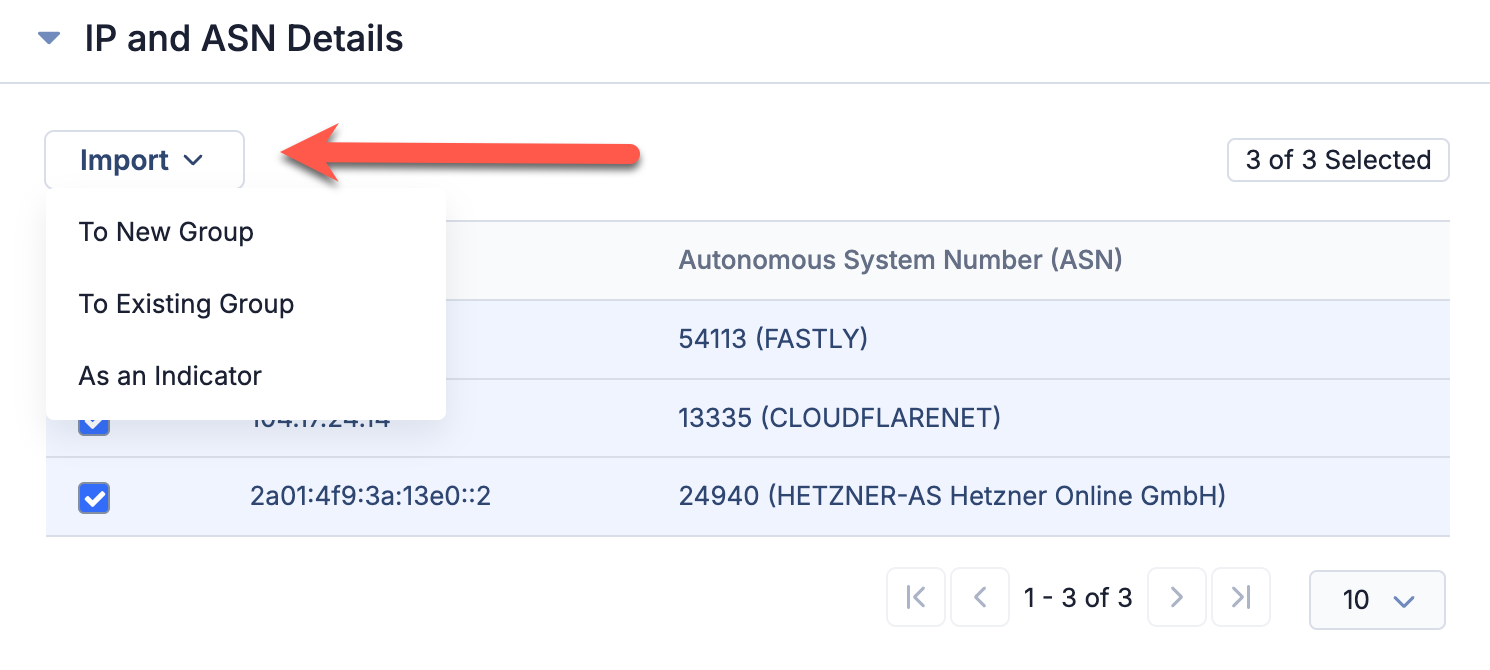
- To New Group: Select this option to import the selected Indicators and associate them to a new Group created during the import.
- To Existing Group: Select this option to import the selected Indicators and associate them to an existing Group.
- As an Indicator: Select this option to import the selected Indicators and associate them directly to the enriched Indicator via a custom association.
Importing Indicators Into a New Group
Follow these steps to import Indicators from urlscan.io and associate them to a new Group created during the import:
- Follow Steps 1–3 in the “Importing Indicators From urlscan.io Into ThreatConnect” section and select To New Group from the Import dropdown.
- Proceed through the steps on the Create screen to create the Group. There are three steps in the Group creation process: Details (required), Associations (optional), and Attachments (optional).
Step 1: Enter Details About the Group
The Details step of the Create screen (Figure 5) is a required step where you enter basic information about the Group you are creating. 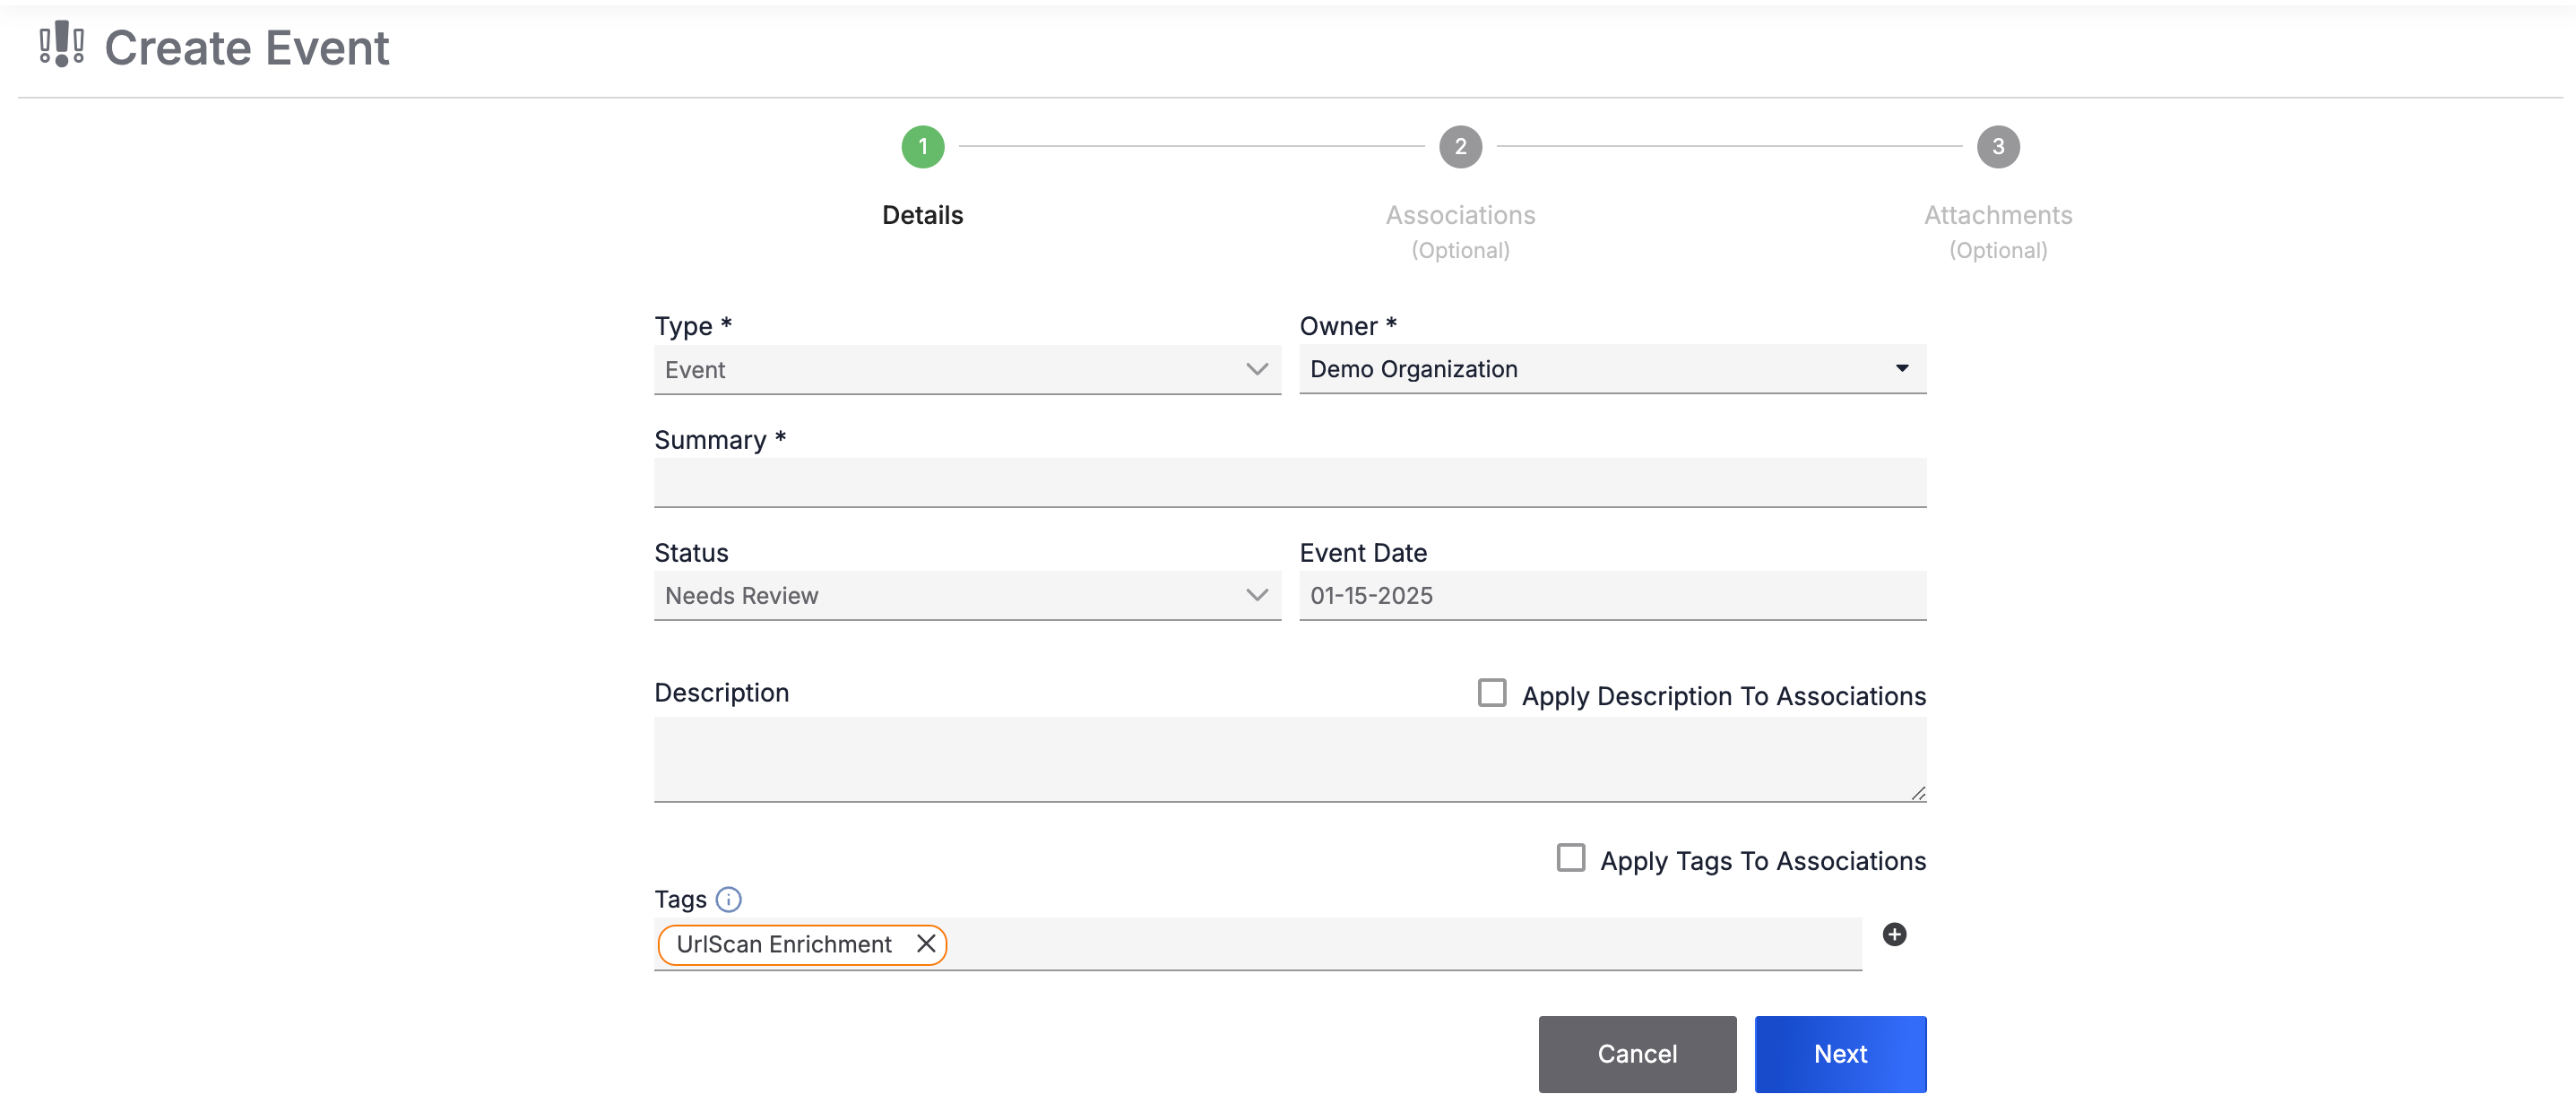
Follow these steps to fill out the fields on the Details step:
- Provide the following details for the Group:
- Type: By default, Event is selected. However, you can select another Group type from the dropdown. If you select a new Group type from the Type dropdown, the fields on the Details step will change based on the new Group type.
- Owner: Select the owner in which to create the Group.
- Summary: Enter a name for the Group.
- Description: (Optional) Enter a Description for the Group. To apply the Description to the Indicators that will be associated to the Group, select Apply Description To Associations.
- Tags: (Optional) Enter one or more Tags to apply to the Group. (By default, the Tags field includes a UrlScan Enrichment Tag.) To apply the Tags to the Indicators that will be associated to the Group, select Apply Tags To Associations.ImportantIf you select Apply Tags to Associations, it is recommended that you remove the UrlScan Enrichment Tag from the Tags field so that the Tag is not applied to the enriched Indicator (that is, the Indicator whose Enrichment tab you are importing urlscan.io data from), as this Indicator will be added as an association to the new Group. Alternatively, if you want to apply the UrlScan Enrichment Tag to all associations except for the enriched Indicator, select Apply Tags to Associations, leave the UrlScan Enrichment Tag in the Tags field, and then, after completing the import, navigate to the enriched Indicator’s Details screen and remove the Tag from the Indicator manually.
- Click Next to proceed to the optional Associations step.NoteThe Save button is available only on the Associations and Attachments steps.
Step 2: Enter Details About Associated Indicators (Optional)
The Associations step of the Create screen (Figure 6) is an optional step where you configure the Indicators from urlscan.io that are being created and associated to the new Group.
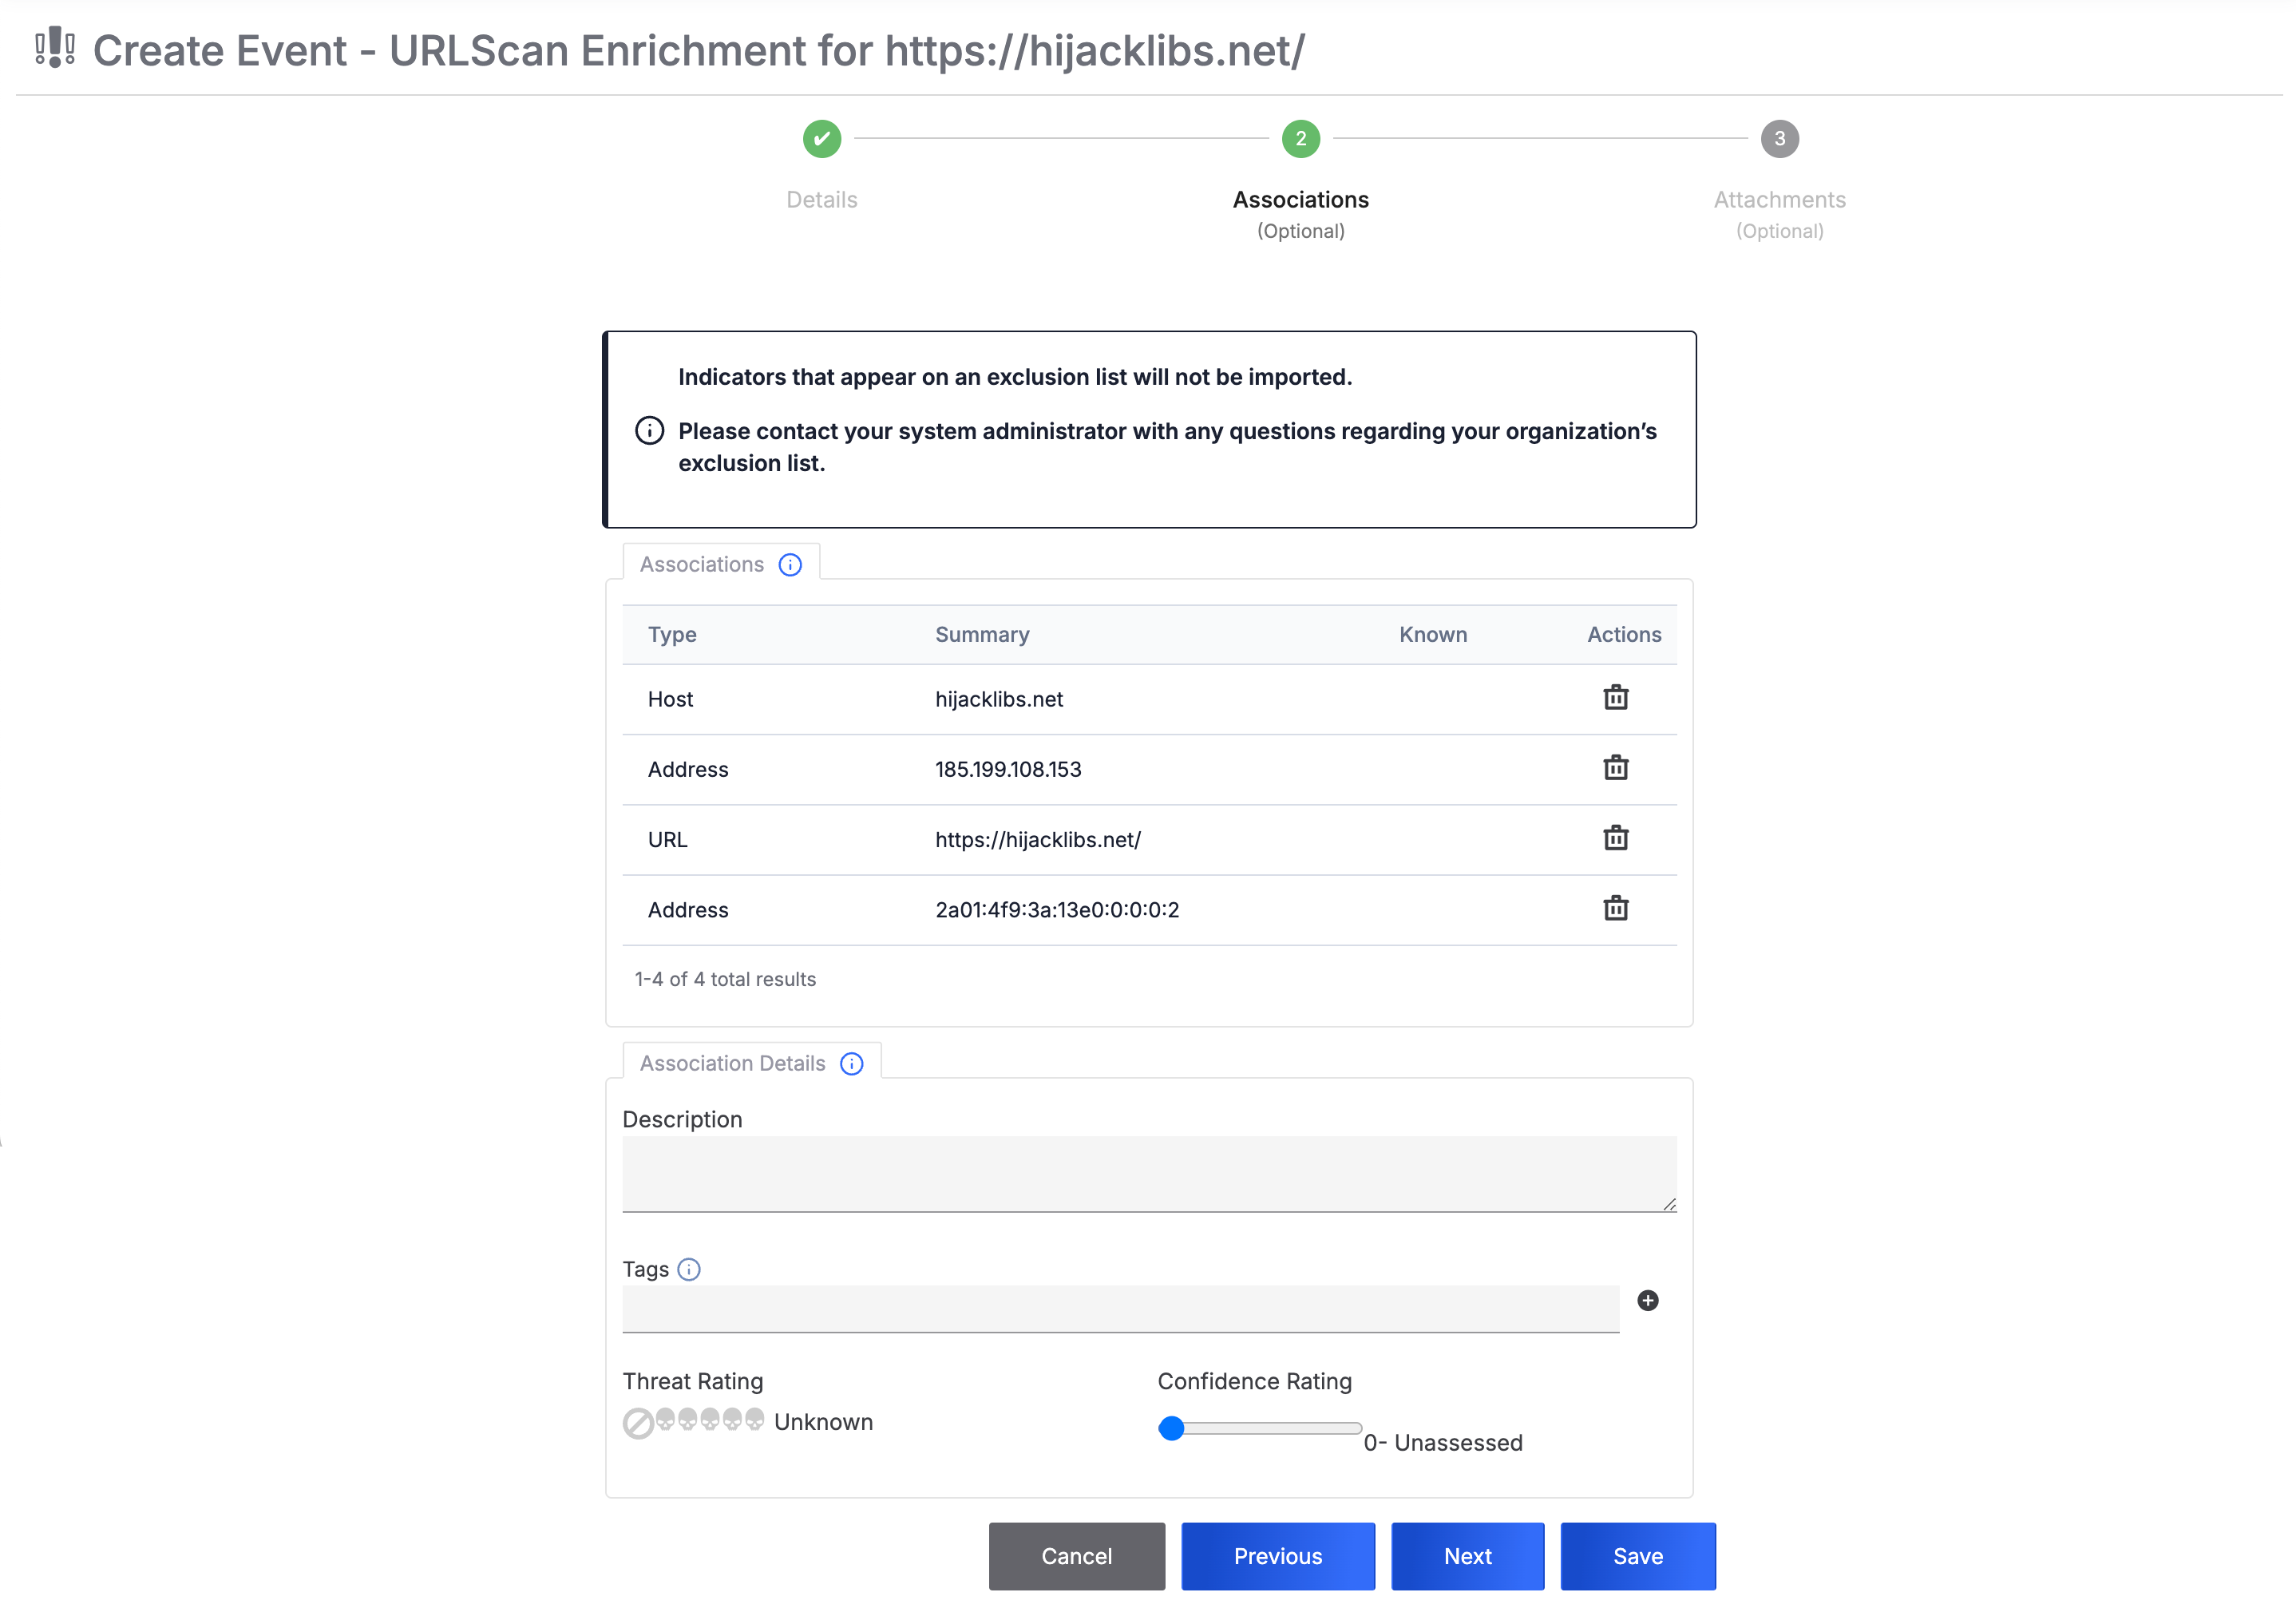
Follow these steps to fill out the fields on the Associations step:
- (Optional) On the Associations card, review the table of Indicators that will be created and associated to the Group. This table includes all selected Indicators, the enriched Indicator, and its corresponding Host Indicator. To remove an Indicator from the table, click Delete
 in the Actions column.NoteThe table on the Associations card will include a Private column if your System Administrator turned on private Indicators for your ThreatConnect instance. To mark an Indicator as private, select the corresponding checkbox in the Private column.NoteA checkmark in the Known column indicates that the corresponding Indicator exists in the owner in which you are creating the Group and Indicators.
 - (Optional) On the Associations Details card, provide the following details for all Indicators that will be created and associated to the Group:ImportantAll information added in this section will be applied to the enriched Indicator (that is, the Indicator whose Enrichment tab you are importing urlscan.io data from), because the enriched Indicator is always added as an association to the new Group, along with the Indicators selected on the card on the URLScan Detailed View drawer (Figure 4). If the enriched Indicator has a default Description, a Threat Rating, or a Confidence Rating and you enter a value for one of these fields, then that value will replace the existing value for the enriched Indicator. Tags entered in this section will be applied in addition to the enriched Indicator’s existing Tags.
- Description: Enter a default Description for the Indicators. If you entered a Description for the Group on the Details step and selected Apply Description to Associations, the text box will contain that Description.
- Tags: Enter one or more Tags to apply to the Indicators. If you entered Tags for the Group on the Details step and selected Apply Tags to Associations, the text box will contain those Tags.
- Threat Rating: Set the Threat Rating for the Indicators.
- Confidence Rating: Set the Confidence Rating for the Indicators.
- Click Next to proceed to the optional Attachments step, or click Save to create the Group and Indicators.
Step 3: Upload File Attachments to the Group (Optional)
If you click Next on the Associations step, you will proceed to the optional Attachments step of the Create screen (Figure 7). Here, you can upload and attach related files to the Group.
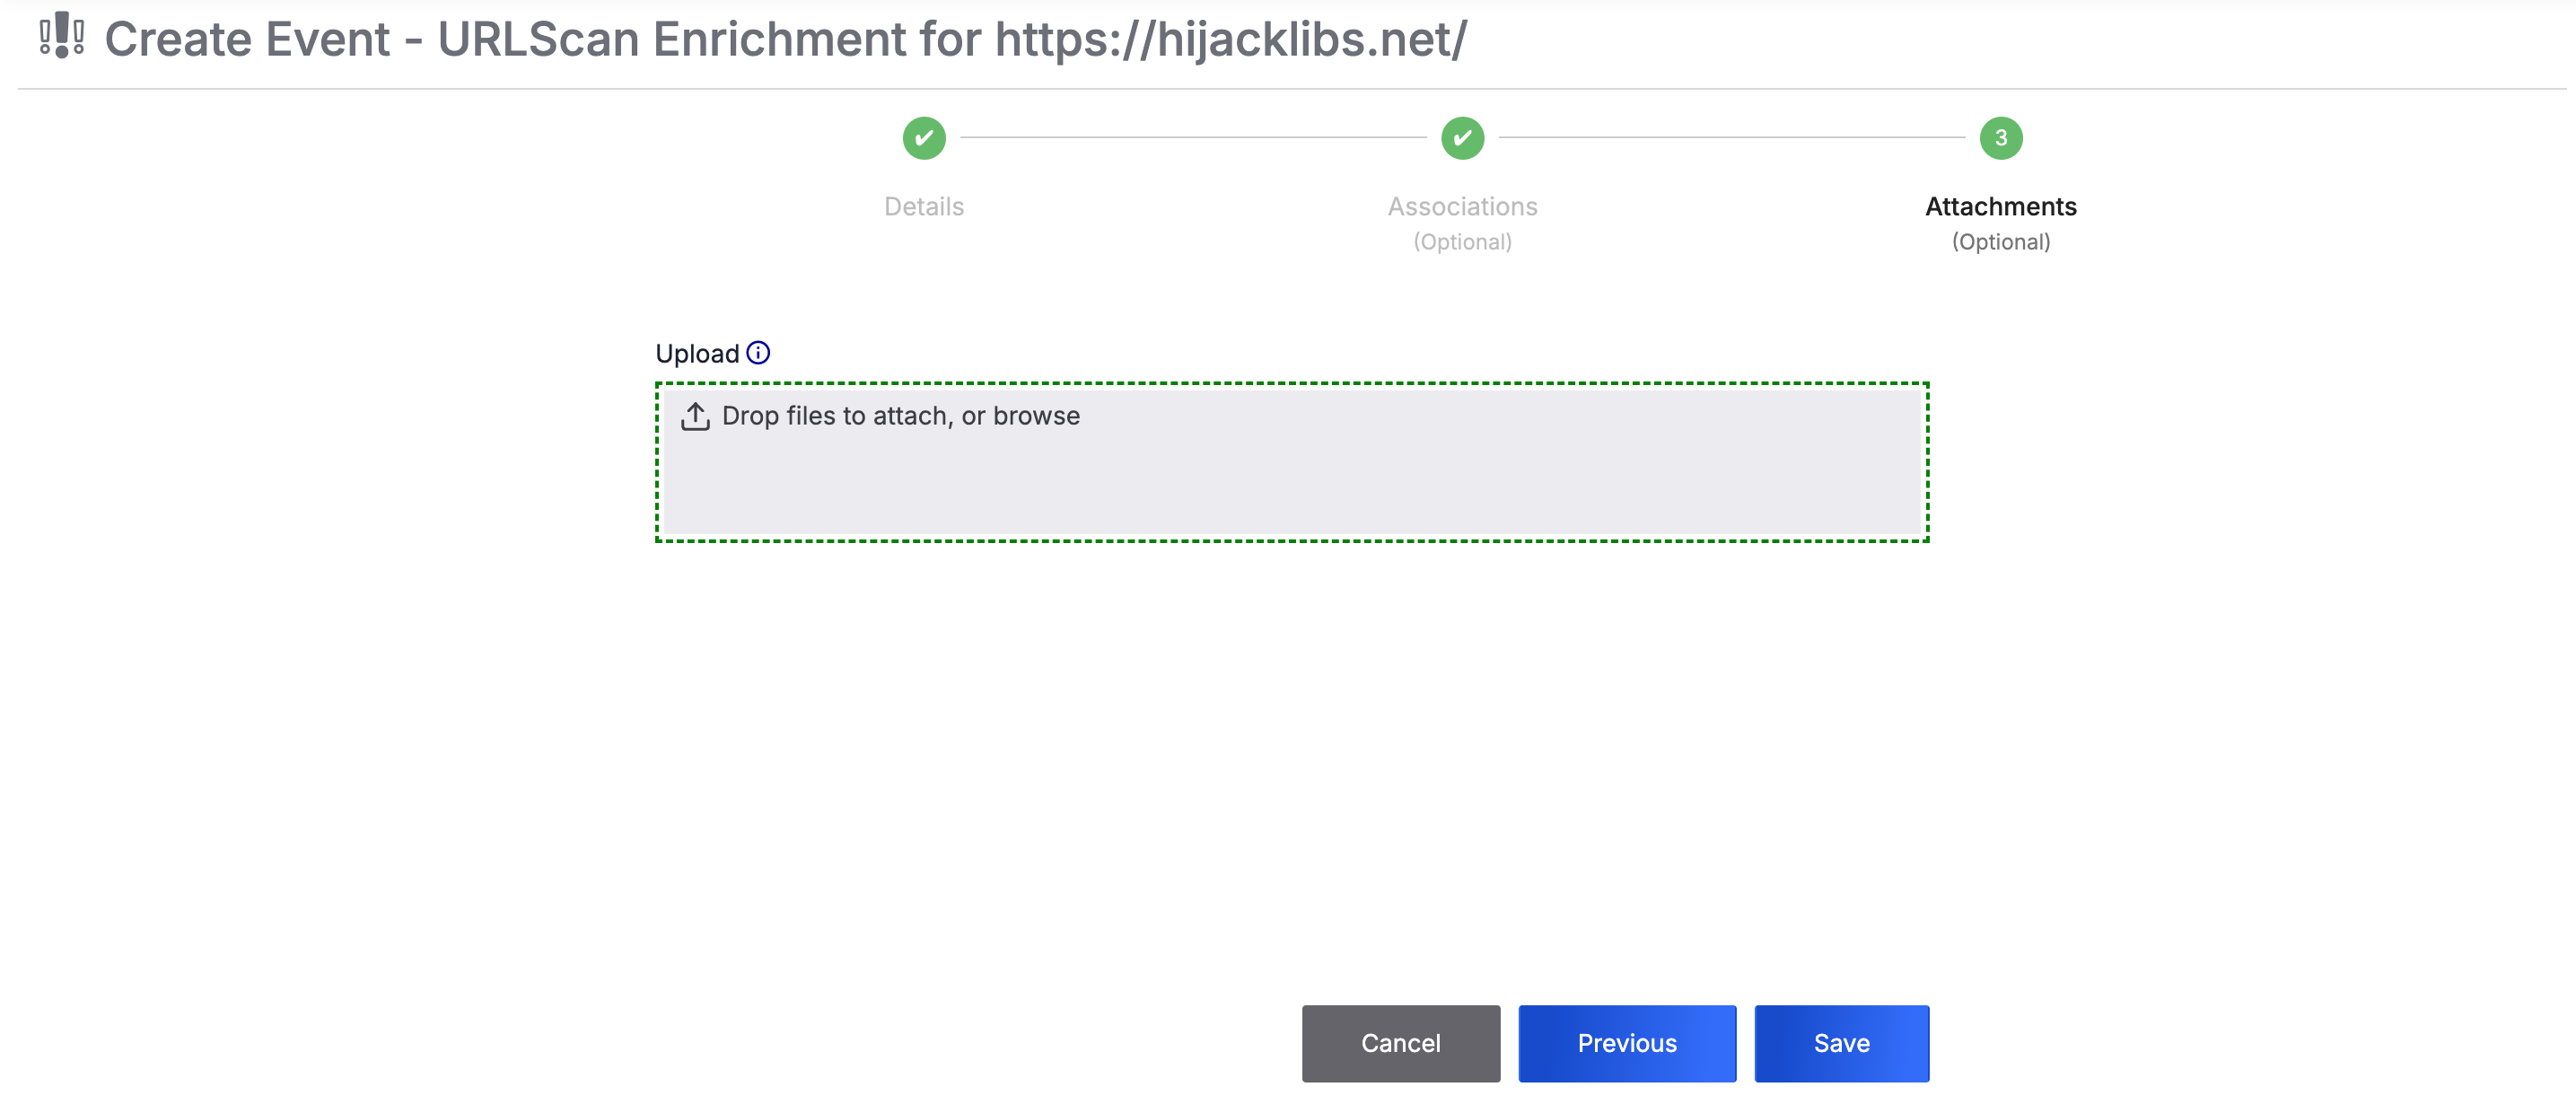
Follow these steps to proceed through the Attachments step:
- Upload one or more files for which Document Groups will be created and associated to the Group being created.
- After a file is uploaded, the filename will be displayed below the upload area, along with the Add to Malware Vault checkbox. Leave this checkbox cleared unless you are uploading a malware file.
- Click Save to create the Group and Indicators.
After you complete the import process, the Group’s Details screen will open. You can view the Indicators that were imported and associated to the Group on the Indicator Associations card of the Group’s Associations tab.
Importing Indicators Into an Existing Group
Follow these steps to import Indicators from urlscan.io and associate them to an existing Group:
- Follow Steps 1–3 in the “Importing Indicators From urlscan.io Into ThreatConnect” section and select To Existing Group from the Import dropdown.
- Proceed through the steps on the Import to Existing Group screen to select an existing Group and configure the Indicators selected for import. There are two steps in this process: Select Group (required) and Associations (optional).
Step 1: Select an Existing Group
The Select Group step of the Import to Existing Group screen (Figure 8) is a required step where you select an existing Group to associate to the imported Indicators.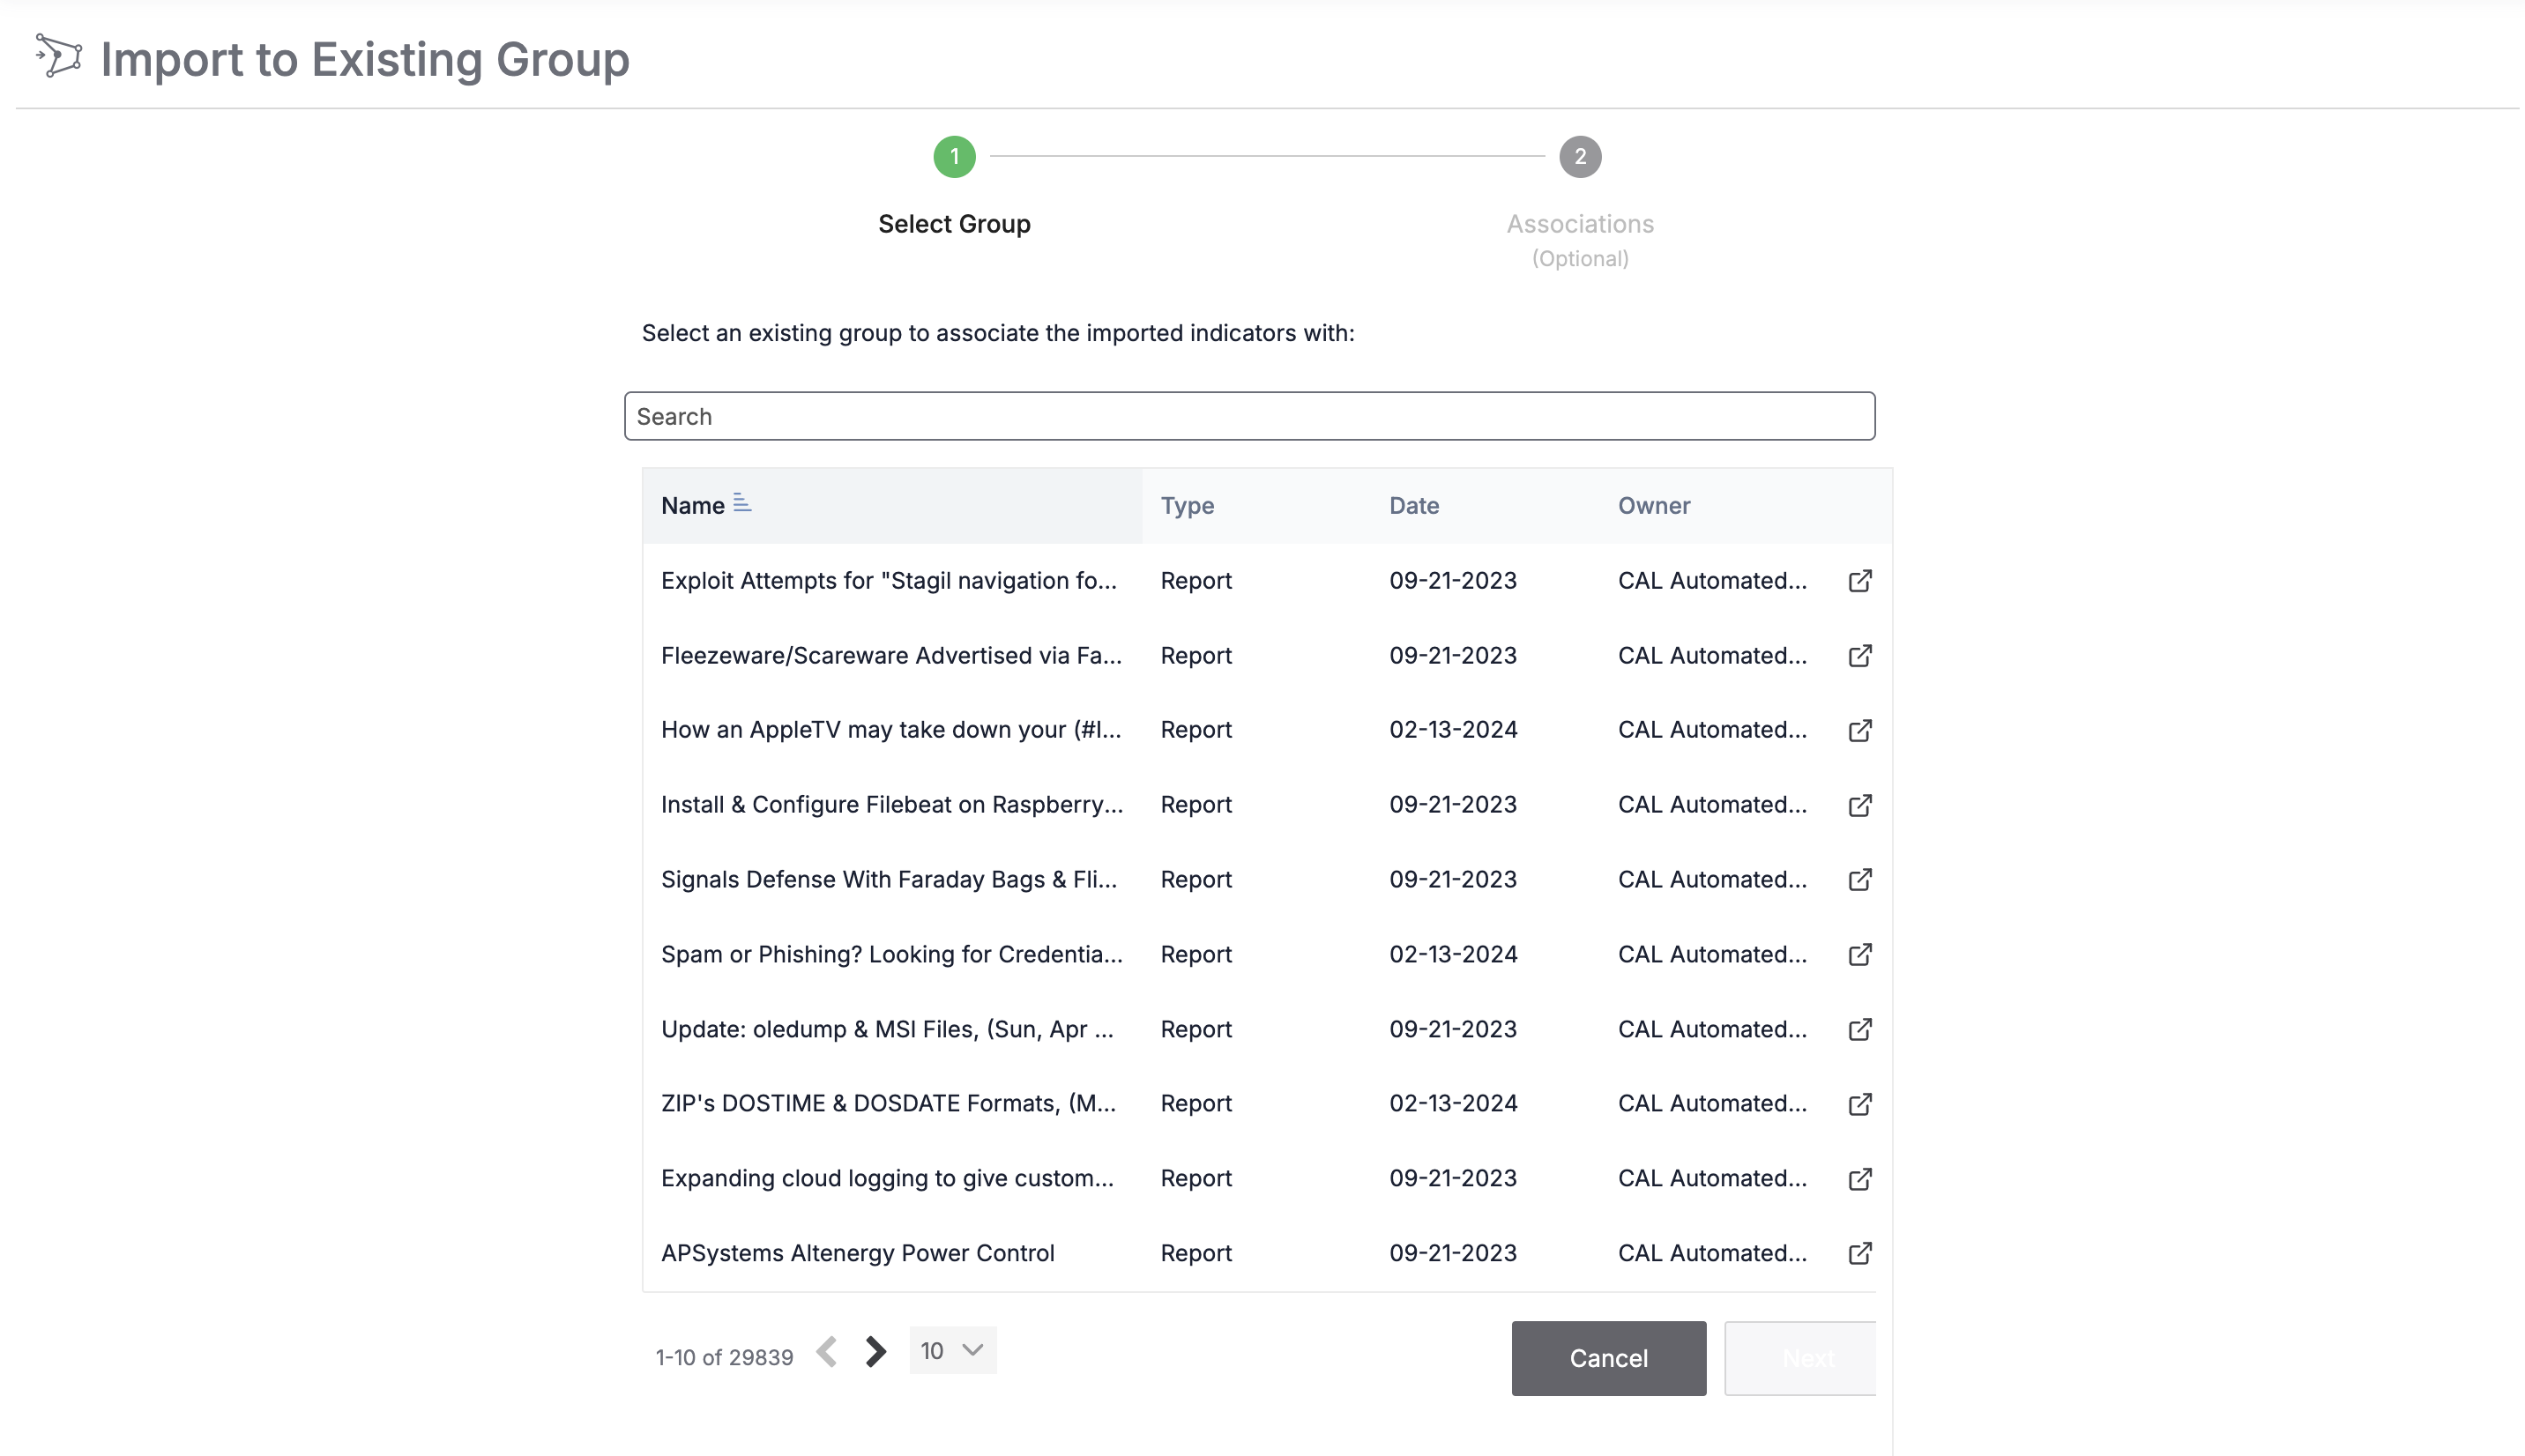
Follow these steps to select a Group to associate to the imported Indicators:
- Select a Group to which the selected Indicators, as well as the enriched Indicator and its corresponding Host Indicator, will be associated. To search for a Group, enter its name in the search bar above the table containing all Groups.
- Click Next to proceed to the optional Associations step.NoteThe Save button is available only on the Associations step.
Step 2: Enter Details About Associated Indicators (Optional)
The Associations step of the Import to Existing Group screen (Figure 9) is an optional step where you configure the Indicators from urlscan.io that are being created and associated to the existing Group.
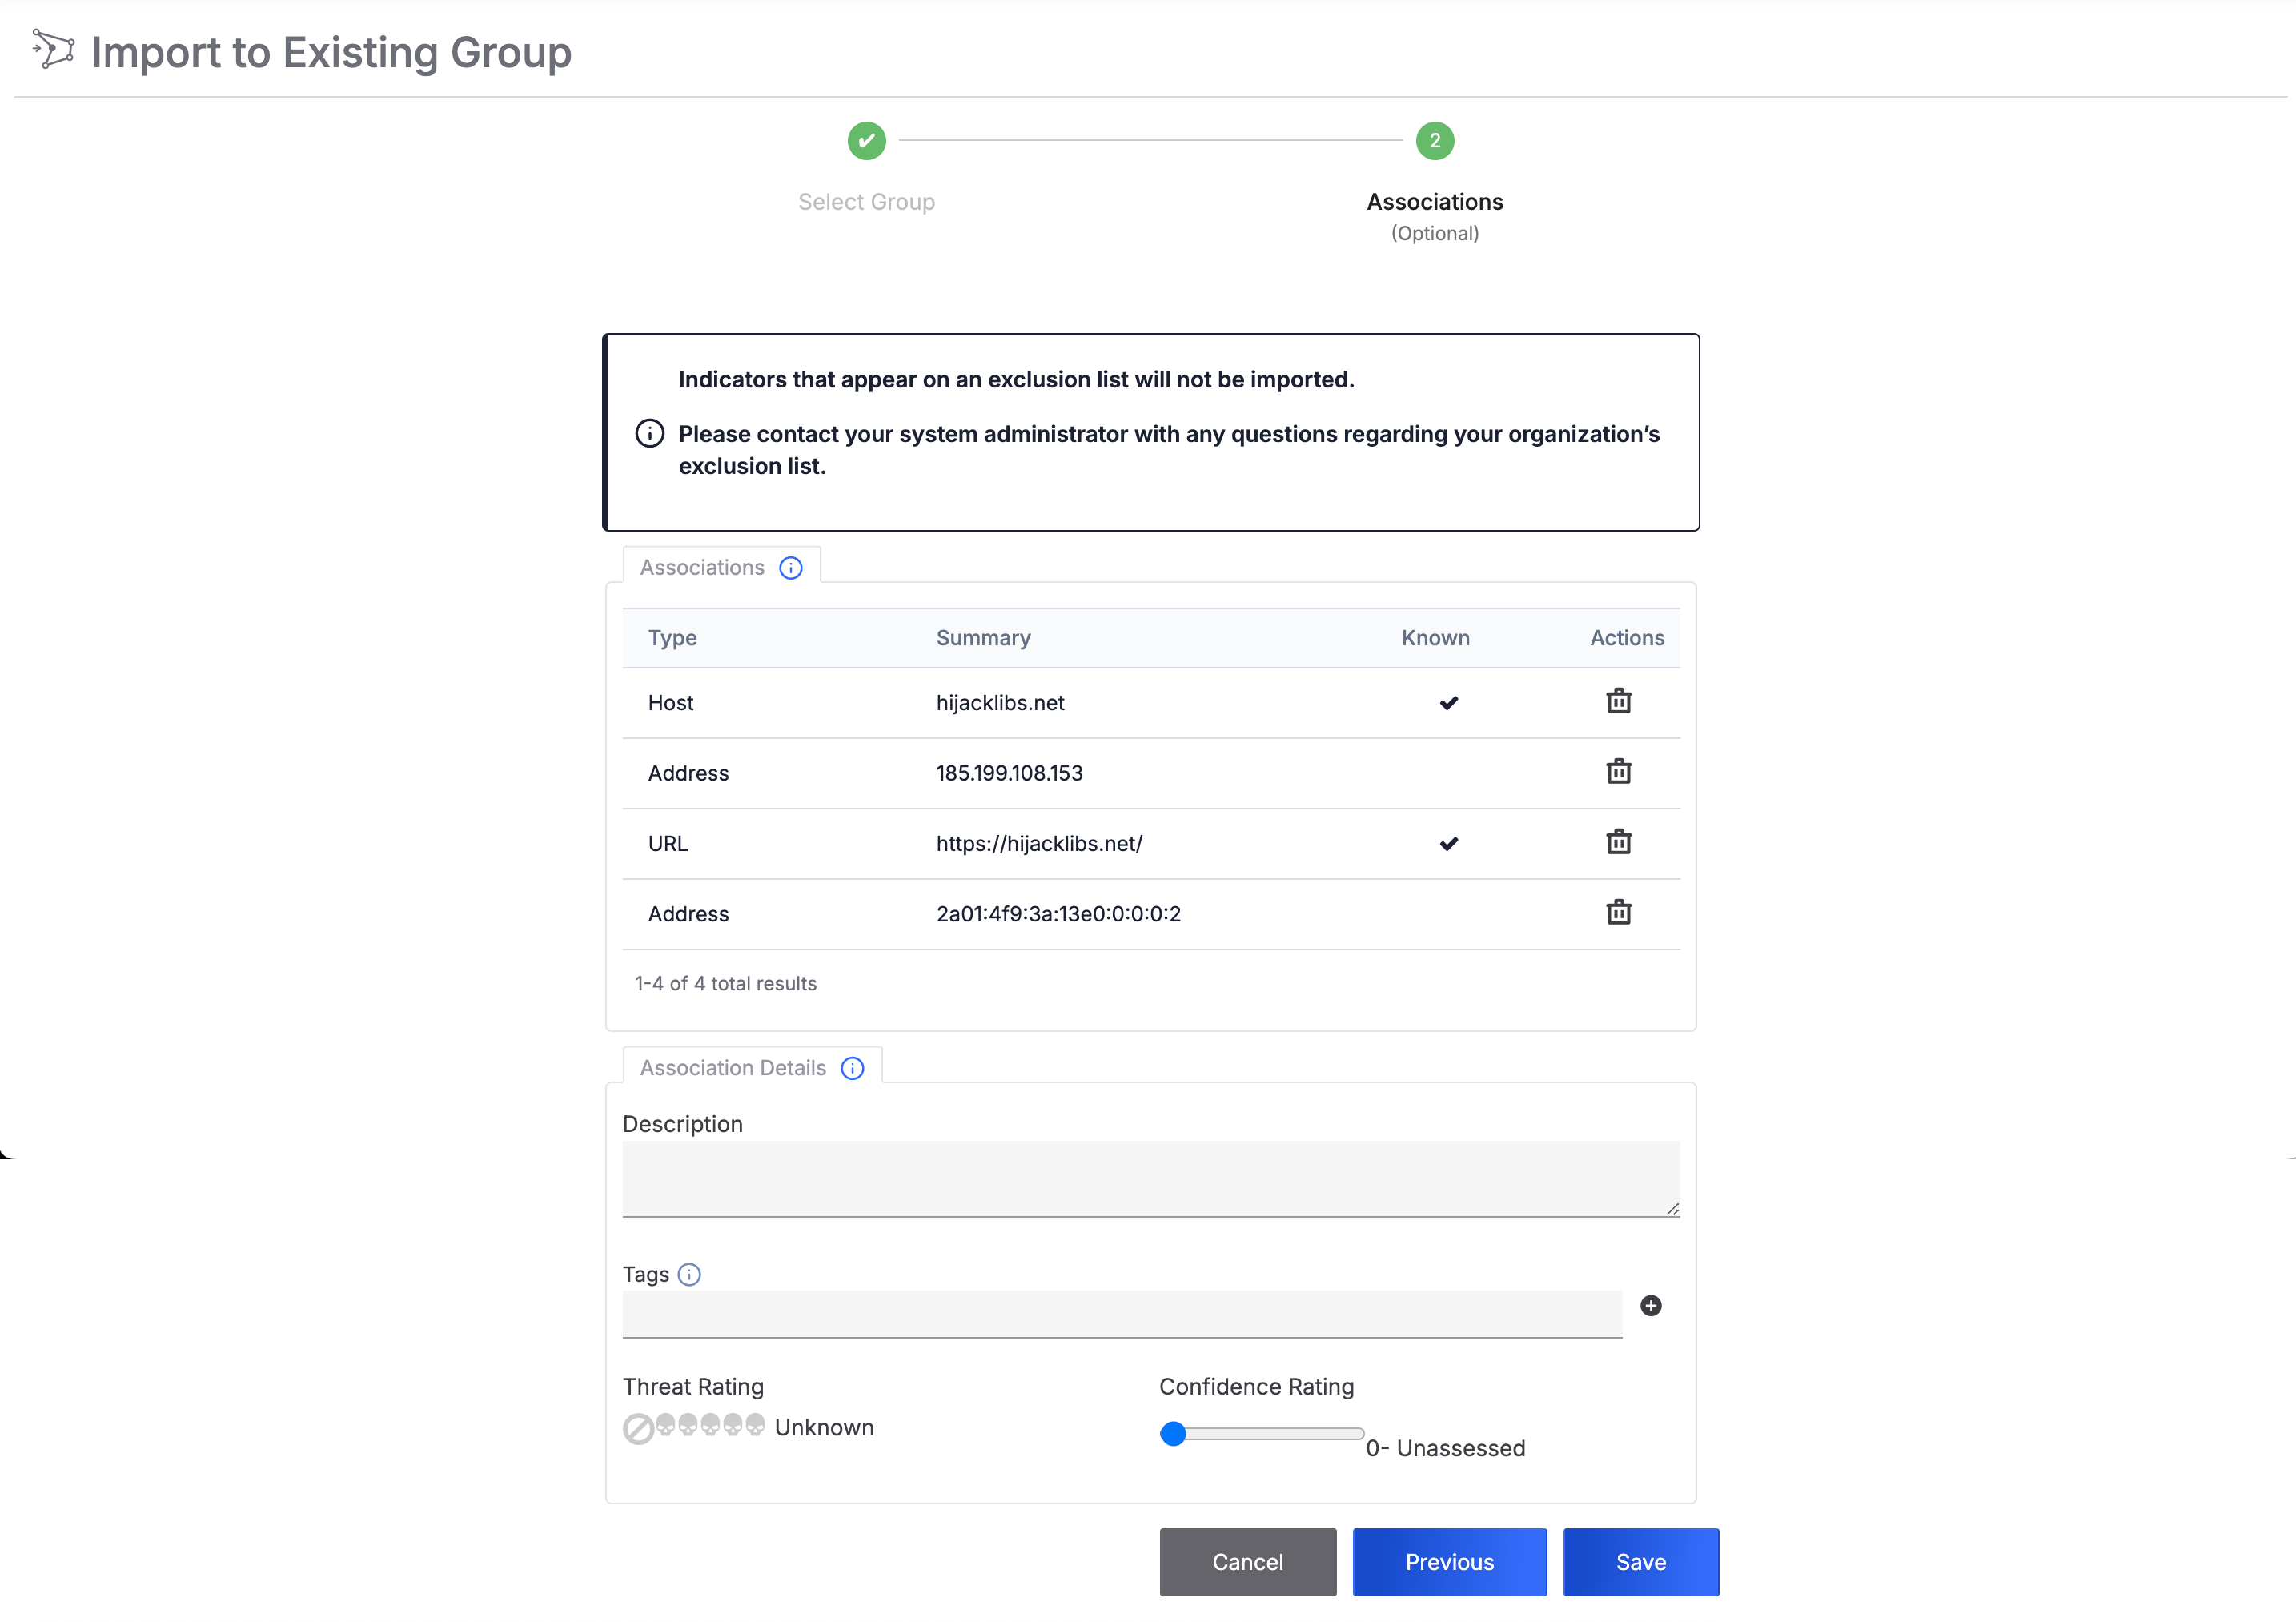
Follow these steps to fill out the fields on the Associations step:
- (Optional) On the Associations card, review the table of Indicators that will be created and associated to the Group. This table includes all selected Indicators and the enriched Indicator and its corresponding Host Indicator. To remove an Indicator from the table, click Deletein the Actions column.NoteThe table on the Associations card will include a Private column if your System Administrator turned on private Indicators for your ThreatConnect instance. To mark an Indicator as private, select the corresponding checkbox in the Private column.NoteA checkmark in the Known column indicates that the corresponding Indicator exists in the owner in which the selected Group exists.
- (Optional) On the Associations Details card, provide the following details for all Indicators that will be created and associated to the Group:ImportantAll information added in this section will be applied to the enriched Indicator (that is, the Indicator whose Enrichment tab you are importing urlscan.io data from), because the enriched Indicator is always added as an association to the existing Group, along with the Indicators selected on the card on the URLScan Detailed View drawer (Figure 4). If the enriched Indicator has a default Description, a Threat Rating, or a Confidence Rating and you enter a value for one of these fields, then that value will replace the existing value for the enriched Indicator. Tags entered in this section will be applied in addition to the enriched Indicator’s existing Tags.
- Description: Enter a default Description for the Indicators.
- Tags: Enter one or more Tags to apply applied to the Indicators.
- Threat Rating: Set the Threat Rating for the Indicators.
- Confidence Rating: Set the Confidence Rating for the Indicators.
- Click Save to create the Indicators and associate them to the existing Group.
After you complete the import process, the Group’s Details screen will open. You can view the Indicators that were imported and associated to the Group on the Indicator Associations card of the Group’s Associations tab.
Importing Indicators as Indicators
Follow these steps to import Indicators from urlscan.io and associate them directly to the enriched Indicator via a custom association:
- Follow Steps 1–3 in the “Importing Indicators From urlscan.io Into ThreatConnect” section and select As an Indicator from the Import dropdown.
- On the Import Indicators window (Figure 10), review the list of Indicators that will be imported into ThreatConnect and associated directly to the enriched Indicator. To remove an Indicator from this list, click Delete
 .
. 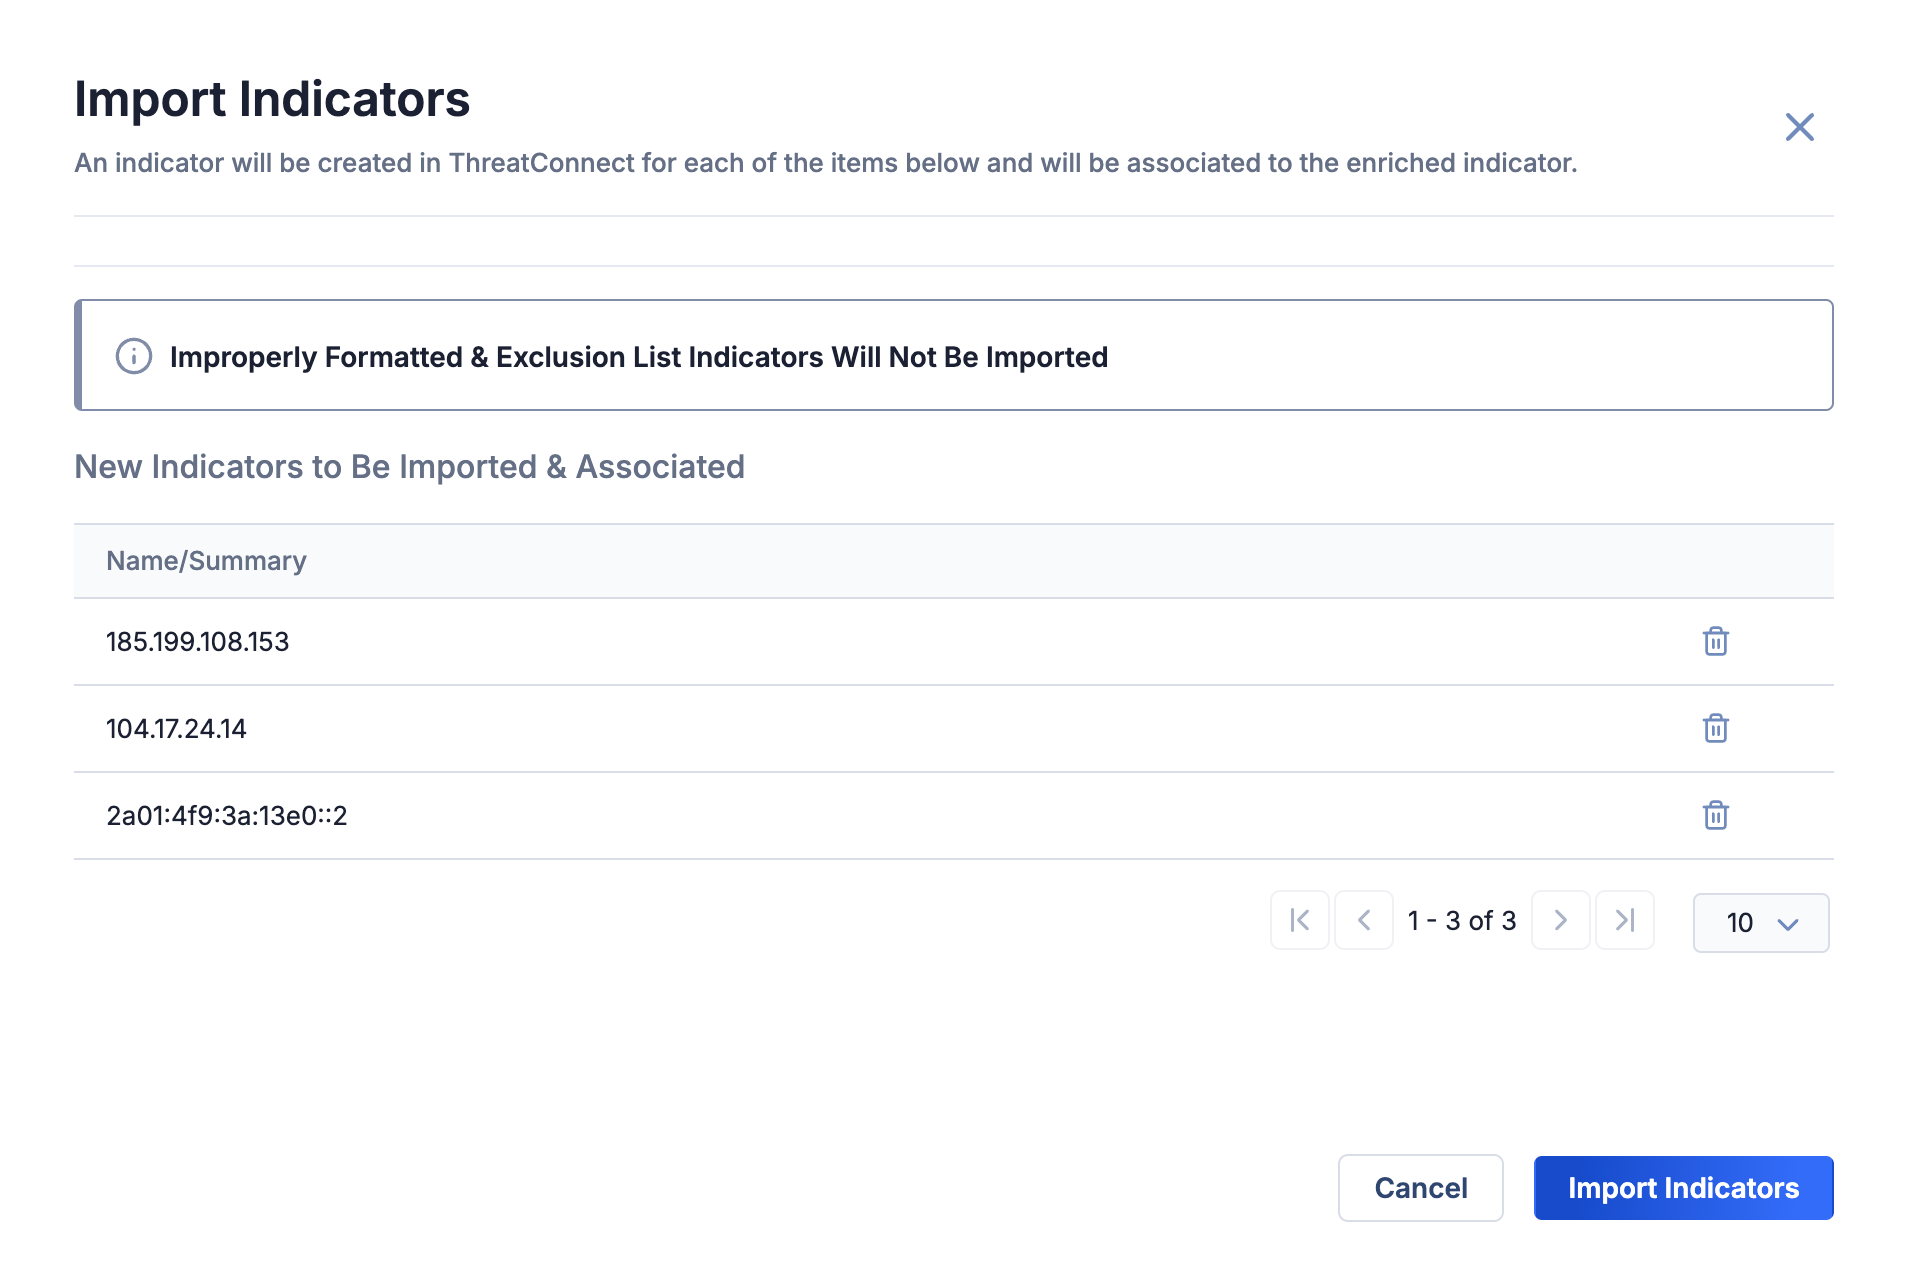
- Click Import Indicators to import the Indicators and associate them directly to the enriched Indicator via a custom association.
After you complete the import process, the Associations tab of the enriched Indicator’s Details screen will be displayed. You can view the associated Indicators on the Indicator Associations card of this tab.
Retrieving Data Manually
When you open an Indicator’s Enrichment tab for the first time, data will be retrieved from urlscan.io and displayed on the URLScan card automatically if your System Administrator enabled automatic data retrieval for urlscan.io. Otherwise, the URLScan card will display a message stating “Automatic Data Retrieval has been disabled by the System Administrator,” and you will need to click Retrieve Data on the card to populate it with data. Once data have been retrieved, they will be cached for a period of time configured by your System Administrator. Each time you revisit that Indicator’s Enrichment tab, the cached urlscan.io data will be displayed until this period of time has passed.
To retrieve the latest urlscan.io data for the Indicator manually, click Retrieve Data on the URLScan card.
Enriching Indicators Using the ThreatConnect API
You can use the ThreatConnect v3 API to enrich URL Indicators with data from urlscan.io. For instructions on using the ThreatConnect v3 API to enrich Indicators, see Indicator Enrichment Overview.
ThreatConnect® is a registered trademark of ThreatConnect, Inc.
MITRE ATT&CK® and ATT&CK® are registered trademarks of The MITRE Corporation.
20146-05 v.04.C