- 18 Dec 2024
- 10 Minutes to read
-
Print
-
DarkLight
-
PDF
Installing and Configuring the ThreatConnect TAXII 2.1 Server (App Version 2.0)
- Updated on 18 Dec 2024
- 10 Minutes to read
-
Print
-
DarkLight
-
PDF
Overview
The ThreatConnect® TAXII™ 2.1 server can be used by an external TAXII client to retrieve data from your Organization, Communities, and Sources. To use the TAXII 2.1 server, you must install and configure the ThreatConnect TAXII Server Service App. This App also provides access to the ThreatConnect TAXII Server user interface, which lets you view and configure collections, data mappings, and Indicator time-to-live (TTL) values for the ThreatConnect TAXII 2.1 server.
Before You Start
User Roles
- To install the ThreatConnect TAXII Server App, your user account must have a System role of Administrator.
- To create and configure a Service for the ThreatConnect TAXII Server App, your user account must have a System role of Administrator or an Organization role of Organization Administrator.
- To access the ThreatConnect TAXII Server user interface, your user account must have an Organization role of Organization Administrator in an Organization that is allowed to use the Service for the ThreatConnect TAXII Server App.
Prerequisites
- Version 2.0 of the ThreatConnect TAXII Server App requires a ThreatConnect instance with version 7.2.0 or newer installed.
- Create a ThreatConnect API user account (if you do not already have one), as the ThreatConnect TAXII 2.1 server requires access to an API user account.
- To have access to Playbook Services, turn on the playbooksEnabled system setting for your ThreatConnect instance on the System Settings screen (must be a System Administrator to perform this action). Also, edit your Organization on the Organizations tab of the Account Settings screen and select the Enable Playbooks checkbox on the Permissions tab of the Organization Information window (must be a System Administrator, Operations Administrator, or Accounts Administrator to perform this action).
Installing the ThreatConnect TAXII Server Service App
Follow these steps to install the ThreatConnect TAXII Server Service App on your ThreatConnect instance via TC Exchange™:
- Log into ThreatConnect with a System Administrator account.
- Hover over Settings
 on the top navigation bar and select TC Exchange Settings. Then select the Catalog tab on the TC Exchange Settings screen.
 - Locate the ThreatConnect TAXII Server App on the Catalog tab. Then click Install
 in the Options column for the ThreatConnect TAXII Server App with an App version number of 2.0.0.
 - Click INSTALL on the Release Notes window for the ThreatConnect TAXII Server App.
Creating and Configuring the ThreatConnect TAXII Server Service
Follow these steps to create and configure a Service for the ThreatConnect TAXII Server App after installing the App:
- Log into ThreatConnect with a System Administrator or Organization Administrator account.
- Hover over Playbooks on the top navigation bar and select Services.
- Click + NEW at the upper-left corner of the Services screen.
- Fill out the fields on the Select step of the Create Service drawer (Figure 1) as follows:
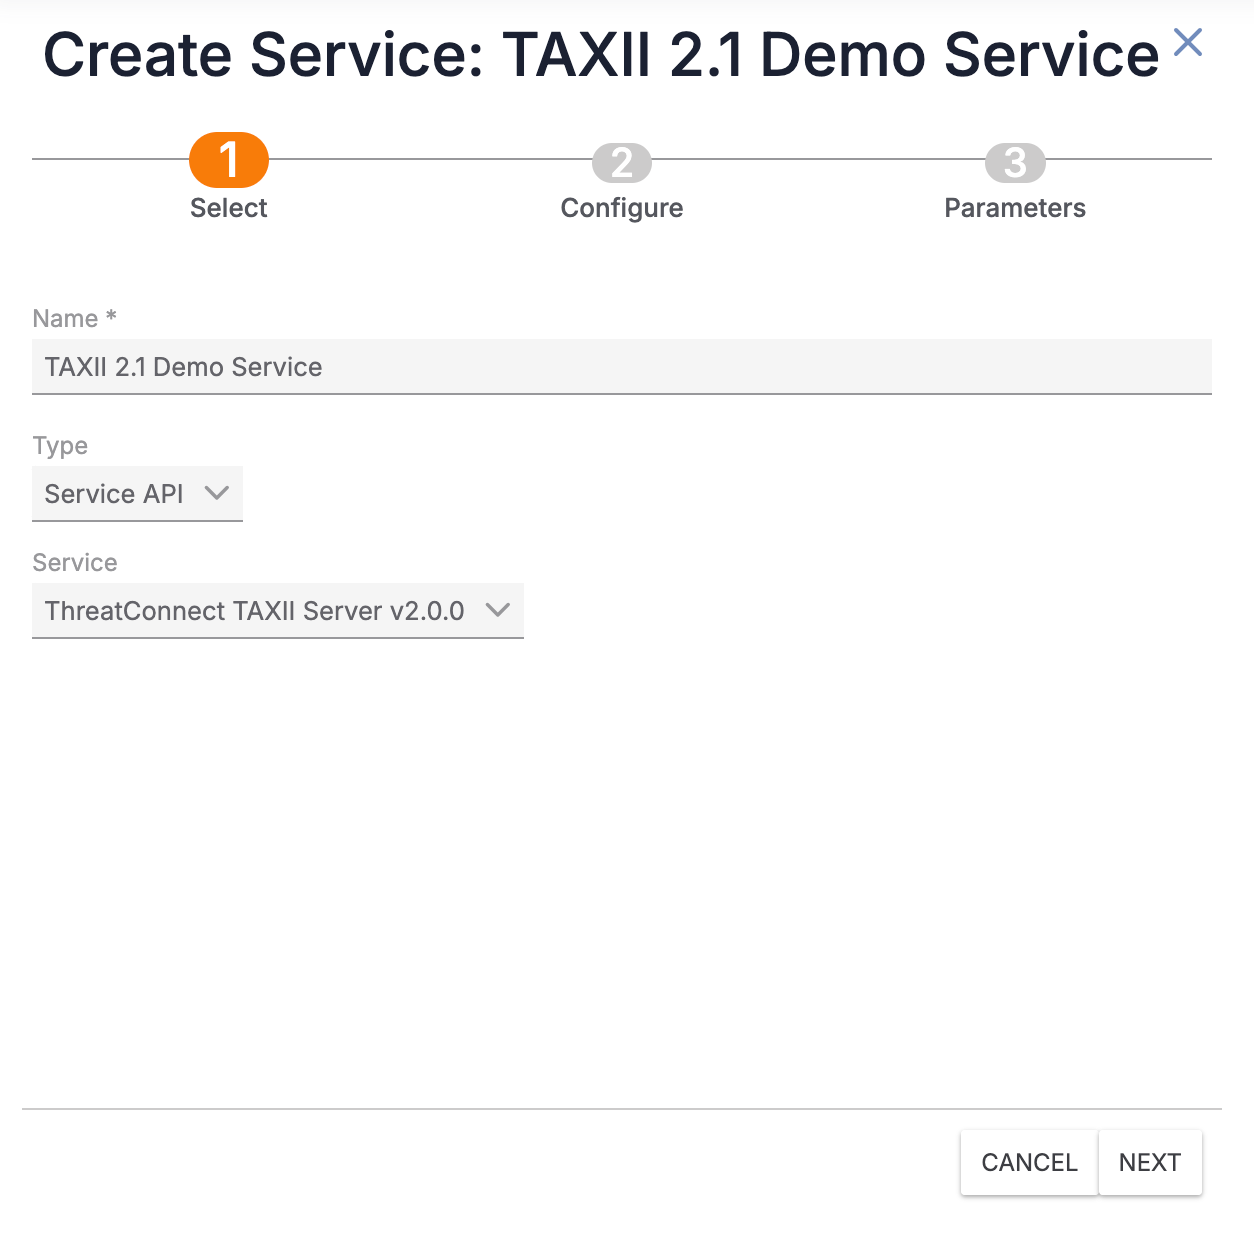
- Name: Enter a unique name for the Service.
- Type: Select Service API.
- Service: Select ThreatConnect TAXII Server v2.0.0.
- Click NEXT to proceed to the Configure step (Figure 2). Then fill out the fields on the Configure step as follows:
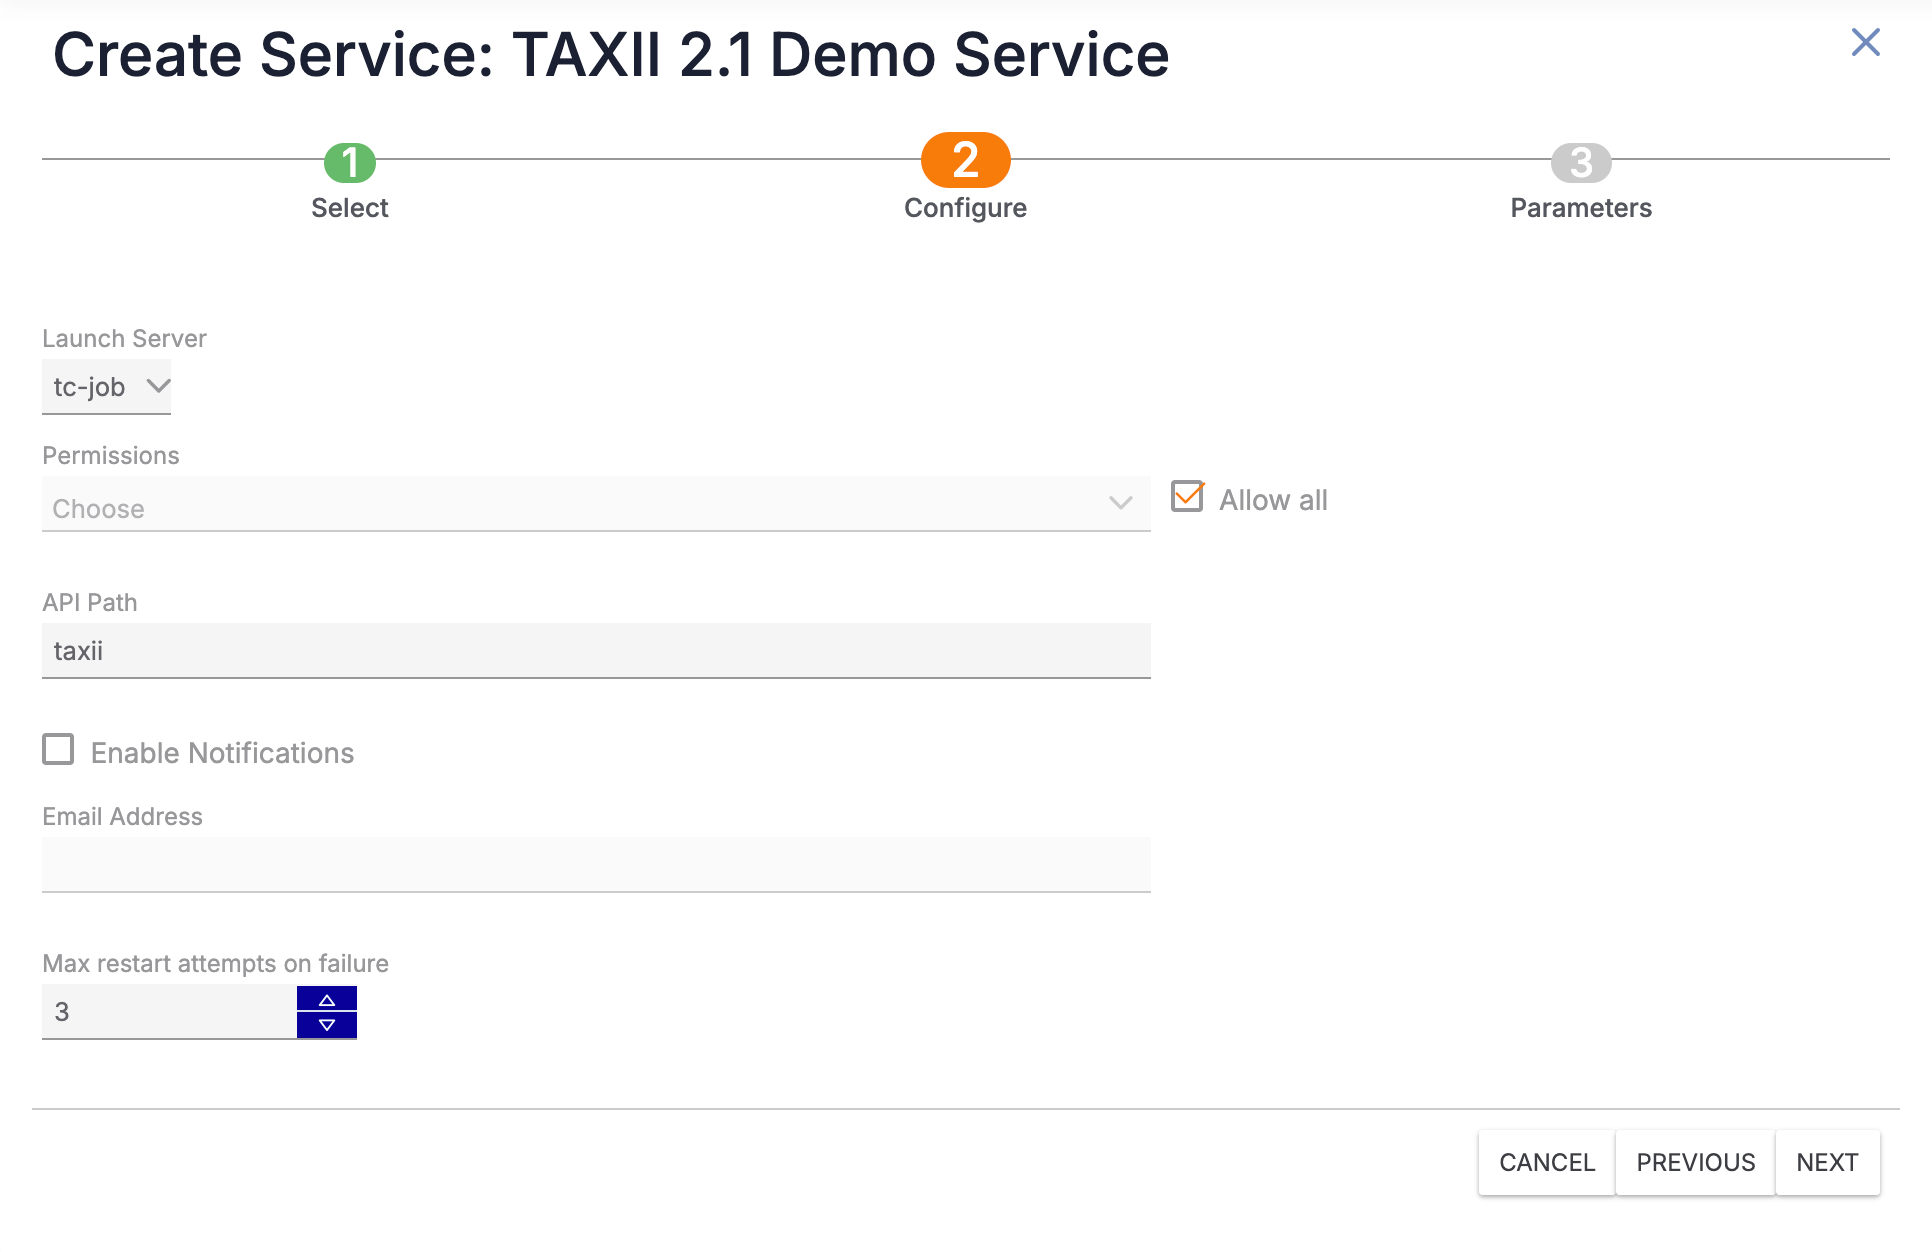
- Launch Server: Select tc-job.
- Permissions: Select one or more Organizations that will be allowed to use the Service. Alternatively, select Allow all to allow all Organizations to use the Service.NoteIf selecting individual Organizations, make sure to select the Organization in which you will create the TAXII user for the ThreatConnect TAXII 2.1 server.
- API Path: Enter a unique API path that will be used to make the TAXII requests. The default API path is taxii.NoteIf you plan to run multiple copies of the Service, each Service must have a unique API path.
- Enable Notifications: Select this checkbox to send an email when the Service fails to start. It is recommended to enable this setting.
- Email Address: If you selected the Enable Notifications checkbox, enter the email address to which notifications should be sent. It is recommended to enter an email address for a ThreatConnect user with a System role of Administrator.
- Max restart attempts on failure: Enter the number of times ThreatConnect should try to restart the Service if it fails. It is recommended to set this value to 3.
- Click NEXT to proceed to the Parameters step (Figure 3). Then fill out the fields on the Parameters step as follows:
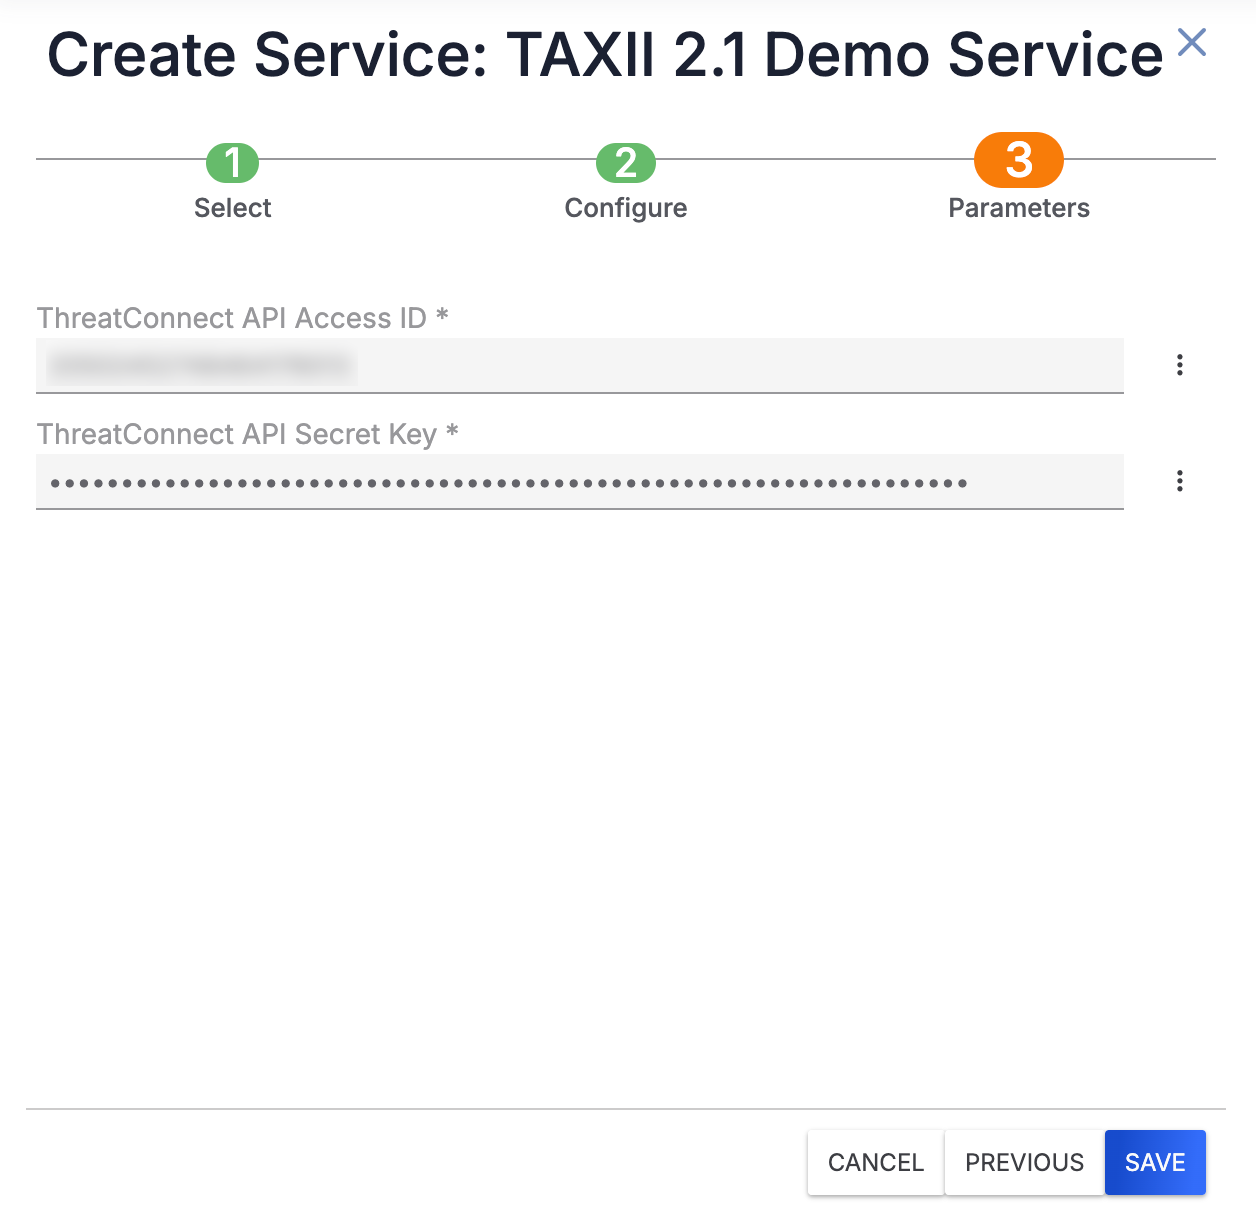
- ThreatConnect API Access ID: The ThreatConnect TAXII 2.1 server requires access to a ThreatConnect API user account. Enter the Access ID for the API user account that the ThreatConnect TAXII 2.1 server will use.
- ThreatConnect API Secret Key: The ThreatConnect TAXII 2.1 server requires access to a ThreatConnect API user account. Enter the Secret Key for the API user account that the ThreatConnect TAXII 2.1 server will use.
- Click SAVE on the Create Service drawer.
- Locate the newly created Service on the Services screen, and then turn on the toggle to the left of the Service to activate it (Figure 4).NoteIt is recommended to set the Service’s log level to INFO, WARN, or ERROR.

After the Service starts successfully, click the API Path link to open the ThreatConnect TAXII Server user interface.
Using the ThreatConnect TAXII Server User Interface
Version 2.0 of the ThreatConnect TAXII Server App re-envisions and enhances the ThreatConnect TAXII 2.1 server with a user interface that includes the following features:
- Collection management that leverages ThreatConnect Query Language (TQL) to filter Indicators included in each collection.
- Configurable Indicator TTL values at the global and collection levels, where collection-level Indicator TTL values override global Indicator TTL values.
- Customizable ThreatConnect-to-STIX™ data mappings utilizing JMESPath at the global and collection levels, where collection-level mappings override global mappings.
Collection Management
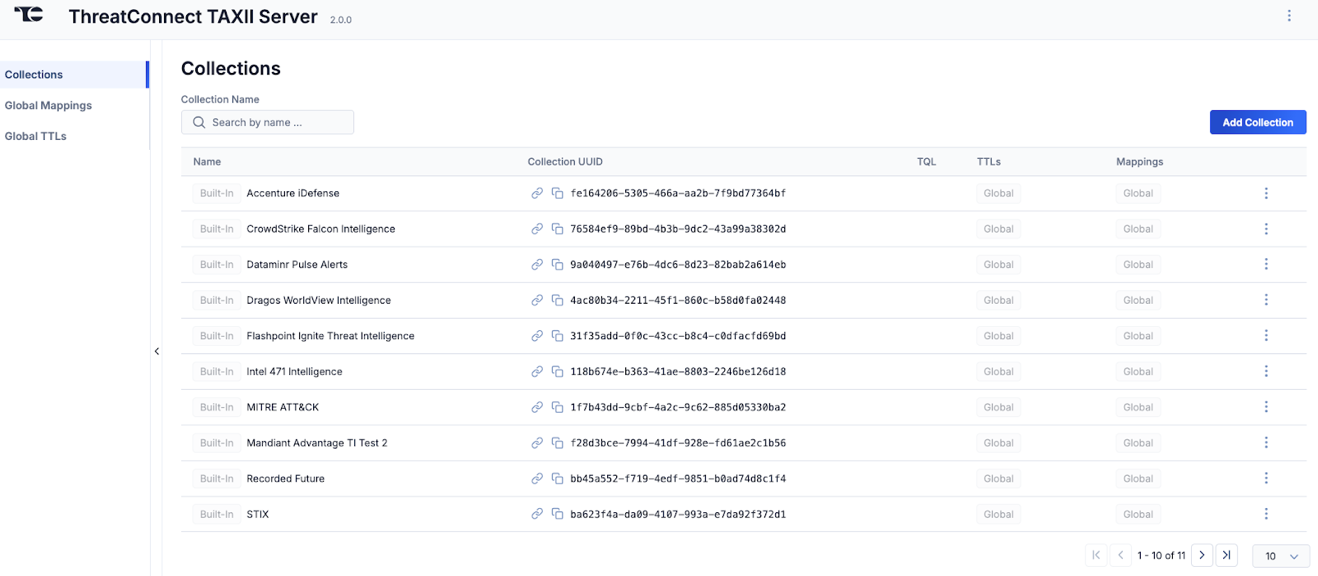
Select Collections in the side navigation bar on the ThreatConnect TAXII Server user interface to open the Collections screen (Figure 5). Here, you can view, create, and manage ThreatConnect TAXII 2.1 server collections.
Viewing Collections
The ThreatConnect TAXII 2.1 server supports two types of collections:
- Built-in collections that correspond to each of your ThreatConnect owners. These collections are available by default after starting the Service for the ThreatConnect TAXII Server App. Built-in collections are denoted by a Built-In label to the left of the collection name in the Name column.
- Virtual collections that are created with the Add Collection button at the top right of the Collections screen.
Copying a Collection's UUID or URL
In some cases, you may want to view a collection directly in a web browser or while using an API tool like Postman®. Use the![]() and
and![]() icons to the left of a collection's universally unique identifier (UUID) in the Collection UUID column to copy the collection's URL or UUID, respectively, to your computer's clipboard.
icons to the left of a collection's universally unique identifier (UUID) in the Collection UUID column to copy the collection's URL or UUID, respectively, to your computer's clipboard.
Managing Collections
Click a collection’s ⋮ menu to access the following options:
- Clone Collection: Select this option to create a copy of the collection. If the collection to be copied includes a TQL query, you can update the query for the copy of the collection.
- Customize Mapping: Select this option to manage custom data mappings for the collection. If you add a custom data mapping to a collection, a Custom label will be displayed in the Mappings column for the collection.
- Customize TTL: Select this option to manage custom Indicator TTL values for the collection. If you add a custom Indicator TTL value to a collection, a Custom label will be displayed in the TTLs column for the collection.
- Delete Collection: Select this option to delete a virtual collection. Built-in collections may not be deleted.
- Edit Collection: Select this option to edit a virtual collection's name, TQL query, and ThreatConnect owners. Built-in collections may not be edited.
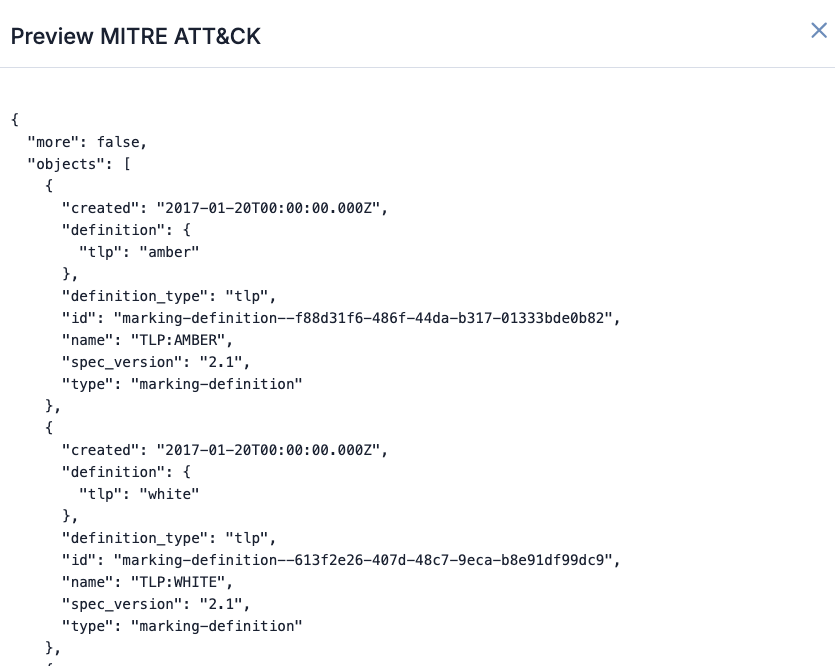
- Preview Collection: Select this option to preview the collection’s data (Figure 6).
Creating a Virtual Collection
Follow these steps to create a virtual collection:
- Select Collections in the side navigation bar on the ThreatConnect TAXII Server user interface.
- Click Add Collection on the Collections screen.
- Fill out the following fields on the Add Collection drawer:
- Collection Name: Enter the collection's name.
- Collection TQL Query: (Optional) Enter a TQL query that will be used to filter Indicators included in the collection.
- ThreatConnect Owners: Select one or more ThreatConnect owners whose Indicators will be included in the collection.
- Click Save on the Add Collection drawer.
Configuring Indicator TTL Values
You can configure Indicator TTL values (that is, the amount of time an Indicator will exist in an external source, such as a SIEM or an ISAC, before it expires) at the global and collection levels. Indicator TTL values configured at the global level are inherited at the collection level; however, Indicator TTL values configured at the collection level will override global Indicator TTL values.
TTL values are limited to Indicators only; you cannot configure TTL values for Groups. Also, TTL values are measured in hours.
An Indicator TTL value in ThreatConnect is converted to the valid_until STIX Indicator object field . The valid_until field's value is automatically converted into a timestamp that is calculated based on an Indicator's last_modifiedtimestamp and the TTL value for the Indicator's type.
Viewing and Managing Global Indicator TTL Values
Select Global TTLs in the side navigation bar on the ThreatConnect TAXII Server user interface to open the Global TTLs screen (Figure 7). Here, you can view, create, and manage global Indicator TTL values for the ThreatConnect TAXII 2.1 server.
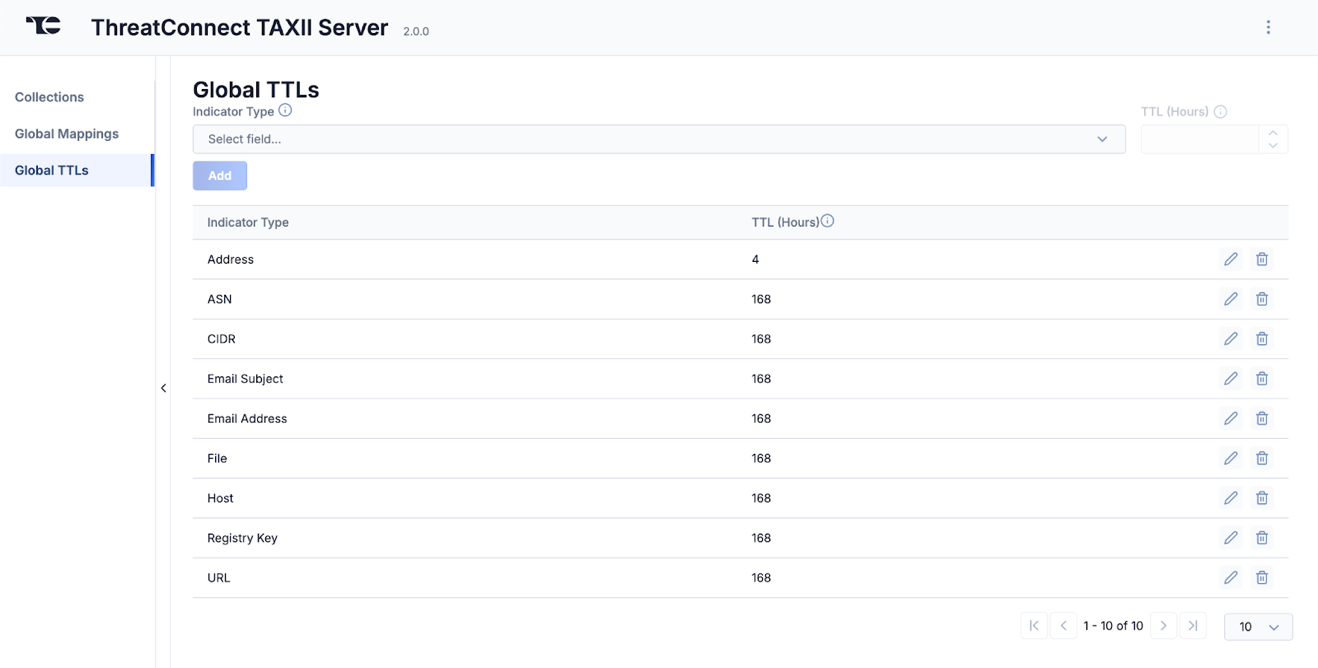
Use the Edit and Delete
 icons for a global Indicator TTL value to edit and delete the value, respectively.
Adding Global Indicator TTL Values
Follow these steps to add an Indicator TTL value at the global level:
- Select Global TTLs in the side navigation bar on the ThreatConnect TAXII Server user interface.
- Fill out the fields on the Global TTLs screen as follows:
- Indicator Type: Select the type of Indicator to configure the TTL value for.
- TTL (Hours): Enter the number of hours until Indicators of the selected type will exist in an external source before they expire. To set an infinite TTL and prevent Indicators of the selected type from expiring, set the TTL value to -1.
- Click Add on the Global TTLs screen.
Adding Collection-Level Indicator TTL Values
Follow these steps to add an Indicator TTL value at the collection level:
- Select Collections in the side navigation bar on the ThreatConnect TAXII Server user interface.
- Click the ⋮ menu for a collection and select Customize TTL.
- Fill out the fields on the Customize TTL drawer as follows:
- Indicator Type: Select the type of Indicator to configure the TTL value for.
- TTL (Hours): Enter the number of hours until Indicators of the selected type will exist in an external source before they expire. To set an infinite TTL and prevent Indicators of the selected type from expiring, set the TTL value to -1.
- Click Add on the Customize TTL drawer.
Customizing Data Mappings
You can configure data mappings at the global and collection levels. Data mappings configured at the global level are inherited at the collection level; however, data mappings configured at the collection level will override global data mappings.
Viewing and Managing Global Data Mappings
Select Global Mappings in the side navigation bar on the ThreatConnect TAXII Server user interface to open the Global Mappings screen (Figure 8). Here, you can view, create, and manage global data mappings for the ThreatConnect TAXII 2.1 server.
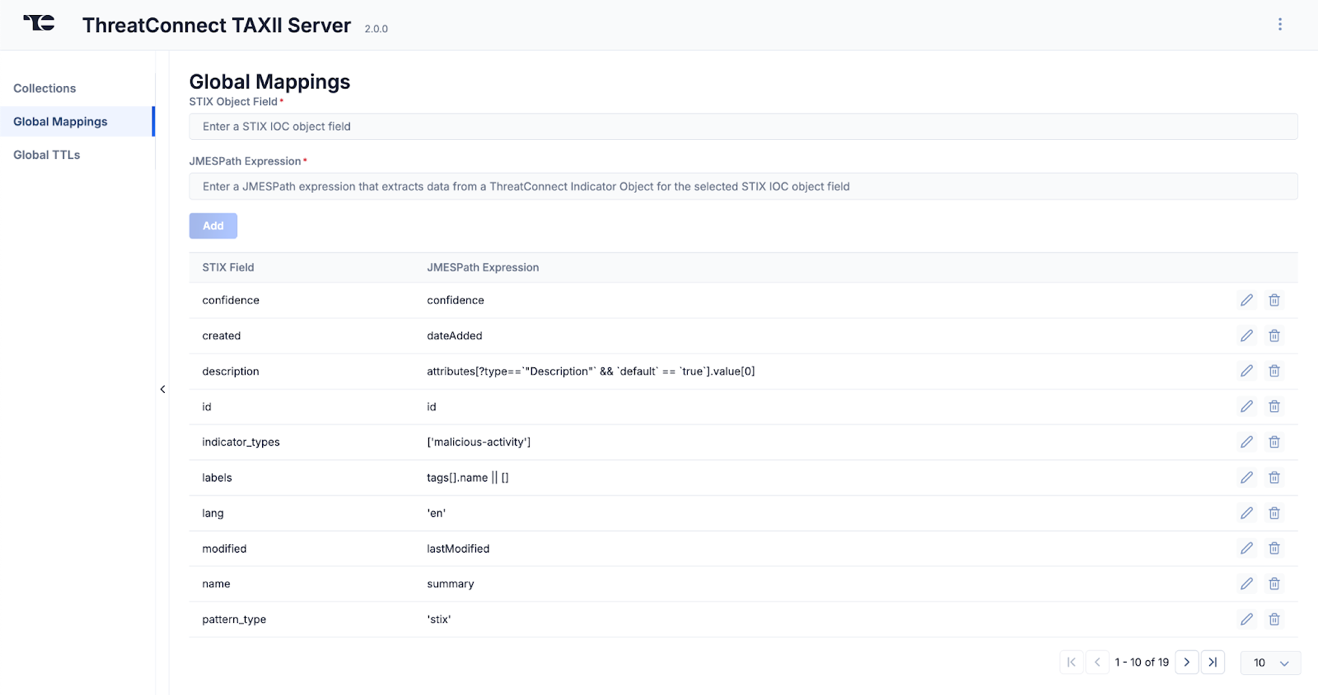
Use the Edit and Delete
 icons for a global data mapping to edit and delete the mapping, respectively.
Adding Global Data Mappings
Follow these steps to add a data mapping at the global level:
- Select Global Mappings in the side navigation bar on the ThreatConnect TAXII Server user interface.
- Fill out the fields on the Global Mappings screen as follows:
- STIX Object Field: Enter a STIX Indicator object field. When you click into the text box, a list of fields available for the STIX 2.1 Indicator object type will be displayed.
- JMESPath Expression: Enter a JMESPath expression to extract a ThreatConnect Indicator object. The extracted object will be mapped to the specified STIX Indicator object field.
- Click Add on the Global Mappings screen.
Adding Collection-Level Data Mappings
Follow these steps to add a data mapping at the collection level:
- Select Collections in the side navigation bar on the ThreatConnect TAXII Server user interface.
- Click the ⋮ menu for a collection and select Customize Mapping.
- Fill out the fields on the Customize Field Mapping drawer as follows:
- STIX Object Field: Enter a STIX Indicator object field. When you click into the text box, a list of fields available for the STIX 2.1 Indicator object type will be displayed.
- JMESPath Expression: Enter a JMESPath expression to extract a ThreatConnect Indicator object. The extracted object will be mapped to the specified STIX Indicator object field.
- Click Add on the Customize Field Mapping drawer.
ThreatConnect® is a registered trademark, and TC Exchange™ is a trademark of ThreatConnect, Inc.
STIX™ and TAXII™ are trademarks of The MITRE Corporation.
Postman® is a registered trademark of Postman, Inc.
20167-02 v.01.A


