Overview
Attributes are a very powerful way to enrich data in ThreatConnect®. This article covers creating Attribute Types in an Organization, but you can also create them in Communities and Sources and on the System level. For more information, see ThreatConnect Community and Source Administration Guide and ThreatConnect System Administration Guide, respectively.
You can add Attributes of a custom Attribute Type to the following types of data:
Before You Start
| Minimum Role(s) | Organization role of Organization Administrator or System role of Administrator or Operations Administrator |
|---|---|
| Prerequisites | None |
Creating Custom Attribute Types
- On the top navigation bar, hover over Settings
 and select Org Config. The Attribute Types tab of the Organization Config screen will be displayed (Figure 1).
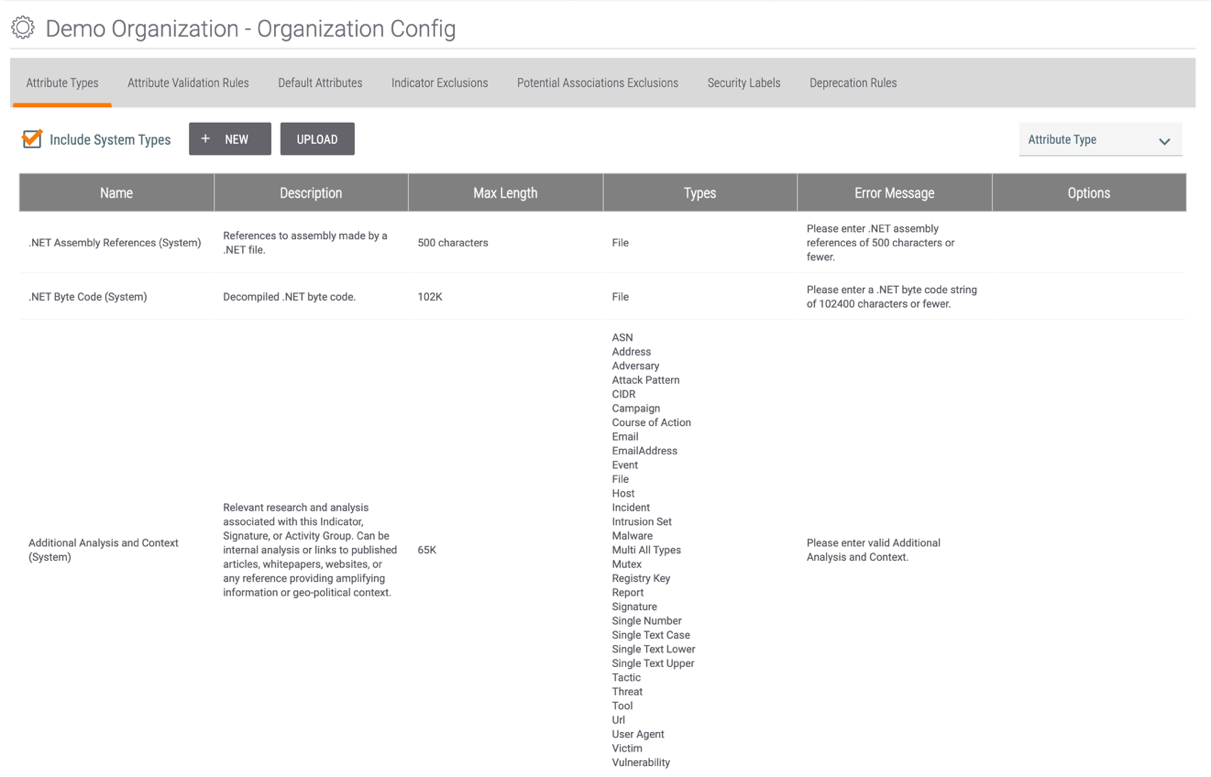
- Click the + NEW button. The Configure Attribute Type window will be displayed (Figure 2).
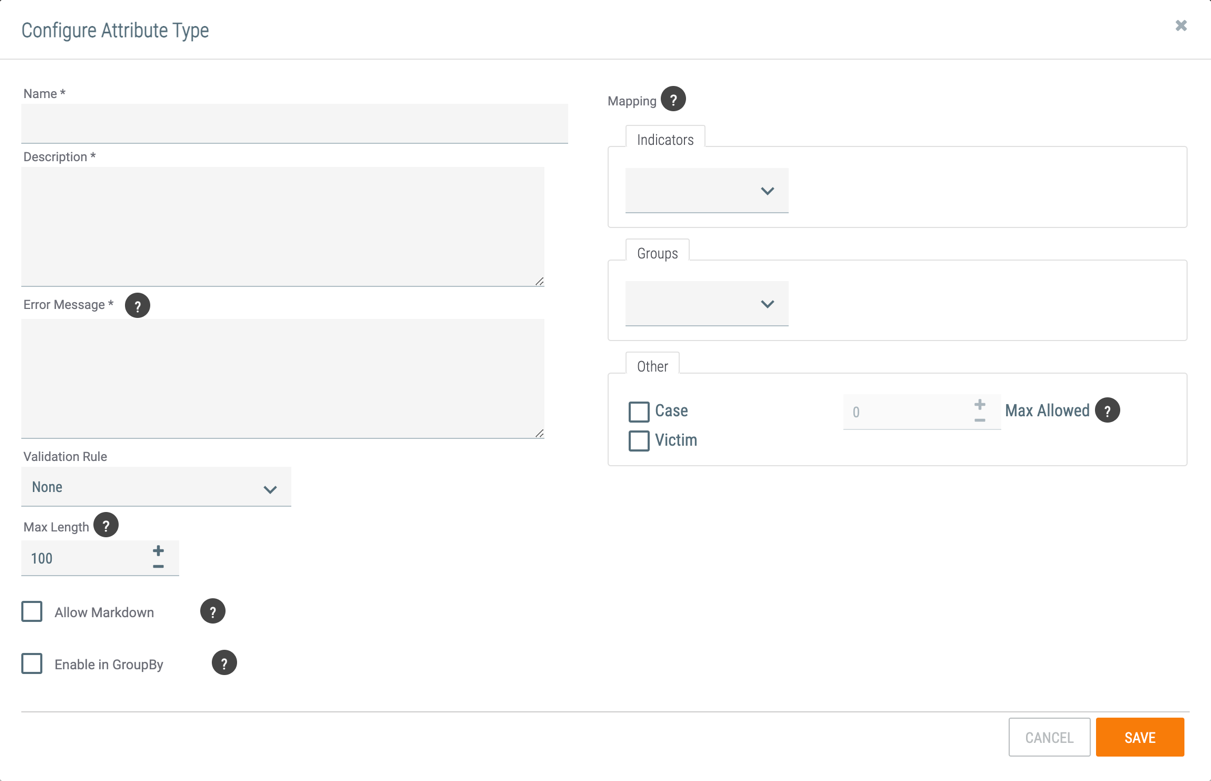
- Name: Enter the name of the custom Attribute Type. This name will be displayed on the Attributes Type tab; on the Details screen for Indicators, Groups, and Victims that have an Attribute of the given Type; and when viewing a Case that has an Attribute of the given Type.
- Description: Enter a description of the custom Attribute Type. This description will be displayed when entering a value for an Attribute of the given Type on the legacy Details screen or in a Case.
- Error Message: Enter the message presented to users who try to input a value that does not meet the custom Attribute Type’s Validation Rule.
- Validation Rule: Select the schema that determines whether a user’s input is valid when entering a value for an Attribute of the given Type. ThreatConnect is preloaded with a variety of Validation Rules, such as Boolean, Country, and Date. System, Community, and Organization Administrators may define custom Attribute Validation Rules.
- Max Length: Enter the maximum size, in characters, of the custom Attribute Type, if applicable, based on the Attribute Type’s assigned Validation Rule.
- Allow Markdown: Select this checkbox to allow Markdown to be used when entering a value for an Attribute of the given Type.NoteWhen creating or editing an Attribute that allows Markdown, the Attribute’s Value text box will support the Marked library (https://marked.js.org/) if you are working with the Attribute on the new Details screen.
- Enable in GroupBy: Select this checkbox to allow the Attribute Type to be grouped or queried by dashboard cards.NoteIf an Attribute Type’s maximum length is greater than 500 characters, the Enable in GroupBy checkbox will be disabled.
- Mapping:
- Indicators: Select the Indicator type(s) that can use the Attribute Type.
- Groups: Select the Group type(s) that can use the Attribute Type.
- Case: Select this checkbox to allow Cases to use the Attribute Type.
- Max Allowed: If the Case checkbox is selected, the Max Allowed option will become enabled. Enter the maximum number of times that the Attribute Type can be added to a single Case.NoteIf a user tries to add an Attribute to a Case when the Attribute Type’s Max Allowed limit has been reached, an error message will be displayed stating that the maximum allowed for the Attribute Type has been exceeded on the current Case, and the user will be directed to select an alternative Attribute Type or remove an existing Attribute of the maxed-out Attribute Type from the Case.
- Victim: Select this checkbox to allow Victims to use the Attribute Type.
- Click the SAVE button.
Uploading Attribute Types
- Click the UPLOAD button on the Attribute Types screen (Figure 1). The Upload Attributes window will be displayed (Figure 3).
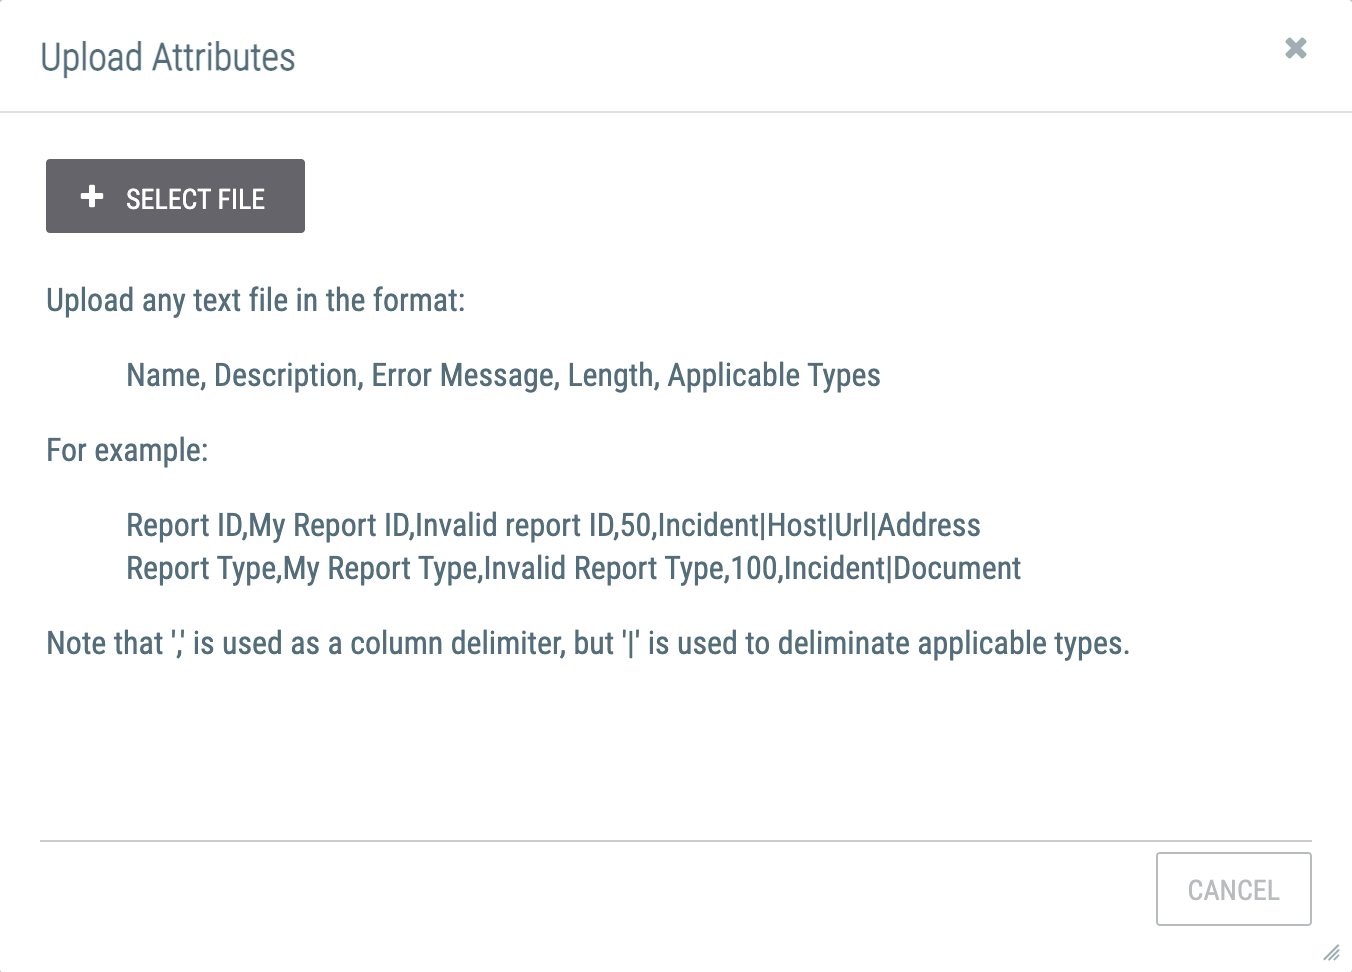
- Click the + SELECT FILE button to locate and select a file to upload. After the file is uploaded, the Upload Attributes window will display the name(s) of the Attribute Type(s) in the file (Figure 4).
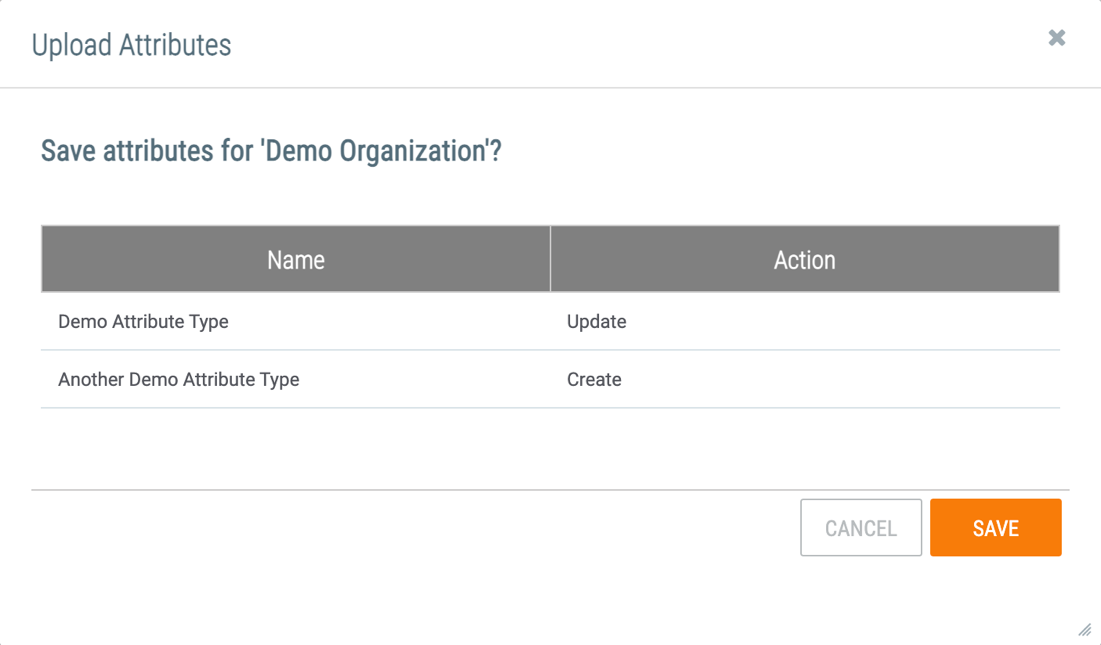
- Click the SAVE button to import the Attribute Type(s).
You can upload Attribute Types using a text or JSON file. If uploading an Attribute Type via a text file, use the following format: Name, Description, Error Message, Length, Applicable Types.
If uploading Attribute Types via a JSON file, refer to the following schema and example for the fields that can be included in the file.
JSON Schema
- types: <Array of Objects> REQUIRED The details of the Attribute Type(s) to create or update:
- allowMarkdown: <Boolean> Specifies whether Markdown may be used when entering values for Attributes of this Attribute Type.
- description: <String> REQUIRED The Attribute Type's description.
- errorMessage: <String> REQUIRED The error message that is presented to users when they try to enter an invalid value for Attributes of this Attribute Type (i.e., a value that does not meet the Attribute Type’s Validation Rule, if one is applied).
- groups: <Array of Strings> The Group type(s) that can use the Attribute Type.
- indicators: <Array of Strings> The Indicator type(s) that can use the Attribute Type.
- maxLength: <Integer> REQUIRED The maximum number of characters that may be used when entering values for Attributes of this Attribute Type. (Minimum value: 1; Maximum value: 512000)
- name: <String> REQUIRED The Attribute Type's name.
- system: <Boolean> Specifies whether to create the Attribute Type at the System level. If uploading the JSON file on the System Settings screen, this field will be ignored.
- validationRule: <Object> The details of the Validation Rule to apply to the Attribute Type. If applying a Validation Rule to an Attribute Type, the validationRulesfield must be included in the JSON file.
- name: <String> The Validation Rule’s name.
- version: <Integer> The Attribute Type's version number. Upon creation of a new Attribute Type, the version field is assigned a value of 1 automatically.
- validationRules: <Array of Objects>The details of the Validation Rule(s) to apply to the Attribute Type(s). If this field is included, each object in the array must include all of the following fields marked as required at a minimum:
- data: <String> The contents of the Validation Rule. This field is required unless the type field’s value is DATE or DATE_TIME. If the type field’s value is SELECT_ONE_PICKLIST, SELECT_ONE_RADIO, or INTEGER, then the value for the data field must be a semicolon-delimited string.
- description: <String> REQUIRED The Validation Rule’s description.
- name: <String> REQUIRED The Validation Rule’s name.
- type: <String> REQUIRED The Validation Rule’s type. (Acceptable values: REGEX, XSD, SELECT_ONE_PICKLIST, SELECT_ONE_RADIO, DATE, DATE_TIME, INTEGER)
- version: <Integer> The Validation Rule’s version number.
JSON Example
{
    "types": [
        {
            "allowMarkdown": <boolean>,
            "description": "<string>",
            "errorMessage": "<string>",
            "groups": [
                "<string>"
            ],
            "indicators": [
                "<string>"
            ],
            "maxLength": <int>,
            "name": "<string>",
            "system": <boolean>,
            "validationRule": {
                "name": "<string>"
            },
            "version": <int>
        }
    ],
    "validationRules": [
        {
            "data": "<string>",
            "description": "<string>",
            "name": "<string>",
            "type": "<string>",
            "version": <int>
        }
    ]
}ThreatConnect® is a registered trademark of ThreatConnect, Inc.
20029-01 v.11.A