Overview
The Shodan® built-in enrichment in ThreatConnect® lets you use Shodan’s extensive search capabilities directly within ThreatConnect, enabling you to obtain detailed information about vulnerabilities and enrich IP addresses with actionable intelligence for threat investigations and other security operations.
This article describes how to enable the Shodan enrichment service in ThreatConnect, view data retrieved from Shodan on the Enrichment tab of an Indicator’s Details screen, and import vulnerabilities from Shodan into ThreatConnect.
Before You Start
User Roles
- To enable and configure the Shodan enrichment, your user account must have a System role of Administrator.
- To view Shodan data on the Enrichment tab of an Indicator’s Details screen, your user account can have any Organization role.
- To retrieve data manually on the Shodan card on the Enrichment tab of an Indicator’s Details screen, your user account can have any Organization role.
- To import Shodan data into an Organization, your user account must have an Organization role of Standard User, Sharing User, Organization Administrator, or App Developer.
- To import Shodan data into a Community or Source, your user account must have a Community role of Contributor, Editor, or Director for that Community or Source.
Prerequisites
- A Shodan API key. To obtain a Shodan API key, create a Shodan account at account.shodan.io/register.
Enabling the Shodan Enrichment
Before you can retrieve data from Shodan, you must enable and configure the Shodan enrichment in ThreatConnect. Follow these steps to enable and configure the Shodan enrichment on your ThreatConnect instance:
- Hover over Settings
 on the top navigation bar and select System Settings.
 - Select the Indicators tab on the System Settings screen, and then click Enrichment Tools in the sidebar.
- Click Edit
 in the Options column for Shodan and fill out the fields on the Edit Vendor window (Figure 1) as follows:
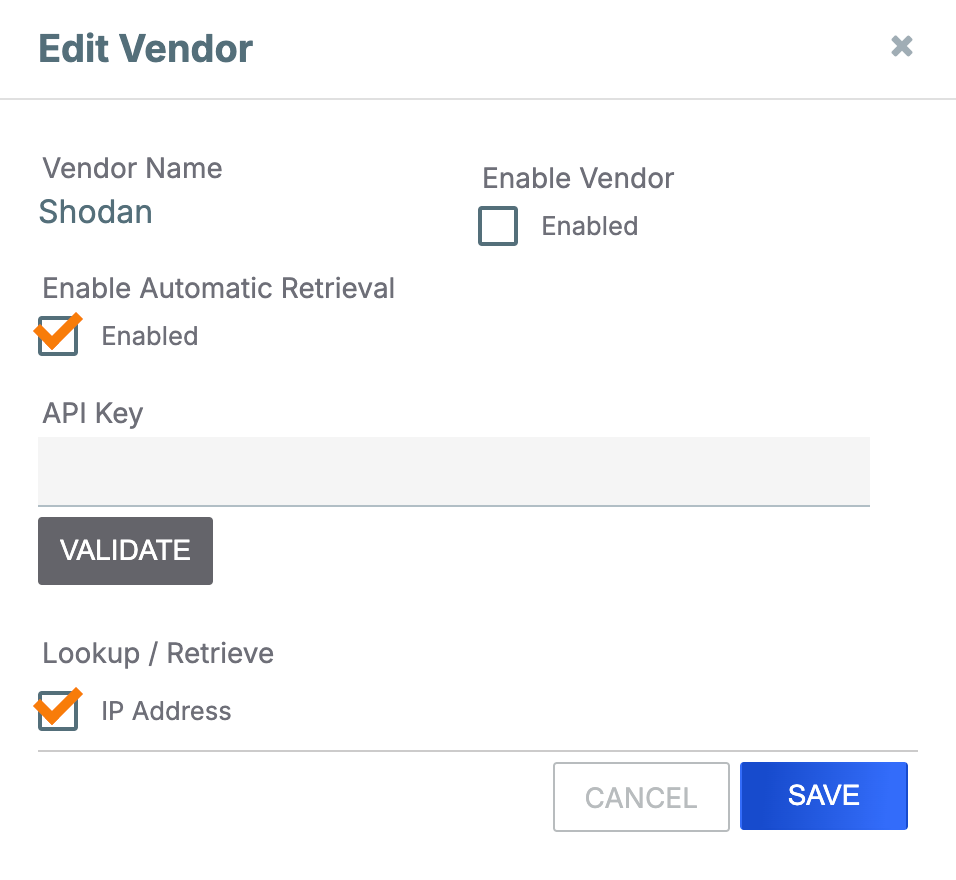
- Enable Vendor: Select this checkbox to enable Shodan.
- Enable Automatic Retrieval: Select this checkbox to enable automatic data retrieval for Shodan. If automatic data retrieval is enabled, Shodan data will automatically populate when a user opens an Address Indicator’s Enrichment tab for the first time. This checkbox is selected by default.
- API Key: Enter the API key that will be used to retrieve data from Shodan.
- VALIDATE: After entering the Shodan API key, click this button to validate it. If the API key is accepted, the VALIDATE button’s label will change to VALID.
- Lookup/Retrieve: Select IP Address to retrieve data from Shodan for Address Indicators.
- Click SAVE on the Edit Vendor window to save the configuration for the Shodan enrichment.
When Shodan is enabled, a value of true will be displayed in the Enabled column for its entry on the Enrichment Tools screen.
Data Overview
The Overview section of the Shodan card (Figure 2) on the Enrichment tab of an Address Indicator’s Details screen provides a summary of data retrieved from Shodan for the Indicator and the date and time the data were last retrieved.
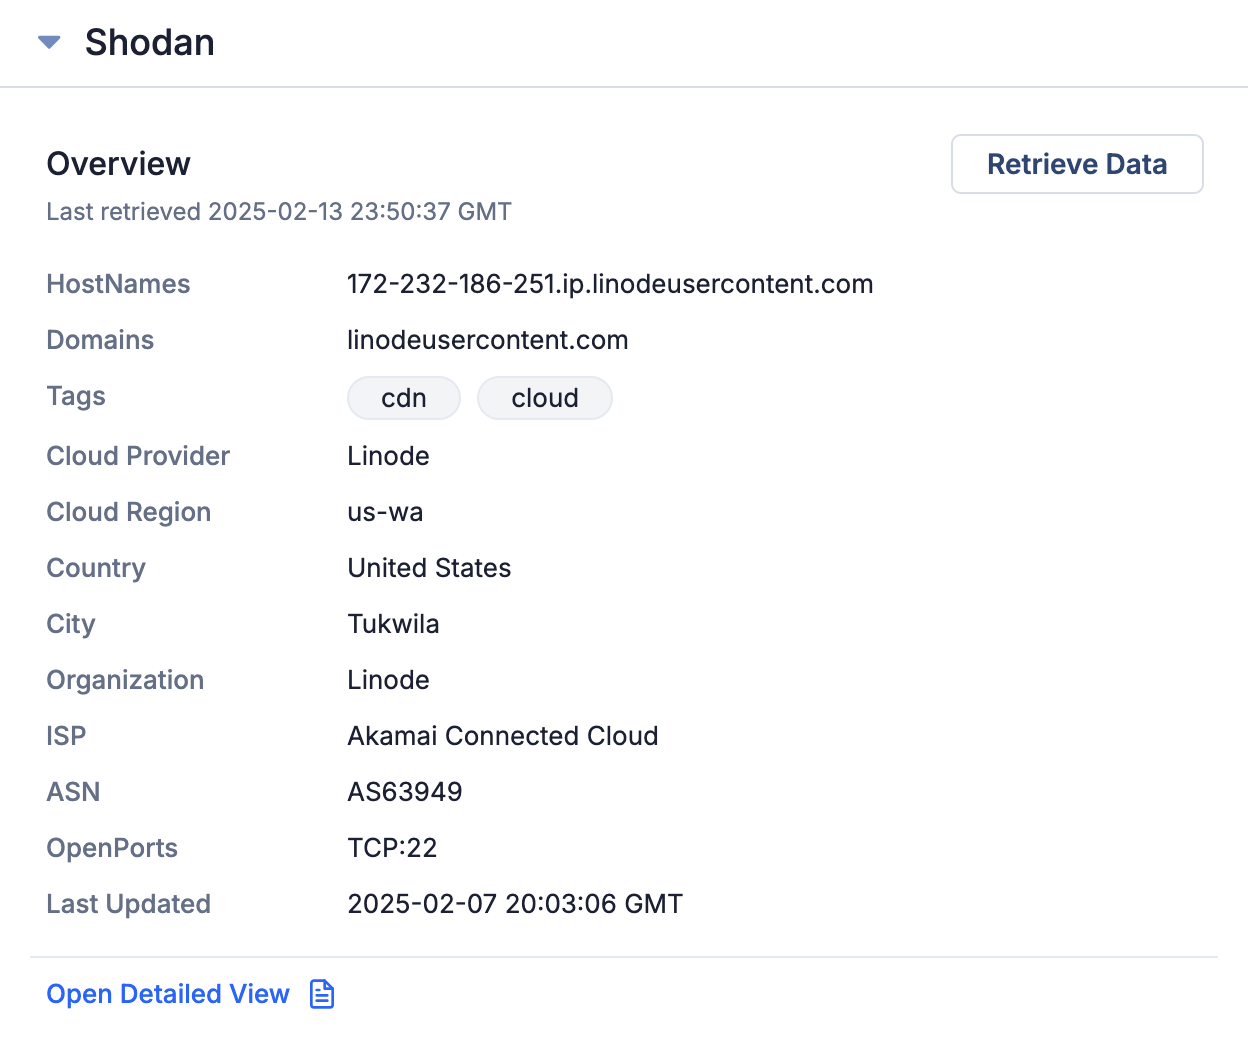
- HostNames: The hostname(s) associated with the Address.
- Domains: The domain(s) associated with the Address.
- Tags: The tag(s) applied to the Address in Shodan.
- Cloud Provider: The cloud provider associated with the Address.
- Cloud Region: The region associated with the Address’s cloud provider.
- Country: The country associated with the Address.
- City: The city associated with the Address.
- Organization: The registering organization associated with the Address.
- ISP: The internet service provider (ISP) associated with the Address.
- ASN: The autonomous system number (ASN) associated with the Address.
- OpenPorts: The ports open on the Address.
- Last Updated: The date and time when data for the Address were last updated in Shodan.
Shodan Detailed View
Click Open Detailed View on the Shodan card to open the Shodan Detailed View drawer (Figure 3). This drawer displays cards with additional data retrieved from Shodan. The cards are collapsed by default. Figure 3 shows the Shodan Detailed View drawer with all available cards expanded.
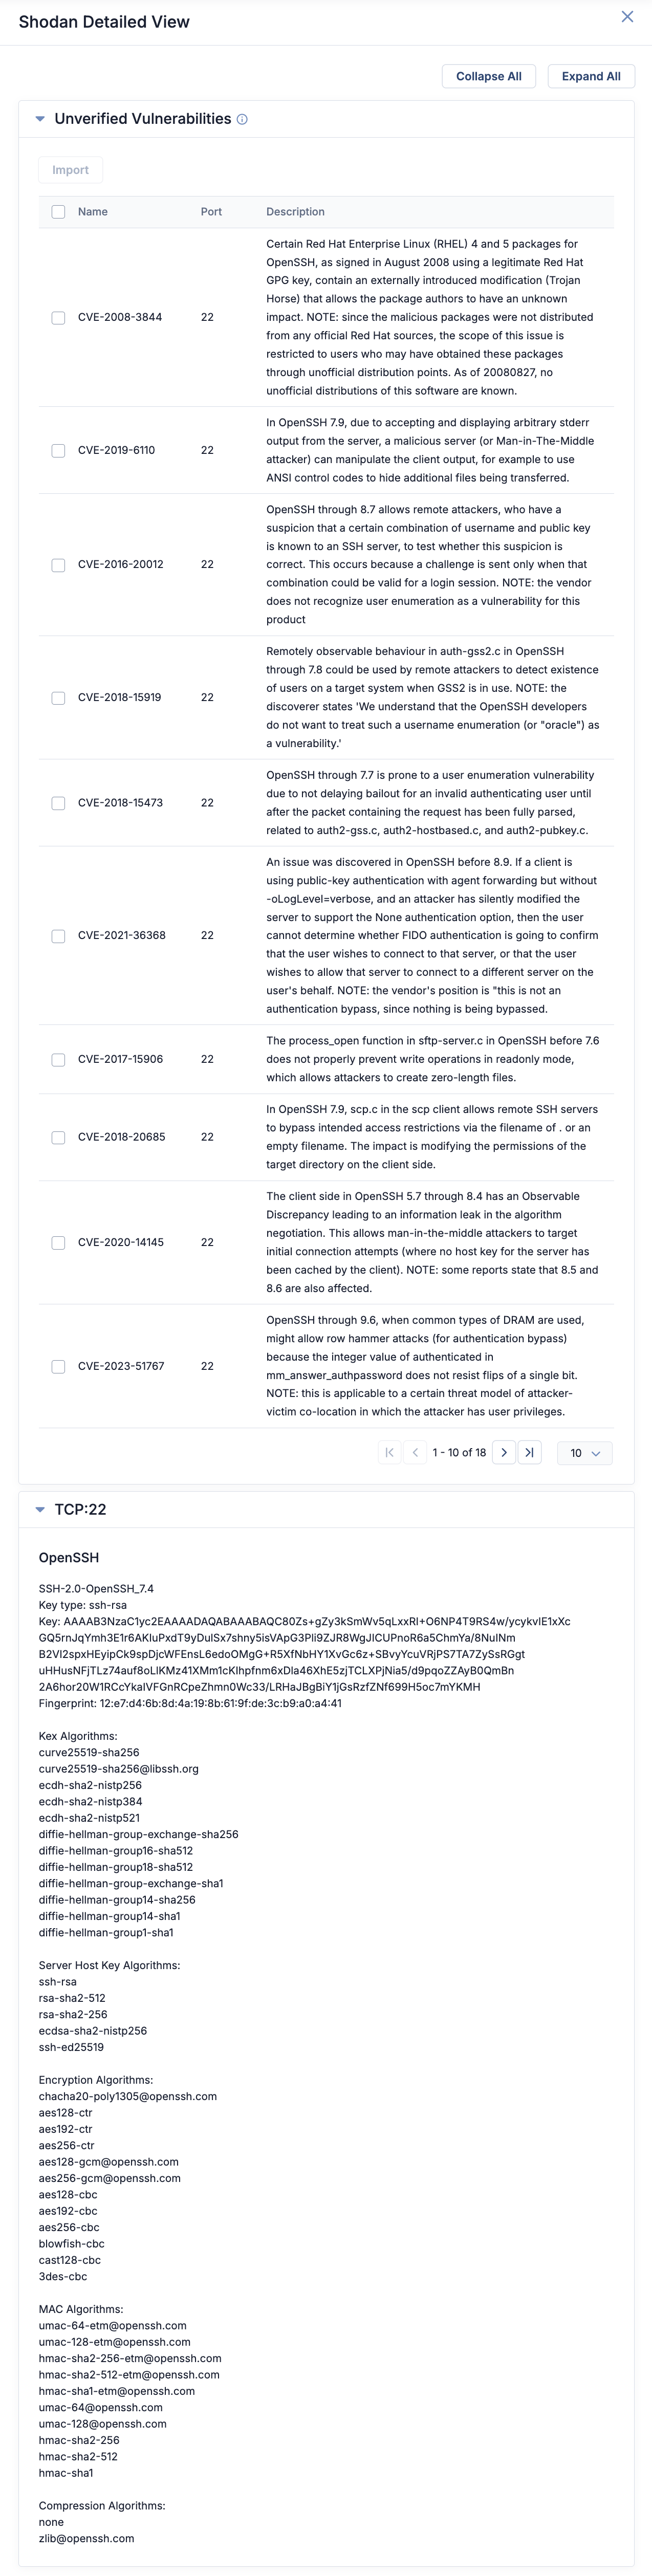
The Shodan Detailed View drawer displays the following cards:
- TCP:<port number>: The details about a Transmission Control Protocol (TCP) port number open on the Address. This card may also display details about the product and Secure Sockets Layer (SSL) certificate, if available.
- UDP:<port number>: The details about a User Datagram Protocol (UDP) port number open on the Address. This card may also display details about the product and SSL certificate, if available.
- Unverified Vulnerabilities: Vulnerabilities that may or may not affect the Address and are implied based on metadata (e.g., software, version) collected by Shodan. Details displayed for each vulnerability include the Common Vulnerabilities and Exposures (CVE) ID number, the affected port number, and a description of the CVE.
- Verified Vulnerabilities: Verified vulnerabilities that affect the Address. Details displayed for each vulnerability include the CVE ID number, the affected port number, and a description of the CVE.
Importing Vulnerabilities From Shodan Into ThreatConnect
You may import vulnerabilities displayed on the Unverified Vulnerabilities or Verified Vulnerabilities cards into ThreatConnect as Vulnerability Groups and associate them to the enriched Indicator (i.e., the Indicator whose Details screen you are viewing).
Follow these steps to import vulnerabilities from Shodan into ThreatConnect:
- Expand the Unverified Vulnerabilities or Verified Vulnerabilities card on the Shodan Detailed View drawer (Figure 3) to view vulnerabilities retrieved from Shodan that are related to the enriched Indicator.
- Select the checkbox for each vulnerability to import into ThreatConnect, or select the checkbox in the table’s header to import all vulnerabilities displayed on the current page in the table.
- Click Import at the top left of the card.
- On the Import Groups window (Figure 4), provide the following details for the Groups that will be created in ThreatConnect:
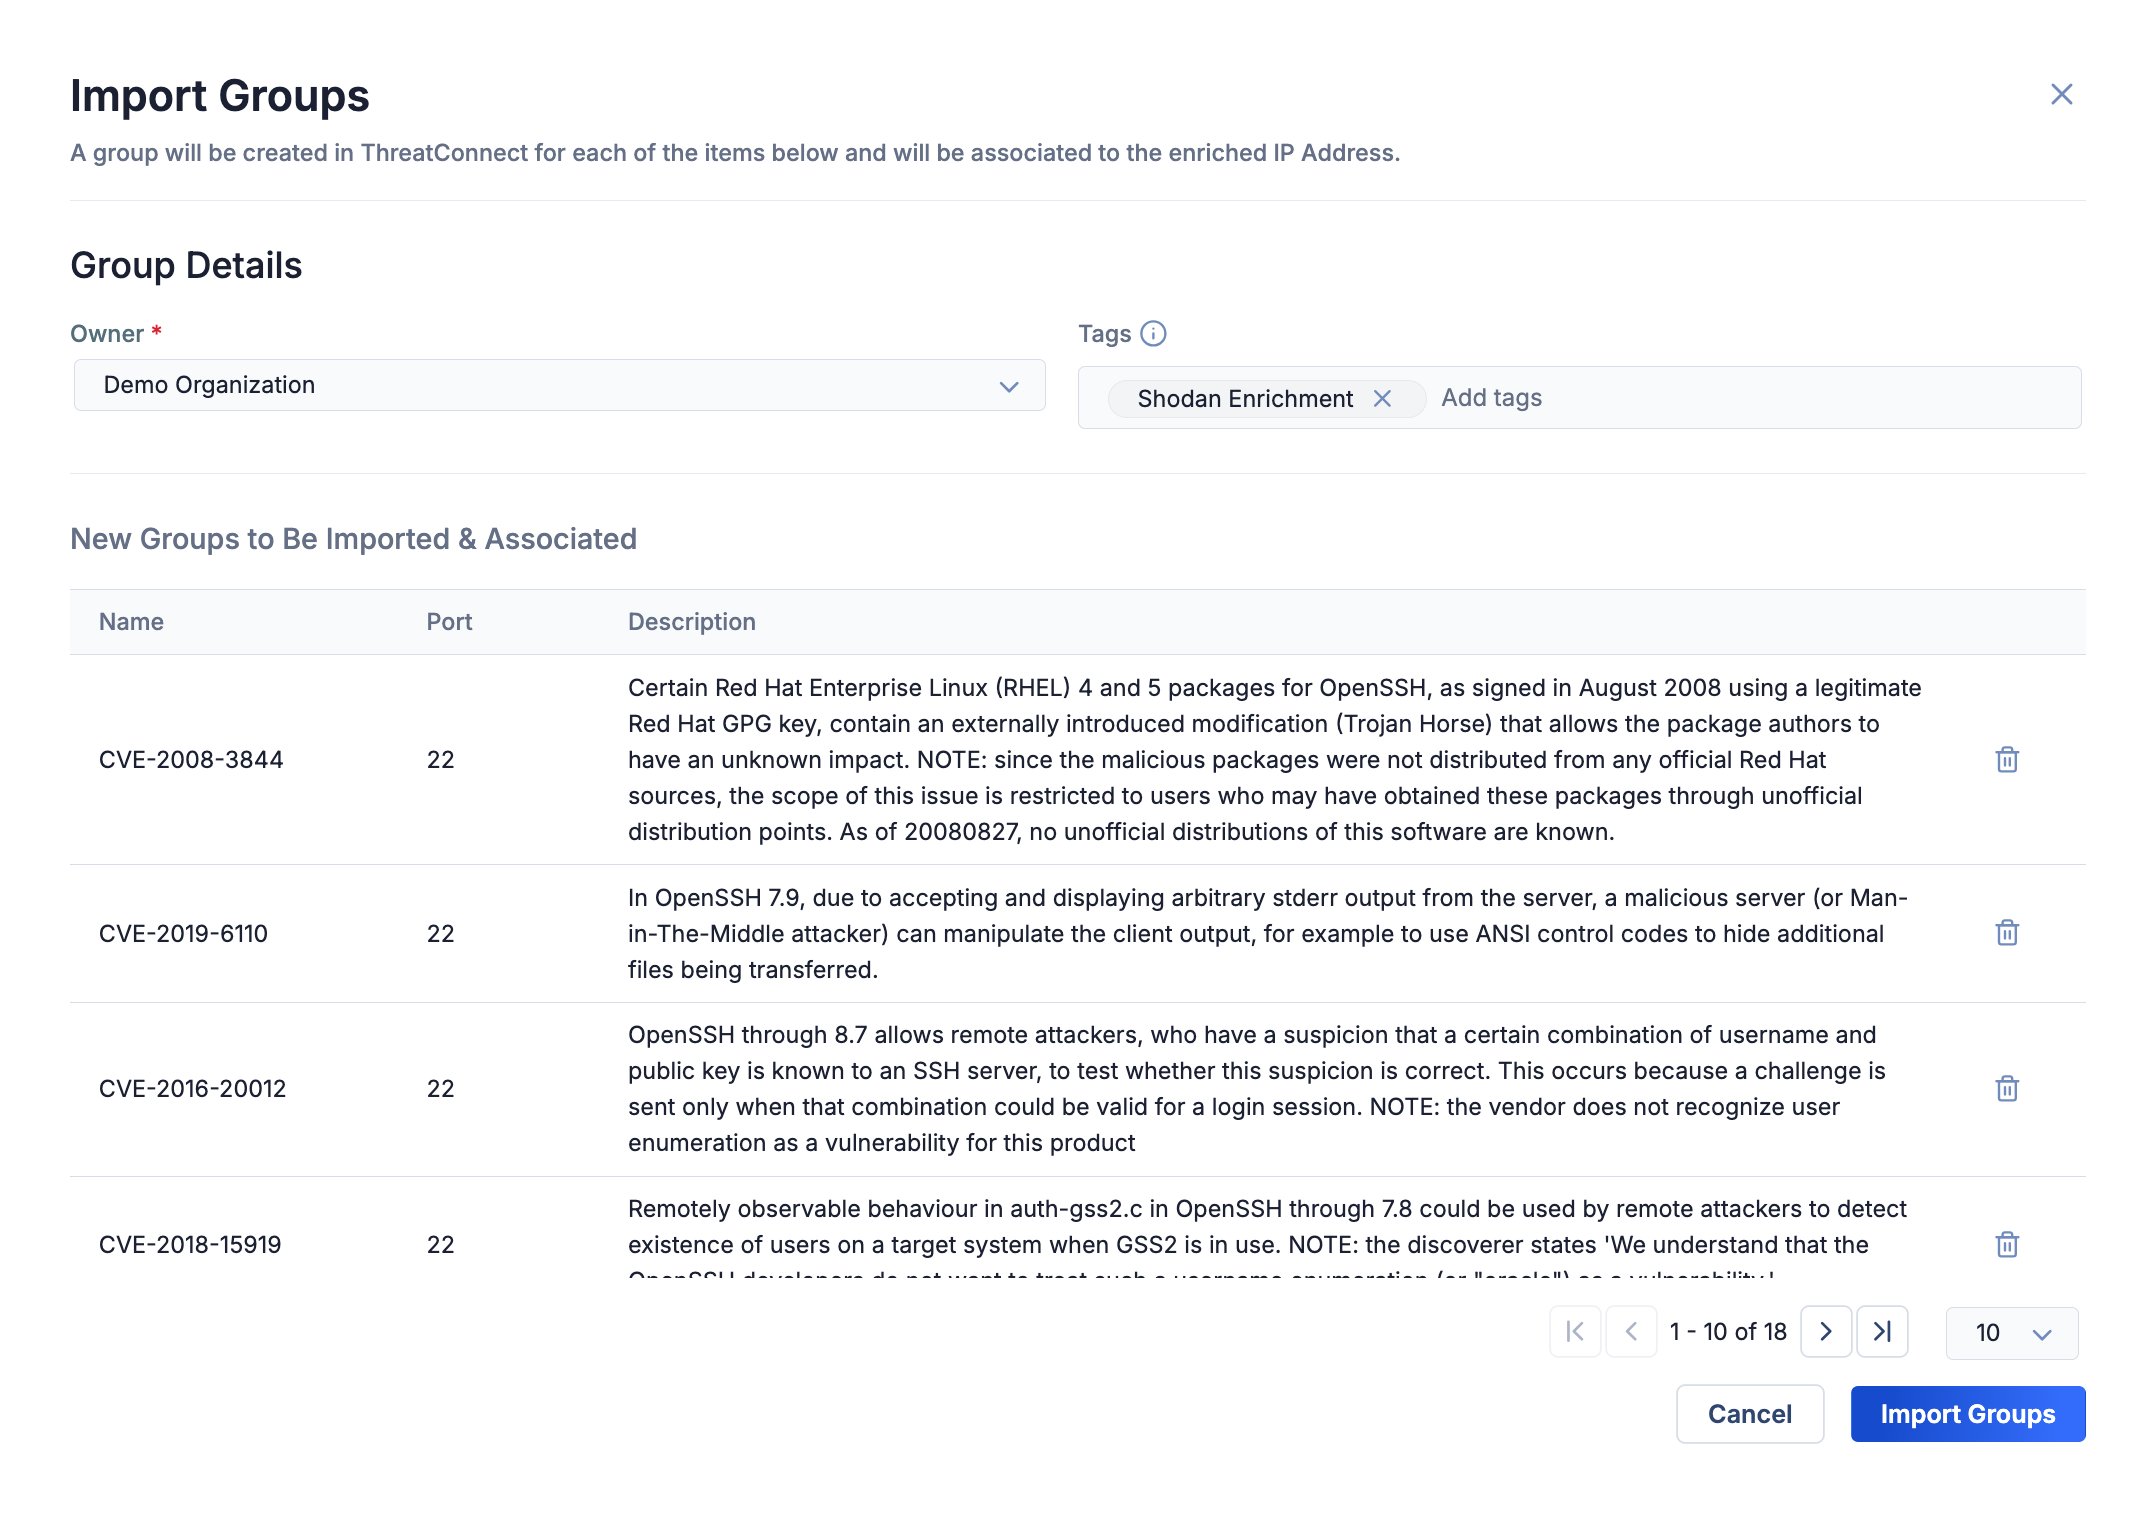
- Review the list of vulnerabilities that will be imported into ThreatConnect as Vulnerability Groups and associated to the enriched Indicator. To remove a vulnerability from this list, click Remove
 .NoteEach Vulnerability Group’s name will include the vulnerability’s name and port number (e.g., CVE-2008-3844 on port 22), and the value listed in the Description column will be set as the Group’s default Description.
 - Click Import Groups to import the vulnerabilities and associate them directly to the enriched Indicator.
After you complete the import process, the Associations tab of the enriched Indicator’s Details screen will be displayed. You can view the associated Vulnerability Groups on the Group Associations card of this tab.
Retrieving Data Manually
When you open an Address Indicator’s Enrichment tab for the first time, data will be retrieved from Shodan and displayed on the Shodan card automatically if your System Administrator enabled automatic data retrieval for Shodan. Otherwise, the Shodan card will display a message stating “Automatic Data Retrieval has been disabled by the System Administrator,” and you will need to click Retrieve Data on the card to populate it with data. Once data have been retrieved, they will be cached for a period of time configured by your System Administrator. Each time you revisit that Indicator’s Enrichment tab, the cached Shodan data will be displayed until this period of time has passed.
To retrieve the latest Shodan data for the Indicator manually, click Retrieve Data on the Shodan card.
Enriching Indicators Using the ThreatConnect API
You can use the ThreatConnect v3 API to enrich Address Indicators with data from Shodan. For instructions on using the ThreatConnect v3 API to enrich Indicators, see Indicator Enrichment Overview.
ThreatConnect® is a registered trademark of ThreatConnect, Inc.
Shodan® is a registered trademark of Shodan.
20146-04 v.04.B