Overview
Contributing a Group to a Community or Source in ThreatConnect® creates a copy of the Group in the target Community or Source. This copy is a separate Group, and any changes to it will not affect the original Group. In addition to contributing a Group, you can contribute a Group’s metadata (i.e., Tags, Attributes, and associated Indicators and Groups) to the target Community or Source. You may also contribute a Group to multiple Communities or Sources, view properties of a contributed Group, and recontribute a Group that was already contributed to a Community or Source.
Before You Start
User Roles
- To contribute a Group to a Community or Source, you must have an Organization role of Sharing User or Organization Administrator and a Community role of Editor, Director, or Contributor in the target Community or Source.
Contributing a Group
Follow these steps to contribute a Group to a Community or Source. Groups in an Organization may be contributed to a Community or Source, and Groups in a Community may be contributed to another Community. Groups in a Source may not be contributed.
- Navigate to the legacy Details screen for a Group in your Organization or one of your Communities. Then select the Sharing tab
- Select the Sharing tab (Figure 1).NoteThe Sharing tab is available only on the legacy Details screen.

- Select one of the following options on the Sharing tab:
- Contribute to Community/Source…: Select this option to contribute the Group to a single Community or Source.
- CONTRIBUTE TO MULTIPLE...: Select this option to contribute the Group to multiple Communities or Sources at once.
- Proceed through the steps on the Contribute to Community/Source window to contribute the Group to a Community or Source. There are four steps in the Group contribution process: Initial, Data, Security Labels, and Save.
Step 1: Specify Where and How to Contribute the Group
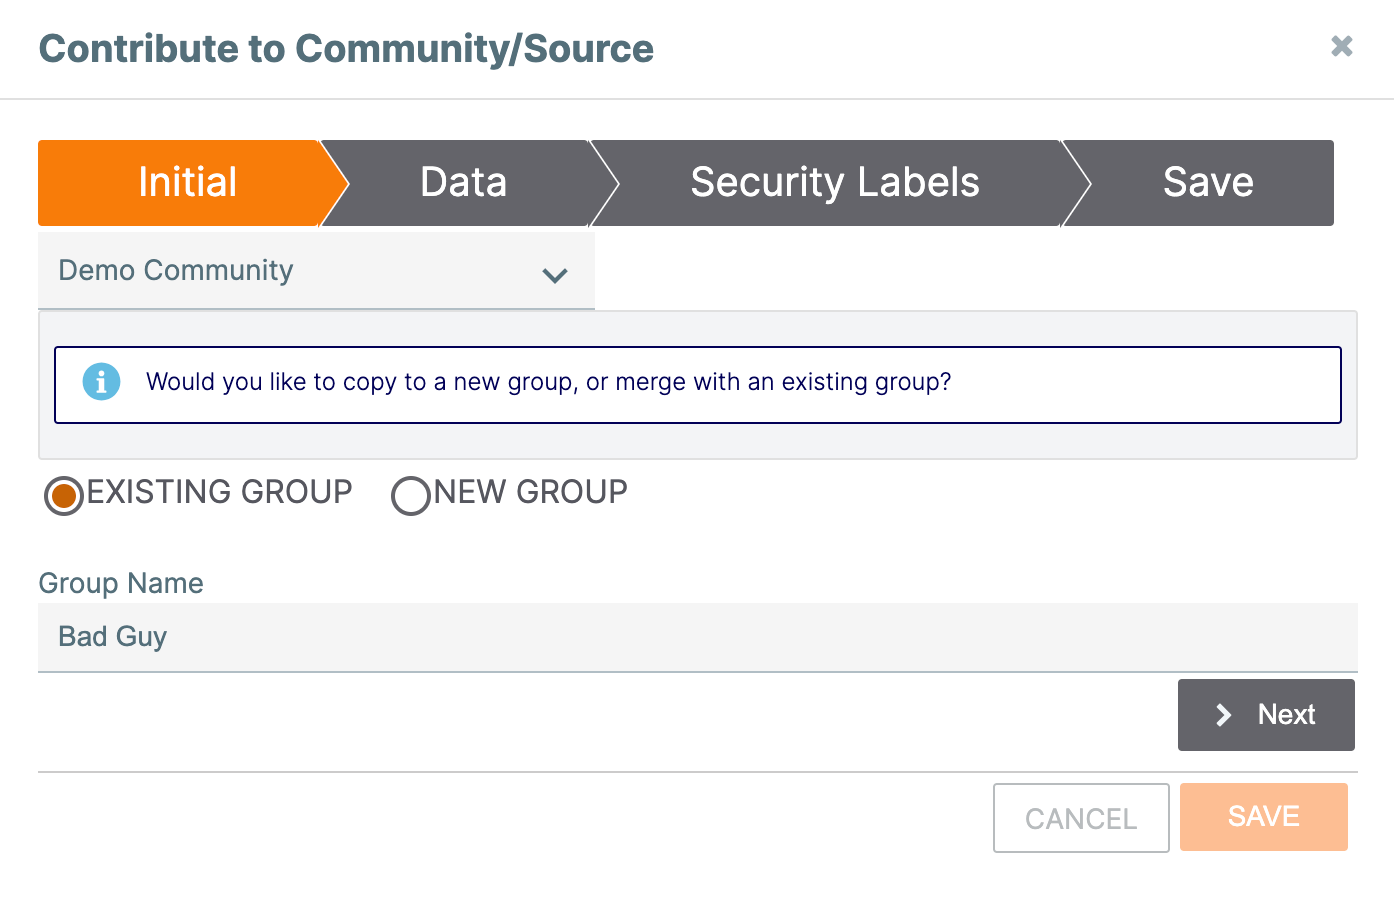
The Initial step (Figure 2) is where you select the Community or Source to contribute the Group to and specify whether to create a new Group or update an existing Group in that Community or Source.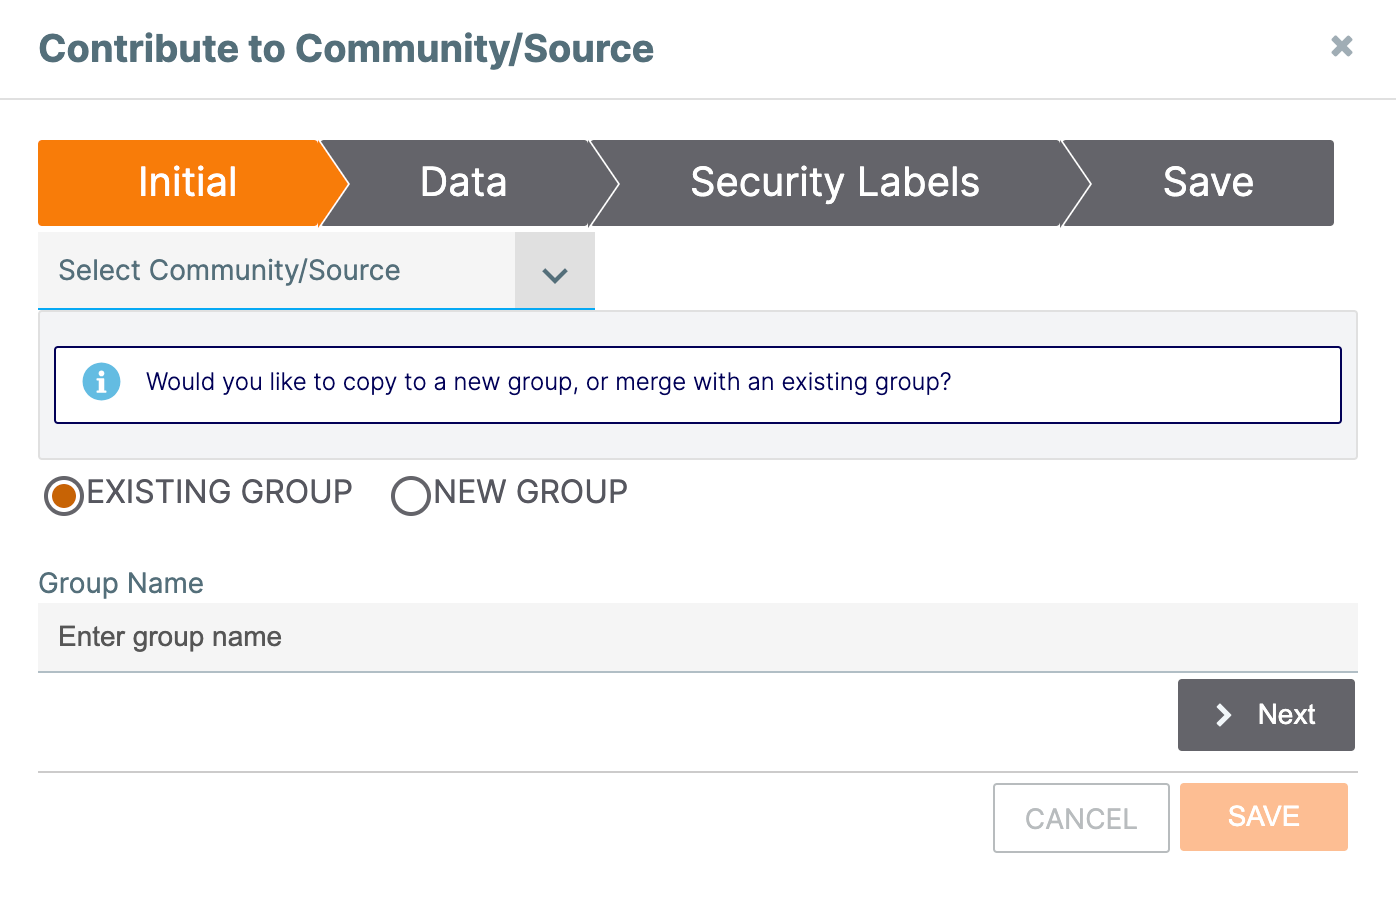
Follow these steps to configure the options on the Initial step of the Contribute to Community/Source window:
- Select the Community or Source in which to contribute the Group from the Select Community/Source dropdown. If you selected CONTRIBUTE TO MULTIPLE... on the Sharing tab, the Select Community/Source dropdown will contain a multi-select list of Communities and Sources. If the Group is contributed to the Common Community, then users in all Organizations on your ThreatConnect instance will have access to the Group. If the Group is contributed to any other Community or Source, only users in Organizations with access to that Community or Source will be able to access the Group.
- Select one of the following options to determine how to contribute the Group to the target Community or Source:
- EXISTING GROUP: Select this option to merge the Group with an existing Group in the target Community or Source. Then enter the name of the existing Group in the Group Name text box, which will auto-populate with available Groups after you enter at least three characters. The EXISTING GROUP option will not be available if contributing to multiple Communities or Sources.
- NEW GROUP: Select this option to contribute the Group to a newly created Group in the target Community or Source. The name of the Group you are contributing will auto-populate in the Group Name text box. Edit this name, if desired.
- Click Next to proceed to the Data step.
Step 2: Select the Group Metadata to Contribute
Clicking Next on the Initial step will display the Data step (Figure 3). Here, you can determine whether to contribute the Group’s metadata and associated Groups to the target Community or Source.
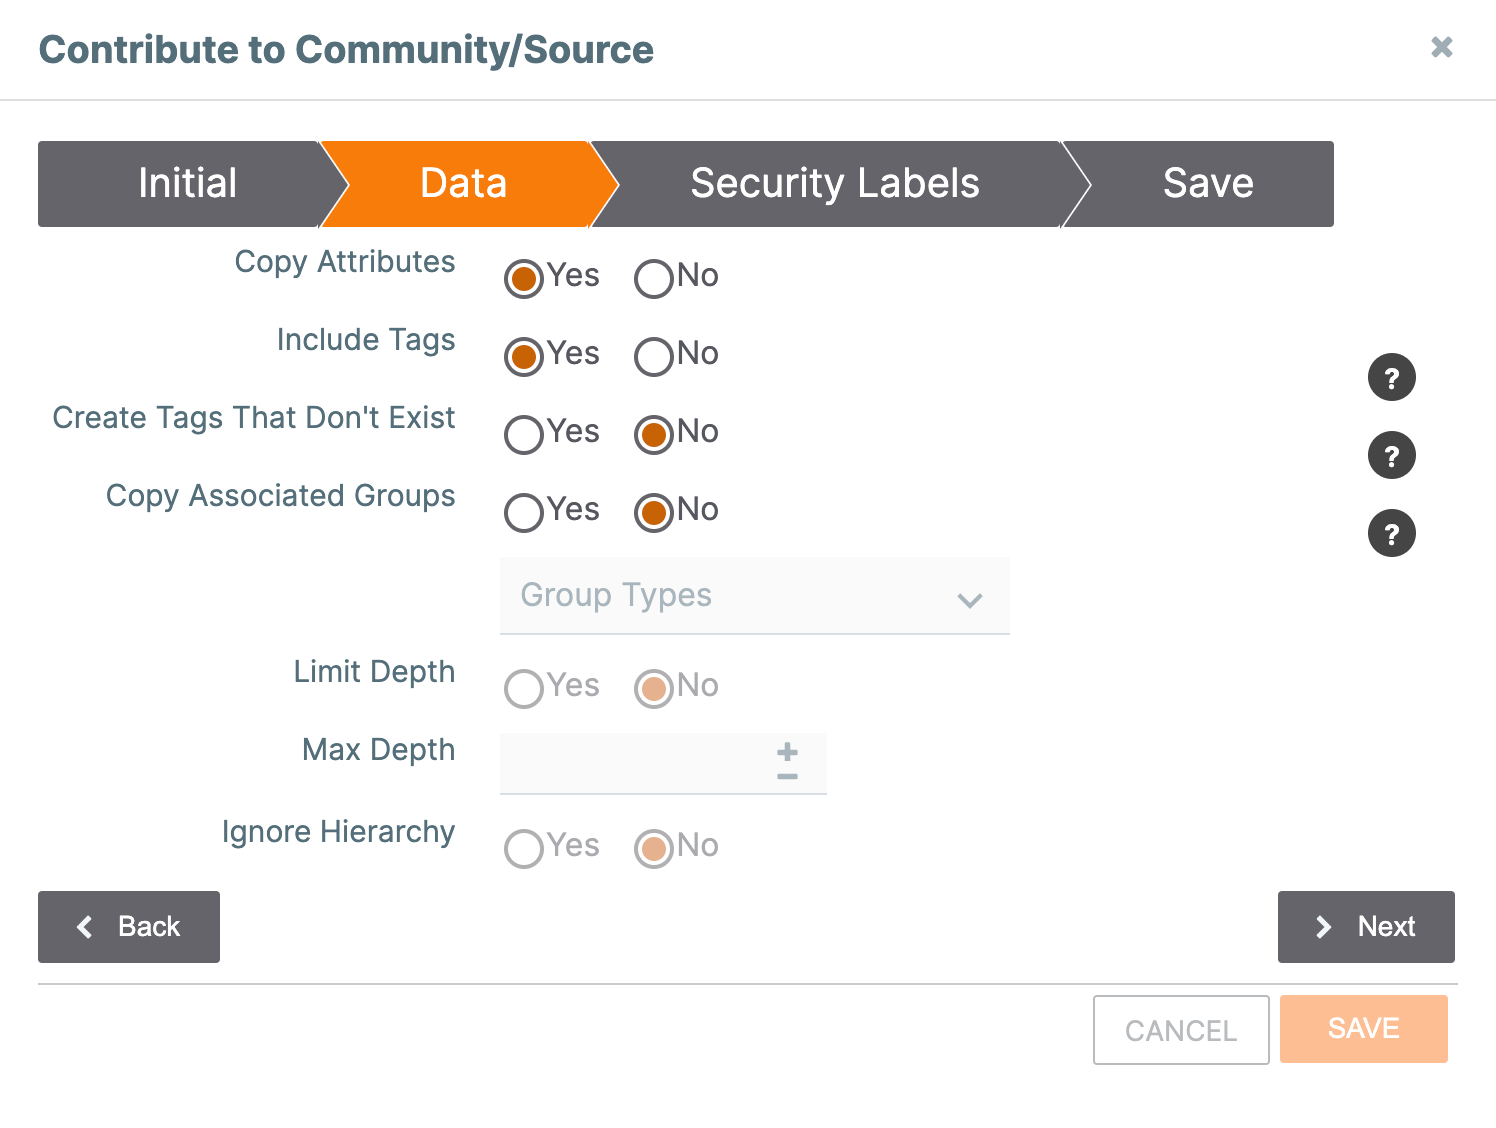
Follow these steps to configure the options on the Data step of the Contribute to Community/Source window:
- Select Yes or No for the following options to specify whether to copy the Group’s metadata during the contribute operation:
- Copy Attributes: Specifies whether to copy the Group's Attributes to the contributed Group.NoteIf you are recontributing the Group to the same Community or Source and select Yes, Attributes added to the original Group since the previous contribute operation will be added to the recontributed Group. In addition, changes to the values of existing Attributes added to the original Group will be made to those same Attributes in the recontributed Group. No Attributes will be removed from the contributed Group after the recontribute operation, even if those Attributes no longer exist in the original Group.
- Include Tags: Specifies whether to apply the Group's Tags to the contributed Group..NoteIf you are recontributing the Group to the same Community or Source and select Yes, new Tags applied to the original Group since the previous contribute operation will be applied to the recontributed Group. No Tags will be removed from the contributed Group after the recontribute operation, even if those Tags are no longer applied to the original Group.
- Create Tags That Don't Exist: Specifies whether to create Tags applied to the Group that do not already exist in the target Community or Source and apply them to the contributed Group. This option is available only if you selected Yes for the Include Tags option.
- Copy Attributes: Specifies whether to copy the Group's Attributes to the contributed Group.
- Use the following options to specify whether to copy the Group’s associated Groups during the contribute operation and configure the types and number of associated Groups to copy:
- Copy Associated Groups: Specify whether to copy the Group's associated Groups to the Community or Source and associate them to the contributed Group. If you select Yes, you must select the type(s) of associated Groups to copy from the Group Types dropdown.ImportantTask Groups cannot be copied as associated Groups because this Group type may contain sensitive information and is specific to users in a given Organization.NoteIf you are recontributing the Group to the same Community or Source and select Yes, Groups associated to the original Group since the previous contribute operation will be copied to the Community or Source and associated to the recontributed Group. No associated Groups will be removed from the contributed Group after the recontribute operation, even if those Groups are no longer associated to the original Group.
- Limit Depth: Specify whether to set a limit for the number of association levels to copy during the contribute operation. This option is available only if you selected Yes for the Copy Associated Groupsoption.WarningIn order to avoid lag times and overloading the system, it is recommended to select a Max Depth of no more than 2 unless you have a controlled, isolated data set.
- Max Depth: Enter the maximum number of association levels to copy during the contribute operation (e.g., an entry of 1 indicates that only the primary Group and Groups directly associated to it will be contributed, while an entry of 2 indicates that the primary Group, Groups directly associated to it, and Groups directly associated to those associated Groups will be contributed). This option is available only if you selected Yes for the Copy Associated Groups and Limit Depth options.
- Ignore Hierarchy: Specify whether to ignore Group hierarchy rules when copying associated Groups during the contribute operation. If you select Yes for this option, all associated Groups, up to the maximum association level (i.e., the value entered for Max Depth), will be contributed to the target Community or Source, regardless of their position in the Group hierarchy. This option is available only if you selected Yes for the Copy Associated Groups and Limit Depth options.
- Copy Associated Groups: Specify whether to copy the Group's associated Groups to the Community or Source and associate them to the contributed Group. If you select Yes, you must select the type(s) of associated Groups to copy from the Group Types dropdown.
- Click Next to proceed to the Security Labels step.
Step 3: Limit Metadata to Be Copied By Security Labels
Clicking Next on the Data step will display the Security Labels step (Figure 4). Here, you can determine whether to limit the associated Groups, associated Indicators, and Attributes to be copied based on their Security Labels.
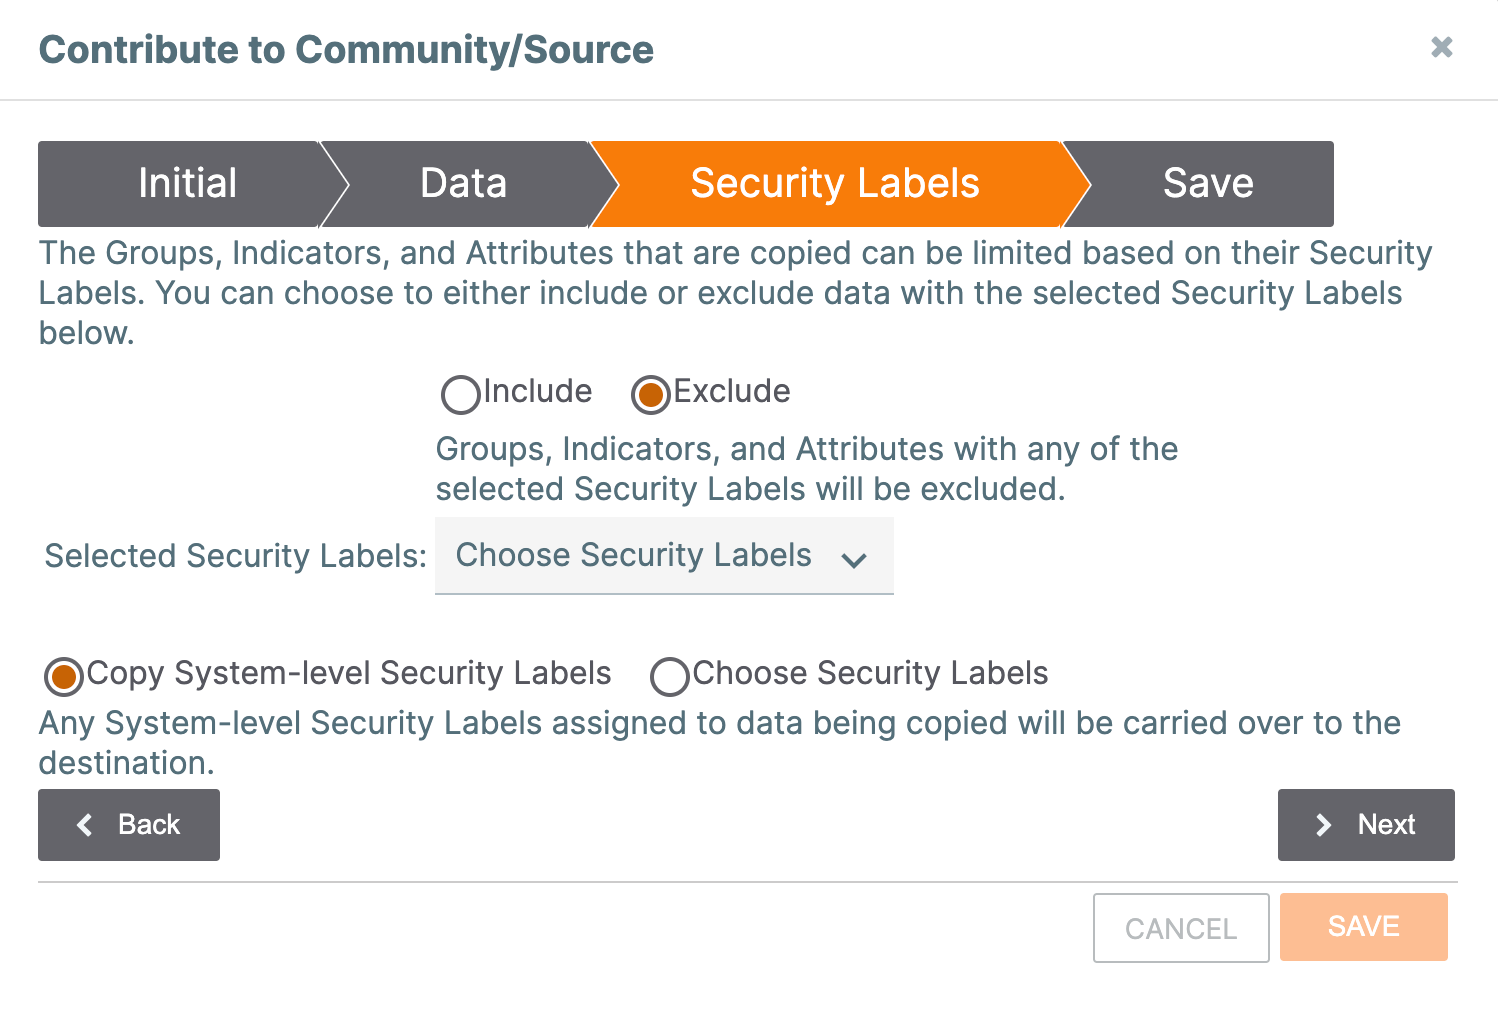
Follow these steps to configure the options on the Security Labels step of the Contribute to Community/Source window:
- Select Include or Exclude to include or exclude, respectively, associated Groups, associated Indicators, and Attributes with one or more of the Security Labels selected from the Choose Security Labels dropdown. Then select the desired Security Labels from this dropdown.
- Select one of the following options to determine how to apply Security Labels to the associated Groups, associated Indicators, and Attributes to be copied:
- Copy System-level Security Labels: Select this option to copy only System-level Security Labels applied to the Groups, Indicators, and Attributes to be copied. By default, this option is selected.NoteIf you are recontributing the Group to the same Community or Source and select Yes, System-level Security Labels applied to the original Group since the previous contribute operation will also be applied to the recontributed Group. No Security Labels will be removed from the contributed Group after the contribute operation, even if those Security Labels are no longer applied to the original Group.
- Choose Security Labels to apply to copied data: Select this option to specify the Security Labels to apply to the Groups, Indicators, and Attributes to be copied. After you select this option, three dropdowns will be displayed: Indicator Security Labels, Group Security Labels, and Attribute Security Labels. Use these dropdowns to select the Security Labels in the Community or Source to apply to the corresponding data type.
- Copy System-level Security Labels: Select this option to copy only System-level Security Labels applied to the Groups, Indicators, and Attributes to be copied. By default, this option is selected.
- Click Next to proceed to the Save step.
Step 4: Review and Finalize the Group Contribution
Clicking Next on the Security Labels step will display the Save step (Figure 5). Here, you can determine whether to send notifications about the Group contribution, review the list of Groups to be contributed, and configure additional options for the contribute operation.
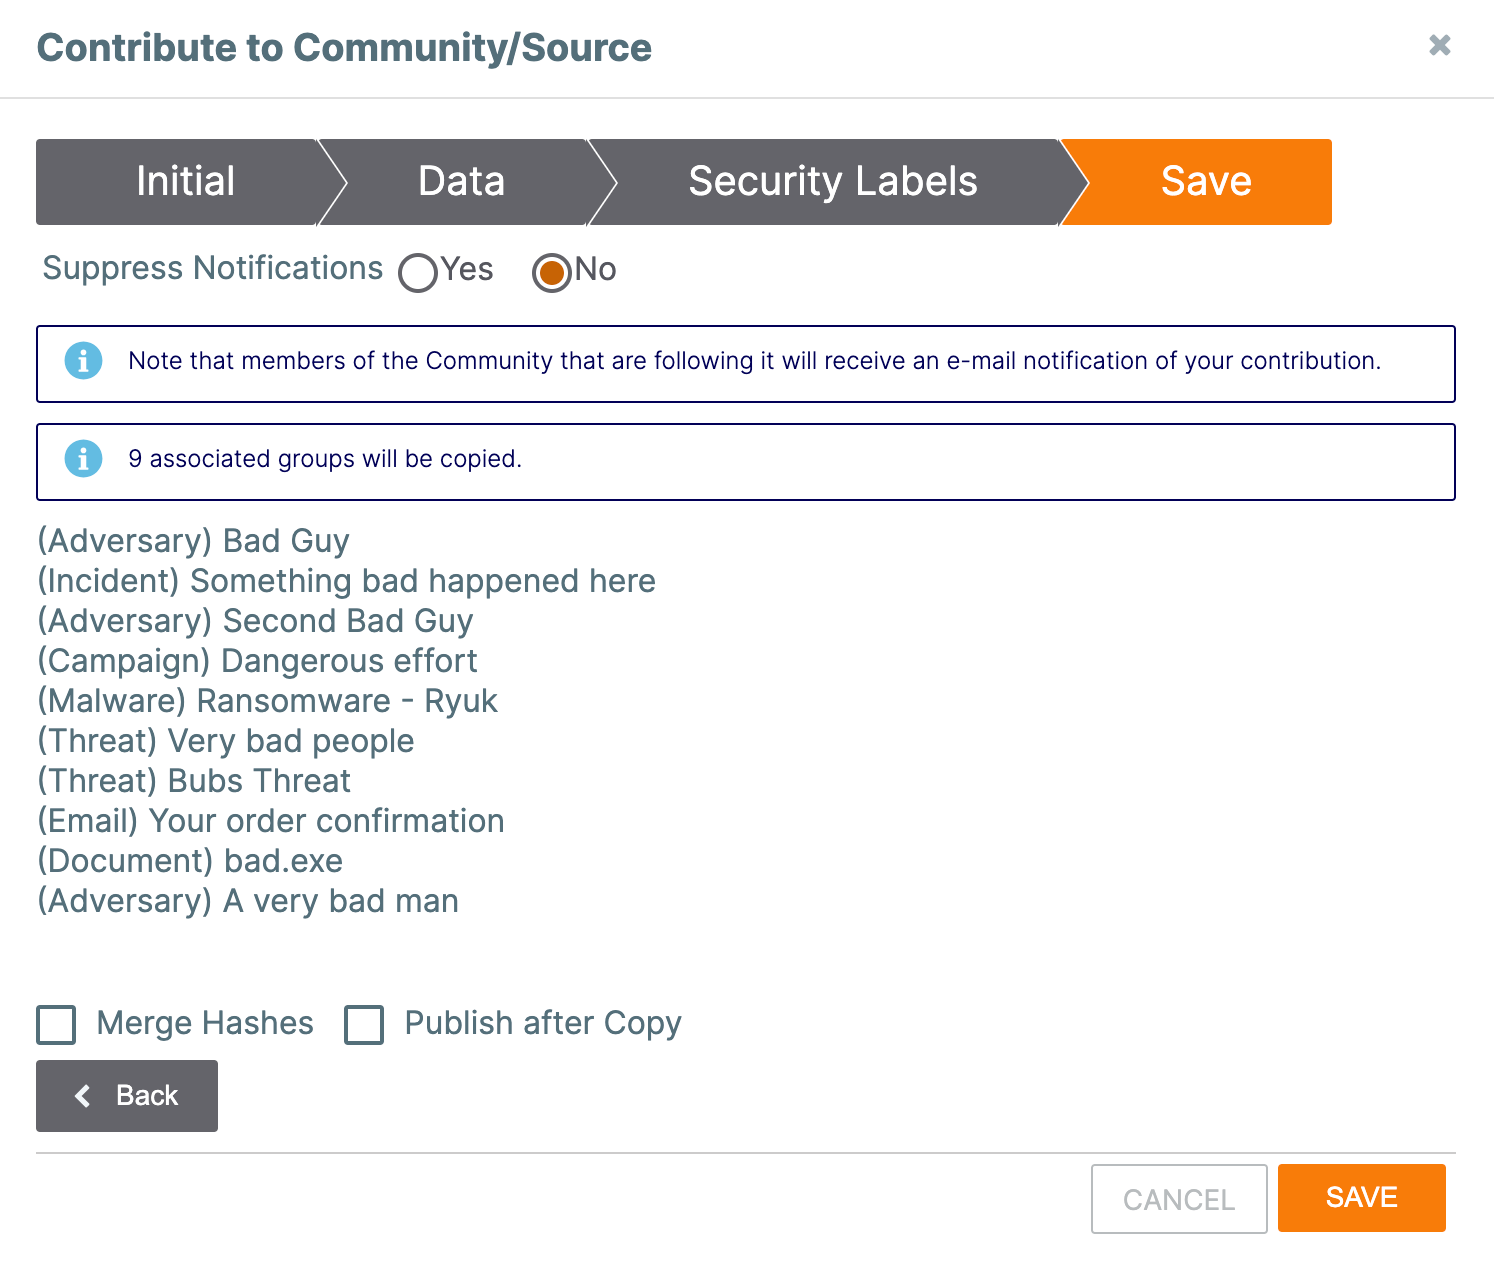
Follow these steps to configure the options on the Save step of the Contribute to Community/Source window:
- Use the Suppress Notifications option to specify whether to prevent notification messages about the contribution from being sent to members of the target Community or Source. By default, No is selected.
- Review the list of Groups that will be copied into the target Community or Source. The total number of associated Groups being copied will be shown above the list of Groups. Note that this number does not include the original Group.NoteWhen reviewing the list of Groups to be copied, make sure you are familiar with all of the Groups and prepared to monitor them in the target Community or Source.WarningIn order to avoid lag times and overloading the system, it is recommended to copy no more than 20 Groups, with a hard limit of 300 Groups. If you attempt to copy more than 300 Groups, the Save step will display a warning message that alerts you to this fact and recommends reducing the number of Groups to be copied by returning to the Data step and adjusting the value of the Max Depth option. If you proceed with a contribute operation that will copy more than 300 Groups, the operation may experience delayed processing or failure, depending on system capabilities and the number of associated Indicators being copied.
- (Optional) If you are contributing a Group with an associated File Indicator that exists in the Group’s owner and in the target Community or Source, select Merge Hashes to synchronize the file hashes between the two File Indicators.ImportantIf you do not select Merge Hashes and the file hashes between the two Indicators are not synchronized, an error message will be displayed directing you to either correct the discrepancy manually (by canceling out of the Contribute to Community/Source window, adding the missing file hash to the File Indicator in the target Community or Source, and then restarting the contribution process) or select Merge Hashes to correct it automatically (by clicking Back, clicking Next on the Security Labels step, and then selecting Merge Hashes, which will no longer be grayed out). If the File Indicators contain mismatched hashes that cannot be merged, or if the File Indicator in the Group’s owner and the File Indicator in the target Community or Source contain duplicate hashes, the contribute process will fail and you will be prompted to correct the discrepancy manually.
- (Optional) Select Publish after Copy to publish the Group data in a package so it may be shared across ThreatConnect instances.
- Click SAVE to complete the contribute operation.NoteThe contribute operation uses asynchronous processing to function partially as a background process, increase the speed of the operation, and prevent timeout errors caused by large numbers of Groups in a single contribute operation from occurring. As such, once you click SAVE in the Contribute to Community/Source window, each Group and associated Group will be mapped to existing target Groups and new Groups and then added to a queue for further enrichment. The queue will copy metadata and associated Indicators in the background, enabling you to navigate elsewhere in ThreatConnect instead of waiting for the entire operation to complete.
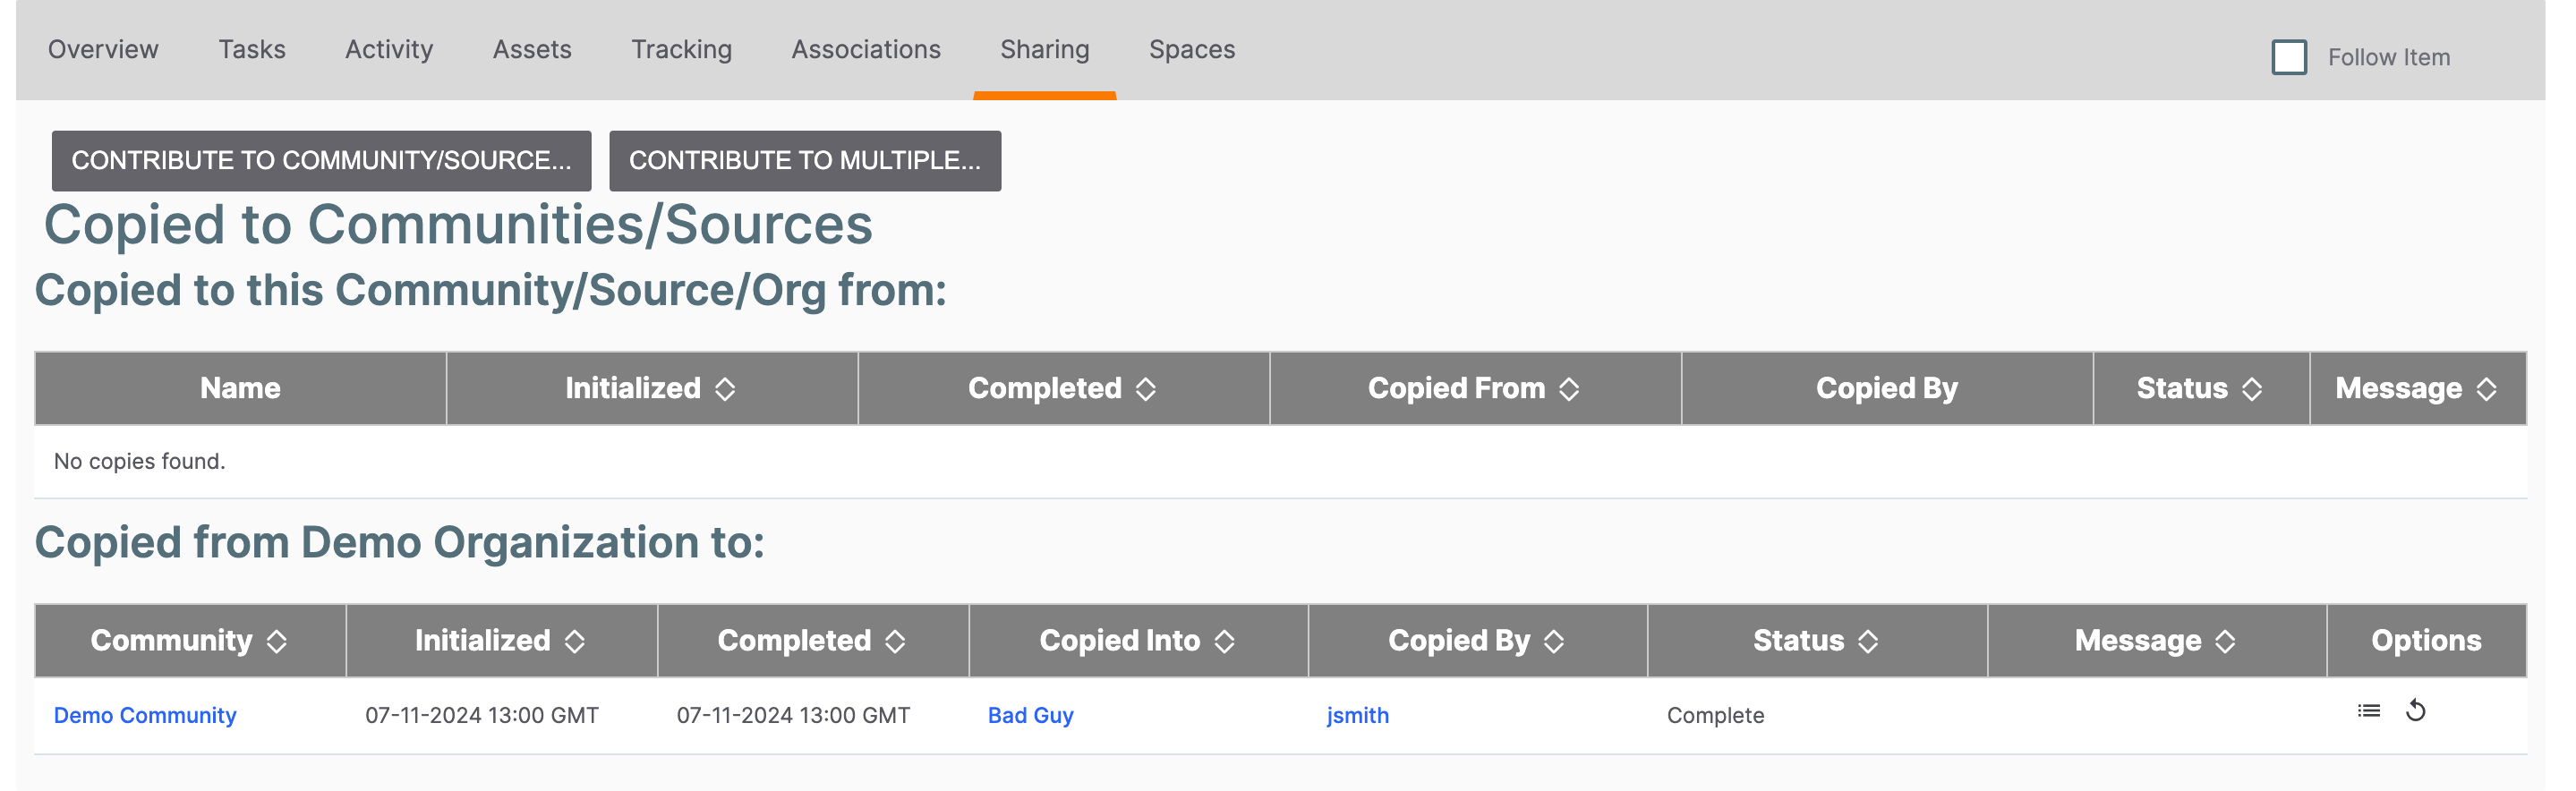
After you complete the contribute operation, the Sharing tab of the Group’s legacy Details screen will show all of the Communities and Sources to which the Group has been contributed (Figure 6). This tab will also provide detailed information on the start and end times and status (Processing, Complete, or Error) of each contribute operation, as well as error messages when applicable.
Viewing Properties of a Contributed Group
Follow these steps to view the properties of a Group that was contributed to one of your Communities or Sources:
- Navigate to the legacy Details screen for a Group that has been contributed to a Community or Source.
- Select the Sharing tab (Figure 6).
- In the Copied from <Organization name> to: section, click Properties
 in the Options column to open the Community/Source Contributionwindow and view a read-only summary of the options selected during the contribution process (Figure 7).
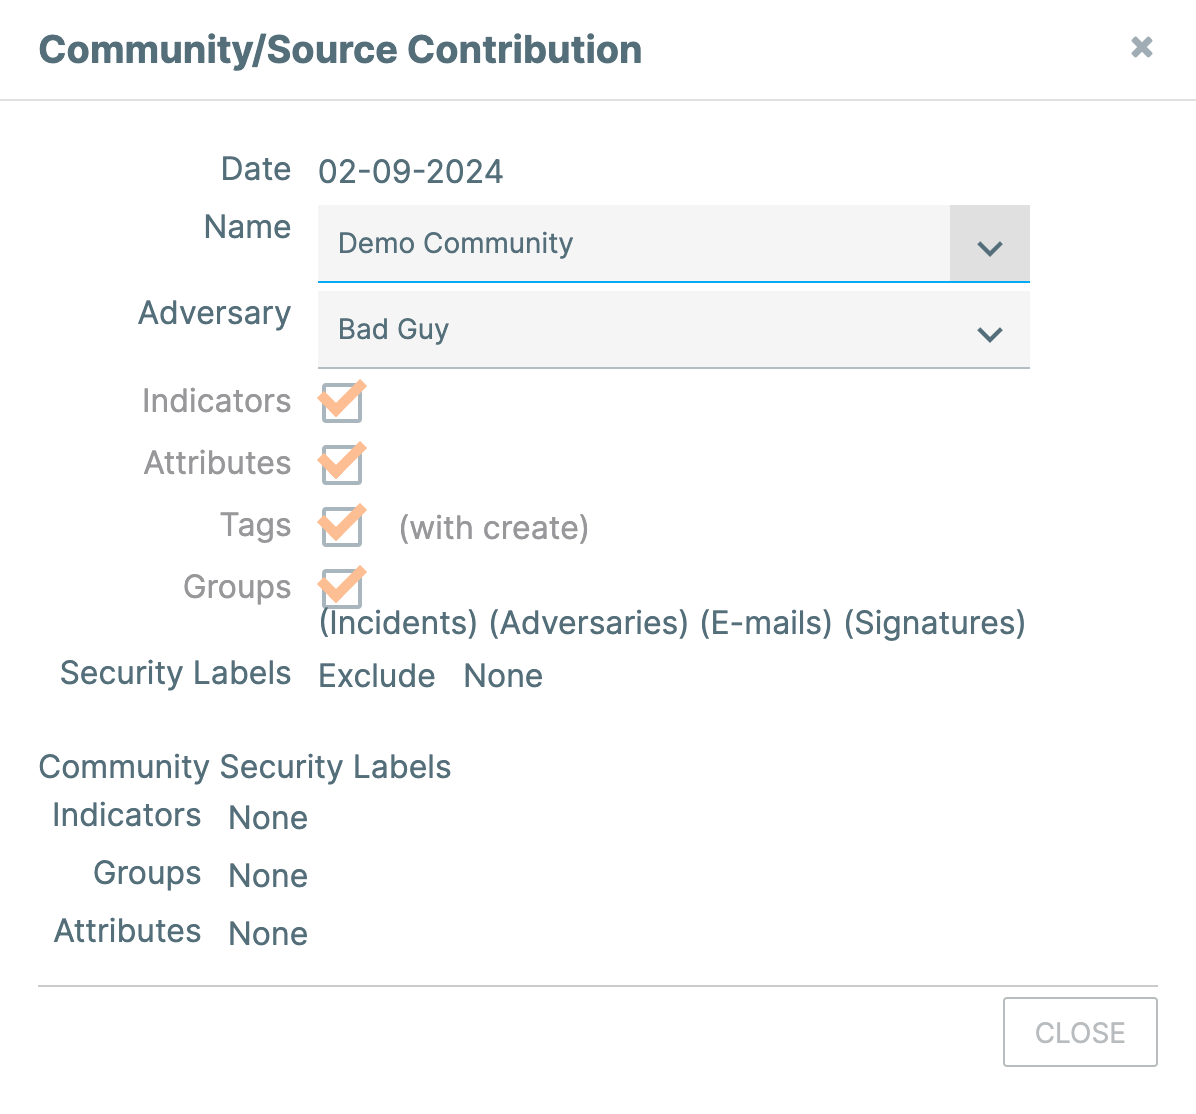
Recontributing a Group
If updates are made to a Group after it was contributed to a Community or Source (e.g., a new Tag is applied, an Attribute’s value is updated), it can be helpful to recopy (recontribute) the original Group to the same Community or Source so that the contributed Group reflects the updates made to the original Group.
Follow these steps to recontribute a Group:
- Navigate to the legacy Details screen for a Group that has been contributed to a Community or Source.
- Select the Sharing tab (Figure 6).
- In the Copied from <Organization name> to: section, click Recopy
 in the Options column.
 - The Initial step of the Contribute to Community/Source window will open with the Community or Source to which the Group was contributed selected in the dropdown at the top, the EXISTING GROUP option selected, and the name of the original Group pre-populated in the Group Name text box (Figure 8). Do not modify any of these values, and then click Next.
- Configure the options on the Data, Security Labels, and Save steps to complete the recontribute process.
ThreatConnect® is a registered trademark of ThreatConnect, Inc.
20001-02 v.17.A