- 21 Dec 2024
- 13 Minutes to read
-
Print
-
DarkLight
-
PDF
ThreatConnect Threat Intelligence Enrichment API Plugin for Microsoft Security Copilot User Guide
- Updated on 21 Dec 2024
- 13 Minutes to read
-
Print
-
DarkLight
-
PDF
Overview
The ThreatConnect Threat Intelligence Enrichment API plugin for Microsoft® Security Copilot enables you to use ThreatConnect®-specific skills in the Copilot standalone experience to query ThreatConnect instances for Indicators, Groups, and Intelligence Requirements (IRs) and to generate ThreatConnect Query Language (TQL) queries. You can then apply Copilot’s extensive AI summarization capabilities to the enriched data it returns from ThreatConnect to create comprehensive reports. In addition, you can use the ThreatConnect-specific skills in Copilot promptbooks to create fast and repeatable workflows.
Dependencies
ThreatConnect Dependencies
- Active ThreatConnect Application Programming Interface (API) token
- ThreatConnect instance with version 7.7 or newer installed
- ThreatConnect Threat Intelligence Enrichment API plugin (provided by ThreatConnect; please email your Customer Success representative directly for access)
Microsoft Dependencies
- Microsoft Security Copilot trial or full-product version
Setup and Installation
Follow these steps to set up and install the ThreatConnect Threat Intelligence Enrichment API plugin for Copilot:
Copilot Onboarding
Copilot operates using a provisioned-capacity model in which customers purchase and use a preset number of Security Compute Units (SCUs) per hour. Follow the instructions in Get Started with Microsoft Security Copilot to onboard to Copilot by provisioning your capacity for Copilot and setting up a default environment:
- Step 1: Provision capacity. Choose one of the following two methods to provision capacity for Copilot:
- Step 2: Set up the default environment.
ThreatConnect Plugin Installation and Configuration in Copilot
Follow these steps to install and configure the ThreatConnect Threat Intelligence Enrichment API plugin in Copilot:
- Contact your Customer Success representative to request the Copilot Manifest File. The name of this file is tc_manifest_separate.yml.
- Open and log into Copilot.
- Click Sources
 on the Copilot prompt bar to open the Plugins tab of the Manage Sources window.
 - Scroll down to the Custom section and click Upload plugin
 . Then fill out the fields on the Add a plugin window (Figure 1) as follows:
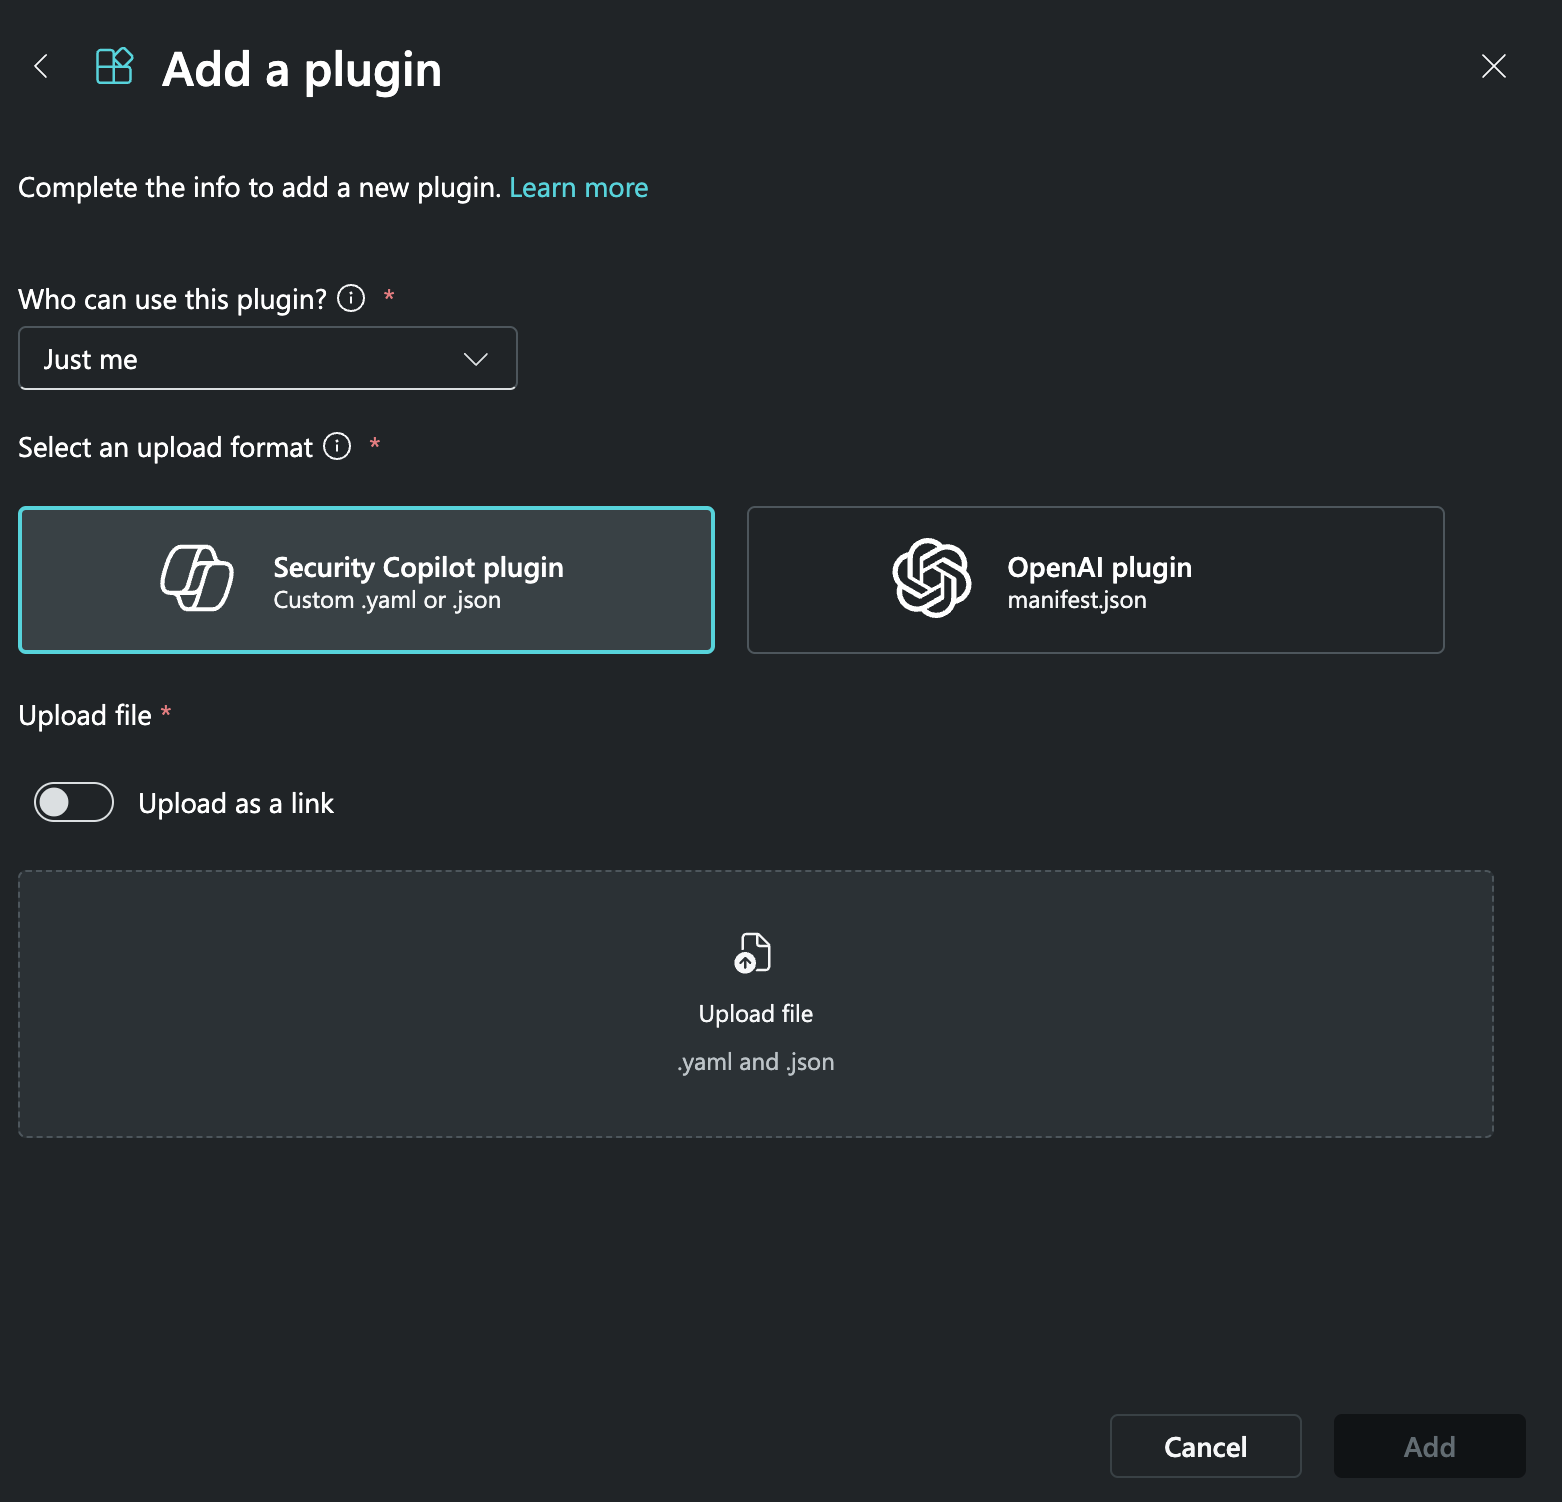
- Who can use this plugin?: Select Just me to make the ThreatConnect Threat Intelligence Enrichment API plugin available only to you. Select Anyone in my organization to make the ThreatConnect Threat Intelligence Enrichment API plugin available to all members of your organization.
- Select an upload format: Select Copilot for Security plugin. Once you select this option, the window will display the Upload file section.
- Upload as a link: (Optional) Leave this toggle turned off.
- Upload file: Click this button. Then locate and select the tc_manifest_separate.yml file.
- Click Add on the Add a plugin window to add the ThreatConnect Threat Intelligence Enrichment API plugin to Copilot.
- The ThreatConnect Threat Intelligence Enrichment API plugin will now be displayed as ThreatConnect (Preview) in the Custom section on the Plugins tab of the Manage Sources window. Click Set up next to ThreatConnect (Preview). Then fill out the fields on the ThreatConnect (Preview) settings window (Figure 2) as follows:
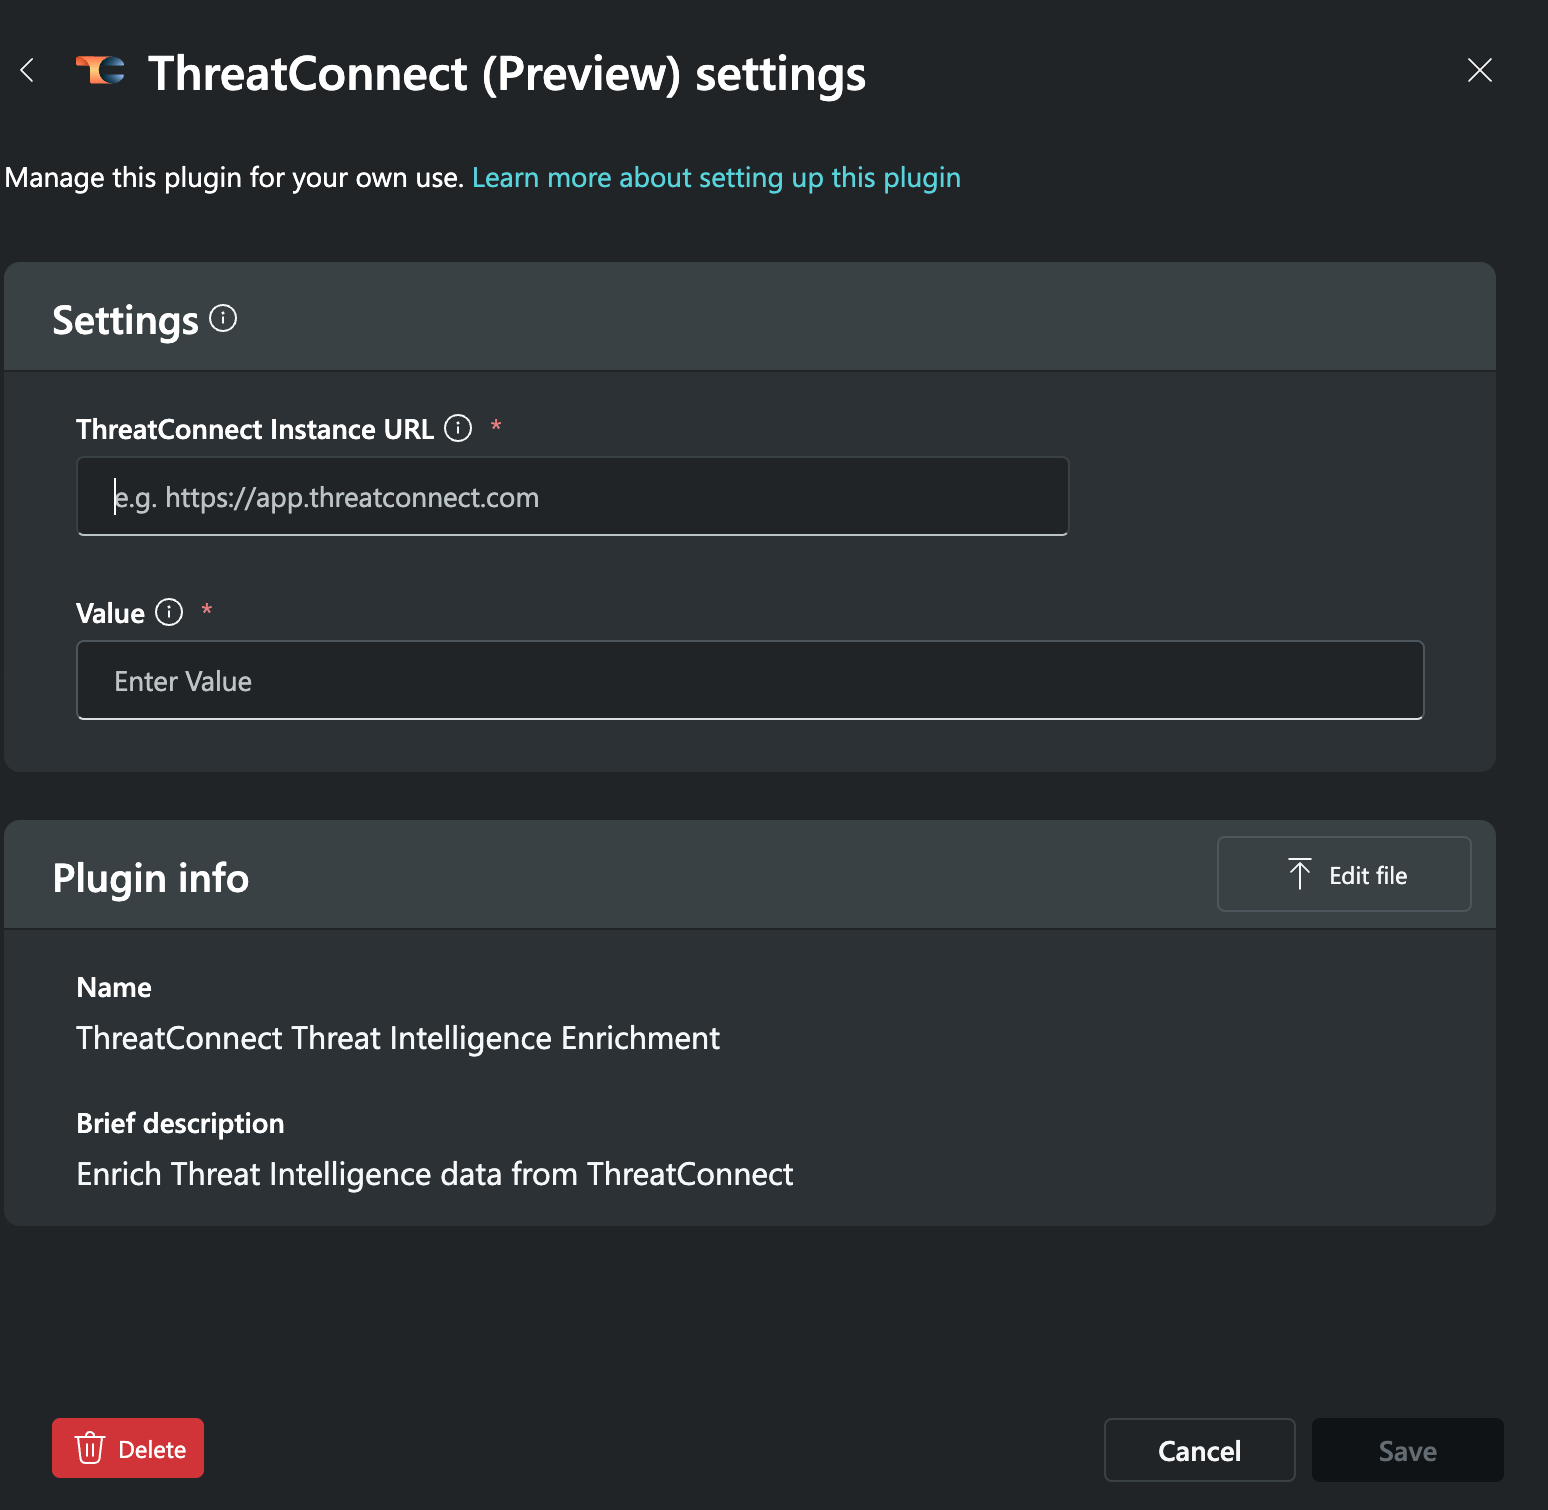
- ThreatConnect Instance URL: Enter the URL for your ThreatConnect instance.
- Value: Enter the API token for your ThreatConnect API user account. See the “Creating an API User” section of Creating User Accounts for more information.NoteIf your ThreatConnect API user account has an Organization role of Organization Administrator, you can find the API token for your user account by navigating to the Membership tab of the Organization Settings screen and clicking Edit
 in the Options column for your user account to view the API User Administration window. If your ThreatConnect API user account does not have an Organization role of Organization Administrator, you will need to ask an Organization Administrator to provide you with the API key for your user account.
- Click Save on the ThreatConnect (Preview) settings window to complete configuration for the ThreatConnect Threat Intelligence Enrichment API plugin for Copilot.
Using ThreatConnect Skills in Copilot
After the ThreatConnect Intelligence Enrichment API plugin has been installed and set up, you can use ThreatConnect skills when writing queries in Copilot. Follow these steps to use a ThreatConnect skill in a Copilot query:
- Open and log into Copilot.
- Enter a ThreatConnect skill followed by the input for the skill in the Copilot prompt bar. See the “ThreatConnect Skills for Copilot” section for a table defining each skill, the type of input the skill takes, and the expected output in Copilot. See the “ThreatConnect Skill Prompt Examples” section for example prompts for each skill.NoteYou can also enter a natural-language prompt that does not use any of the ThreatConnect skills (e.g.
what are the indicators in my threatconnect organization). - Click Submit prompt
 . Copilot will process the request and return results containing data available to your API user account on the ThreatConnect instance entered in the plugin configuration (Figure 2).
Viewing Copilot Sessions
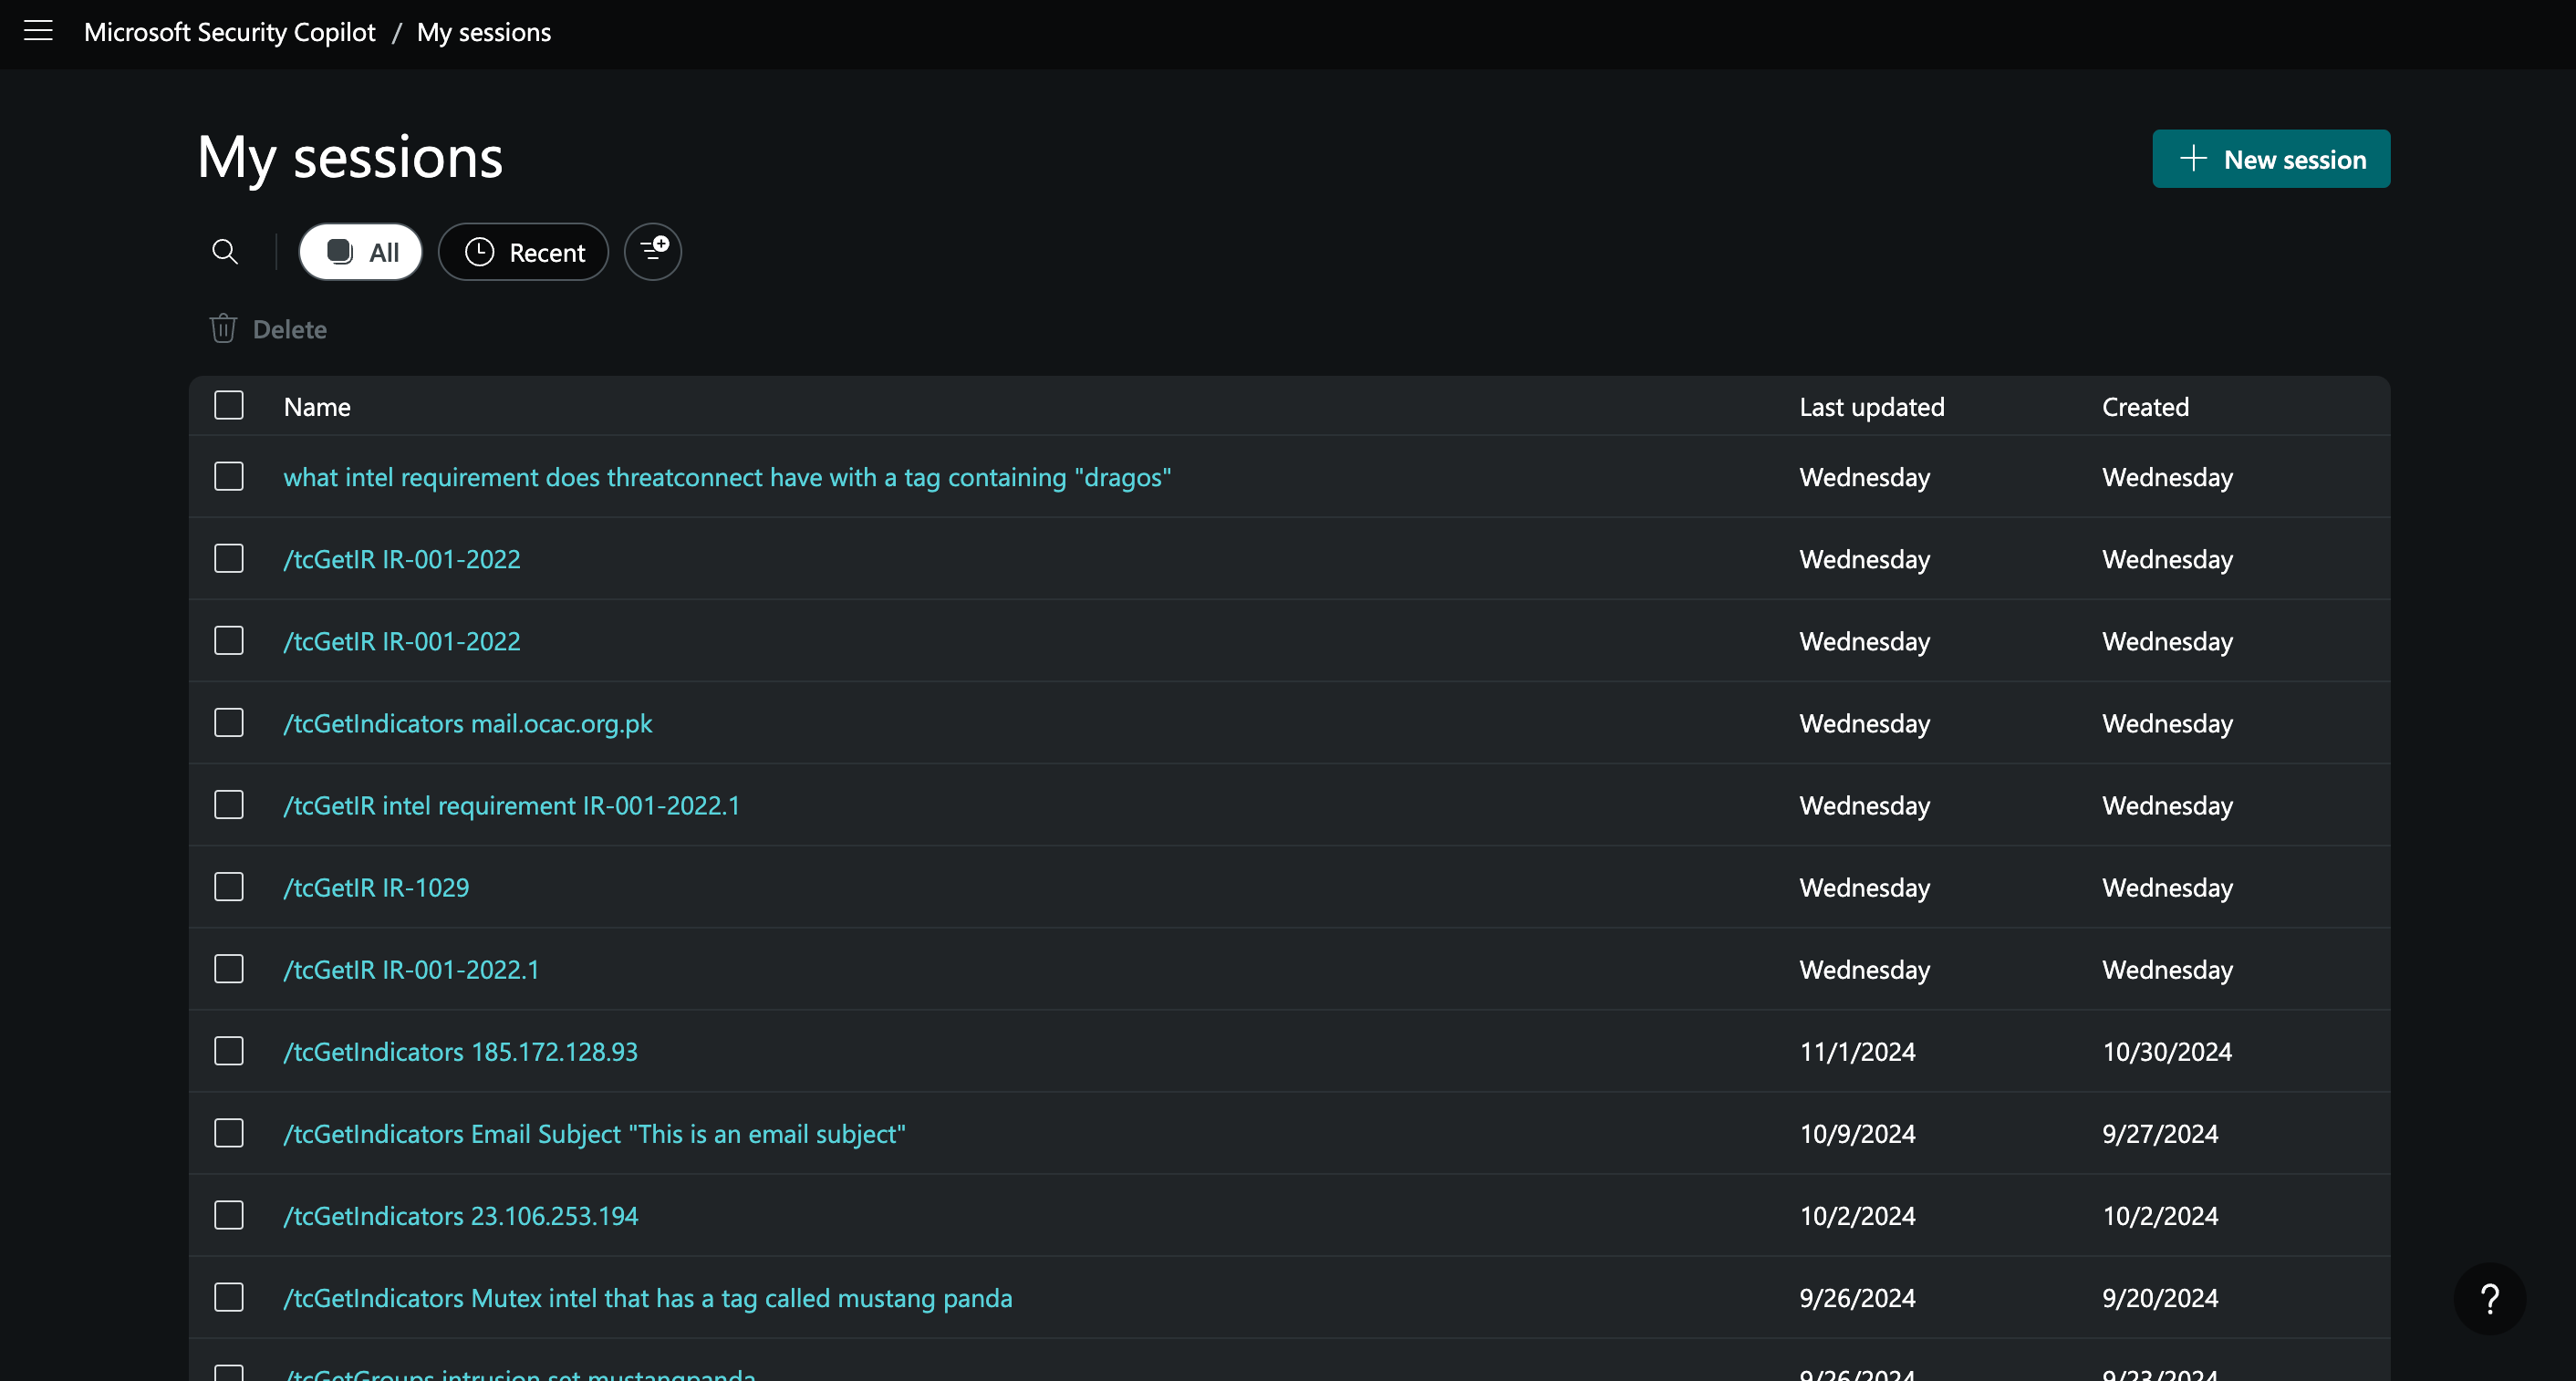
A session in Copilot represents a set of prompts you made during a particular time period and the results returned by those prompts. Sessions provide a record of work you have done in Copilot that you can review or use to create a promptbook. Follow these steps to view your Copilot sessions:
- Click Open menu
 at the upper left to display Copilot's side navigation bar.
 - Select My sessions to display the My sessions screen (Figure 3). On this screen, you can view a session by clicking the link in its Name column, create a new session by clicking + New session, or delete one or more sessions by selecting their checkboxes and clicking Delete.NoteA new session is also created when you open Copilot and enter a prompt into the prompt bar.
Creating Promptbooks in Copilot
A promptbook in Copilot is a series of prompts that have been put together to accomplish specific security-related tasks. You can use promptbooks to store and repeat a set of prompts without having to retype each prompt individually. Follow these steps to create a promptbook:
- In your current session, or in a session you have opened from the My sessions screen, select the checkbox to the left of each prompt that you want to add to a promptbook.
- Click Create promptbook
 on the options strip above the session. Then fill out the fields on the Create a prompt book screen (Figure 4) as follows:
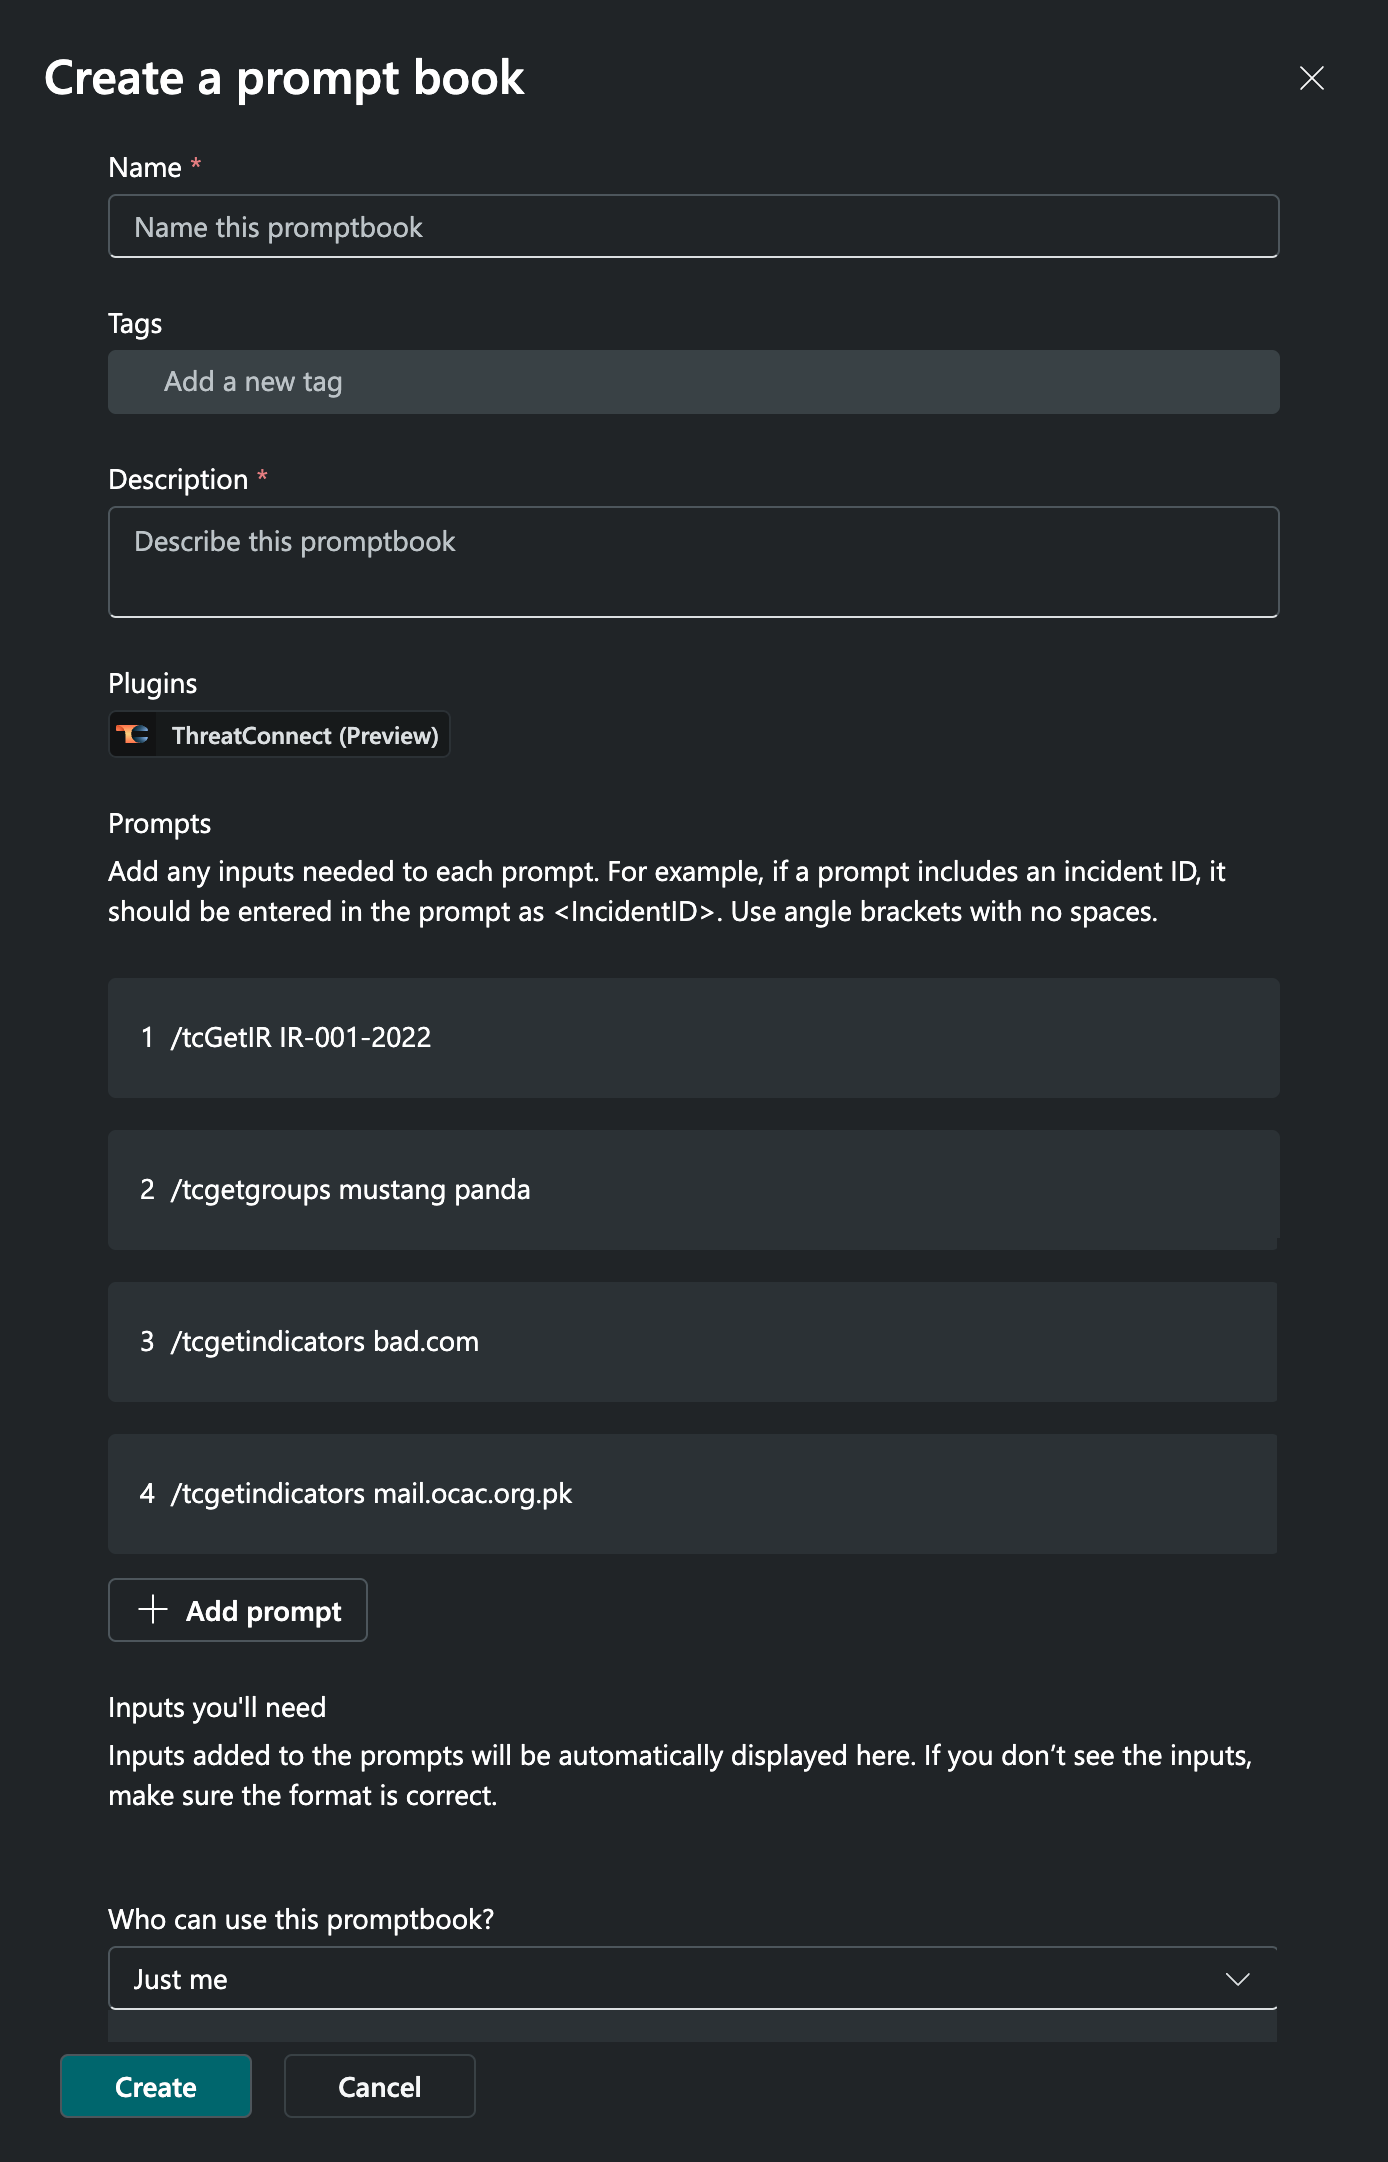
- Name: Enter a name for the promptbook.
- Tags: (Optional) Add one or more tags to the promptbook. If entering multiple tags, press Enter after entering each tag.
- Description: Enter a description for the promptbook.
- Plugins: This field will list the plugins used for the prompts in the promptbook and cannot be edited.
- Prompts: This section lists the prompts you selected from the session to add to the promptbook. Hovering over the right side of the row for a prompt provides an option to edit
 the prompt and a ⋯ menu with options to delete the prompt from the promptbook and move the prompt up or down in the prompt list. Click + Add prompt under the last prompt to add a row in which you can enter a new prompt to the list. When adding a new prompt, you can include one or more inputs. An input is a variable name enclosed in angle brackets (e.g.,
 <IntelRequirementID>,<hostname>) to indicate that, the next time the promptbook is run, the user will need to enter a value for the input. Note that inputs cannot contain spaces. - Inputs you’ll need: This section lists inputs in the promptbook’s prompts, if applicable.
- Who can use this promptbook?: Select Just me to make the promptbook available only to you. Select Anyone in my organization to make the promptbook available to all members of your organization.
- Click Create on the Create a prompt book window to create the promptbook.
You can view, edit, and run your saved promptbooks from your promptbook library, which you can view by clicking Open menu![]() at the upper left of Copilot and selecting Promptbook library.
at the upper left of Copilot and selecting Promptbook library.
ThreatConnect Skills for Copilot
Table 1 lists all ThreatConnect skills for Copilot and defines their required input and expected output.
| ThreatConnect Skill | Input for Skill | Expected Output |
|---|---|---|
| /tcGetIndicators | Name/Summary of a single ThreatConnect Indicator or a natural-language description of a set of Indicators to return from ThreatConnect. Natural-language prompts are translated into a TQL query when ThreatConnect processes the request from Copilot. | Details, Tags, and Attributes for the Indicator, as well as links to the Indicator’s Details screen in all ThreatConnect owners you have access to. If the results set contains multiple Indicators, they will be returned as a list or table. |
| /tcGetGroups | Name/Summary of a single ThreatConnect Group or a natural-language description of a set of Groups to return from ThreatConnect. Natural-language prompts are translated into a TQL query when ThreatConnect processes the request from Copilot. | Details for the Group, as well as links to the Group’s Details screen in all ThreatConnect owners you have access to. Links to the Group in non-ThreatConnect feeds may also be provided. If the results set contains multiple Groups, they will be returned as a list or table. |
| /tcGetGroupById | ThreatConnect ID number of a single ThreatConnect Group. This number may be found by navigating to the Details screen for the Group and identifying the number at the end of the URL. | Details for the Group, as well as links to the Group’s Details screen in all ThreatConnect owners you have access to. Links to the Group in non-ThreatConnect feeds may also be provided. |
| /tcGetIR | Unique ID for a single IR in ThreatConnect (that is, the ID number defined for the IR by the user who created it, not the ThreatConnect ID number found in the URL for the IR’s Details screen) or a natural-language description of a set of IRs to return from ThreatConnect. Natural-language prompts are translated into a TQL query when ThreatConnect processes the request from Copilot. | Details and Tags for the IR, as well as a link to the IR’s Details screen in ThreatConnect. If the results set contains multiple IRs, they will be returned as a list or table. |
| /tcGetIRResults | ID for a single IR in ThreatConnect. Hint Add global results for between the prompt and the IR’s ID to get only global results. Add local results for between the prompt and the IR’s ID to get only local results. Note that a search requesting local results only may return the same results set as a search that does not specify a result type, as the 10 results returned for a general search may be the same 10 results returned from a search for local results only. | A table displaying 10 of the IR’s results. |
| /tcGenerateBasicTQL | A natural-language description of the set of ThreatConnect data you want a TQL query to return. | A TQL query matching the criteria of the prompt. Hint After Copilot returns the TQL query, you can submit the prompt run this tql to run the query in Copilot. |
ThreatConnect Skill Prompt Examples
Skill Prompt Examples: /tcGetIndicators
/tcGetIndicators 1.2.3.4/tcGetIndicators bad.com/tcGetIndicators indicators created in the past 12 months in the source "CrowdStrike Falcon Intelligence" and has tag "Threat Type: Criminal" with at least one observation and no false positive reports/tcGetIndicators host indicators created in the past 12 months in the source "CrowdStrike Falcon Intelligence" and has tag "Threat Type: Criminal" with at least one observation and no false positive reports; /tcGetIndicators bad.com host indicator). However, Copilot sometimes returns other Indicator types in its response./tcGetIndicators EAF62ADE86350B658D68973A5299DE82E25DE759) or with multiple hashes separated by colons (e.g., /tcGetIndicators 11B44C0FFCE780A3CE48A641431D0AD0 : EAF62ADE86350B658D68973A5299DE82E25DE759 : E079961F8556B5FC0C3BDC0E4DD1558CCB775BE4D80AE847B26CDA0658B85373). (Including a space on either side of the colon is optional.) To query Copilot for all File Indicators that have at least one of a set of multiple hashes, separate each hash by a space (e.g., /tcGetIndicators 11B44C0FFCE780A3CE48A641431D0AD0 EAF62ADE86350B658D68973A5299DE82E25DE759 E079961F8556B5FC0C3BDC0E4DD1558CCB775BE4D80AE847B26CDA0658B85373). Similarly, Registry Key Indicators in ThreatConnect can have three parts to their Name/Summary: Key Name, Value Name, and Value Type. Queries for Registry Keys in Copilot operate similarly to queries for File Indicators. Note that queries for multiple named Indicators of other types (e.g., /tcGetIndicators bad.com badguy.com) may return results for only one of the Indicators.Skill Prompt Examples: /tcGetGroups
/tcGetGroups Mustang Panda/tcGetGroups CVE-2024-21743/tcGetGroups group associated with an ip address indicator and the indicator having a tag of "Threat Type: RAT"/tcGetGroups malware group associated with an ip address indicator and the indicator having a tag of "Threat Type: RAT"; /tcGetGroups Mustang Panda adversary group). However, Copilot sometimes returns other Group types in its response.Skill Prompt Examples: /tcGetGroupByID
/tcGetGroupById 1125899927003855Skill Prompt Examples: /tcGetIR
/tcGetIR IR-001-2022.1/tcGetIR What intel requirements does threatconnect have with a tag containing "dragos"?Skill Prompt Examples: /tcGetIRResults
/tcGetIRResults IR-010-2022/tcGetIRResults local results for IR-010-2022/tcGetIRResults global results for IR-010-2022Skill Prompt Examples: /tcGenerateBasicTQL
tcGenerateBasicTQL report made in February/tcGenerateBasicTQL groups that match the names CVE-2024-5806, CVE-2024-5806, CVE-2024-6387Frequently Asked Questions (FAQ)
How does Copilot work?
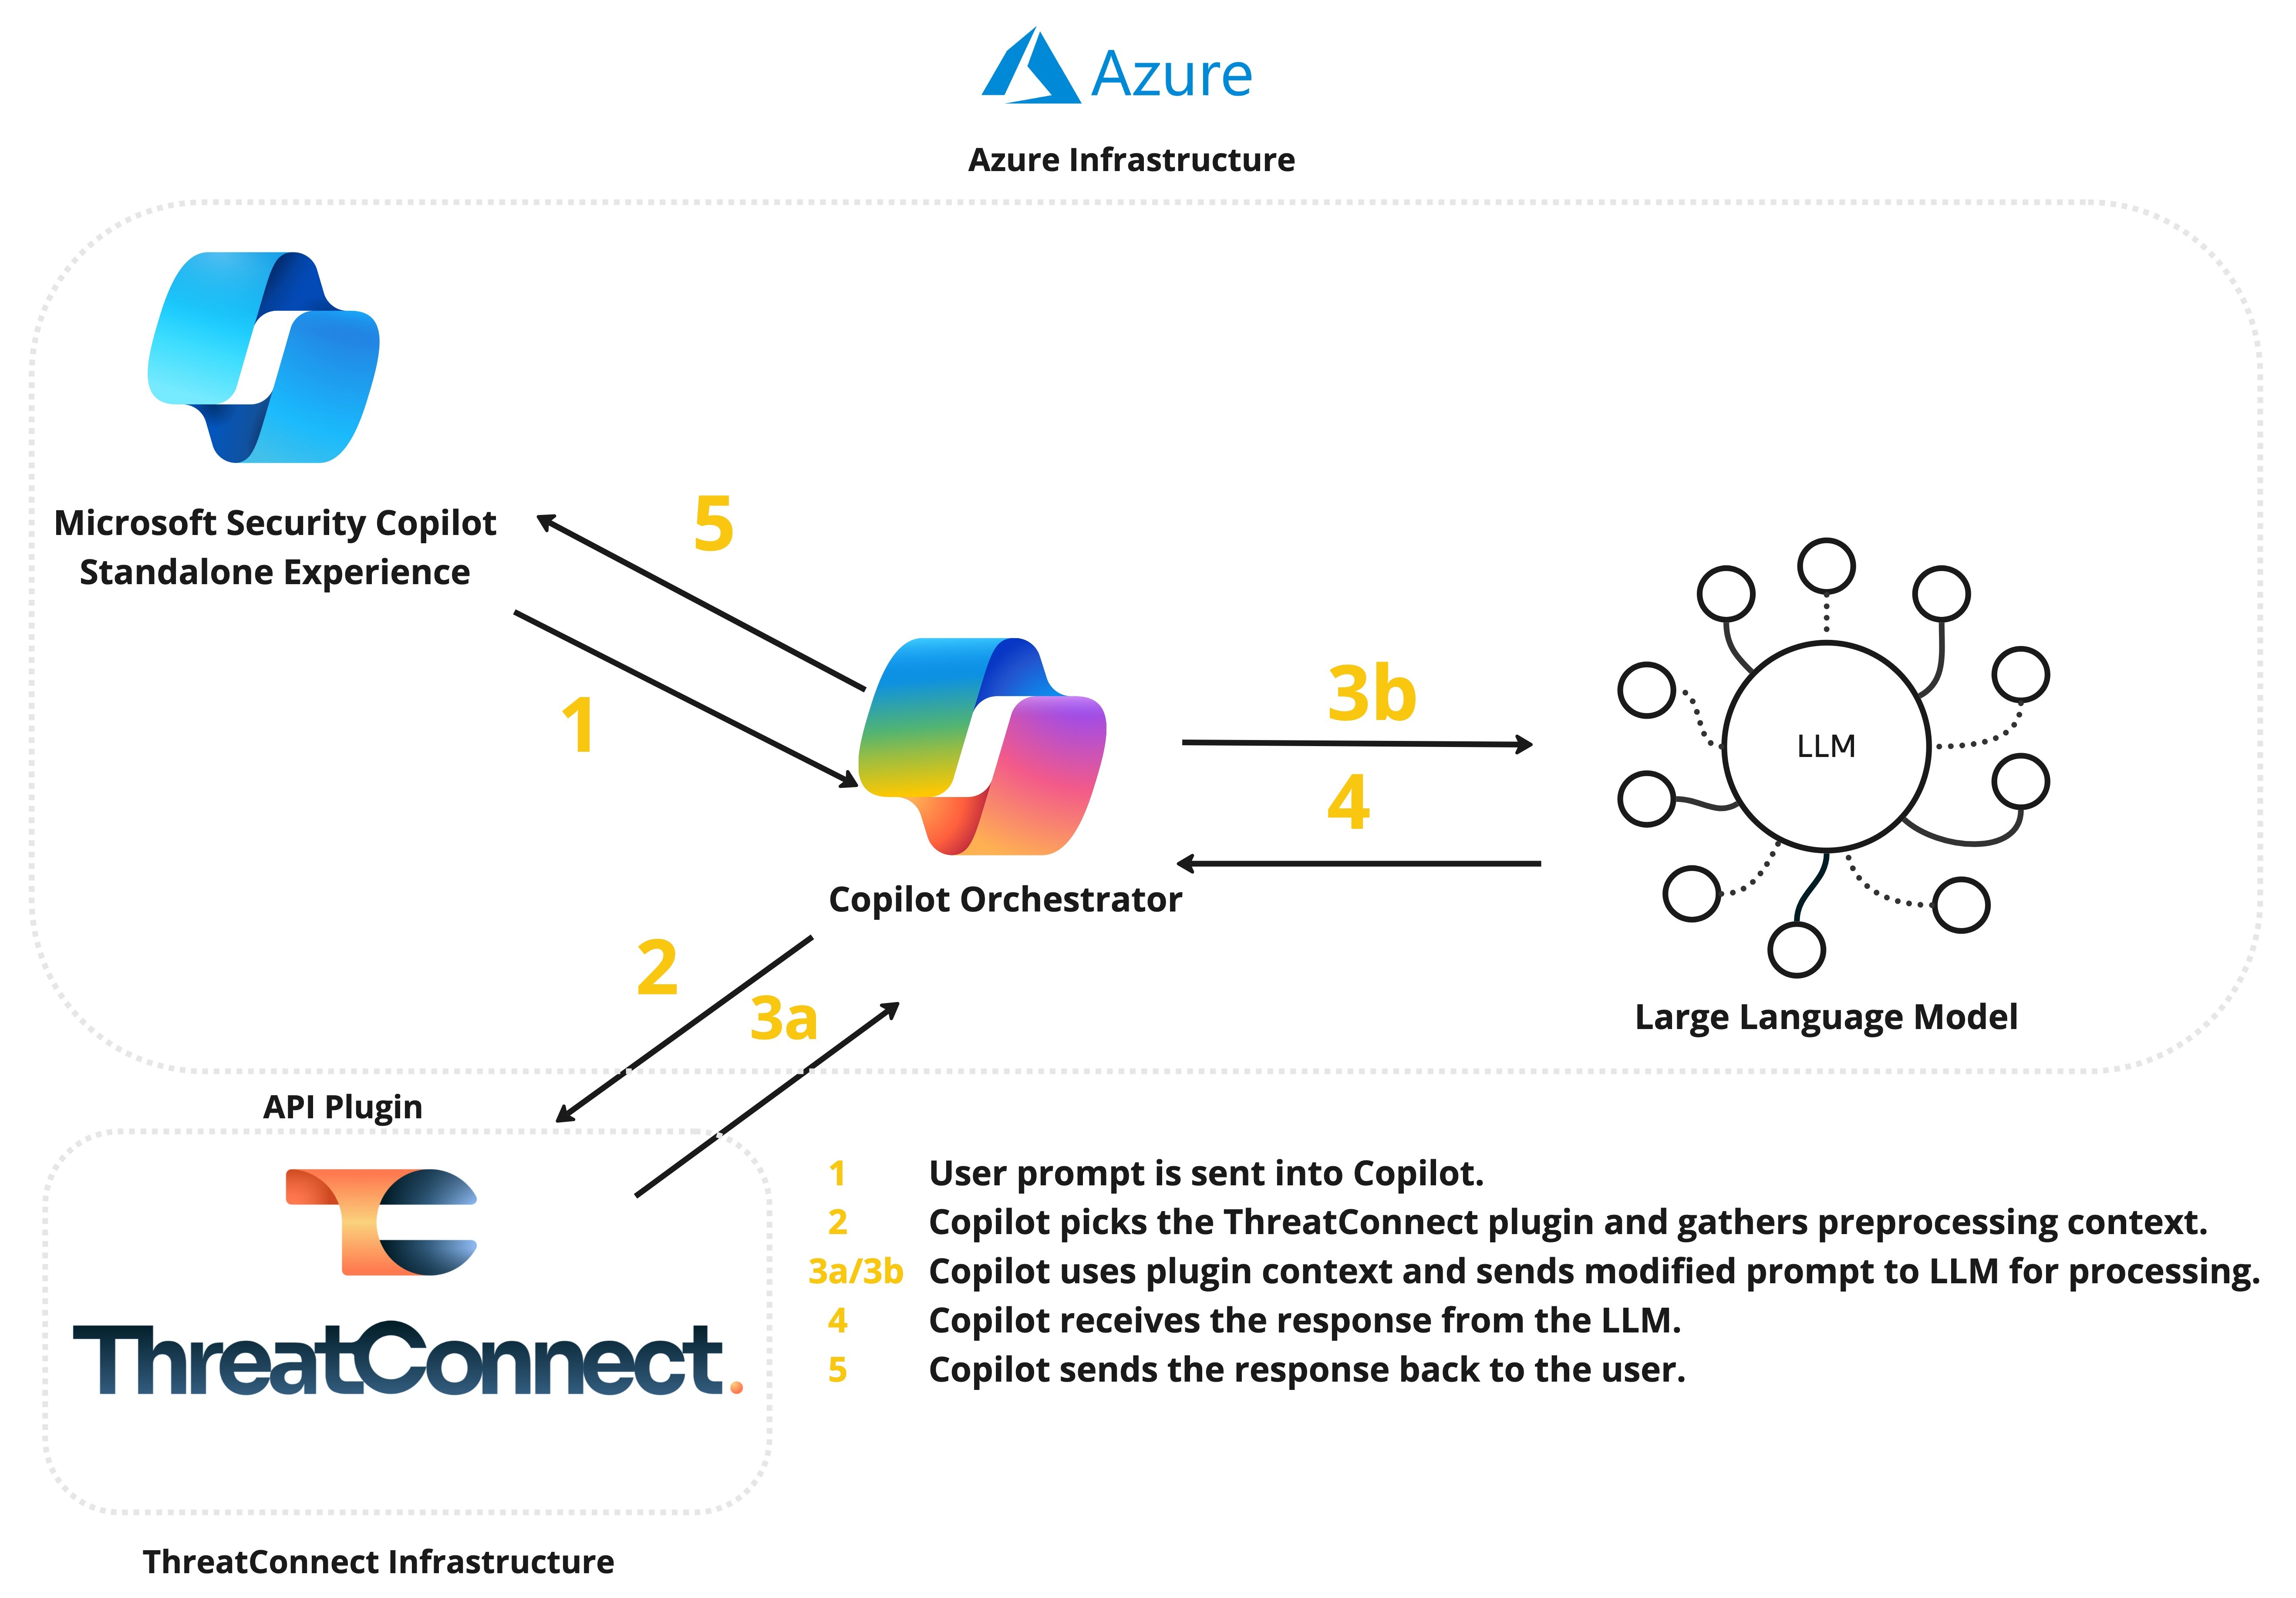
Figure 5 displays an overview of what happens when you submit a prompt to Copilot. Copilot can operate using natural-language prompts, or it can use skills—that is, rules for how to access, retrieve, and perform certain actions with data—for direct interaction with a plugin or module.
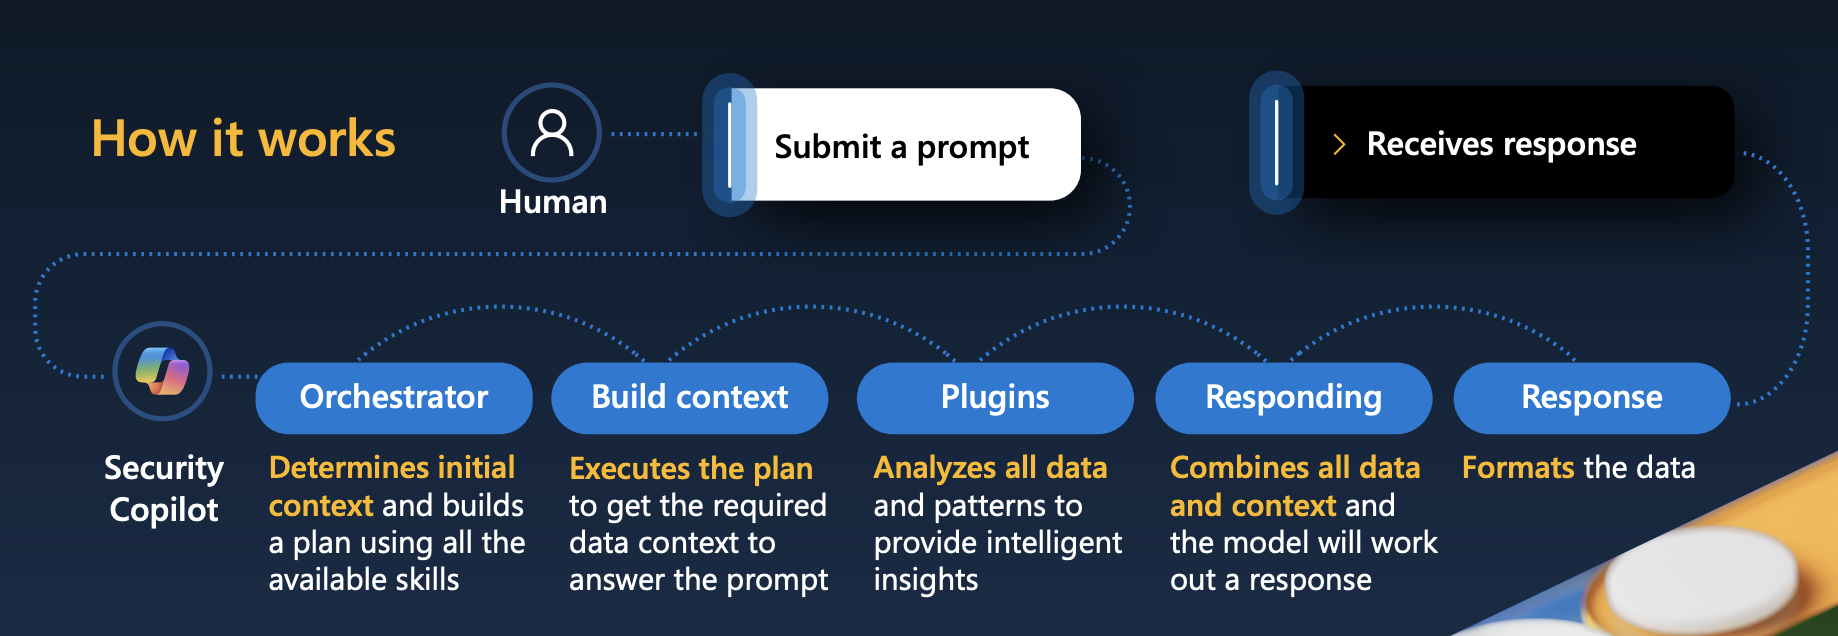 Image credit: Microsoft Security Copilot, “Security Copilot Coverage and Capabilities,” https://www.microsoft.com/en-us/security/business/ai-machine-learning/microsoft-security-copilot#modal-021, 2024
How does Copilot choose which plugins to use when a user submits a prompt?
The following is an excerpt from Microsoft details how the Copilot orchestrator decides which plugins to use:
When a user submits a query to Copilot, the orchestrator searches its full catalog of skills (functions) from installed plugins to identify up to five skills which best match the query. The orchestrator first tries to match on exact words (lexical match) and expands its search scope as needed to include matches on descriptive meanings (semantic match), working from specific function names to general plugin descriptions, until all five function candidate slots are filled. Specifically, here is the hierarchy of matching mechanisms for Copilot plugin function selection:
- Lexical match on function name.
- Semantic match on function description.
- Lexical match on plugin name (adds all plugin functions to candidate list).
- Semantic match on plugin name (adds all plugin functions to candidate list).
See Overview of the Microsoft 365 Copilot orchestrator for further information.
What do I do if Copilot is returning error messages, no data, or otherwise not providing expected results?
There are several troubleshooting steps you can take if Copilot is returning error messages, no data, or not providing expected results:
- Check your Copilot usage to ensure you are under your organization’s usage limit.
- Make sure the ThreatConnect instance URL in the ThreatConnect (Preview) settings (Figure 2) is pointing to the correct instance.
- Make sure your ThreatConnect API token is entered correctly in the ThreatConnect (Preview) settings (Figure 2) and that it is not expired.
- Make sure you have only one version of the ThreatConnect (Preview) plugin installed in the Custom section on the Plugins tab of the Manage sources window.
- If pure natural-language prompts are not working, try using ThreatConnect skills for Copilot instead.
- If some skills are not returning the expected data, try adding the Group or Indicator type right after the skill (e.g.,
/tcGetIndicators host bad.com).
ThreatConnect® is a registered trademark of ThreatConnect, Inc.
Azure®, Excel®, and Microsoft® are registered trademarks of Microsoft Corporation
30090-01 EN Rev. A


