MITRE ATT&CK Manual Job Configuration (Advanced Users Only)
- 01 Sep 2022
- 3 Minutes to read
-
Print
-
DarkLight
-
PDF
MITRE ATT&CK Manual Job Configuration (Advanced Users Only)
- Updated on 01 Sep 2022
- 3 Minutes to read
-
Print
-
DarkLight
-
PDF
Article summary
Did you find this summary helpful?
Thank you for your feedback!
Before following the steps listed in this article, verify that your System Administrator installed the MITRE ATT&CK™ 2.0.x App via TC Exchange™.
Creating the MITRE ATT&CK Job
- Log into ThreatConnect with an Organization Administrator account.
- On the top navigation bar, hover the cursor over Settings
 and select Org Settings. The Membership tab of the Organization Settings screen will be displayed.
 - Click the Apps tab. The Jobs view of the Apps screen will be displayed (Figure 1).
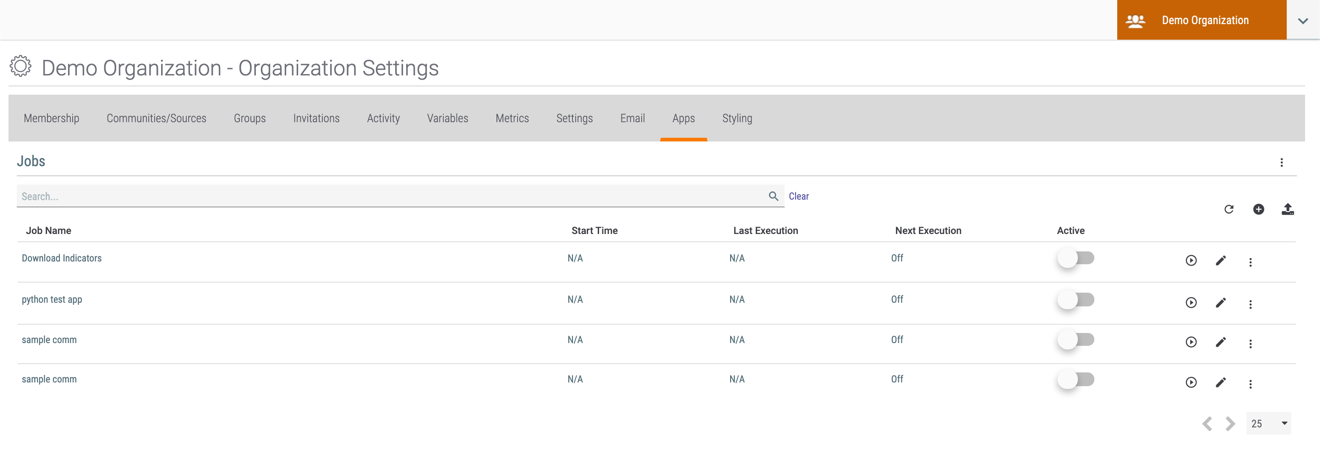
- Click Add Job
 at the top right of the table. The Program step of the Add Job drawer will be displayed (Figure 2).
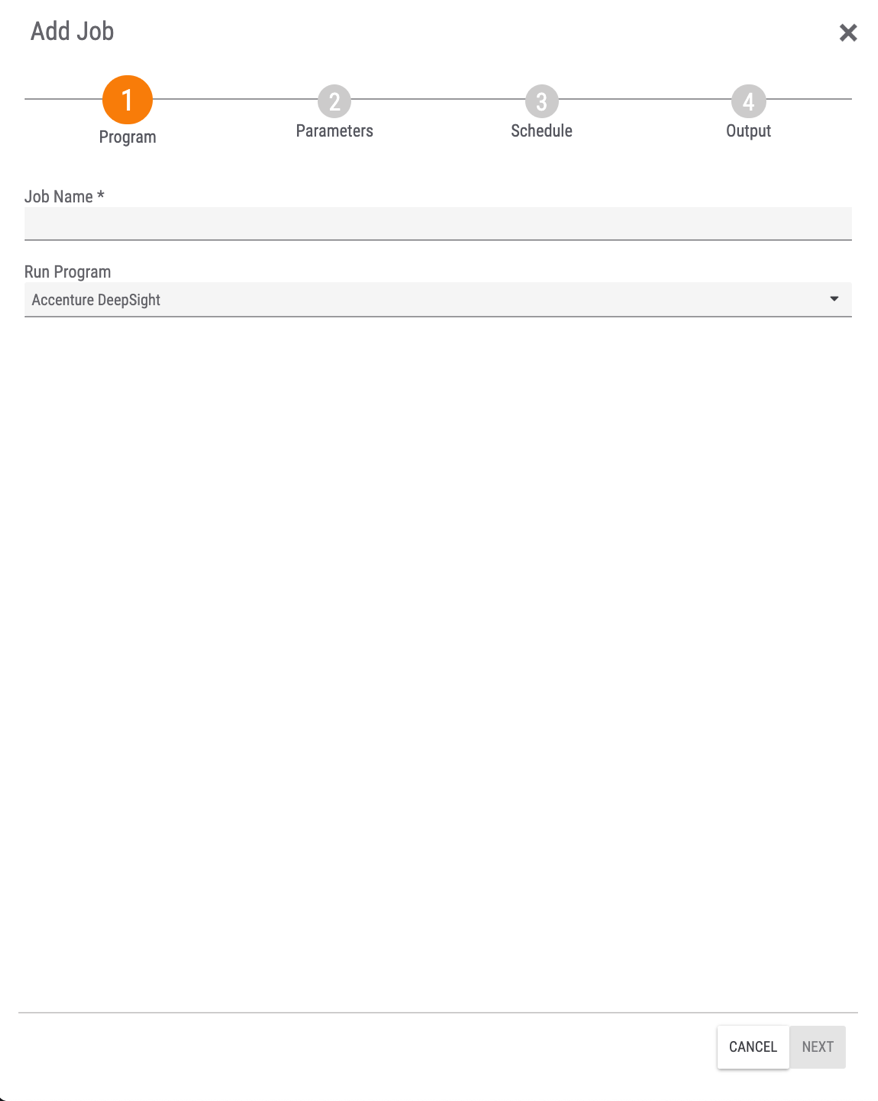
- Job Name: Enter a name (e.g., MITRE ATT&CK) for the Job.
- Run Program: Select MITRE ATT&CK.NoteIf the MITRE ATT&CK 1.1.x App is also installed in your Organization and the Organization has permissions to run the App, two MITRE ATT&CK options will be listed in the Run Program dropdown menu. Select the second MITRE ATT&CK option to configure a Job for the MITRE ATT&CK 2.0.x App.
- Click the NEXT button.
- The Parameters step of the Add Job drawer will be displayed (Figure 3).
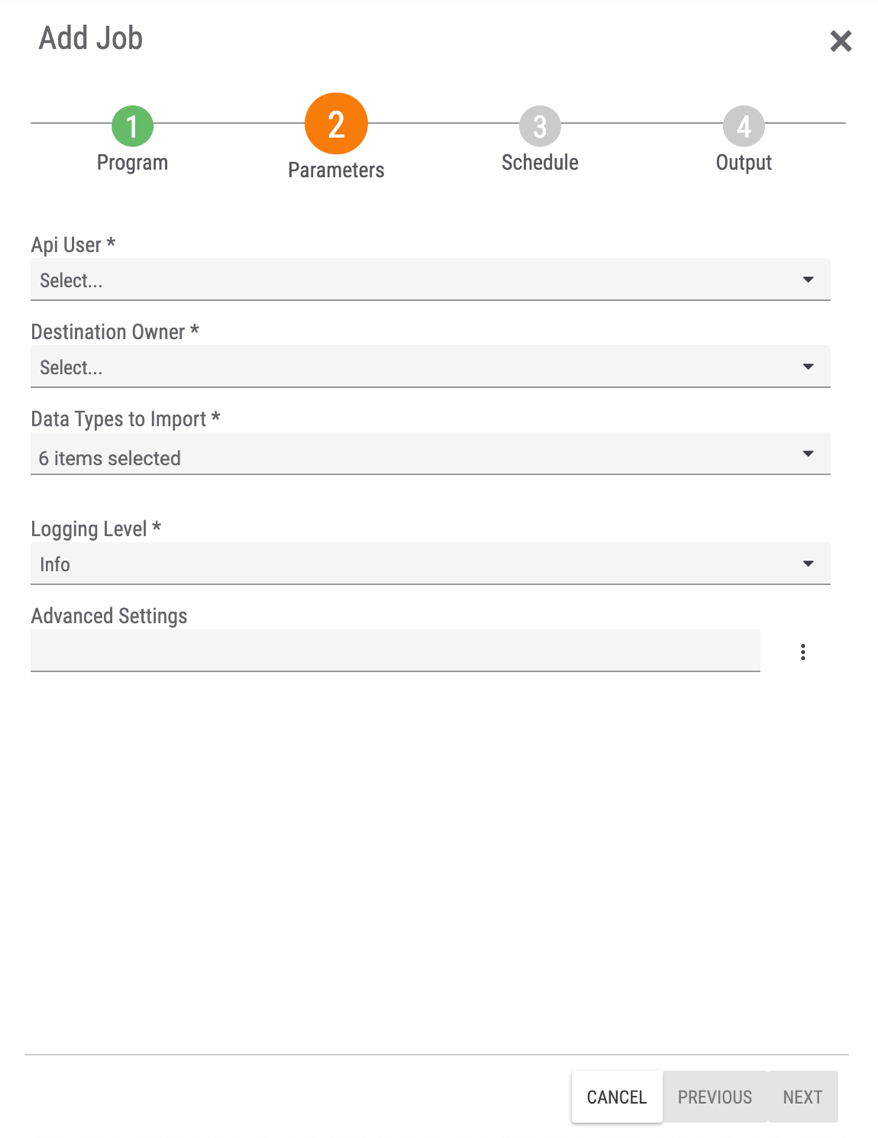
- Api User: Select an API user.
- Destination Owner: Select the owner into which the MITRE ATT&CK data objects are to be added.
- Data Types to Import: Leave all checkboxes (Attack Patterns, Intrusion Sets, Malware, Tactics, Tools, and Document with all Tags) selected.
- Logging Level: Select a logging level for the Job.
- Advanced Settings: By default, the MITRE ATT&CK 2.0.x App will delete Groups in the destination owner that are not included in the MITRE ATT&CK Source feed when the Job is run. To prevent this behavior, enter delete_enabled=false for this parameter.WarningIf the Advanced Settings parameter is left blank, the Job will delete Groups in the destination owner that are not included in the MITRE ATT&CK Source feed each time the Job is run.
- Click the NEXT button.
- The Schedule step of the Add Job drawer will be displayed (Figure 4).
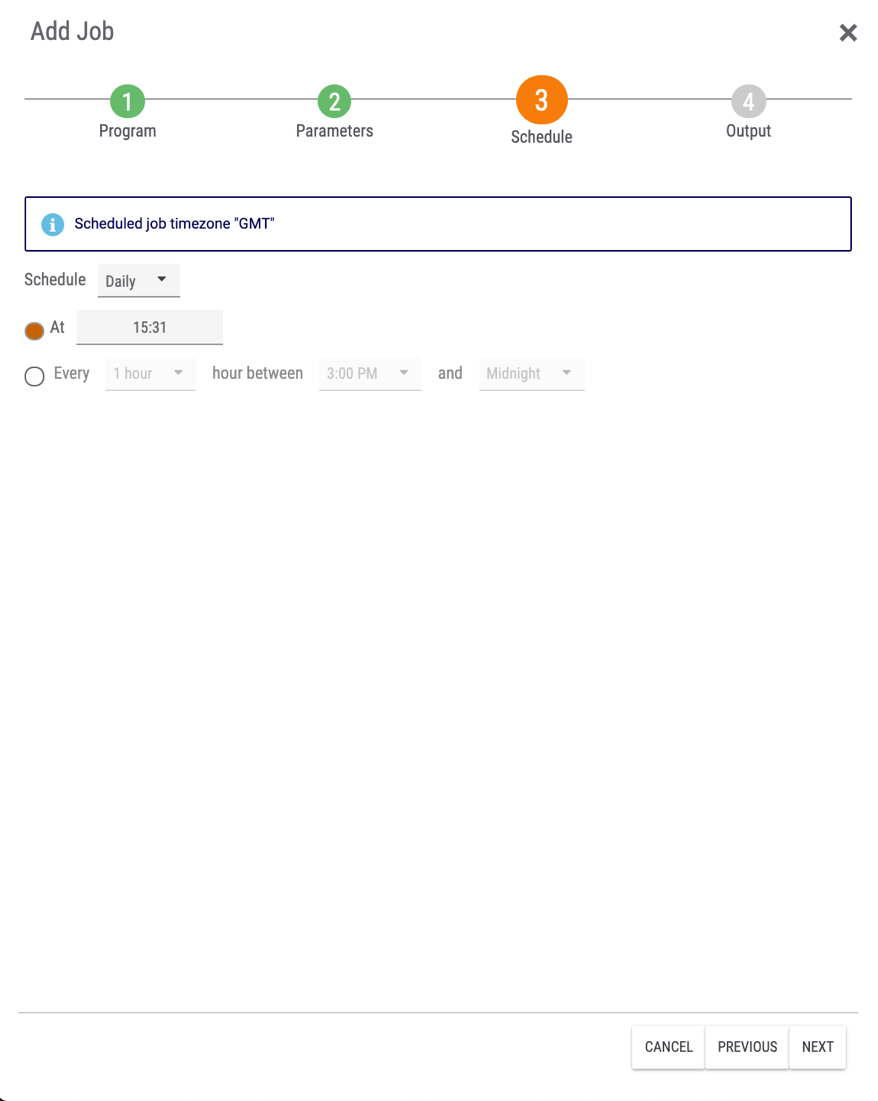
- Schedule: Select the frequency of Job runs.
- At: Select this option to schedule a specific time for Job runs, and use the corresponding field to enter the Job run time.
- Every: Select this option to schedule Job runs to occur at intervals, and use the corresponding fields to set the specific frequency and interval.
- Click the NEXT button.
- The Output step of the Add Job drawer will be displayed (Figure 5).
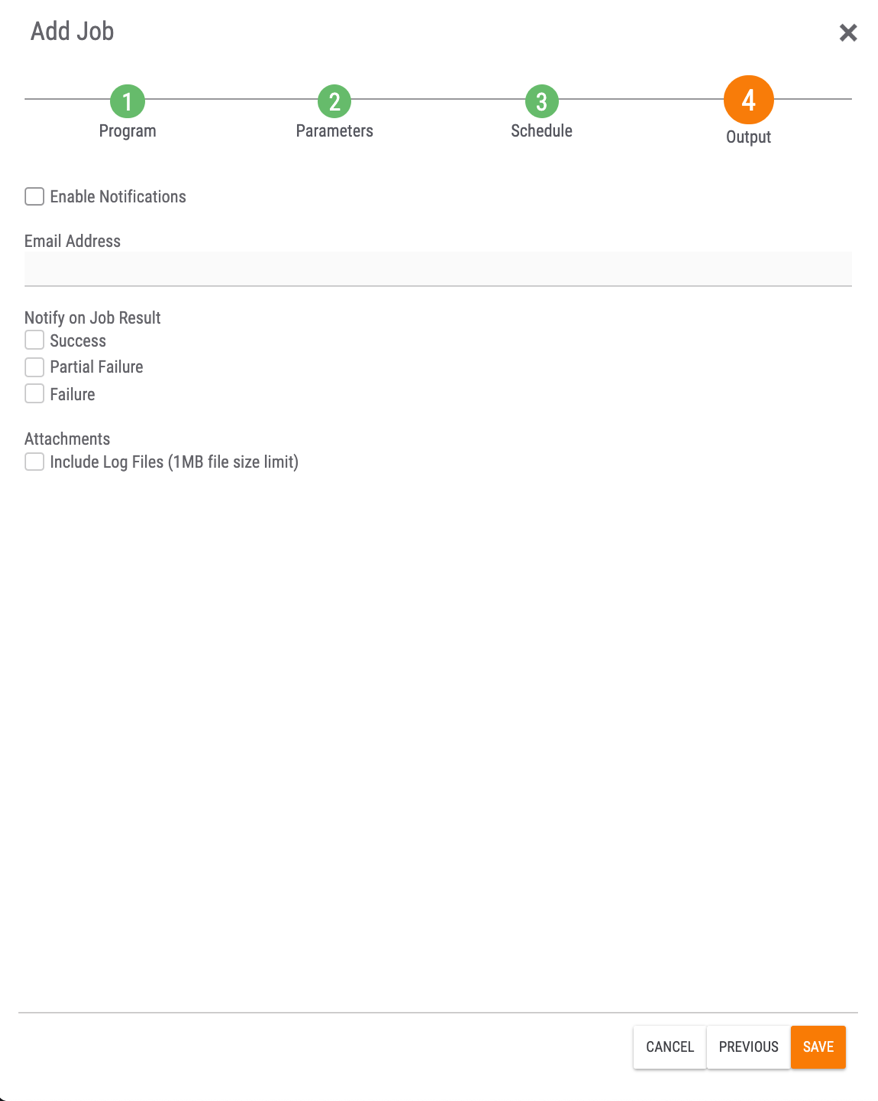
- Enable Notifications: Select this checkbox to enable notifications on the results of Job runs. If this checkbox is not selected, none of the other options in this step will be available.
- Email Address: Enter the email address to which notifications should be sent.
- Notify on Job Result: Select the checkbox(es) for the type(s) of Job results for which notification emails should be sent.
- Attachments: Select the Include Log Files checkbox to include log files in notification emails.
- Click the SAVE button.
- The Jobs view of the Apps screen will now display the MITRE ATT&CK Job.
Activating and Running the MITRE ATT&CK Job
- Toggle the switch in the Active column for the MITRE ATT&CK Job on to activate the Job (Figure 6). A message stating that the Job was successfully activated will be displayed in the lower-left corner of the screen.
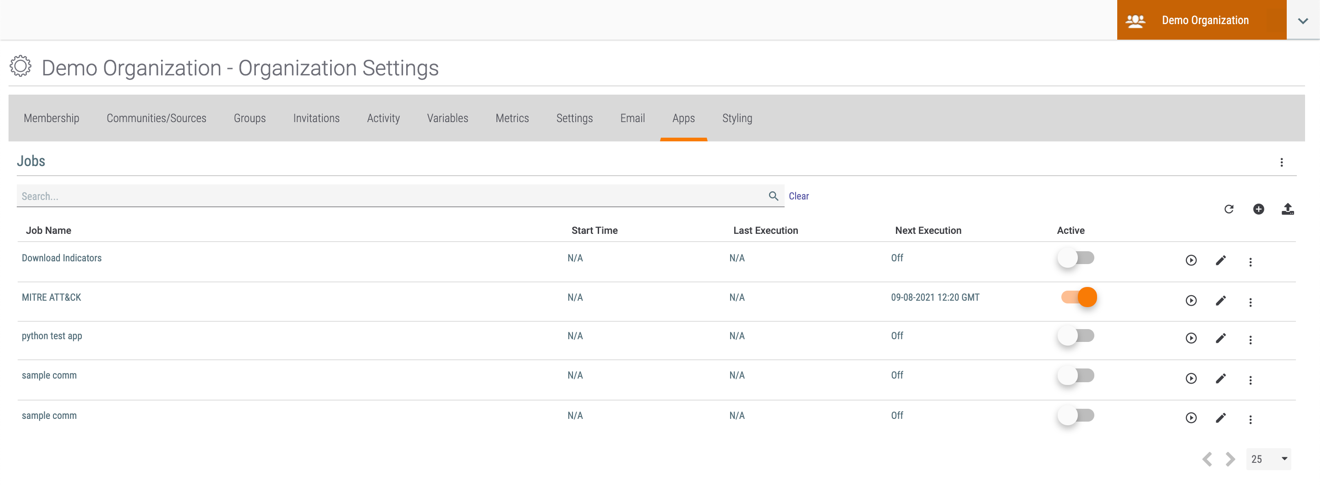
- To add MITRE ATT&CK data objects to the destination owner immediately, run the Job by clicking Run Job
 in the Options column.
 - A window will be displayed prompting you to confirm whether you want to run the MITRE ATT&CK Job at this time. Click the YES button.
- The Start Time column will display the time that the Job started running, and the Last Execution column will display a status of Running for the Job. After about two minutes, refresh the screen. The Last Execution column should display a status of Completed for the Job.
- Navigate to the Browse screen and confirm that the MITRE ATT&CK data objects were added to the destination owner.
ThreatConnect® is a registered trademark, and TC Exchange™ is a trademark, of ThreatConnect, Inc.
MITRE ATT&CK™ is a trademark of The MITRE Corporation.
20119-05 v.03.A
Was this article helpful?


