Adding Tasks to a Case
- 06 Nov 2024
- 8 Minutes to read
-
Print
-
DarkLight
-
PDF
Adding Tasks to a Case
- Updated on 06 Nov 2024
- 8 Minutes to read
-
Print
-
DarkLight
-
PDF
Article summary
Did you find this summary helpful?
Thank you for your feedback!
Adding Manual Tasks
To add a Task to a Case, click the New… button at the upper-right corner of the Case and select Task. Alternatively, scroll to the top of the Tasks and Phases section, hover the cursor anywhere in that section, and click Create Task
 at the top right of the section, above the
 icon. The Create Task drawer will be displayed (Figure 1).
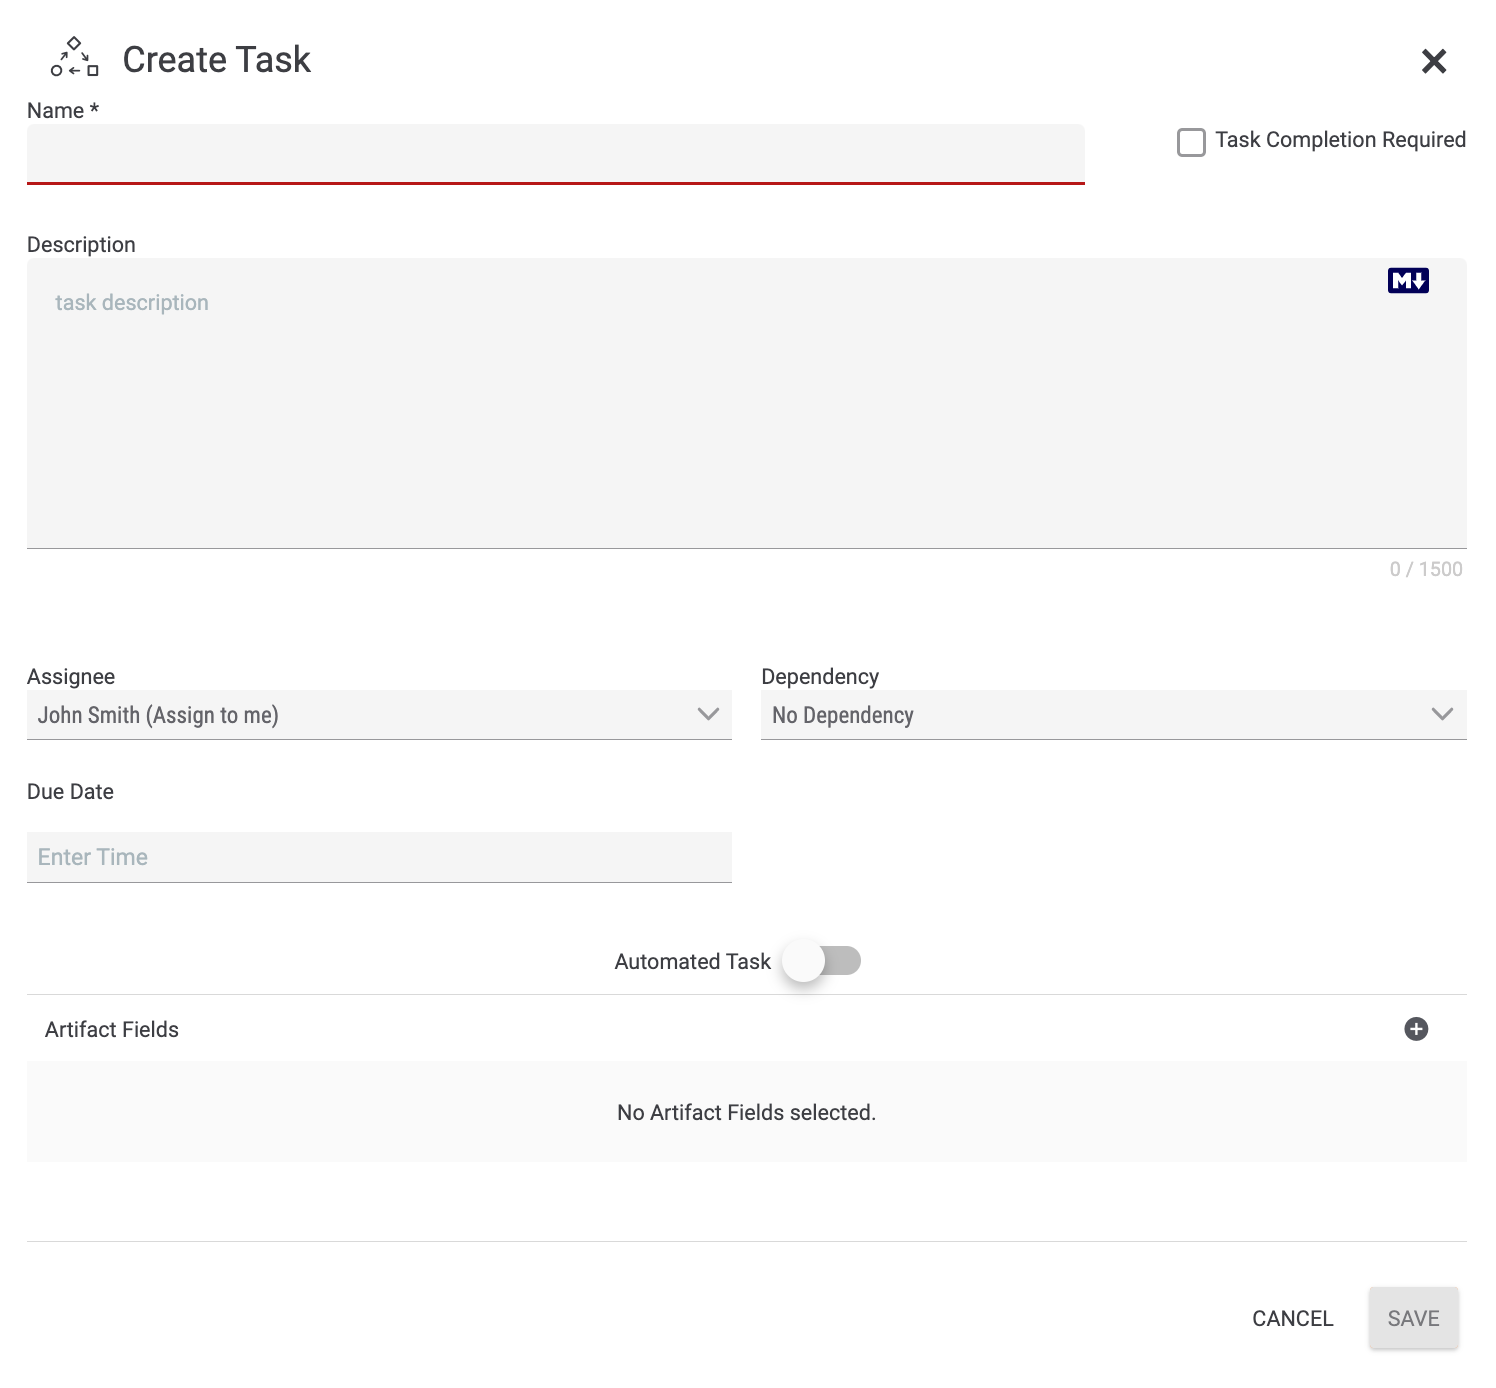
- Name: Enter a name for the Task. The name should describe the goal of the Task (e.g., “Identify Target CVE,” “Prioritize the Incident,” “Review Analytic Standards”).
- Description: Enter a detailed description of the Task in the text box, which supports Markdown.NoteThe Description text box supports the Marked library (https://marked.js.org/).
- Task Completion Required: Select this checkbox to make completion of this Task a requirement for completion of the Case.
- Assignee: Select the user or user group that will be assigned to the Task.
- Dependency: Select an existing Task on which the new Task will be dependent, if desired.
- Due Date: Select the date and time when the Task is due.
- Due In: If you select a Task from the Dependency dropdown menu, the Due Date field will be labeled Due In. (See Figure 6.) Select the unit of time (Days, Hours, or Minutes) and enter the amount of time until this Task (i.e., the dependent Task) is due. For example, if you enter 5 for the amount of time and select Days as the unit of time, the dependent Task will be due 5 days after the Task on which it depends is completed.
- Automated Task: Toggle this slider on to make this Task an automated Task (i.e., a Task that is accomplished by a Workflow Playbook). Otherwise, the Task will be performed manually. This example demonstrates the creation of a manual Task. See the “Adding Automated Tasks” section for further instruction on creating automated Tasks.
Artifact Fields
Artifact Fields define the Artifacts (i.e., the pieces of data) to be collected during the execution of the Task. To add and configure an Artifact Field in the Task, click the plusicon in the Artifact Fields section of the Create Task drawer (Figure 1). The drawer will display options for configuring an Artifact Field (Figure 2).
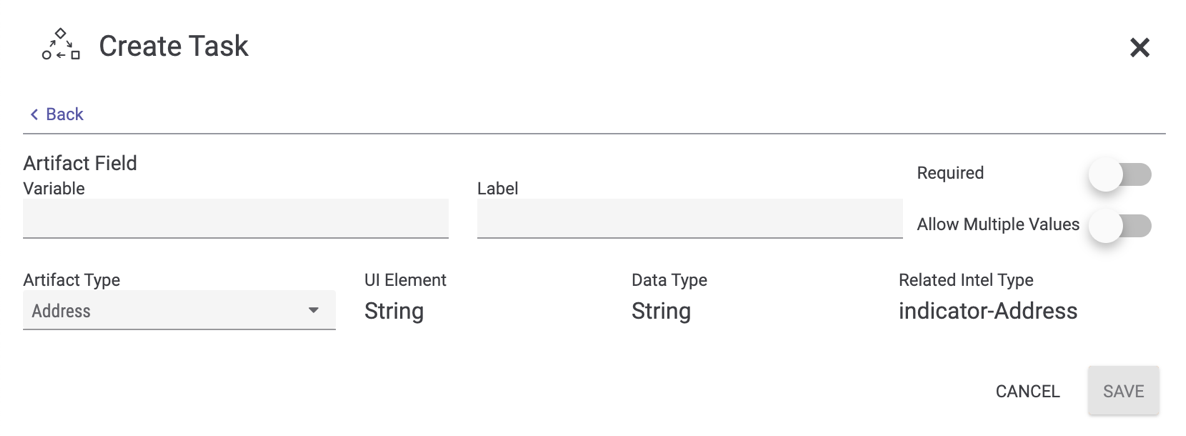
- Variable: Enter a name to identify the Artifact Field (e.g., emailSubject). This name must be unique within a Task (i.e., no two Artifact Fields within the same Task may have the same Variable).
- Label: Enter a brief description of the Artifact Field (e.g., Subject Line of the Email).
- Required: Toggle the slider on to require the collection of the Artifact during the execution of the Task, or toggle the slider off to make the collection of the Artifact optional.
- Allow Multiple Values: Toggle the slider on to allow multiple values to be collected for this Artifact during the execution of the Task, or toggle the slider off to ensure that only one value is collected for this Artifact during the execution of the Task.
- Artifact Type: Select the data type for the Artifact. The potential Artifact types include all Indicator types, as well as several other data types determined by ThreatConnect and your System Administrator.
- UI Element: This field is automatically populated with the UI Element—that is, the way in which the user executing the Task is prompted to enter information—that corresponds to the selected Artifact Type. For example, for an Artifact Type of “Address,” the UI Element will be “String,” and for an Artifact Type of “Timestamp,” the UI Element will be “DateTimePicker.”
- Data Type: This field is automatically populated with the data type that corresponds to the selected Artifact Type. For example, for an Artifact Type of “Address,” the Data Type will be “String,” and for an Artifact Type of “Timestamp,” the Data Type will be “TimeStamp.”NoteIf you toggle the Allow Multiple Values slider on, the Data Type will be an Array. For example, for an Artifact Type of “Address,” the Data Type will be “StringArray,” and for an Artifact Type of “TimeStamp,” the Data Type will be “TimeStampArray.”
- Related Intel Type: If the selected Artifact Type maps to a ThreatConnect Indicator type, this field will be populated automatically with that ThreatConnect Indicator type. For example, for an Artifact Type of “File” or “File Hash,” the Related Intel Type is “indicator-File.”ImportantThis mapping works only for single-value Indicator types. For example, the Registry Key Indicator type contains more than one value (key name, value name, and value type), so there will be no Related Intel Type provided when “Registry Key” is selected as the Artifact Type.
- Click the SAVE button to save the Artifact Field.
The Artifact Field will now be displayed in the Artifact Fields section of the Create Task drawer (Figure 3).
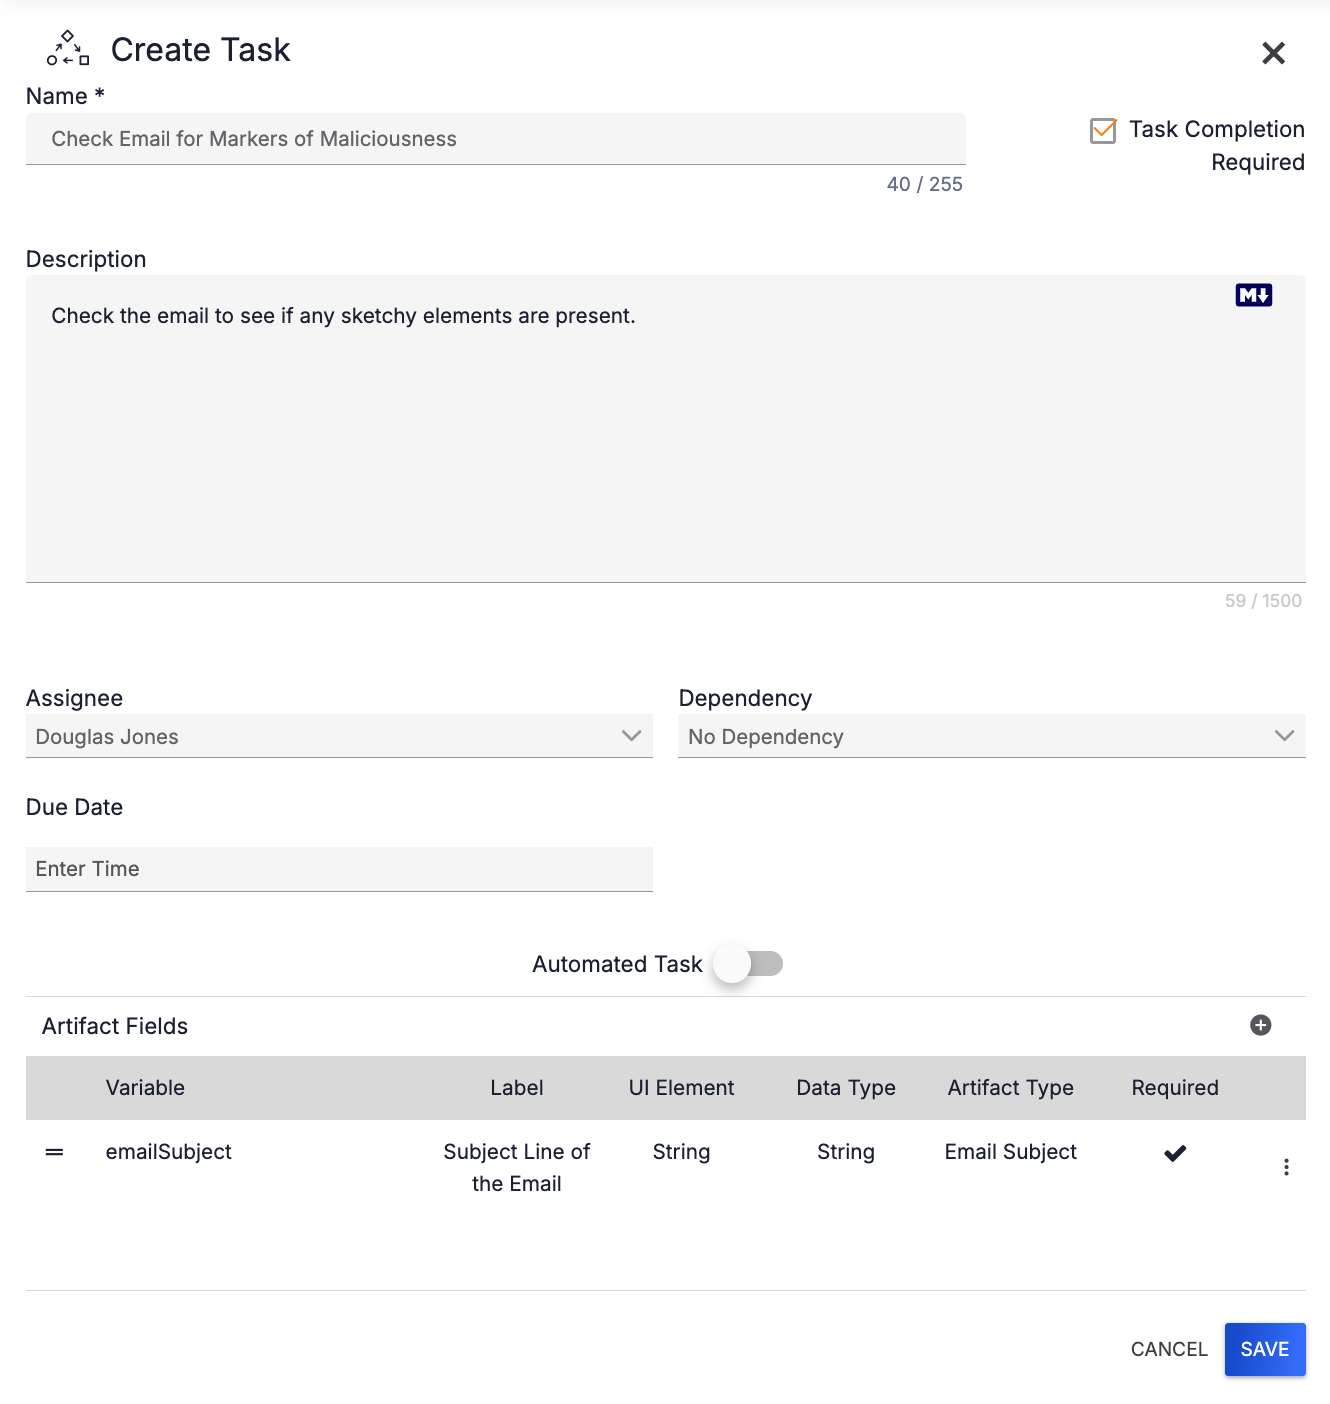
The vertical ellipsis to the right of the Required column for an Artifact Field provides options for editing and removing the Artifact Field. After more than one Artifact Field has been entered, use the = icon to drag an Artifact Field to a different location in the table.
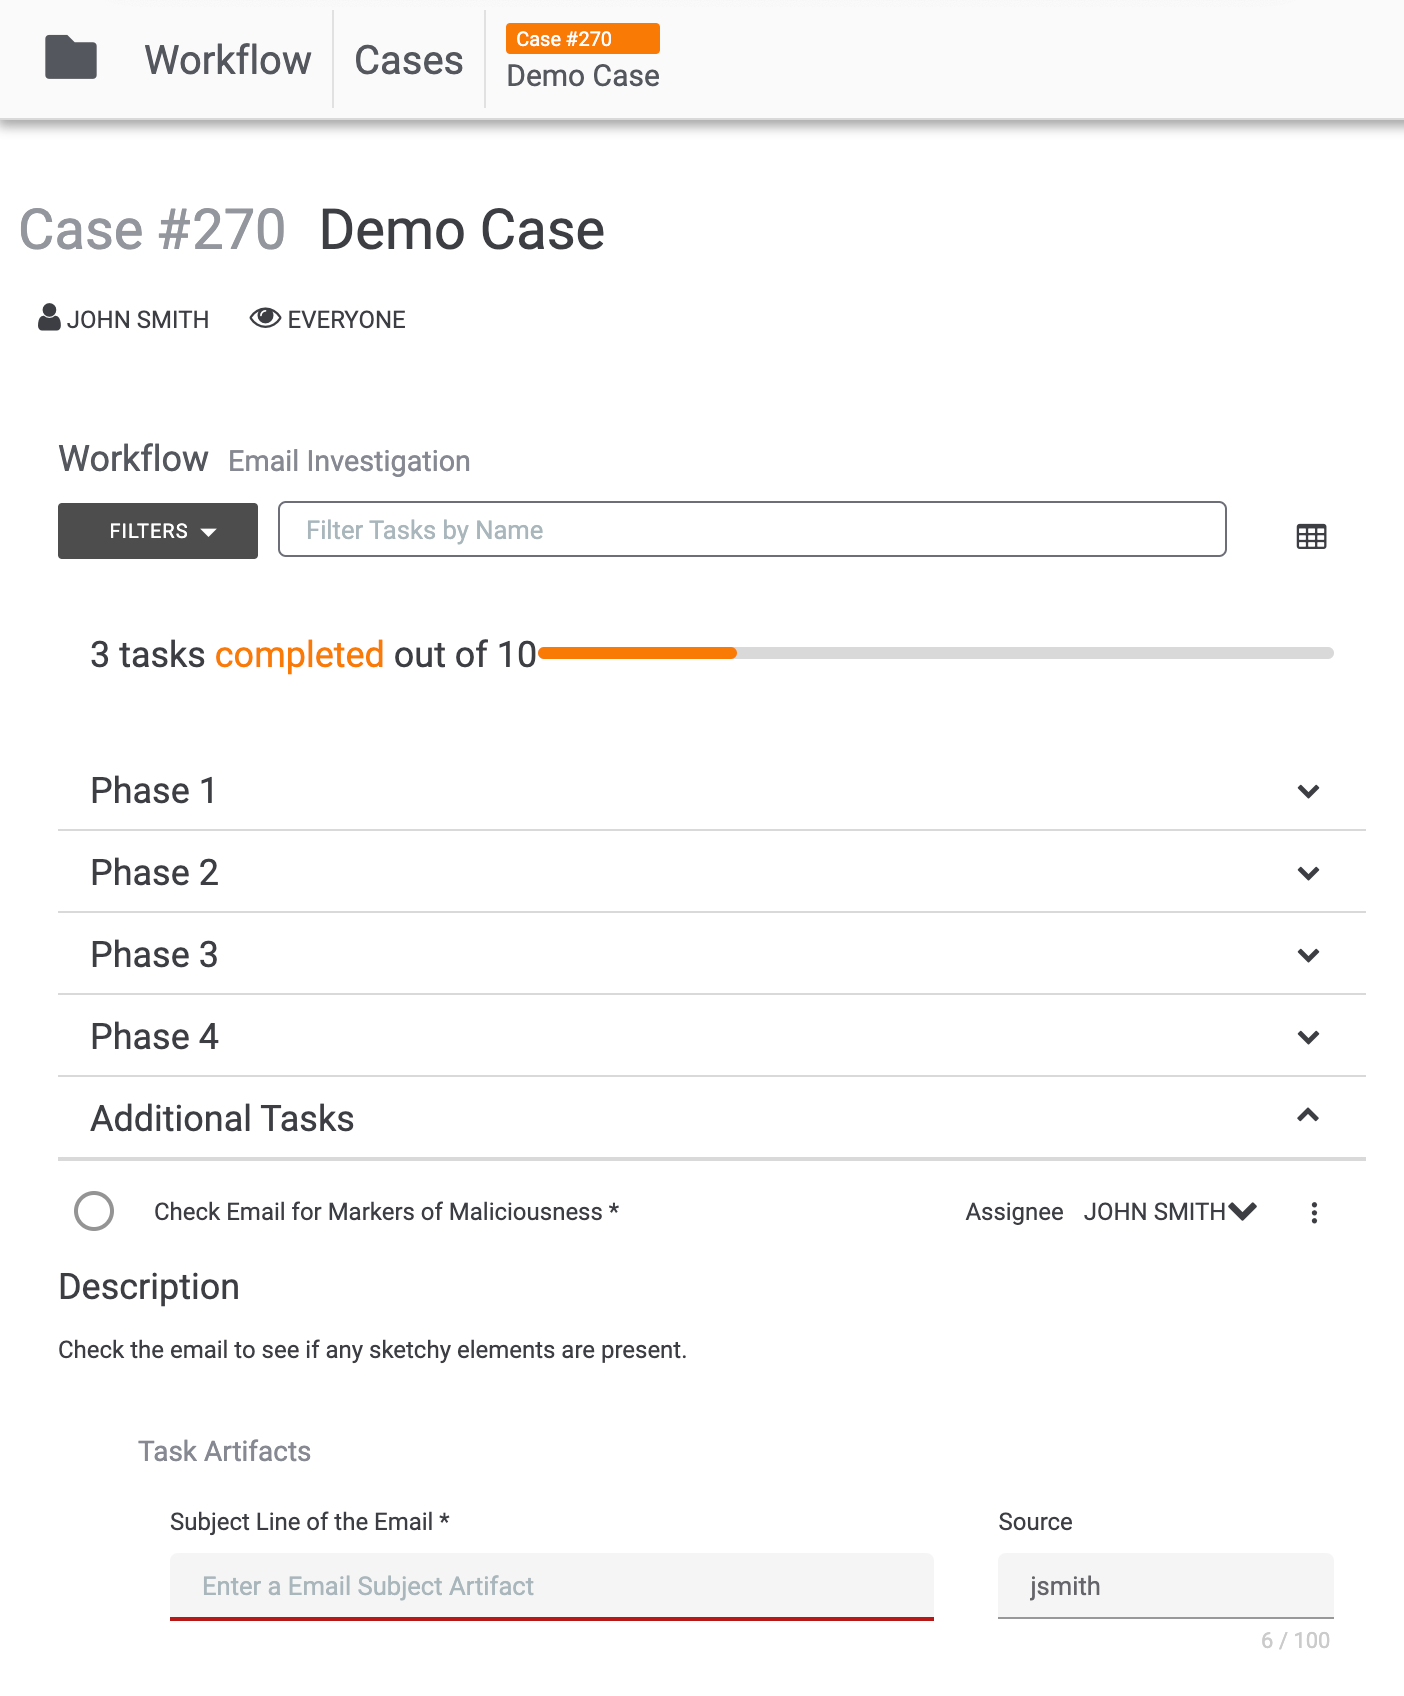
Click the SAVE button to create the Task. It will be displayed at the bottom of the Phases and Tasks section in the Additional Tasks subsection (Figure 4).
Adding Automated Tasks
Fill in the fields in the top half of the Create Task drawer (Figure 1), and then toggle the Automated Task slider on. The drawer will display all Workflow Playbooks in your Organization (Figure 5).

- Use the search bar displayed above the table to filter Playbooks by name, if desired.
- To create a new Workflow Playbook that will run the automated task, click CREATE NEW PLAYBOOK. The Create Playbook window will be displayed. Enter the name and, if desired, description of the new Workflow Playbook, and click the SAVE button. The Playbook Designer will open in a new browser tab and display the newly created Playbook with a Workflow Trigger added to it. After configuring and activating the Playbook, return to the browser tab with the Create Task drawer open and click REFRESH to refresh the list of Playbooks and display a status of Active for the newly created Playbook.
Select the Workflow Playbook that will run the automated Task. The Playbook will be displayed at the bottom of the Create Task drawer (Figure 6).
Note
If you try to select a Playbook with a status of Inactive, like the Phishing Alert Playbook in Figure 5, a message will be displayed stating you can select only an active Playbook. This message will include a link to open the selected Playbook in the Playbook Designer in a new browser tab. After activating the selected Playbook, return to the browser tab with the Create Task drawer open and click REFRESH to refresh the list of Playbooks and display a status of Active for the newly created Playbook.

- CHANGE: To select a different Workflow Playbook, click CHANGE under the name of the Playbook. The drawer will display all active Workflow Playbooks again (Figure 5).
- Run automatically after dependent task completion: Select this checkbox to have the Task run automatically after the completion of the Task on which it is dependent. If this checkbox is selected, the Assignee dropdown menu will disappear. This checkbox will not be displayed if the automated Task has no dependency.
Click INPUTS > at the lower-right corner of the drawer to display the inputs required by the Workflow Playbook (Figure 7).
The bottom left of the drawer displays all input fields for the Playbook. You may populate these fields when running the Playbook, or you may fill them in at this time to lock in specific values before the Playbook is run.
You can populate input fields with Artifacts in the Case, variables in your Organization, or, if applicable, output variables from the Task on which the automated Task is dependent (i.e., Workflow variables). You can also enter values manually into an input field’s text box.
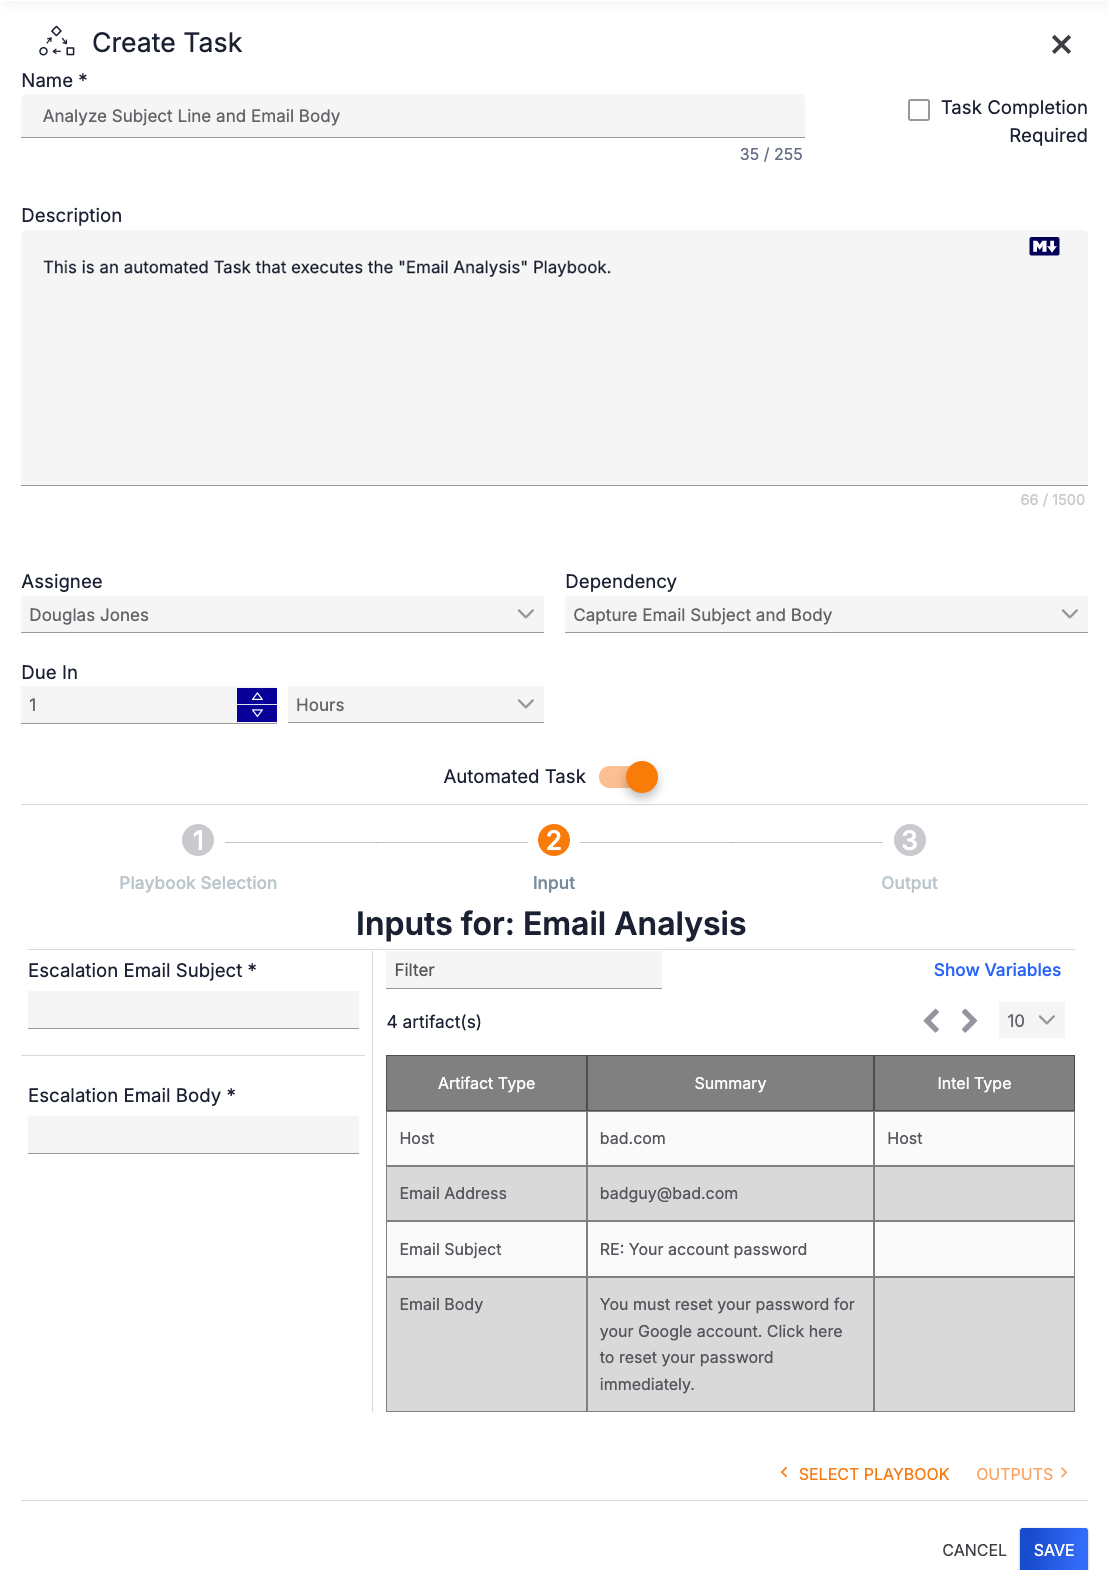
By default, the table at the bottom right of the drawer displays all Artifacts in the Case that you can use to populate an input field. Use the Filter field at the top to enter text to filter the Artifacts by keyword. To populate an input field with an Artifact, click on the Artifact and drag it to the field.
To view variables in your Organization and Workflow variables that you can use to populate an input field, click Show Variables at the top right of the table. The table of Artifacts will be replaced with a table of variables (Figure 8).
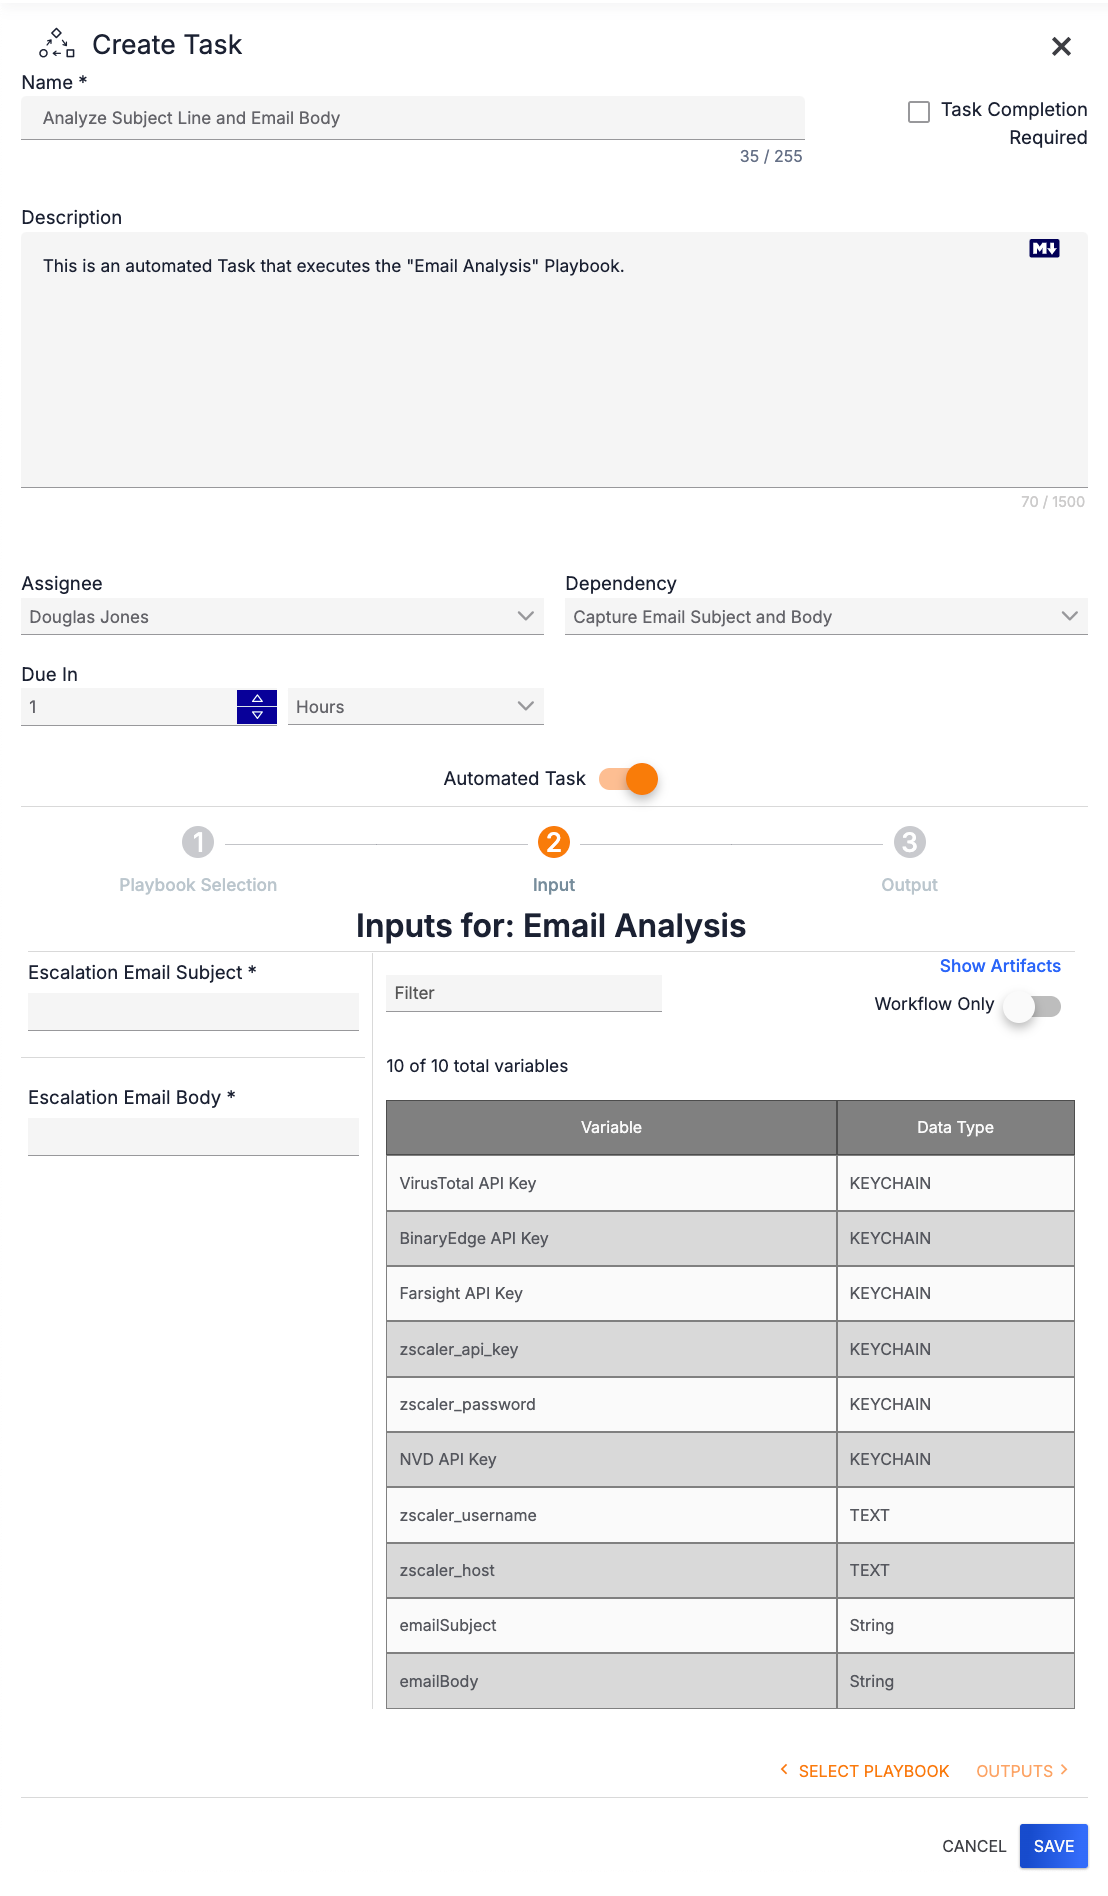
To view Workflow variables only, toggle the Workflow Only slider on. This slider will not be displayed if there are no available output variables from the automated Task’s dependency, or if the automated Task has no dependencies. Use the Filter field at the top to enter text to filter the variables by keyword. To populate an input field with a variable, click on the variable and drag it to the field. To toggle back to the Artifacts table, click Show Artifacts at the top right of the table.
After filling out the input fields required by the Workflow Playbook, click OUTPUTS > at the lower-right corner of the drawer to display the outputs it will produce (Figure 9).
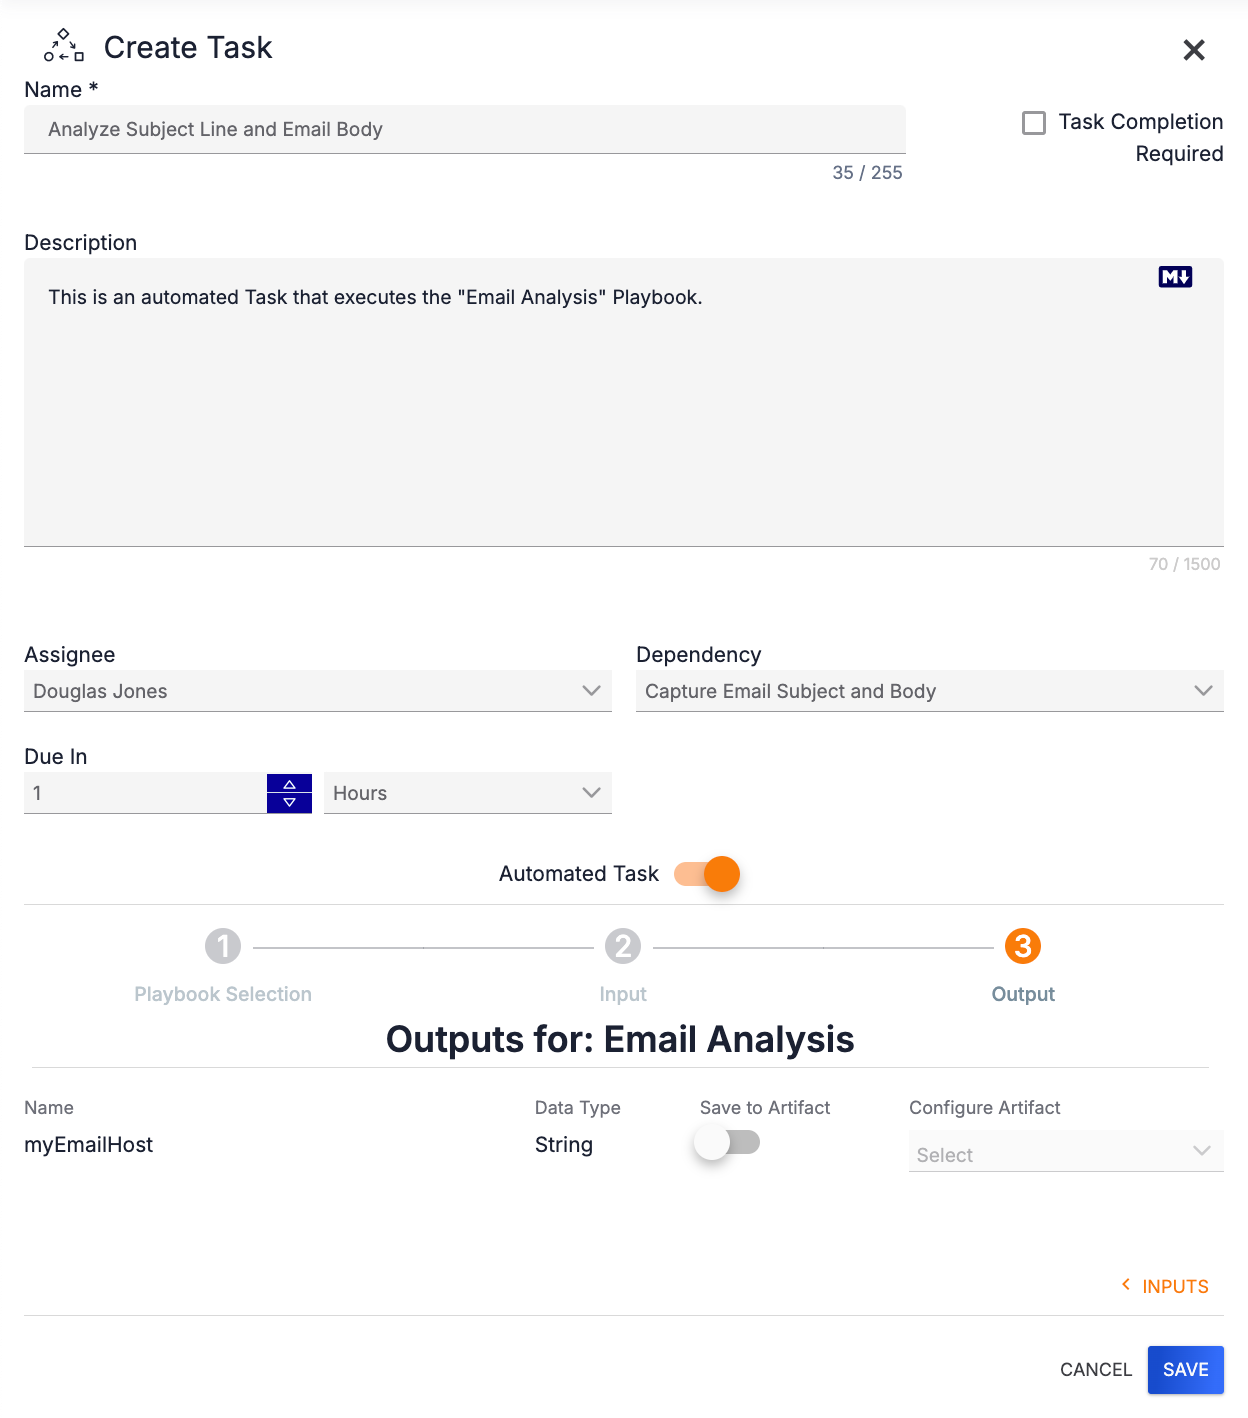
To save an output item as an Artifact, toggle the Save to Artifact slider on. Fields for configuring the Artifact will be displayed (Figure 10).
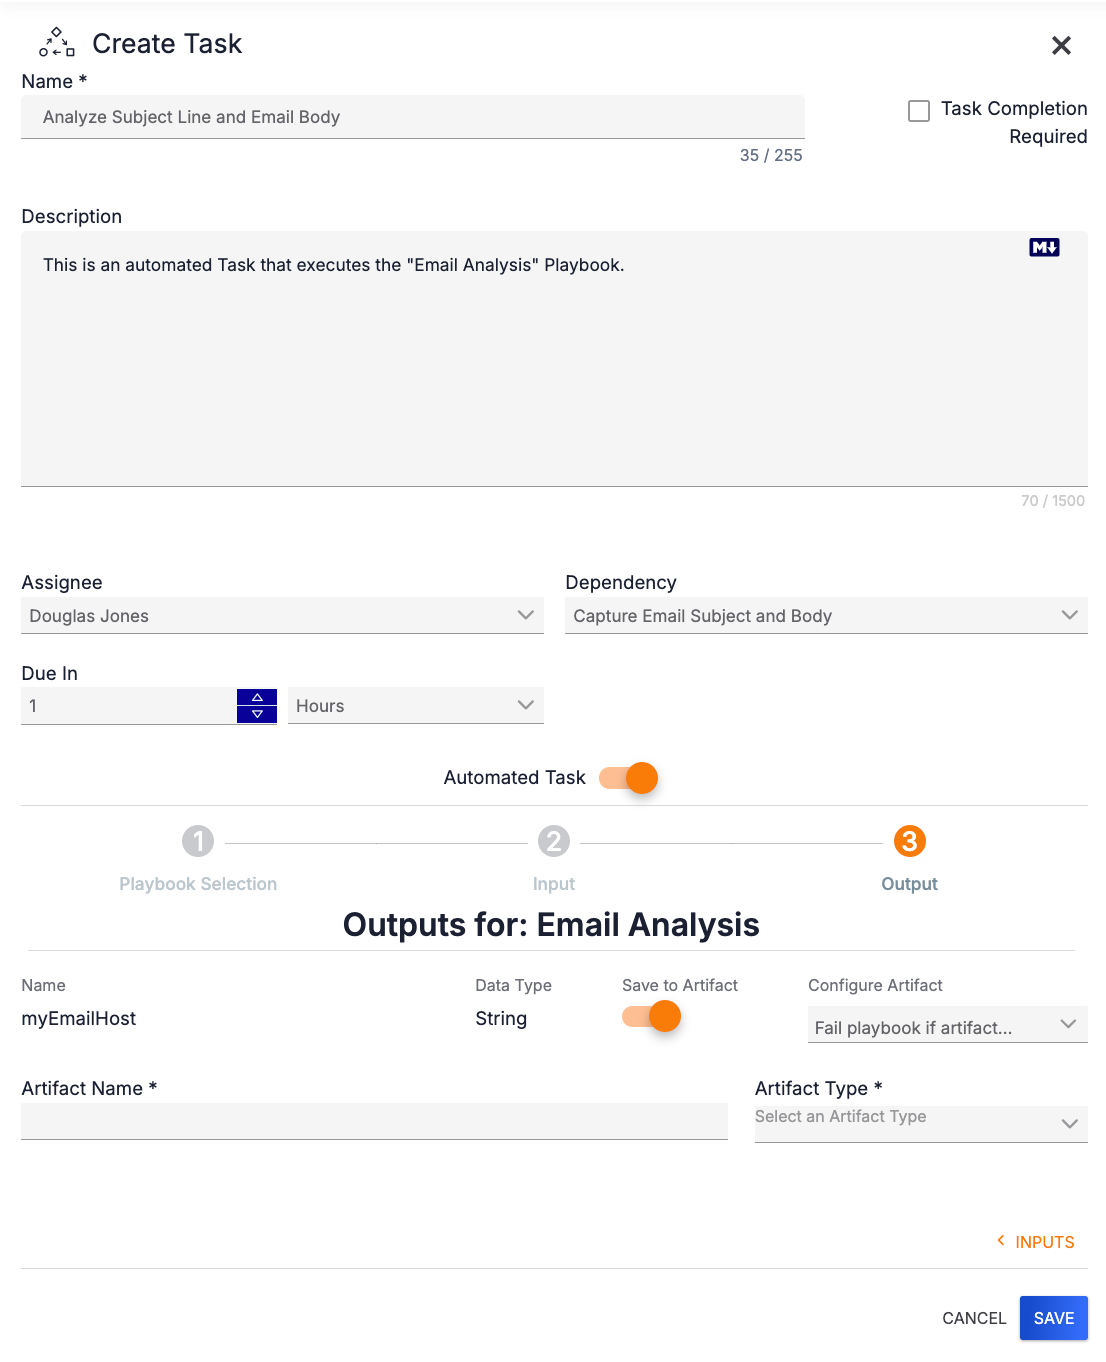
- Artifact Name: Enter a name for the Artifact.
- Artifact Type: Select the type of Artifact being saved. Only Artifact Types that map to the Data Type of the output will be provided in the dropdown menu. For example, if the Data Type is String, then the Artifact Type menu will display only types that are Strings.
- Configure Artifact: Select the failure option(s) for the Playbook. Note that no selection is required for this field, and more than one option may be selected. Available options include:
- Output is required: Select this option to make the Playbook fail if it does not produce any output.
- Fail playbook if artifact validation fails: Select this option to make the Playbook fail if it produces output that fails Artifact validation.
Click the SAVE button to save the Task. It will be displayed at the bottom of the Phases and Tasks section in the Additional Tasks subsection.
ThreatConnect® is a registered trademark of ThreatConnect, Inc.
20128-03 v.02.D
Was this article helpful?
