New Features and Functionality
ThreatConnect 8.1 builds upon the Agentic Threat Intelligence Platform (ATIP) foundation introduced as an early-beta feature in version 8.0. This release extends the agentic capabilities in the TIP from a curated set of pre-built agents to a platform you can actively build on and tailor to how your team already works.
Version 8.1 lets you create your own AI agents inside the Playbooks canvas, adding AI to the already highly customizable automation and orchestration functionality available in the platform. In addition, you can now configure the agentic capabilities to use your own LLM provider instead of relying solely on ThreatConnect’s managed model layer, and you can interact with data and automations available in the platform via external AI clients using a new TIP Model Context Protocol (MCP) server. Alongside these agentic offerings, 8.1 includes native, branded, generative AI reporting that lets your organization’s look and feel carry through to finished intelligence products, as well as another phase of improvements to the Case Details screen.
Build Agentic Playbooks
In version 8.1, you can extend Playbooks by adding Agent triggers and Agent nodes (base agents). This functionality lets you customize the out-of-the-box agents introduced in version 8.0 to your own use cases, incorporate AI into existing workflows, and build new AI-powered playbooks.
Once agent building is enabled on your instance, you will gain access to the Agent trigger type and Agent node type in the Playbooks canvas. You can add these elements to a playbook the same way you'd add any other trigger or app—via a new Add Node dropdown that groups the options for adding agents, apps, operators, and triggers in a single, convenient location.
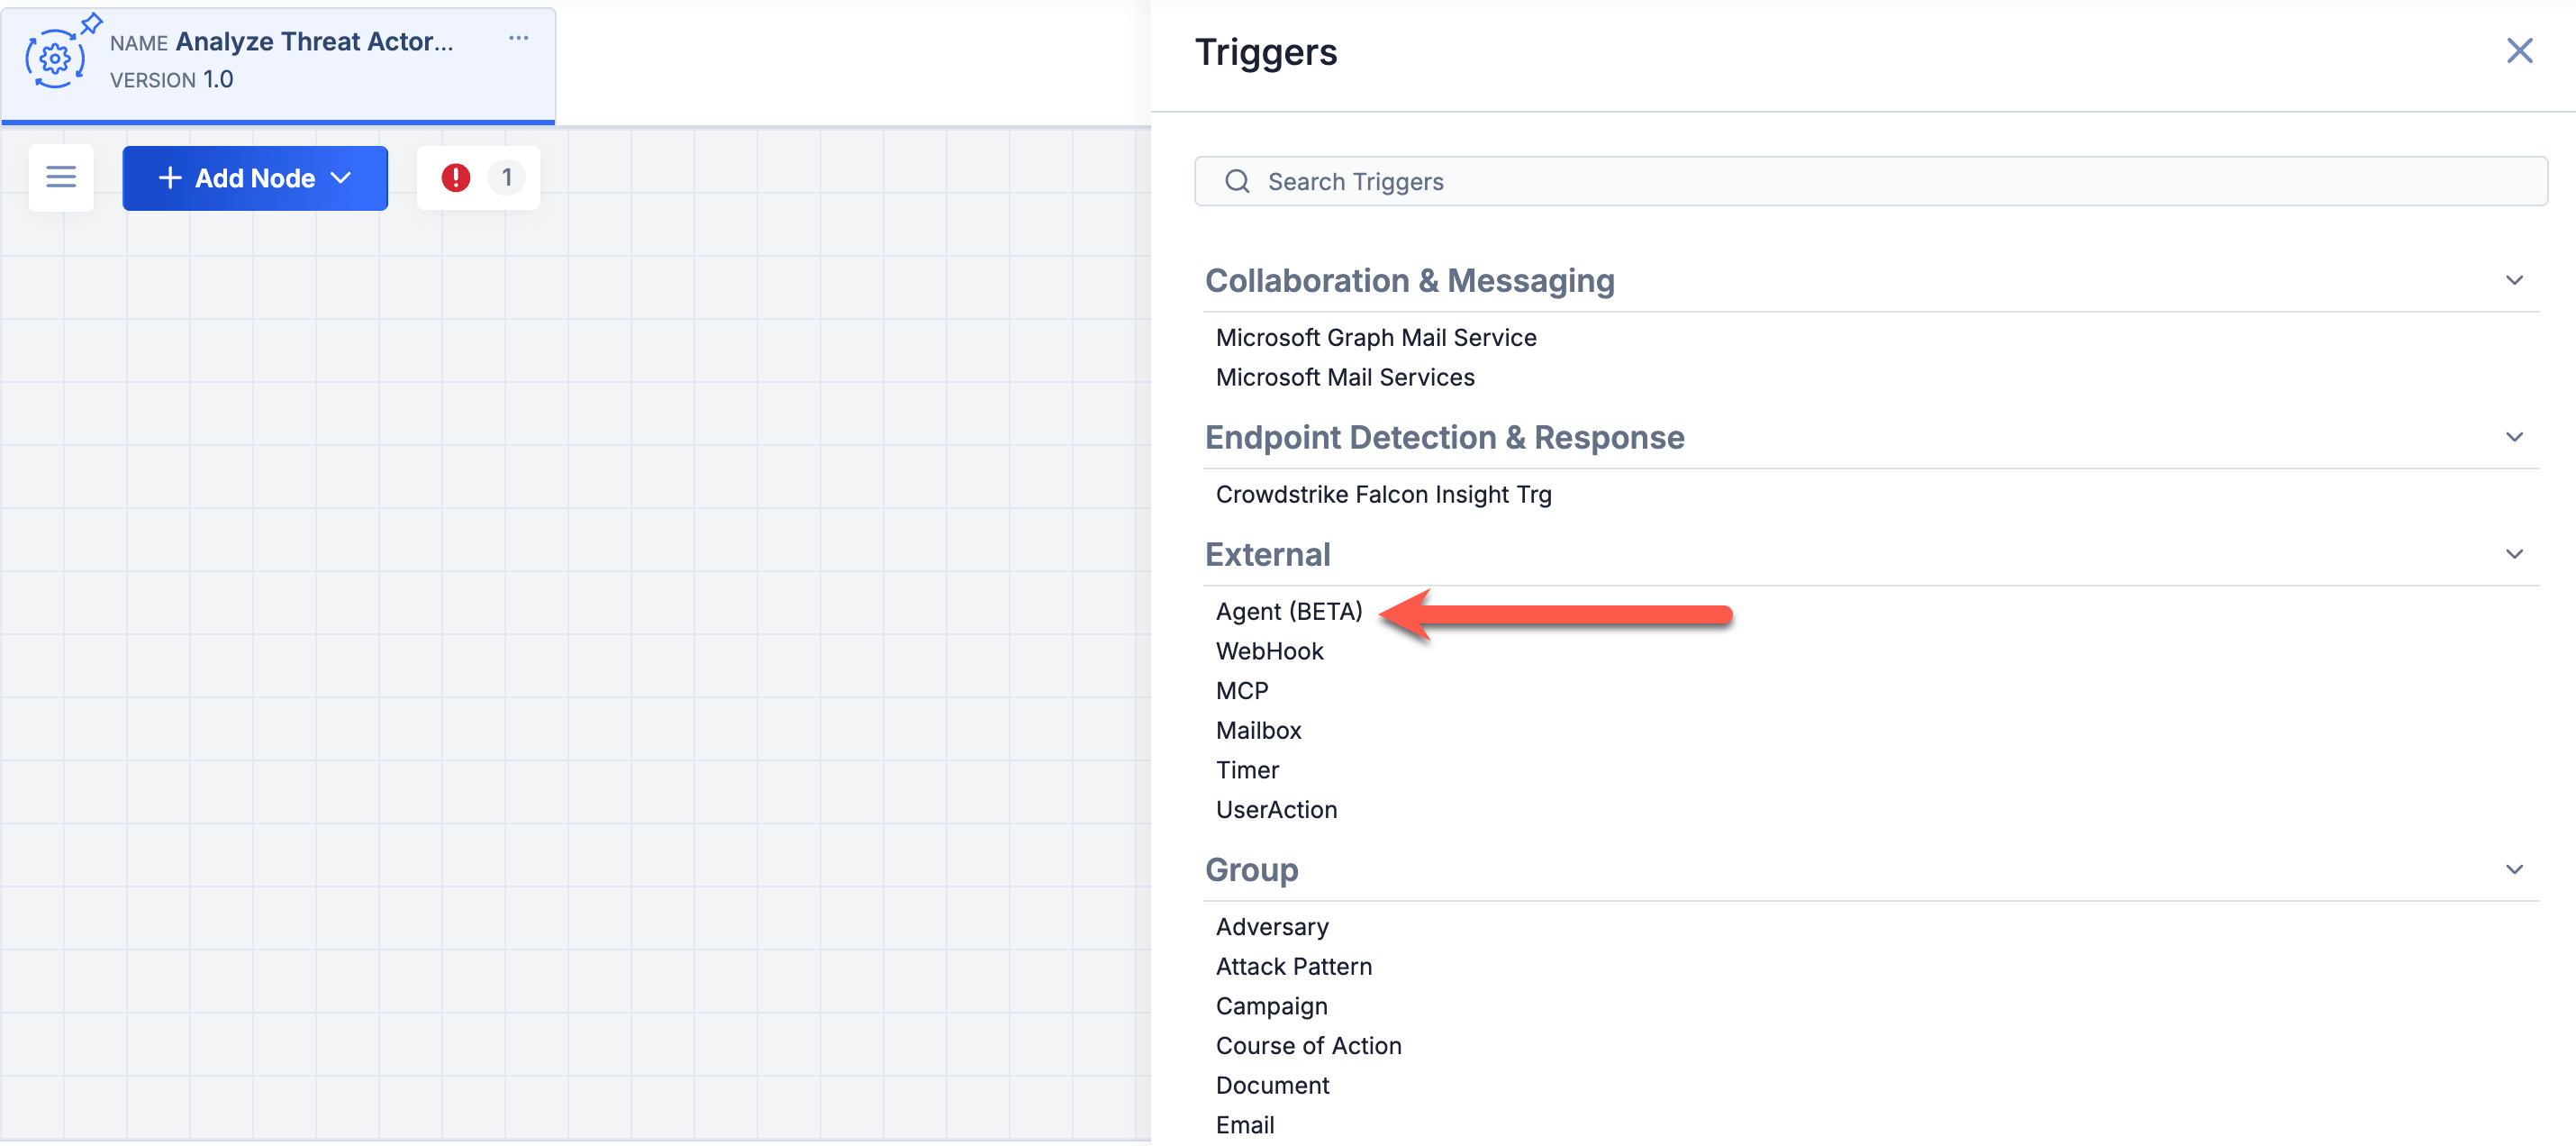
Add an Agent trigger to a playbook
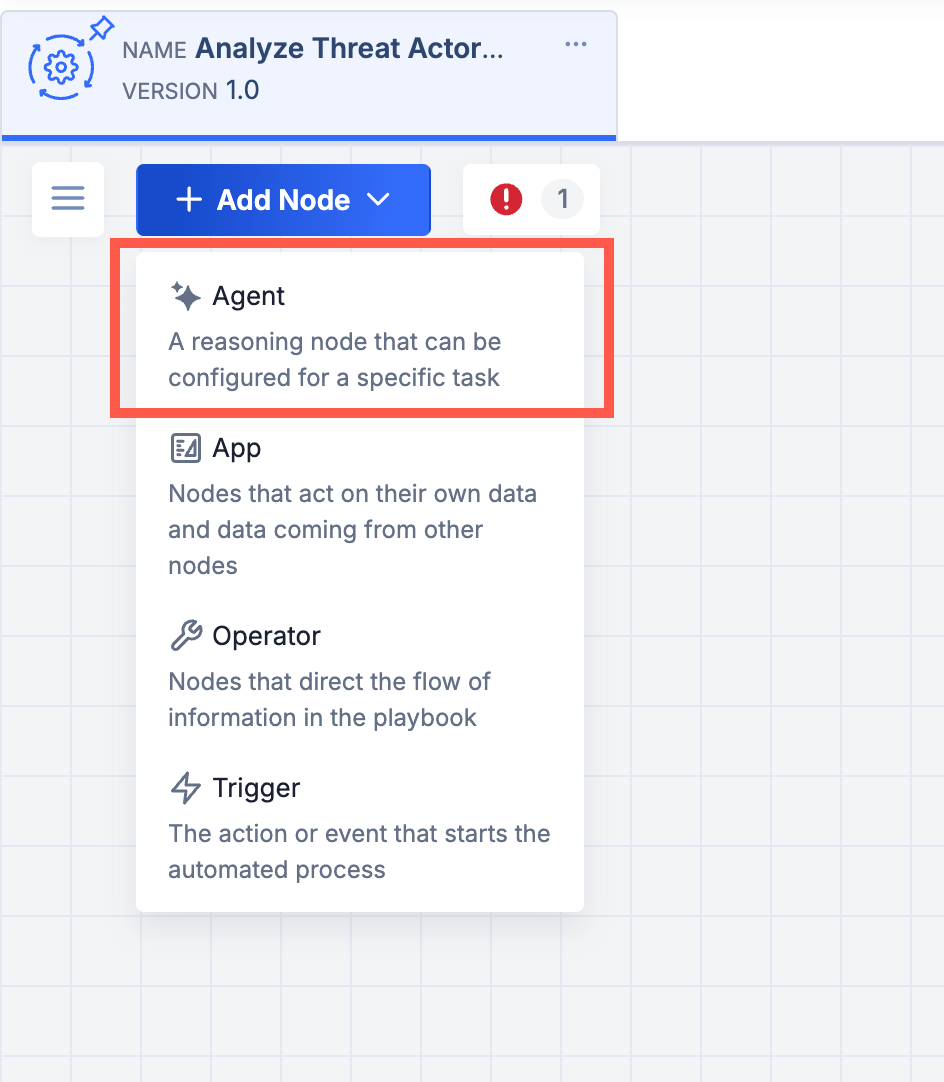
Add an Agent node to a playbook via the new Add Node dropdown
Agent Trigger
When you add an Agent trigger to a playbook, the trigger is automatically assigned a unique name that you can customize to your liking, along with details such as platform areas and objects from which the agent can be called, conversation hints that the Ask AI drawer can display to help users call the agent from there, and suggestions the agent can make at the end of a chat in the Ask AI drawer for further action.
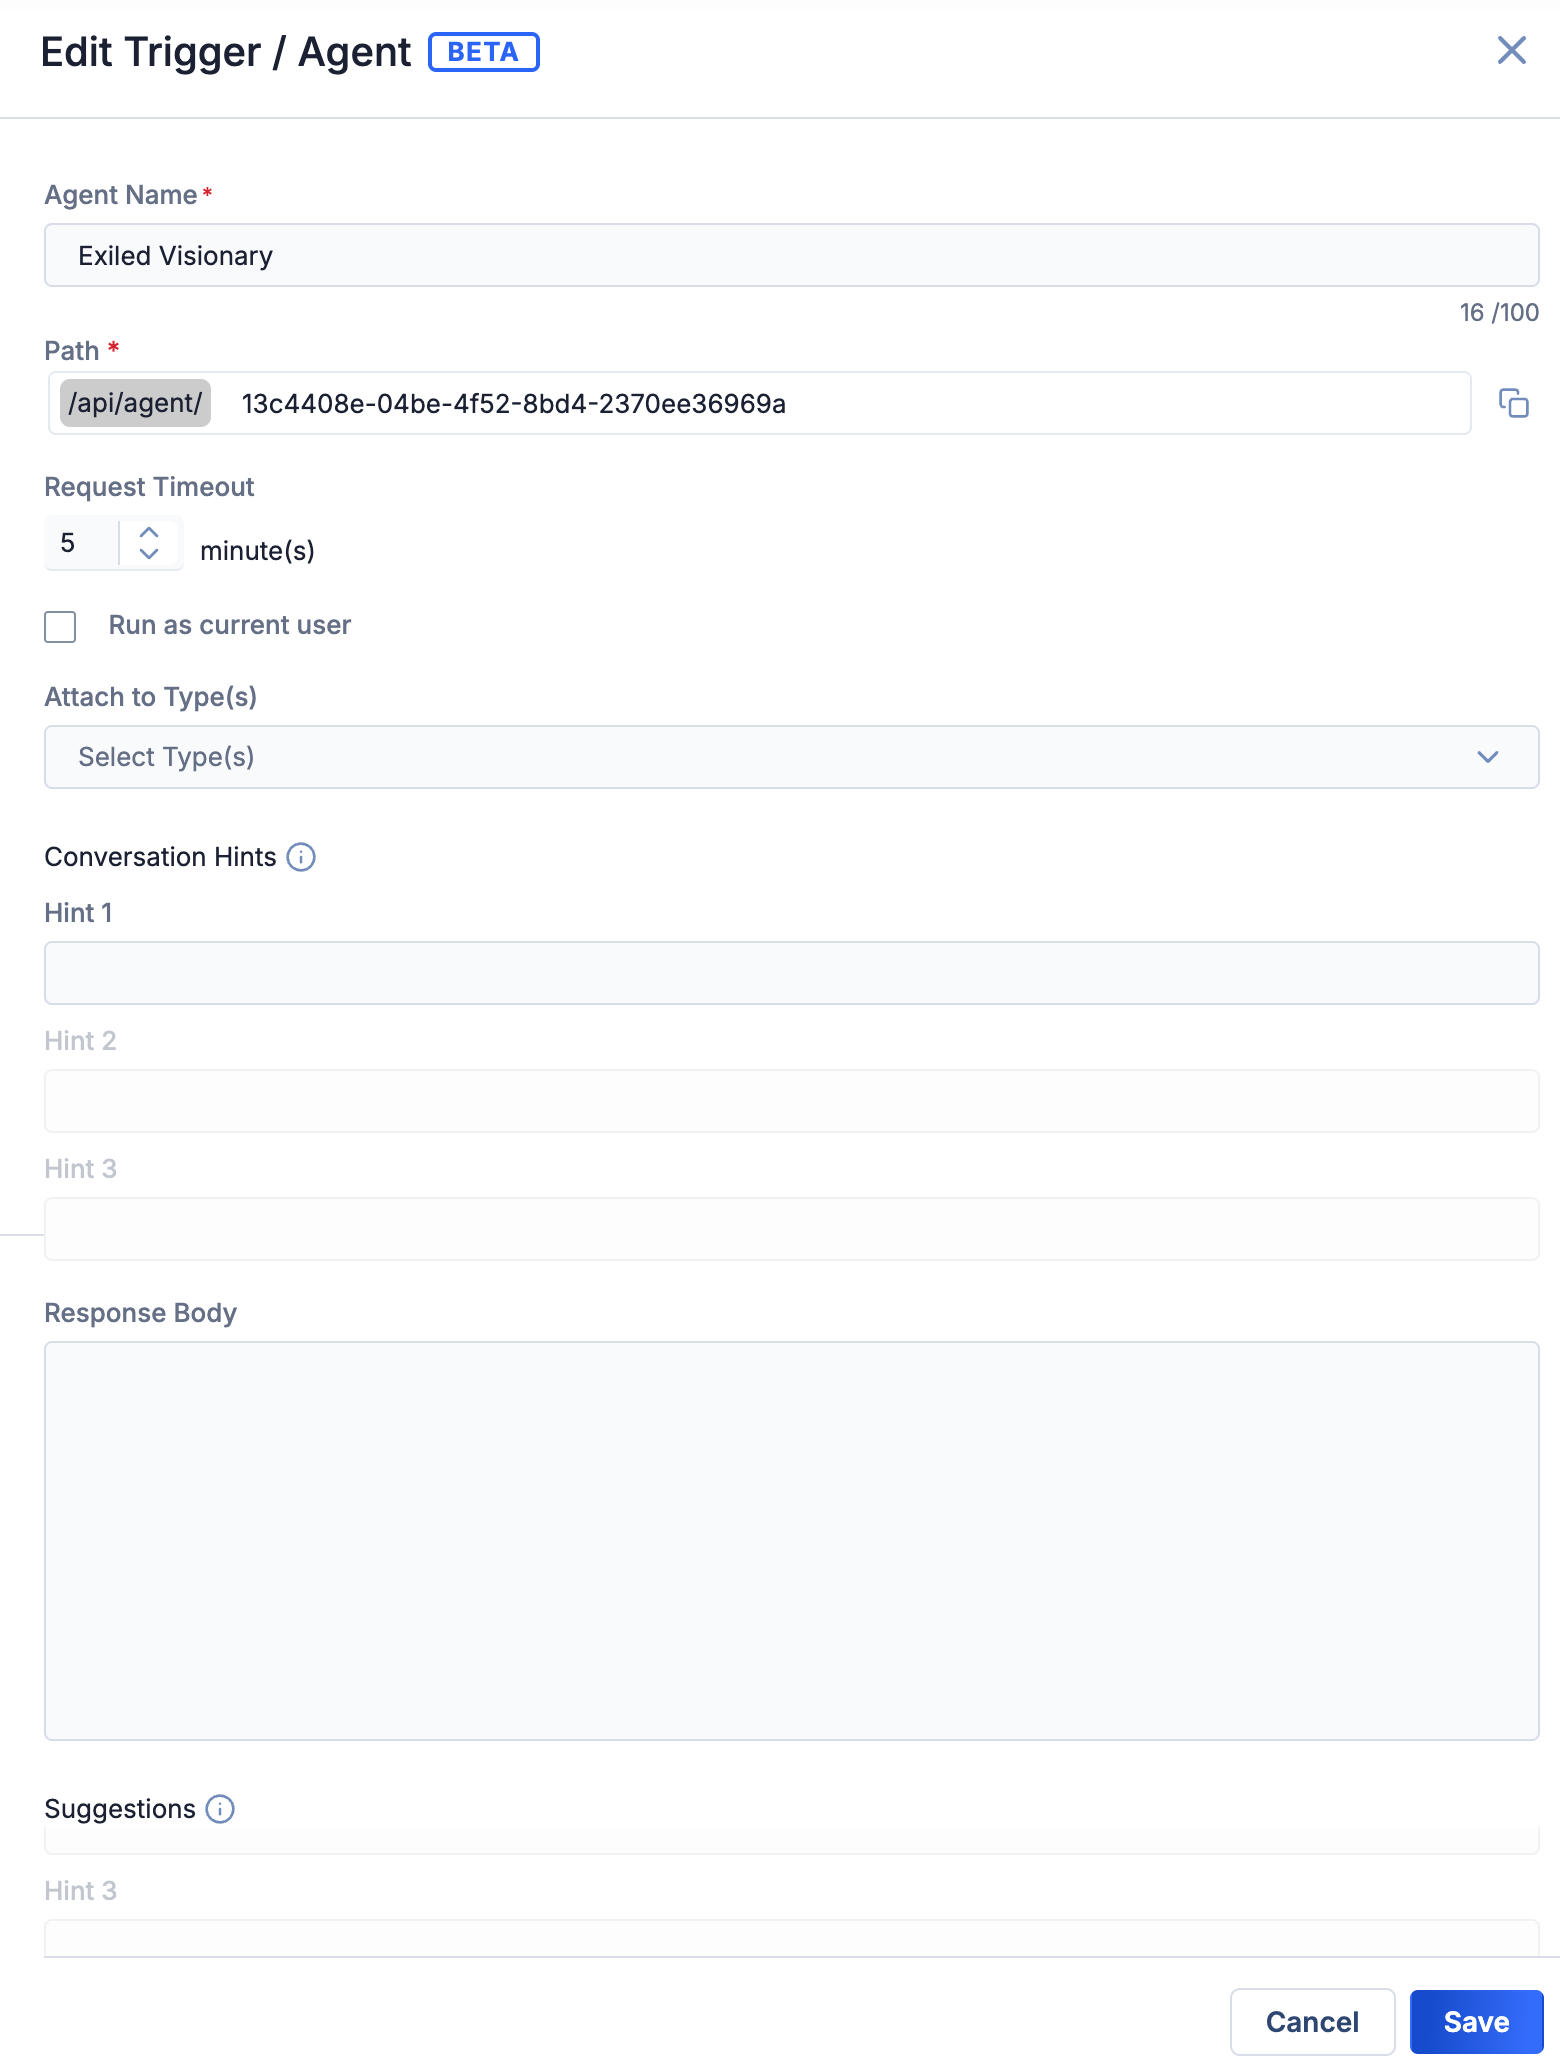
Customize an Agent trigger
Agent Node
When building an agentic playbook, you can add one or more Agent nodes to process and act on information from upstream nodes. From there, you can configure each agent further—for example, connect it to remote MCP servers so it can call external tools, or set up a Knowledge Store for it to reference when reasoning about a request.
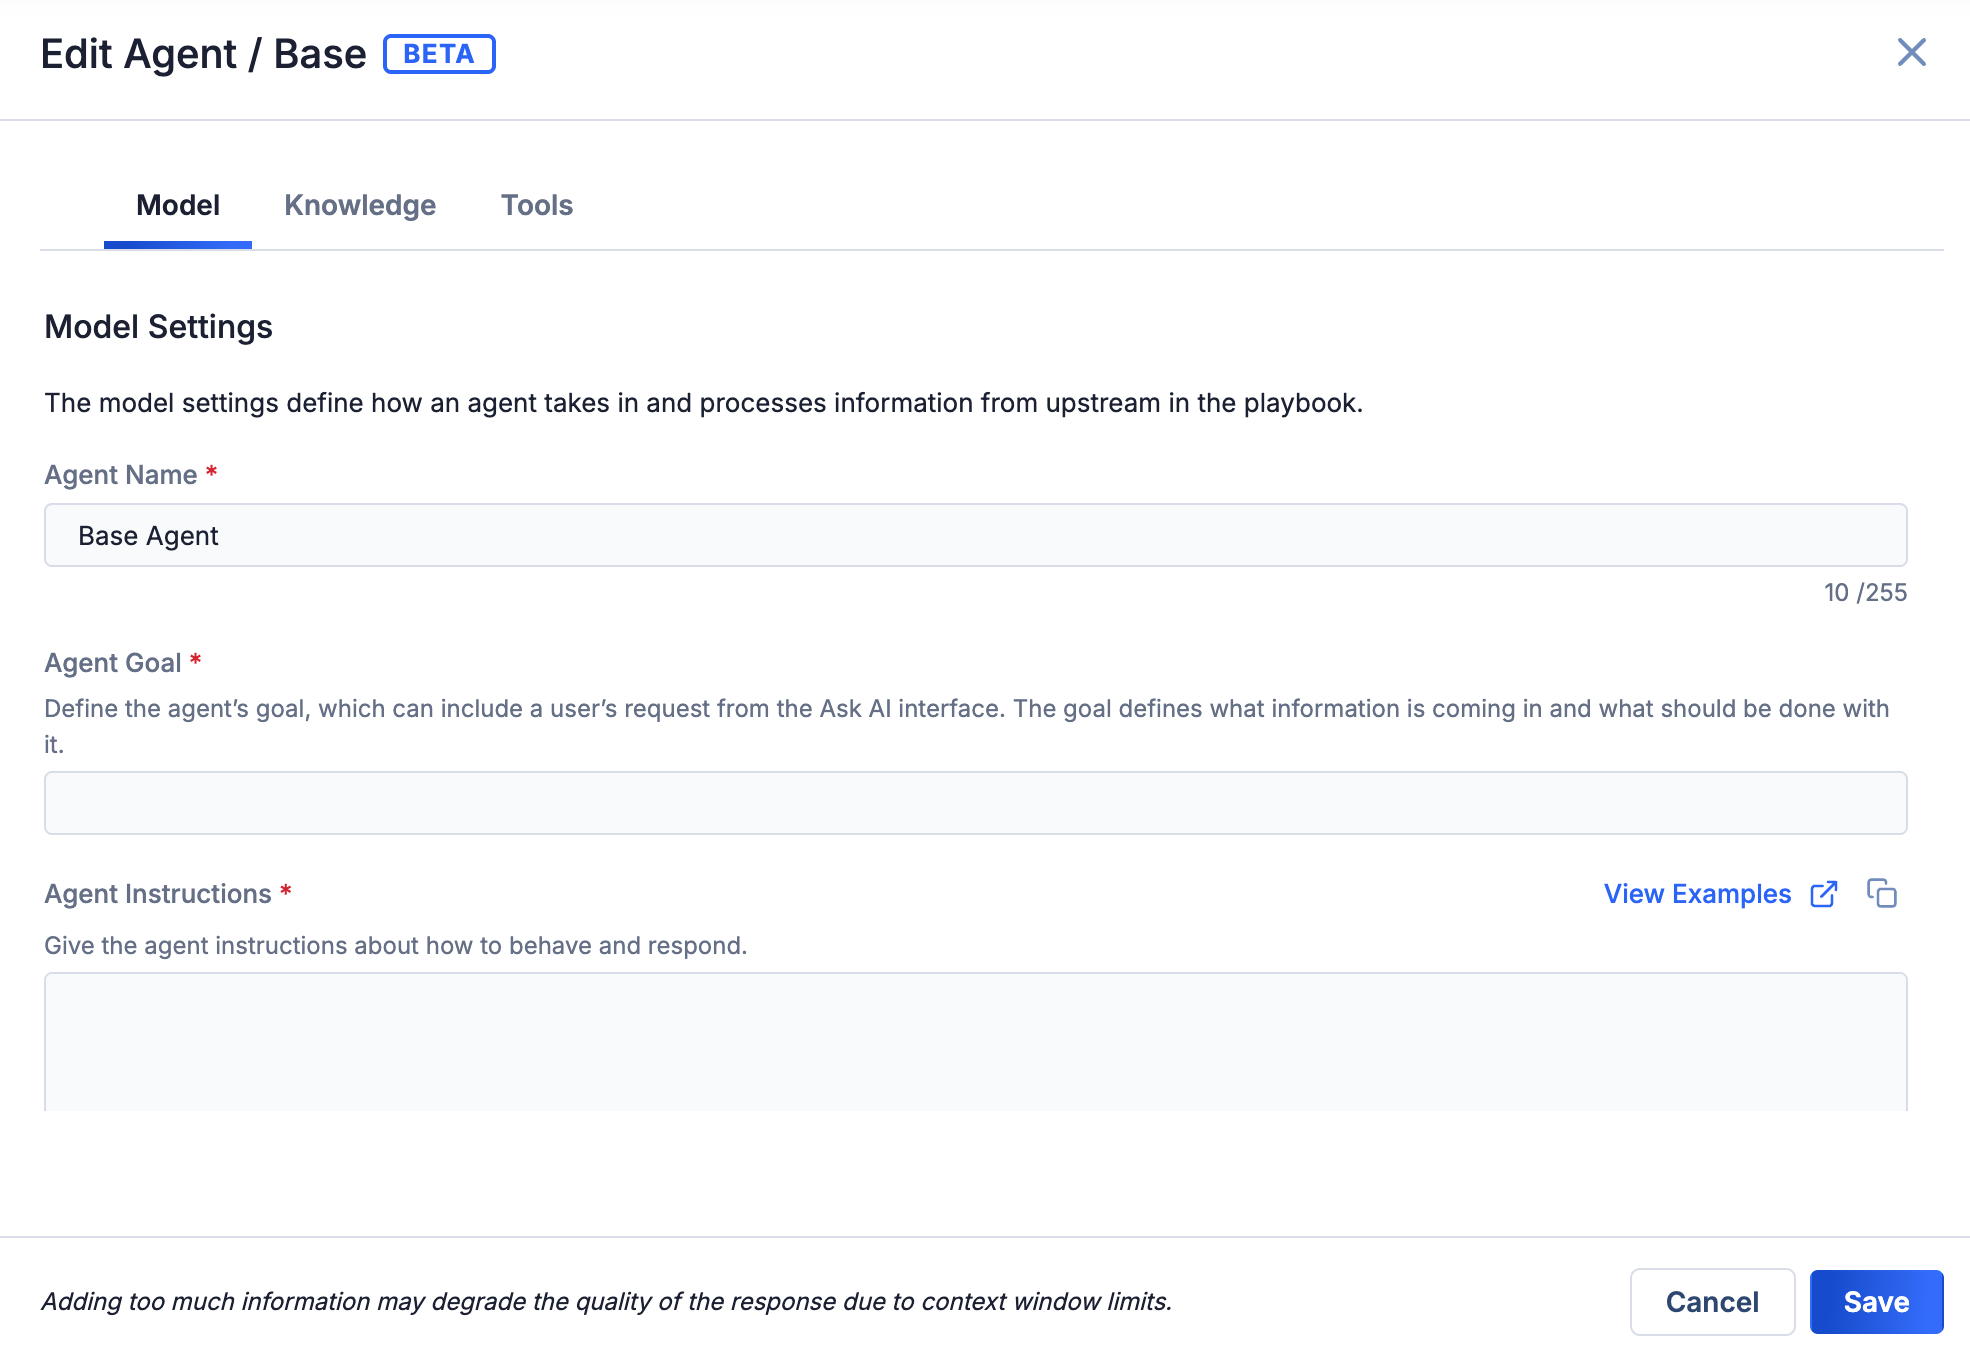
Customize an Agent node
- The Model tab allows you to define the agent’s goal, instruct the agent about how to behave and respond, and determine how output is generated and token resources are allocated.
- The Knowledge tab allows you to provide additional information the agent can reference and use to execute on its goal, such as knowledge from playbook and custom variables, searchable knowledge from object types in the ThreatConnect data model, and searchable knowledge from a knowledge store (which you can create via the + Create Store option in the DataStore).
- The Tools tab allows you to add tools that allow agents to take action on external systems and local or remote data, add toolsets (reusable, named groups of tools that can be used across instances), or shortcut over to the Configurations drawer, where you can manage configurations for global variables, remote MCP servers, parameter sets, and toolsets.
Agent Evaluations
Evaluating output and user feedback is an essential part of maintaining and improving agentic systems. When you have agent building enabled on your instance and are viewing a playbook with at least one Agent node, you will be able to access a new Agent Evaluations selection in the redesigned menu for playbook configuration options.
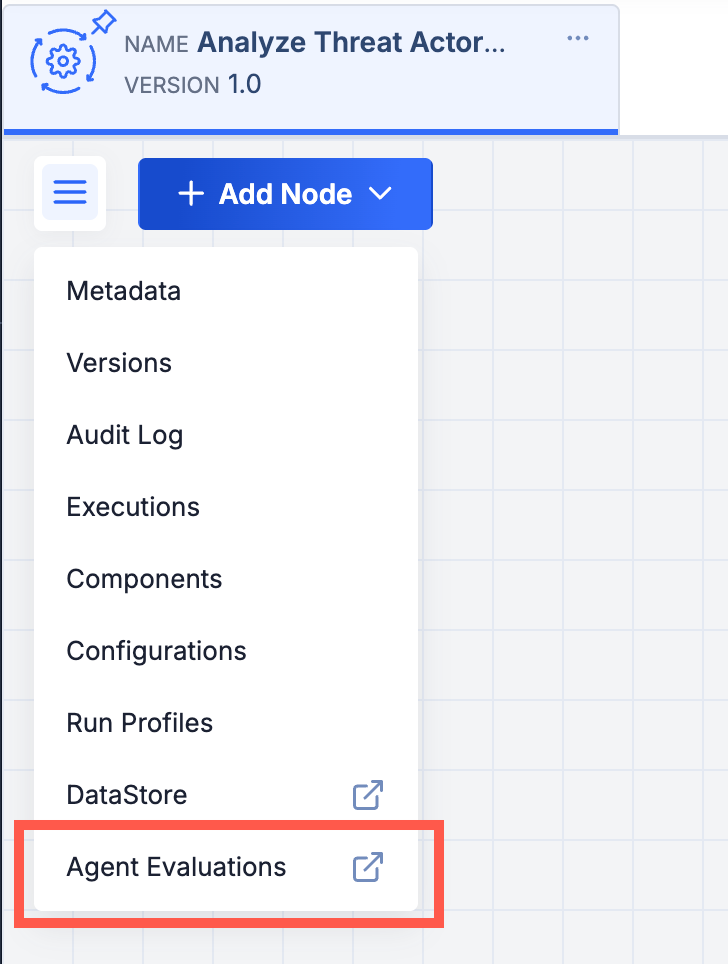
Open the Agent Evaluations tab in agentic playbooks
This option opens the Agent Evaluations tab, where you can create and configure evaluation schemas for the agent using sample inputs and outputs and apply those schemas to the results of agent executions. In addition, you can view user feedback collected by the agent.
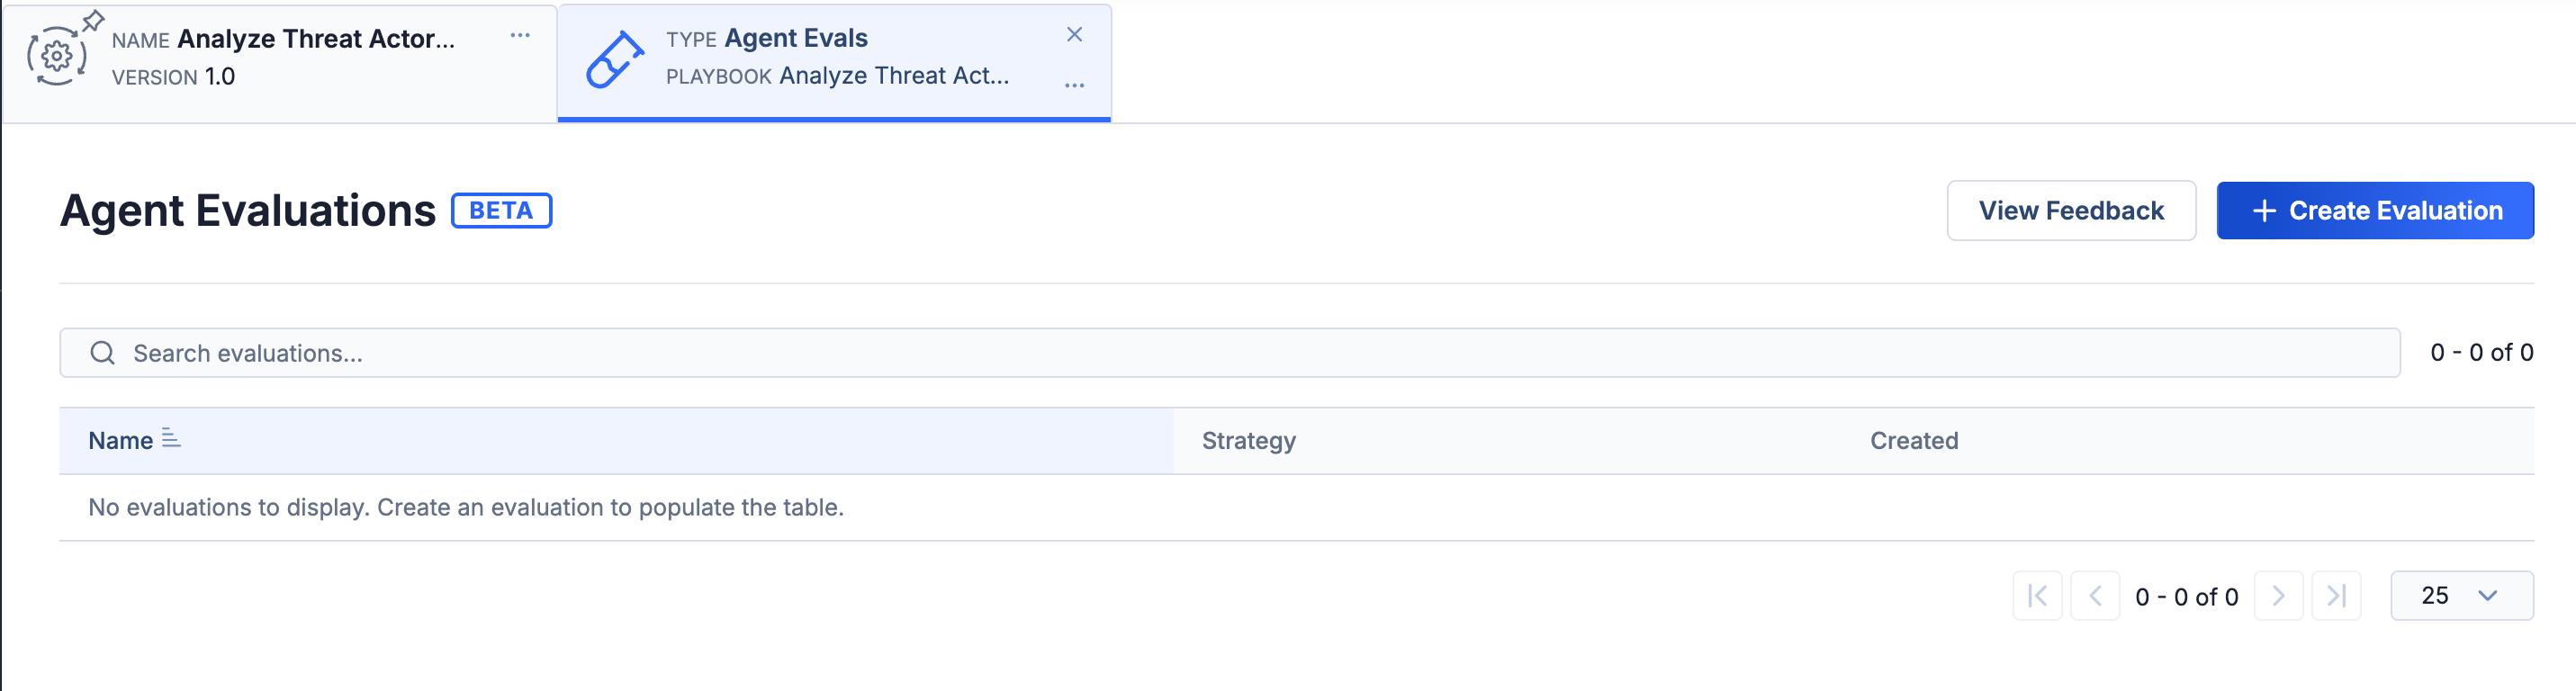
Evaluate an agent’s executions against preconfigured schemas and view user feedback
Bring Your Own Model (BYOM)
Many organizations have policies in place requiring AI features to go through a rigorous compliance review before they can be used on production systems. Some of these teams are already using LLMs that have been through this process. Version 8.1 lets you bring already approved or otherwise preferred models into ThreatConnect’s agentic AI features instead of relying solely on the platform-provided LLMs, allowing you to put agentic AI to work without needing to navigate through another compliance review.
In this version of the platform, BYOM supports the following providers:
- OpenAI
- Anthropic®
- (Microsoft) Azure® OpenAI
- Amazon Bedrock®
- OpenAI-Compatible
System Administrators can enable and configure the BYOM feature from the new AI Providers tab of the System Settings screen. First, turn on the Enable Custom AI Provider (BYOM) toggle. Then select an AI provider, provide and verify an API key for that provider, map each performance tier to a model ID for the provider, and save the configuration. You can also add custom models for the provider.
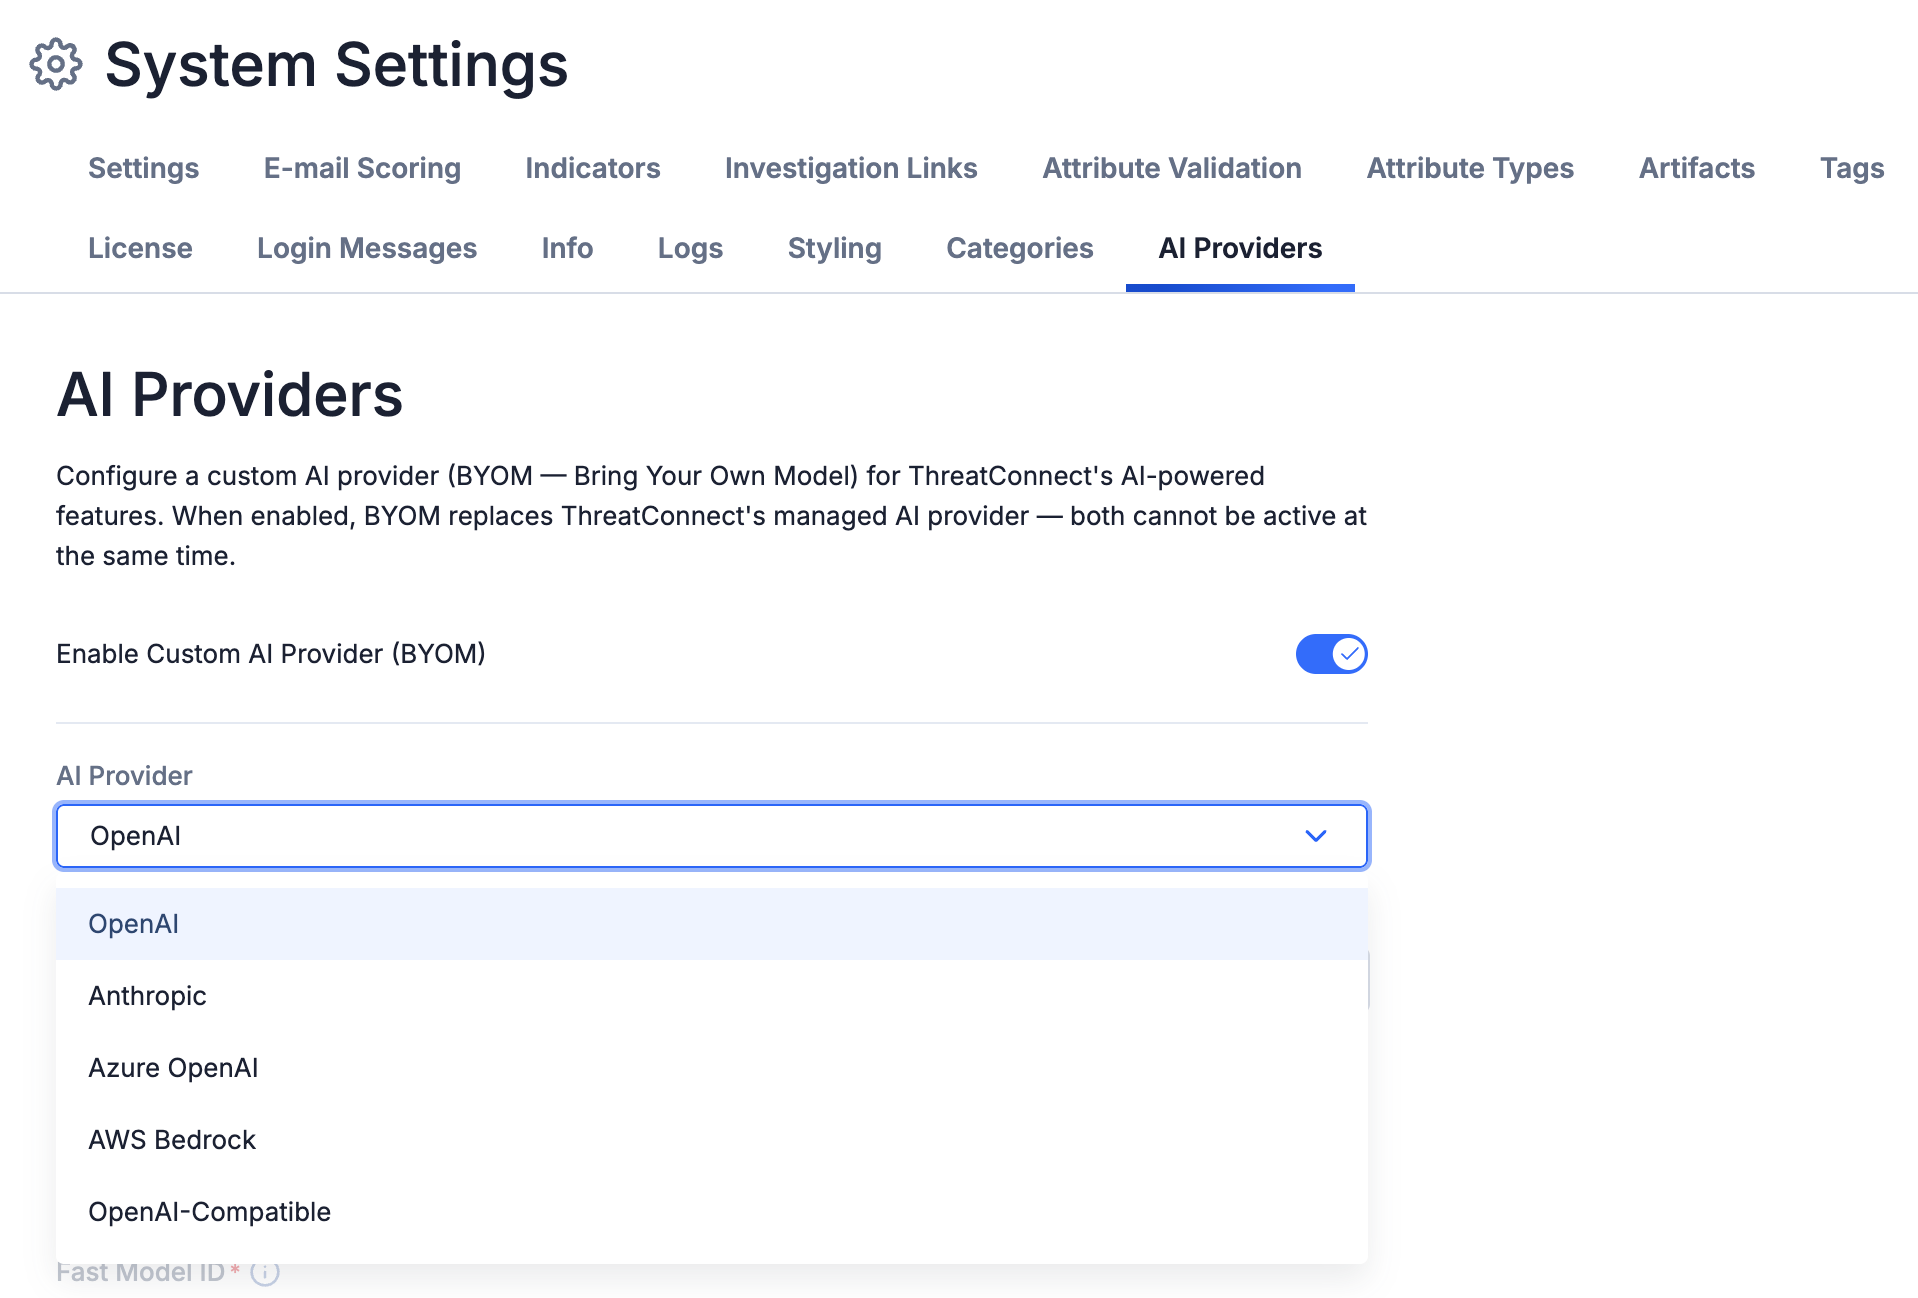
Enable a custom AI provider (BYOM) in System Settings
TIP MCP Server
Version 8.1 exposes threat intelligence, Workflow, notifications, playbooks, and other data available in the TIP through an MCP server, so you can connect the AI client of your choice and work with your TIP data and automations directly from that client rather than being limited to the platform’s built-in Ask AI chat interface and out-of-the-box and custom agents.
Once it is connected to the TIP MCP server, your AI client has access to your Indicators, Groups, Intelligence Requirements, Tags, Victims, Victim Assets, Cases (including Artifacts, tasks, Case notes, timeline events, and Workflows), attributes, attribute types, security labels, notes, notifications, and batch and DataStore operations, along with read access to owners, users, user groups, roles, system settings, Indicator exclusion lists, playbooks, and jobs. Your active playbooks are exposed as callable tools as well, so your client can invoke a playbook directly or trigger one indirectly simply by creating or updating a resource the playbook is watching.
In addition, version 8.1 adds a new trigger type in playbooks: MCP. After you configure your AI client, playbooks with this trigger type will be available as MCP tools in the AI client.
Configure TIP MCP Server in Claude Desktop
Follow these steps to configure the TIP MCP server in Claude Desktop:
- Get a TIP API token.
- Confirm that Node.js is installed.
- Update the Claude Desktop configuration JavaScript® Object Notation (JSON) file with the TIP MCP server configuration.
- Restart Claude Desktop.
Get TIP API Token
A TIP API token is required for configuring the TIP MCP server. Users with an Organization role of Organization Administrator can retrieve API tokens. All other users must request an API token from their Organization Administrator.
Follow these steps to retrieve a TIP API token:
- On the Membership tab of the Organization Settings screen, create a new API user or edit an existing API user.ImportantIf your user account allows you to select Organizations on the Organization Settings screen, make sure to select the Organization whose data you want to work with in the AI client. API tokens are assigned to API user accounts and allow access only to data in the API user’s Organization and the Communities and Sources in which that Organization has membership.
- If creating a new API user, fill out the fields on the API User Administration window, and then click SAVE USER AND GENERATE TOKEN. If editing an existing API user, click GENERATE TOKEN if the API Token field is empty or the current API token is expired.ImportantThe AI client’s data access is determined by the Organization role of the API user assigned to the token. When retrieving a token for another user, Organization Administrators should pull it from an API user account with the least-privileged Organization role needed to accomplish tasks in the AI client. Don’t give a user a token from an account whose Organization role is higher than their own.
- Copy the token in the API Token field. The first five characters of the token are always
APIV2.
Confirm Node.js Is Installed
Claude Desktop launches the TIP MCP server using npx, which is installed as part of Node.js®. Follow these steps for your local environment to confirm that Node.js is available on your machine.
macOS
Follow these steps to confirm that Node.js is available on your macOS® machine:
- Open the Terminal and run the following commands:
which npx npx --version - If both commands return a result (a file path and a version number, respectively), Node.js is already installed; skip to the “Update Claude Desktop Configuration File” section. Otherwise, follow the rest of the steps in this section.
- Run the following command to install Node.js via Homebrew:
/bin/bash -c "$(curl -fsSL https://raw.githubusercontent.com/Homebrew/install/HEAD/install.sh)" - Enter your Mac login password when prompted and press Enter. Note that the Terminal does not display characters as you type in the password.
- When the Homebrew install finishes, it outputs a “Next steps” section with commands to add Homebrew to your
PATH—something like the code that follows. Copy and run the exact commands shown in your own Terminal’s output.Important- Do not skip this step, or else
brew—and later,npx—won’t be found. - The commands in this step will not produce any output. This is normal.
echo >> /Users//.zprofile echo 'eval "$(/opt/homebrew/bin/brew shellenv zsh)"' >> /Users//.zprofile eval "$(/opt/homebrew/bin/brew shellenv zsh)" - Do not skip this step, or else
- Enter the following command:
brew install node - Homebrew will list the formula and dependencies it’s about to install and ask the following question:
==> Do you want to proceed with the installation? [y/n] - Type
yand press Enter to proceed. - Once the install finishes, re-run the check in Step 1. You should now get a real path (e.g.
/opt/homebrew/bin/npx) and a version number, confirming Node.js is installed correctly.
Windows
Follow these steps to confirm that Node.js is available on your Windows® machine:
- Open Command Prompt (search
cmdin the Start menu) and run the following commands:where npx npx --version - If both commands return a result (a file path and a version number, respectively), Node.js is already installed; skip to the “Update Claude Desktop Configuration File” section. Otherwise, install Node.js using one of the following methods:
- Option A: Install from the Node.js website
- Go to https://nodejs.org/en/download/ and follow the instructions to download the Long-Term Support (LTS) installer for Windows with npm®. The installer should download as an
.msifile. - Run the downloaded installer. Windows may show a User Account Control prompt asking to allow the app to make changes; if so, click Yes.
- Step through the installer wizard (accept the license, keep the default install location, keep default options selected) and click Install and then Finish.
- Go to https://nodejs.org/en/download/ and follow the instructions to download the Long-Term Support (LTS) installer for Windows with npm®. The installer should download as an
- Option B: Install via WinGet from Command Prompt
- Run the following command:
winget install OpenJS.NodeJS.LTS - If this is your first time using
winget, you may be prompted to accept the Microsoft® Store source agreements before continuing. Accept the agreements to proceed.
- Run the following command:
- Option A: Install from the Node.js website
- Close and reopen Command Prompt and then re-run the check in Step 1. You should now get a real path and a version number, confirming Node.js is installed correctly.
Update Claude Desktop Configuration JSON File
Follow these steps to update the Claude Desktop configuration JSON file with the TIP MCP server configuration:
- Navigate to the location of your Claude Desktop configuration file:
- macOS:
~/Library/Application Support/Claude/claude_desktop_config.jsonHintThe~/Librarypath is hidden by default in the Finder®. To navigate there, open Finder, pressCommand-Shift-G(Go To Folder), paste~/Library/Application Support/Claude/, and press Enter. - Windows:
%APPDATA%\Claude\claude_desktop_config.jsonHintPressWIN+Rand enter%APPDATA%\Claude\to navigate to that folder. Alternatively, depending on your local setup, the folder containing the configuration file may be located inC:\Users\or\AppData\Local\Packages\Claude C:\Users\.\AppData\Roaming\Claude
- macOS:
- Open the
claude_desktop_config.jsonfile in a text or code editor. - If the file doesn’t already have an
mcpServerskey, add the following code as a new top-level key (i.e., on the same level of existing keys such ascoworkUserFilesPathandpreferences—not nested inside them), replacing<TC_HOST>with your instance host (e.g.,acme.threatconnect.com) and<YOUR_TOKEN>with your TIP API token:Important- The server key (
threatconnect) is just a label. When connecting to multiple TIP instances, add a separatemcpServerskey block for each instance, using the name of the instance (e.g.,tc-dev,tc-prod) as the label. It is critical to use a uniquemcpServerskey for each instance; reusing a label across different servers can trigger Claude Desktop’s stale-tool caching. - The part after
<TC_HOST>is always/api/v3/mcp. Confirm the port for your host.:443is the default, but some deployments use:8443;if the latter is the case, include it in the<TC_HOST>.
- macOS:
"mcpServers": { "threatconnect": { "command": "npx", "args": [ "-y", "mcp-remote@latest", "https://<TC_HOST>/api/v3/mcp", "--header", "Authorization: Bearer <YOUR_TOKEN>" ] } } - Windows:
"mcpServers": {
    "threatconnect": {
      "command": "mcp-remote",
      "args": [
        "https://<TC_HOST>/api/v3/mcp",
        "--header", "Authorization: Bearer <YOUR_TOKEN>"
      ]
    }
  }
- The server key (
- Make sure to add a comma after the closing
}of the key immediately beforemcpServers, and then confirm that your final file is valid JSON (matching braces and brackets). - Save the configuration file.WarningThe TIP API token is cleartext data that exists in the
claude_desktop_config.jsonfile on a user’s local machine. If this token is leaked, edit the API user on the Membership tab of the Organization Settings screen and generate a new token, which fully and immediately revokes the old token. - (Windows only) Run the following additional command:
npm install -g mcp-remote@latest
Restart Claude Desktop
Fully quit Claude Desktop (not just close the window) and reopen it. The threatconnect (or whatever label you have given it) MCP server should be listed in the Connectors section. If you click on it, you should see the following tools:
- Tc resources: List all available resource types.
- Tc describe: Get field names, ThreatConnect Query Language (TQL) syntax, and enumerable values for a resource type.
- Tc list: List resources with TQL filtering, field selection, sorting, and pagination.
- Tc get: Retrieve a single resource by ID.
- Tc create: Create a new resource.
- Tc update: Replace an existing resource (PUT).
- Tc delete: Delete a resource by ID.
If you have active playbooks with an MCP trigger in your Organization, they will also be listed as tools.
Branded Generative AI Reporting
The new branded generative AI reporting feature lets you produce brand-compliant intelligence report drafts directly from Group data already in the platform. Once generated, a report can be refined in the new HTML report editor and then saved as a Report Group object, exported as a PDF or HTML file, or sent as an email.
An Organization Administrator sets up your brand customization once, through a new configuration drawer (click at the upper right of the Reporting screen) in which they provide a logo, custom font, and custom colors. After that, every report generated for your Organization can have that same look and feel, no matter who generates it. If you’d rather not build a fully custom palette, three built-in style presets are available out of the box: Blueprint (steel-blue tones), Ember (warm amber tones), and Dataminr (reflecting the TIP’s new post-acquisition branding).
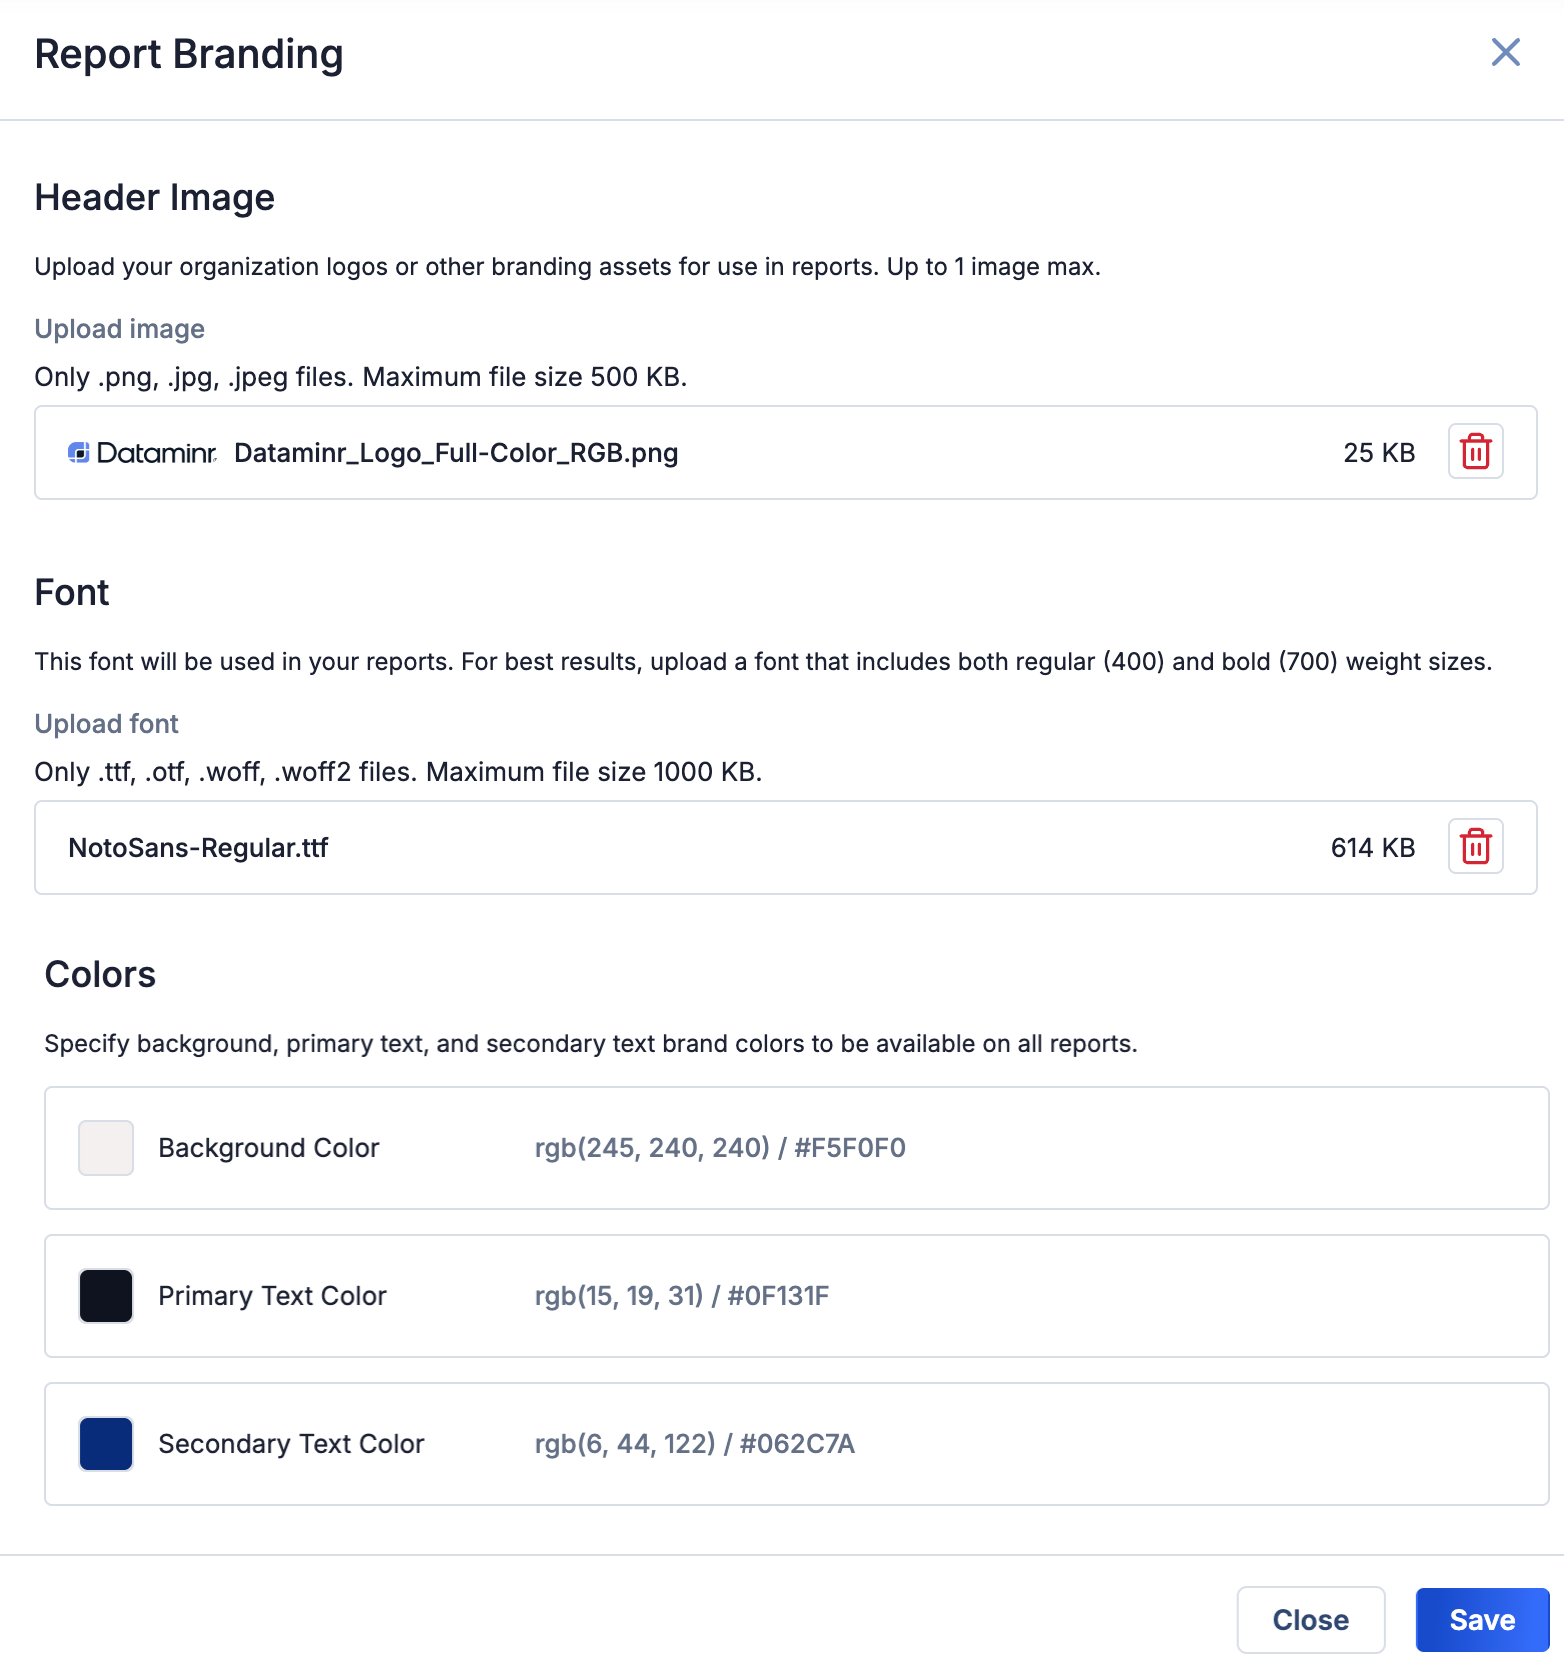
Configure your Organization’s logo, font, and colors for generative AI reports
Generate a report directly from a Group’s Details drawer or screen by clicking the Generative Report Agent button or selecting Generative Report Agent from the Create AI Report dropdown. Then configure the report as follows:
- Choose a report format: Executive Brief, Technical Analysis, or Deep Dive Intelligence Analysis. As in the Intelligence Report Generator Agent released in version 8.0, each format is tuned for a different audience and level of detail.
- Select a style from the presets or the brand configuration set by your Organization Administrator.
- (Optional) Use the Describe with AI text block to further steer the output—for example, by describing the depth and voice the output should use. The tool is designed to prioritize and summarize the data already present in the TIP rather than generate new information, which keeps reports grounded in your actual intelligence rather than introducing hallucinated content.
Once generated, the report opens directly in the HTML report editor, where you can adjust fonts, colors, and text. From there, you can save the finished report as a Report Group object, export it, or email it.
Case Details Screen UI Revamp
Version 8.0 introduced improvements to the Case Details screen that brought it into closer alignment with the Details screen for threat intelligence objects. Version 8.1 iterates on this enhancement with a fully rebuilt Case Details screen. This update is a UI rewrite, not a redesign of the case management feature set: The existing tabbed layout and the task management, Artifacts, associations, timeline, and other features are carried forward from previous versions, refined for consistency and performance. Alongside the rewrite, a handful of new capabilities have been added directly to the page.
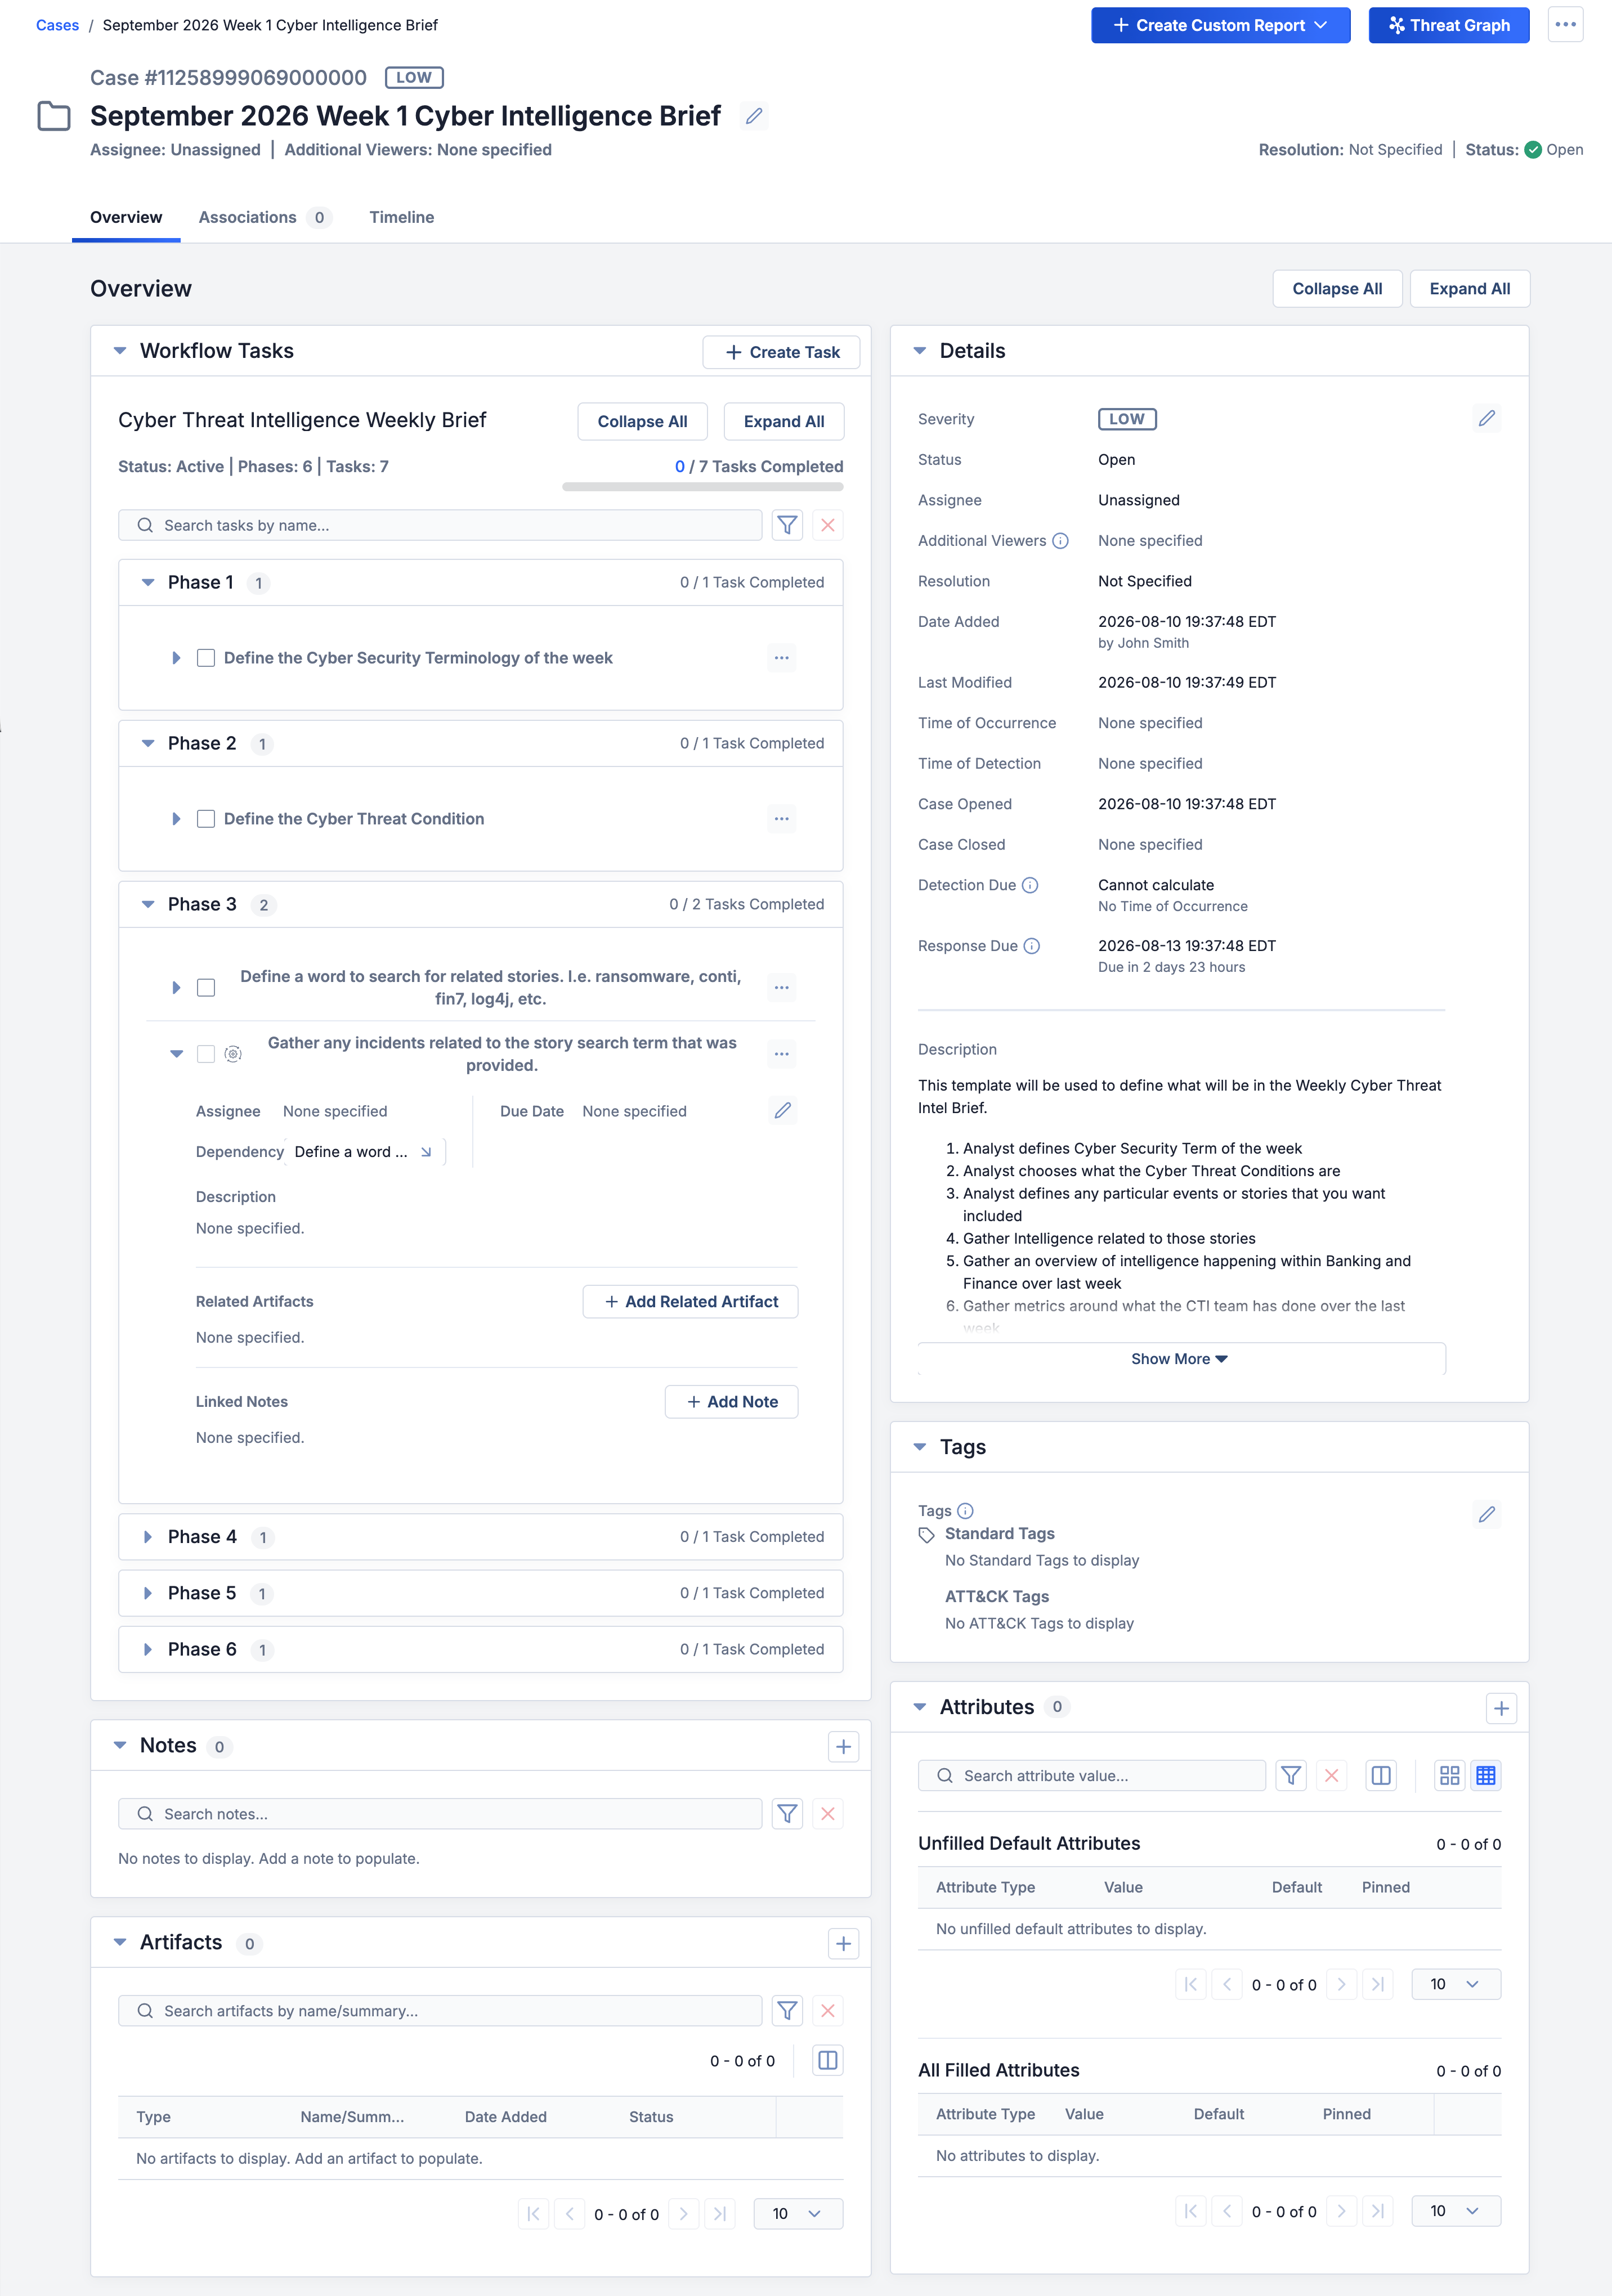
The rebuilt Case Details screen
Miscellaneous Case Enhancements
There are a few enhancements available as part of this UI uplift. You can now pin key attributes to the top of the Attributes card, so that you don’t have to dig for the data points that matter to your investigation. This feature is useful for surfacing the details your team references most—status indicators, classification, or any attribute critical to triage.
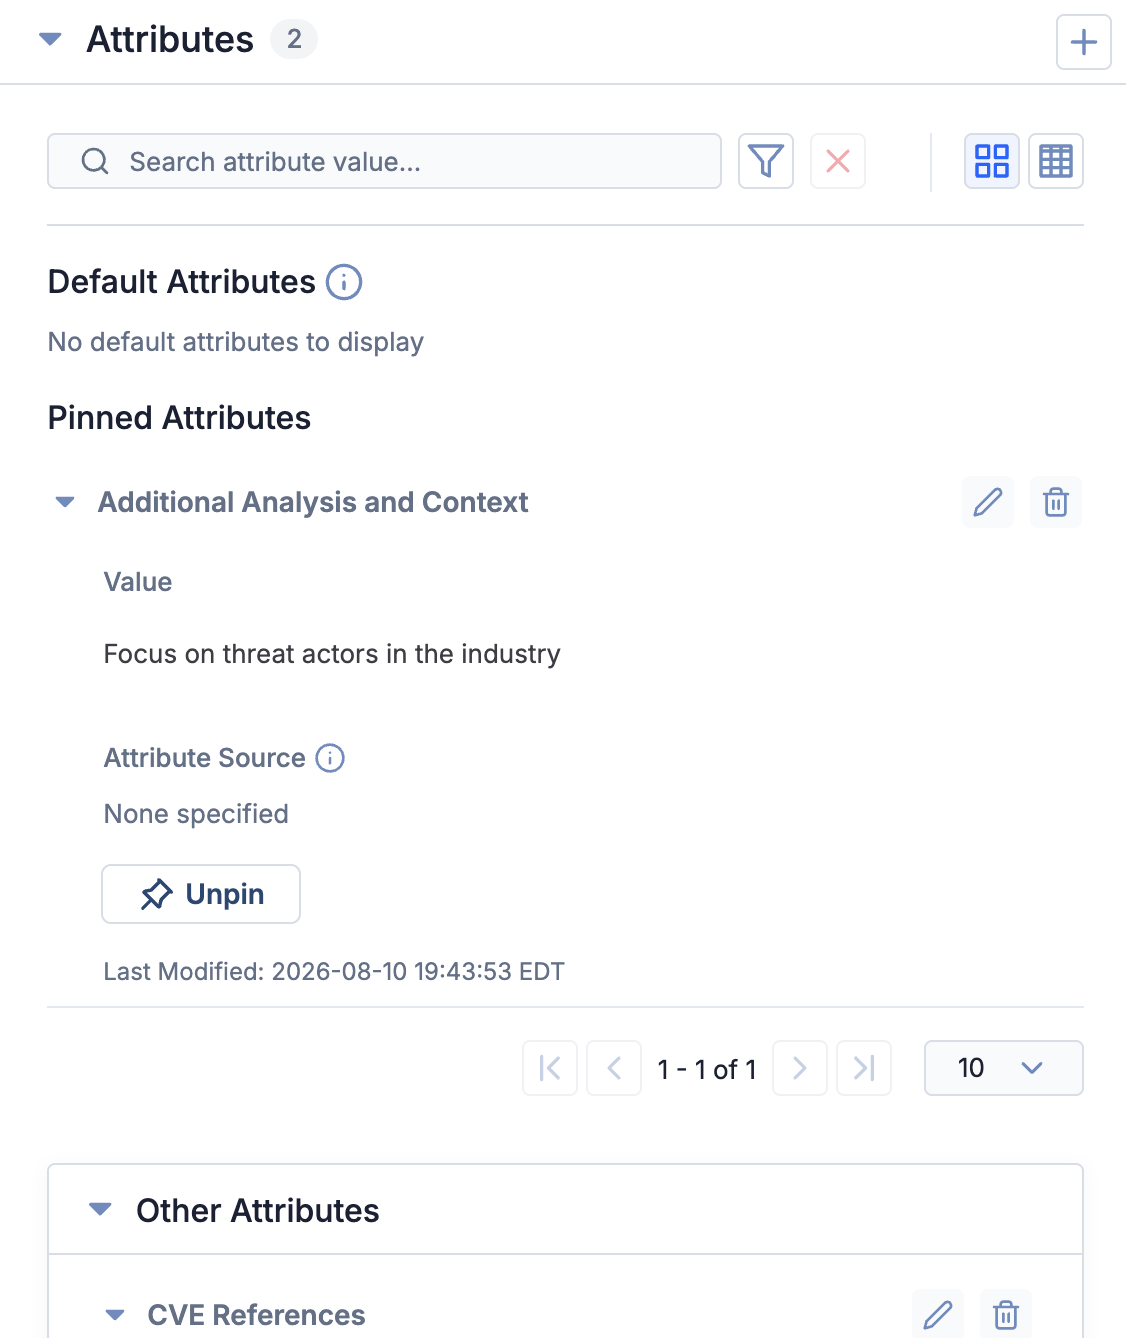
Pin an attribute in a Case
In addition, Case Artifacts now have a Details drawer that makes it easy to view all available information about the Artifact in a streamlined, familiar interface.
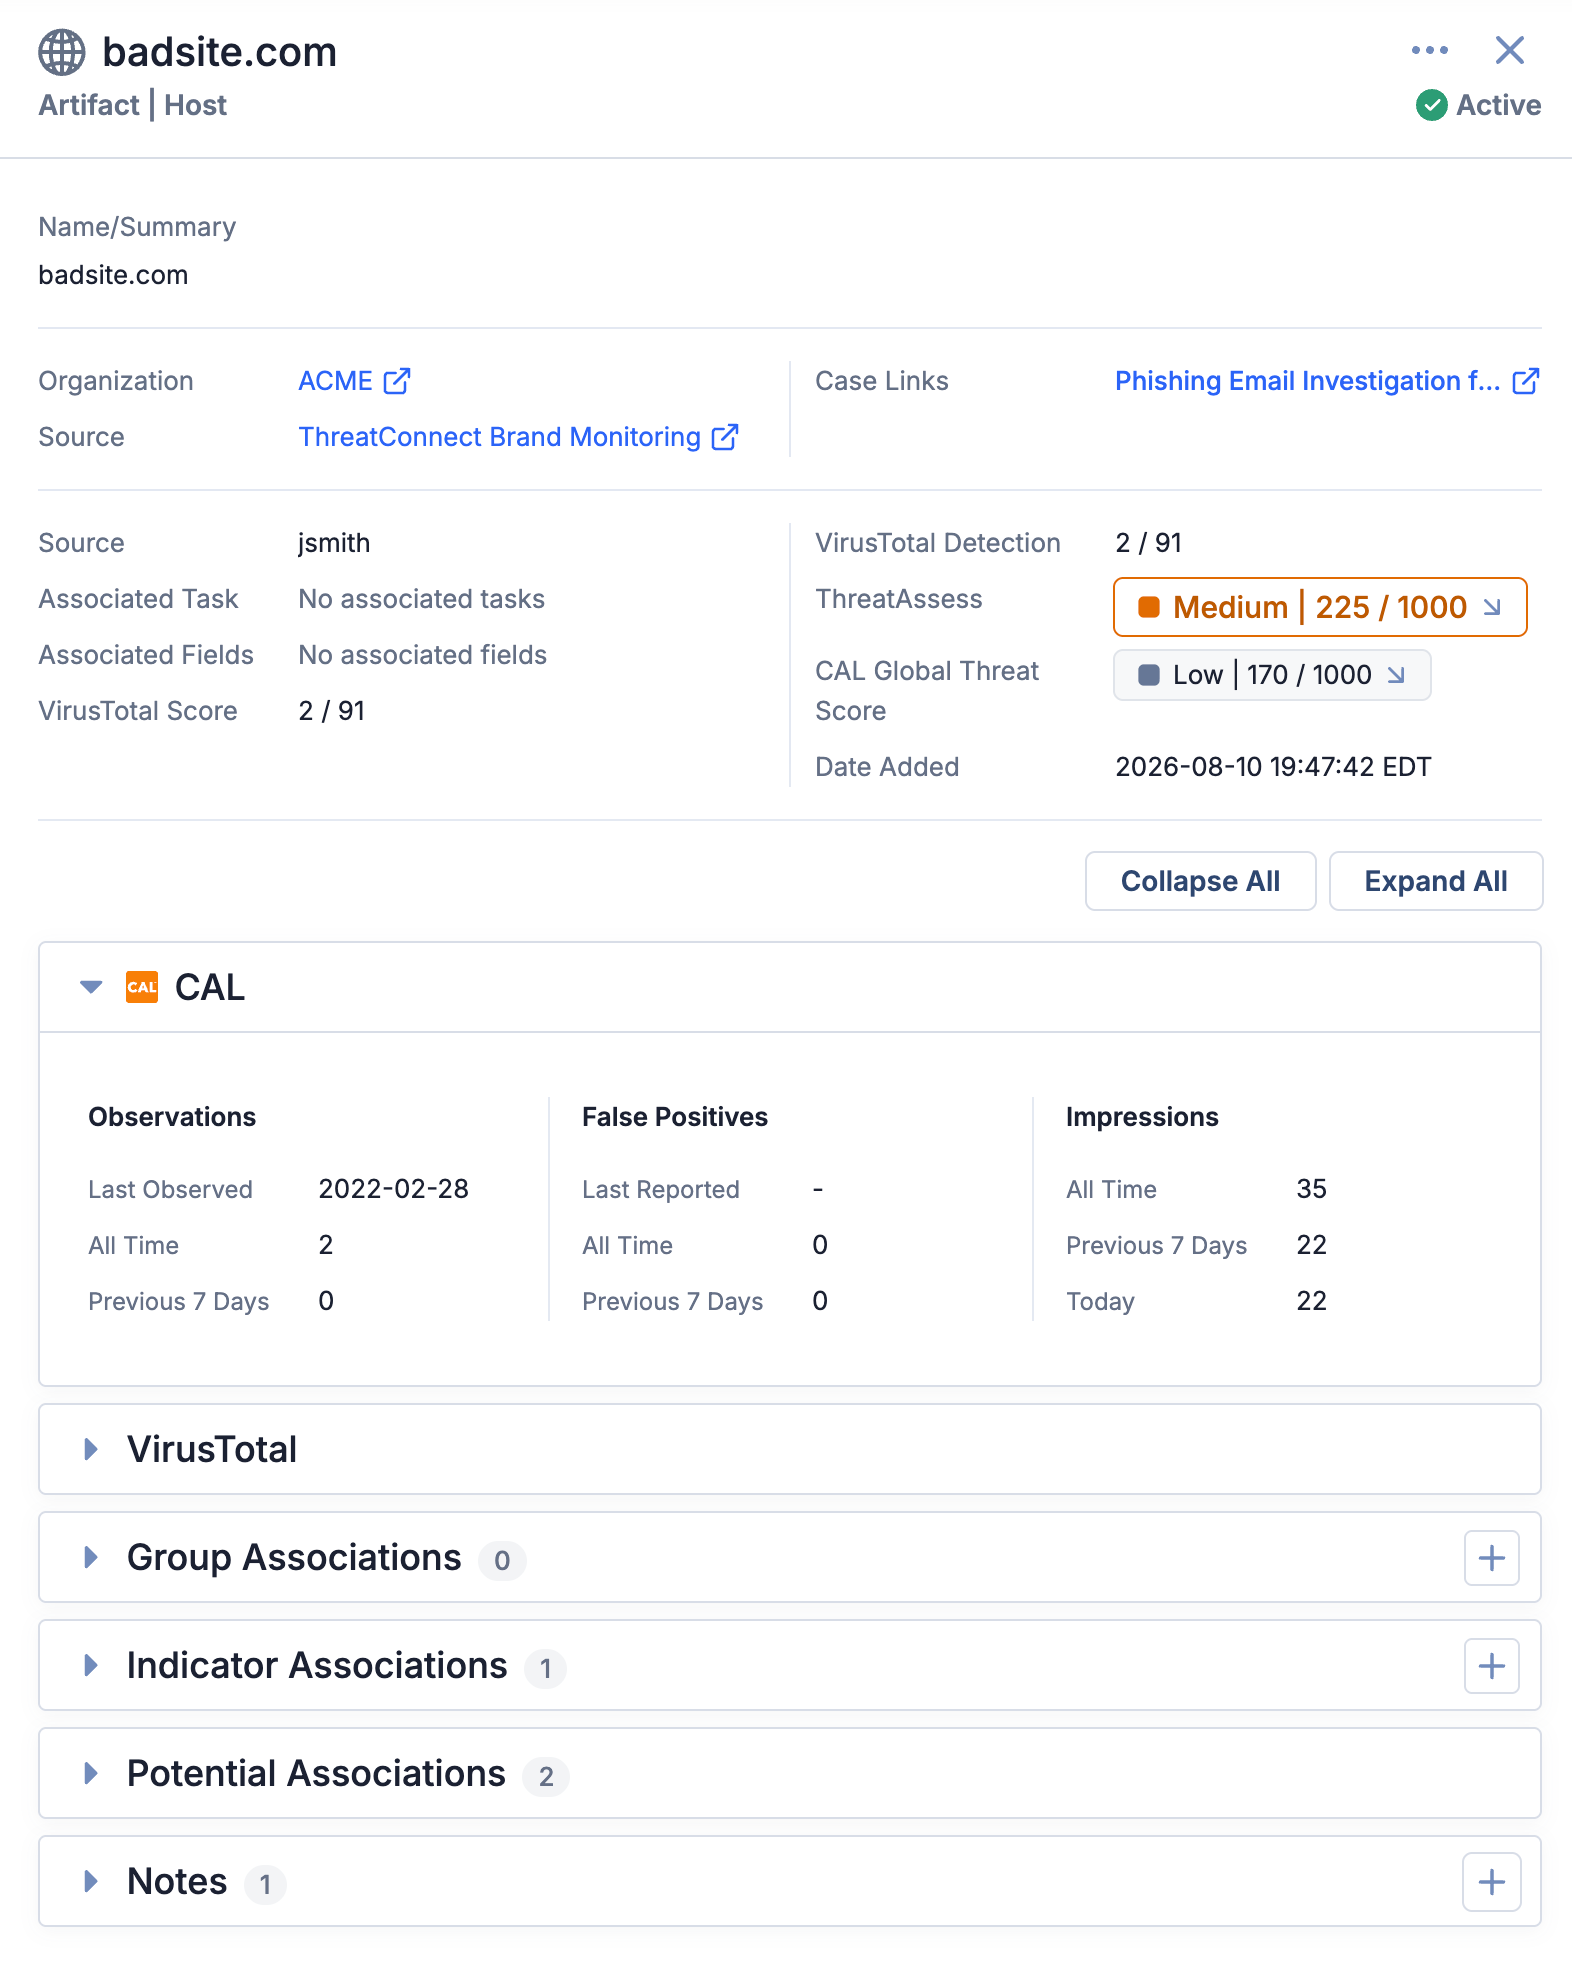
The new Artifact Details drawer provides an organized view of an Artifact’s details
Improvements
Platform UX
- Dataminr logos and color schemes have replaced the default ThreatConnect styling, including in the site header and footer, in the Agentic TIP UI. If your instance has custom headers and footers, that styling may be retained.
- You can now resize, reorder, and select columns to hide or display in tables in the following areas of the TIP:
- Results table in the following windows when adding an association to an object: Add Intelligence Requirements, Add Groups, Add Indicators (Existing Indicators view), Add Victim Assets, Add Cases
- All Filled Attributes table on the Attributes card of the Group, Indicator, and Case Details screens
- Additional Owners table on the Owners & Feeds card on the Overview tab of the Indicator Details screen
- DNS Resolution History table on the DNS Resolution card on the Overview tab of the Indicator Details screen
- Results and Archived Results tables on the Keyword Tracking & Results card on the Overview tab of the Intelligence Requirement Details screen
- All tables on the Copy tab of the Group Details screen
Threat Intelligence
- The maximum length of the Name/Summary of URL Indicators was increased to 2000 characters.
- The list of countries for the Country validation rule for attribute types has been updated.
- The Reinitialize ThreatAssess feature in Account Settings > ThreatAssess has been renamed as Recalculate ThreatAssess and enhanced to support targeted and prioritized recalculation of Indicator ThreatAssess scores and CAL™ Global Threat Scores on demand. System Administrators and Operations Administrators can use this feature to ensure that these scores are current for a subset of Indicators defined by a TQL query instead of reinitializing all Indicators or recalculating scores one Indicator at a time. In addition, the ThreatAssess recalculation queue display has been improved, providing clearer and more granular information on how the ThreatAssess monitors process each queue, as well as breaking out the updates from the CAL daily delta into a separate queue for greater transparency.
- Updates were made to ensure that, on instances with the CAL Indicator enrichment feature turned off, the CAL Global Threat Score is not displayed in the TIP UI and that historic CAL Global Threat Score data stored from before the feature was turned off are not used in ThreatAssess score calculations.
- A new TQL parameter for Indicators,
calLastChecked, holds a timestamp for the last time that the TIP reached out to CAL for an Indicator’s CAL Global Threat Score and CAL status. System and Operations Administrators can use this parameter in TQL queries in the Recalculate ThreatAssess feature to update Indicators with absent or stale data from missed updates during CAL server outages or other CAL downtime (e.g., after turning CAL Indicator enrichment on after it was previously off)—for example, by using the querycalLastChecked is NULLor by querying for Indicators with acalLastCheckeddate that is earlier (<) than a particular date. ThecalLastCheckedfield has also been added to theindicatorsendpoint in the v3 API.
Threat Graph
- The following enhancements were made to pivoting in ThreatConnect in Threat Graph:
- You can now view the number of results for each available associated-object type and subtype before completing the pivot operation.
- Previously, for pivots that returned a large number of associated objects, only the first 500 would be added to the graph. This maximum has now been removed. However, it is recommended that you review the number of expected results and proceed with caution, as rendering large numbers of pivot results to the graph is resource heavy and can slow down system performance.
- Previously, when pivoting on Indicators from an Indicator node, all possible direct Indicator-to-Indicator association types for the selected node’s Indicator type were displayed. Now, only direct Indicator-to-Indicator association types with existing associations for the selected Indicator node are displayed, along with the number of results for each type. In addition, you can now see the total number of indirect Indicator-to-Indicator associations (that is, Indicators that are indirectly associated with each other via a mutual association to a Group) for the Indicator node.
Playbooks
- The Playbook Designer UI has been streamlined to provide options for maximizing the available space. First, the left sidebar has been replaced with two expandable/collapsible dropdowns at the upper left of the canvas: The Add Node dropdown provides options for adding each node type (trigger, app, operator, and—if agent building is enabled—agents), and the Playbooks ☰ menu provides all other options for playbook configuration. Second, validation error information is located in a new element next to these dropdowns. This element shows the number of validation errors in a playbook and, when clicked, displays the Validations drawer.
- Run profiles for playbooks are now always available. The playbooksUIInteractiveMode system setting, which previously applied to the availability of both run profiles and interactive mode, now controls only the availability of interactive mode. Note that you can’t create run profiles for Agent triggers.
- A playbook’s log level is now displayed directly in the ⋯ menu rather than embedded in ⋯ > Settings. To change the log level, simply click on the option and adjust it in the new Playbook Log Level window, which defines the type of information recorded by each level to help you select the most appropriate level for your needs.
AI & Agents
- A new AI Usage screen has been added under the Automation & Feeds menu. This screen provides Organization Administrators with visibility into AI/LLM usage for their Organization over a selected time period, including inference counts, token consumption, and usage by agentic playbook and by individual user. Usage is displayed as a percentage of the monthly limit, calculated from usage since the start of the current calendar month. System Administrators and Super Users can view usage totals for individual Organizations as well as across the entire instance.
- New Organizations created on a ThreatConnect instance with agentic AI enabled now receive AI agents, the Ask AI button, and associated agentic playbooks automatically, without requiring a restart. Previously, these resources had to be manually imported from an existing Organization.
Workflow
- On the Case Details screen, you can now add a Workflow to a Case that was created without one via the new + Assign Workflow button on the Workflow Tasks card.
Reporting
- The Custom Reports tab of the Reporting screen has a new Format column that, for AI-generated reports, identifies whether the report’s format is HTML (“AI HTML”) or Markdown (“AI Markdown”). Note that this column is blank for reports that are not AI generated, as well as for AI-generated reports created before upgrade to version 8.1.
Administration
- The implementation of pseudonyms in Communities and Sources with anonymous profiles enabled has been modified to display real user and Organization names under the following conditions:
- The user is viewing their own content, changes, or activity in the Community or Source.
- The user is viewing content, changes, or activity made by another user in their Organization in the Community or Source.
- The user can access the Community’s or Source’s Information screen and is viewing their Organization’s name and member names on that screen. Other Organizations’ names and member names are displayed as pseudonyms.
- The user has a Community role of Director in the Community or Source and is viewing any content, changes, activity, or membership data for that Community or Source.
- The user has a System role of Administrator or Operations Administrator and is viewing any content, changes, activity, or membership data for any Community or Source.
Bug Fixes
Threat Intelligence
- Changes to a Google® TI API endpoint was causing instances with Google TI Indicator enrichment enabled to revert to VirusTotal™ API responses. This issue was fixed.
- The
vtMaliciousCountfield was missing from VirusTotal/Google TI enrichment data in v3 API responses for File, Host, and URL Indicators. This issue has been fixed. - An issue preventing retrieval of urlscan.io Indicator enrichment data was fixed.
- Additional measures were implemented to prevent Groups from being associated to themselves during feed and batch import ingestion. This fix remediates association count mismatches that were occurring on the Group Associations card on the Associations tab of the Details screen. Self-associations created prior to this fix have been removed.
- Additional checks were implemented to prevent creation of duplicate Indicators in the database.
Playbooks
- An issue preventing scrolling in long-text fields when editing apps in active playbooks was resolved. You can now scroll, select, and copy the entire contents of these fields.
- The display documentation for some playbook apps was incorrectly showing that an upgrade was available. This issue was fixed.
- The Iterator operator in playbooks was outputting duplicate values from previous iterations instead of the correct values from the current iteration. This issue was resolved.
- An issue causing null sessionIDs for Component executions to be passed to the calling playbook was resolved.
Workflow
- On the Associations tab of the revamped Case Details screen introduced in version 8.0, you could not click on an associated or potentially associated Indicator or Group to see its Details drawer. This feature has been added back for all Indicator types and for all Group types except Email and Task.
Dependencies & Library Changes
- ThreatConnect is now running the following versions:
- Java® 21
- Redis® 8.2.8
- Postgres® 17
- Wildfly® 39
Maintenance Releases Changelog
2026-09-23 8.1.2 [Latest]
Improvements
- Threat rating and confidence rating in Communities now function as they do in Organizations and Sources. The Your Threat Rating and Overall Threat Rating fields on the legacy Indicator Details screen have been replaced by a single Threat Rating field, and the Your Confidence Rating and Overall Confidence Rating fields have been replaced by a single Confidence Rating field. This update resolves an issue that was causing latency and errors to occur when calculating the overall confidence rating value for Indicators in Communities. In addition, confidence deprecation in Communities now functions in the same way as in Organizations and Sources, allowing recurring deprecation and an action at minimum.
- The following updates were made to prevent stale Indicators from remaining active due to feed re-import or batch API updates to confidence rating disrupting the confidence deprecation schedule:
- Deprecation rule configuration now includes an option to lock the deprecation schedule, preventing it from being paused by updates to an Indicator’s confidence rating.
- Source configuration (Account Settings > Communities/Sources > create or edit a Source) now includes options to block batch API updates to confidence rating or Indicator status. These options are turned off by default. When the corresponding option is turned on, existing Indicators in the Source retain their confidence rating or Indicator status instead of taking on the value from the Source when the Indicators are re-imported.
- The deprecation monitor now runs checks every 30 minutes instead of every 24 hours, allowing more efficient performance and preventing a backlog from building.
- A new system setting was added to enable administrators of development instances to test specific deprecation rules on demand instead of waiting for a monitor to run. Please contact your Customer Success representative if you would like to access it.
- User-generated AI summaries for Document and Report Group objects now leverage the AI exploited-vulnerability analyzer, enabling this summary content to provide more contextually relevant and vulnerability-specific information when available in an object.
- The regexes used to parse URL and Host Indicators were updated to reduce false positives and catch more real-world threat data. Host parsing no longer mistakes common file types (e.g.,
.iso,.msi,.zip) for domains, while correctly recognizing valid long top-level domains (TLDs) and infrastructure domains (e.g.,.arpa) that were previously blocked. It also now includes the ability to parse Hosts that are part of email addresses. URL parsing now supports additional protocols (e.g., WebSocket,mailto:,data:) and preserves invalid port numbers as part of the captured Indicator rather than dropping them, since malformed ports can themselves be a signal of malicious activity. - You can now change the log level of an active playbook, eliminating the need to switch back and forth between design and active mode to adjust the log level. If a playbook is executing during a log level change, the active execution will continue at the previous log level, and subsequent executions will occur at the new log level.
- The display documentation for the MCP trigger has been rewritten to provide correct, comprehensive guidance for configuring the trigger in a playbook.
- The filter on the Completed Playbooks card on the Activity screen has a new Stopped option for filtering on playbooks that were manually stopped (killed) or timed out (i.e., entry of Stopped in the Status column).
- A Run Playbook... selection has been added to the ⋯ menu on the Case Details screen, allowing you to select active Workflow playbooks to run ad hoc (outside of a task) in a Case.
- On the Artifacts card on the Case Details screen, the Download option has been added back to the ⋯ menu for Artifacts of the
SearchableFileandNonSearchableFiletypes. - In a Case, you are now prevented from deleting a task on which other tasks are dependent. A task cannot be deleted until all tasks that depend on it are deleted.
- When manually running an automated task in a Case, you are now prompted to enter required inputs and review all configured inputs before the playbook runs.
- When adding associations to new Indicators from the new Case Details screen, you can now remove individual Indicators from the set before finishing the create-and-associate operation.
- When sorting certain table columns with numeric data, null values are now always at the bottom, regardless of whether the sort is in ascending or descending order.
- The following endpoints have been added to the ThreatConnect v3 API:
POST /v3/threatAssess/tqlRefresh/preview: Previews the results of a TQL-based ThreatAssess recalculation.POST /v3/threatAssess/tqlRefresh: Executes a TQL-based ThreatAssess recalculation with a specified priority.GET /v3/threatAssess/queueCounts: Retrieves the ThreatAssess recalculation queue count for each priority.OPTIONS /v3/threatAssess/tqlRefresh: Retrieves a list of acceptable values for thepriorityparameter, which can be used as a request body parameter in thePOST /v3/threatAssess/tqlRefreshoperation and as a query parameter in theGET /v3/threatAssess/queueCountsoperation.
Bug Fixes
- Previously, CAL Indicator enrichment services, the TQL Generator, and CAL Automated Threat Library AI insights were not available when the CALServices system setting was at the Disable CAL Services level. This issue has been corrected.
- The CALPersistentProcessing system setting was hidden on some instances. This issue was fixed.
- An issue causing agents to fail and return an error message stating that “the AI model isn't properly configured” when there weren’t actually configuration gaps was resolved.
- Playbook Webhook triggers were not resolving variables configured exclusively in HTTP response headers, causing them to return “variable not found” errors. This issue has been fixed.
- When the Activity screen was refreshed, the elapsed execution time counter for running playbooks was being reset to 0. This issue was fixed.
- Inputs and outputs for playbook app executions were not being logged at the DEBUG log level. This issue was fixed.
- An issue causing an error to occur when opening or Importing playbooks with misconfigured or cyclical Iterator operator loop connections was corrected.
- An issue causing TQL queries and playbook app outputs to report inflated Case counts was resolved.
- An issue causing the “Last Reported” date for Indicator false positives to display as one calendar day early for users in timezones behind UTC was corrected.
- An issue causing column sorting and filtering selections in the results table on the Cases screen and on certain dashboard query cards to revert to an earlier state when two selections were made in quick succession was resolved.
- Certain legacy cards in shared dashboards were causing those dashboards to become overwritten with a blank dashboard. This issue was resolved.
- Redeployment of a feed API service over an existing source with large volumes of associated data was causing transaction timeouts and deployment failures. This issue has been resolved.
- Redeployment of an existing feed source was failing when an instance’s Organization-level API user limit was fully allocated. This issue was resolved.
- When modifying Indicator exclusion lists via the v3 API,
variableValueswere being dropped. This issue was fixed. - An issue causing PDF report generation to fail after upgrading to a new version of the agentic TIP has been resolved.
- An issue causing multipage text blocks in custom reports to be clipped at the bottom of the page in the report editor and PDF viewer was fixed.
- An issue causing batch imports that include custom Indicator types or associations to fail was corrected.
- An issue causing Indicators of single-value custom types with a space-colon-space (
:) in their name (e.g.., Email Subject Indicators) to be incorrectly truncated upon import and not found for association processing was resolved. - An issue preventing the agentic TIP from shutting down gracefully was fixed.
2026-09-02 8.1.1-M0902R
Bug Fixes
- When adding the String Operations app to a playbook, a console error was occurring that was preventing some of the apps in the playbook from being rendered in the UI. This issue was fixed.
2026-08-26 8.1.1
Improvements
- The BYOM feature now supports Google Gemini™.
- The Workflow Tasks card on the Case Details screen now has Collapse All and Expand All buttons, allowing you to collapse and expand all tasks independently of the rest of the cards on the Case Details screen.
- The Artifacts card on the Case Details screen has a new Owners column that displays the number of owners of the corresponding Indicator for Artifacts of the following types: Address, Email Address, File, Host, URL. This number is displayed only for Artifacts of these types that exist in one or more of your ThreatConnect owners. Click on the number to view the Details drawer for the corresponding Indicators. For Artifacts of those types that do not exist in the Organization that owns the Case, the ⋯ menu now includes an Add to Organization option that allows you to add the Artifact as an Indicator to that Organization with a single click.
- In Cases, task Artifacts that can take multiple values now have a separate Source field for each entered value, ensuring that each field is correctly attributed to the user who created or edited it.
- In Threat Graph, Groups of the same type with the same name in the same owner are now identified individually rather than treated as a single entity. Each version is distinguished by its ID number (that is, the number found after
/groups/in the URL for the Group’s Details screen in a particular owner). For example, when you select Add Associations or View Details from the node’s menu, you will get a submenu listing all versions of the Group with that name in all owners, and the entries for versions that exist in the same owner will include the version’s ID. This change allows you to select the specific version of the Group you want to add associations to or view details for. In addition, when viewing a Group’s Details drawer in Threat Graph, you can select which version of the Group you want to see within a particular owner as well as across all owners, even if the Group does not have a unified view. Groups that exist in multiple versions in the same owner and/or across owners are displayed with a dashed border around the Group node. Note that you must click on a node to display its border. - In custom query cards for Indicators on dashboards, Last Observed Date has been added as a column option for table view.
- In the configurable email templates in System Settings, the default logo and footer have been updated to Dataminr versions. Custom logos and footers configured in email templates are not replaced by these new defaults.
- A new
/v3/notificationsendpoint has been added to the v3 API. This endpoint allows you to retrieve an API user’s notifications, including job failure outcomes for feed API services. - A new system setting, logScimEvents, was added to allow System Administrators to turn on or off logging of SCIM API requests and user and user group changes. These logs can be accessed via System Settings > Logs and the Management API.
- Updates were implemented to ensure that calls to an instance’s configured CALHost are made only for features that are available when the corresponding system setting is turned on (CALIndicatorEnrichment, CALPersistentProcessing, aiTqlGenerationEnabled) or set to the appropriate level (CALServices). Note, however, that the two playbook apps that leverage CAL data are not gated by these system settings—that is, the ThreatConnect CAL playbook app makes calls to the CALHost regardless of whether CALIndicatorEnrichment is turned on, and the ThreatConnect Doc Analysis playbook app makes calls to the CALHost regardless of whether CALServices is set to the corresponding level for features selected in the app’s configuration. System Administrators should uninstall these two apps if their instance should not interact with CAL.
Bug Fixes
- An issue causing latency on the Case Details screen for Cases with large amounts of data (e.g., tasks, attributes) was resolved.
- Certain File Indicators were not being trimmed on creation for certain import pathways, which was preventing outbound TAXII™ servers from recognizing them. This issue was corrected.
- Group association tables in reports created in the Reporting feature were intermittently truncated after 1 or 2 rows. This issue has been fixed.
- An issue preventing execution of playbooks with Mailbox triggers was resolved.
- An issue preventing scrolling past the first two options when selecting a remote environment for a playbook app has been fixed.
- An issue causing the Update Global Variable playbook app to fail when generating a large JSON payload was fixed.
- An issue causing instances to reach their maximum playbook executions limit prematurely was fixed.
- An issue causing playbook execution across all workers to stall while an app is being built and released was fixed.
- An issue preventing newly created Report, Incident, Event, or Campaign Groups from being associated via the v3 API was fixed.
- An issue causing out-of-memory errors to occur during V2 API lookups for Indicators with large numbers of attributes was resolved.
- An issue causing a system health check error to be recorded on instances with a proxy enabled was fixed.
ThreatConnect® is a registered trademark, and CAL™ is a trademark, of ThreatConnect, Inc.
Amazon Bedrock® is a registered trademark of Amazon Web Services, Inc.
Anthropic® and Claude® are registered trademarks of Anthropic, PBC.
Finder® and macOS® are registered trademarks of Apple, Inc.
Wildfly® is a registered trademark of The Commonhaus Foundation.
Google® is a registered trademark, and Gemini™ and VirusTotal™ are trademarks, of Google LLC.
Microsoft®, Azure®, and Windows® are registered trademarks, and TAXII is a trademark™, of Microsoft Corporation.
npm® is a registered trademark of npm, Inc.
Node.js® is a registered trademark of the OpenJS Foundation.
Java® and JavaScript® are registered trademarks of Oracle Corporation.
Postgres® is a registered trademark of PostgreSQL Community Association of Canada.
Redis® is a registered trademark of Redis Ltd.