Overview
Multi-environment orchestration (MEO) allows ThreatConnect® users that have an Environment Server behind a firewall to use their instance to communicate with that server and run applications inside their firewall. This article provides the system requirements and instructions for installing an instance of the ThreatConnect Environment Server. See Playbook Environments for information about how to administrate and use Environments and configure an Environment to an Environment Server.
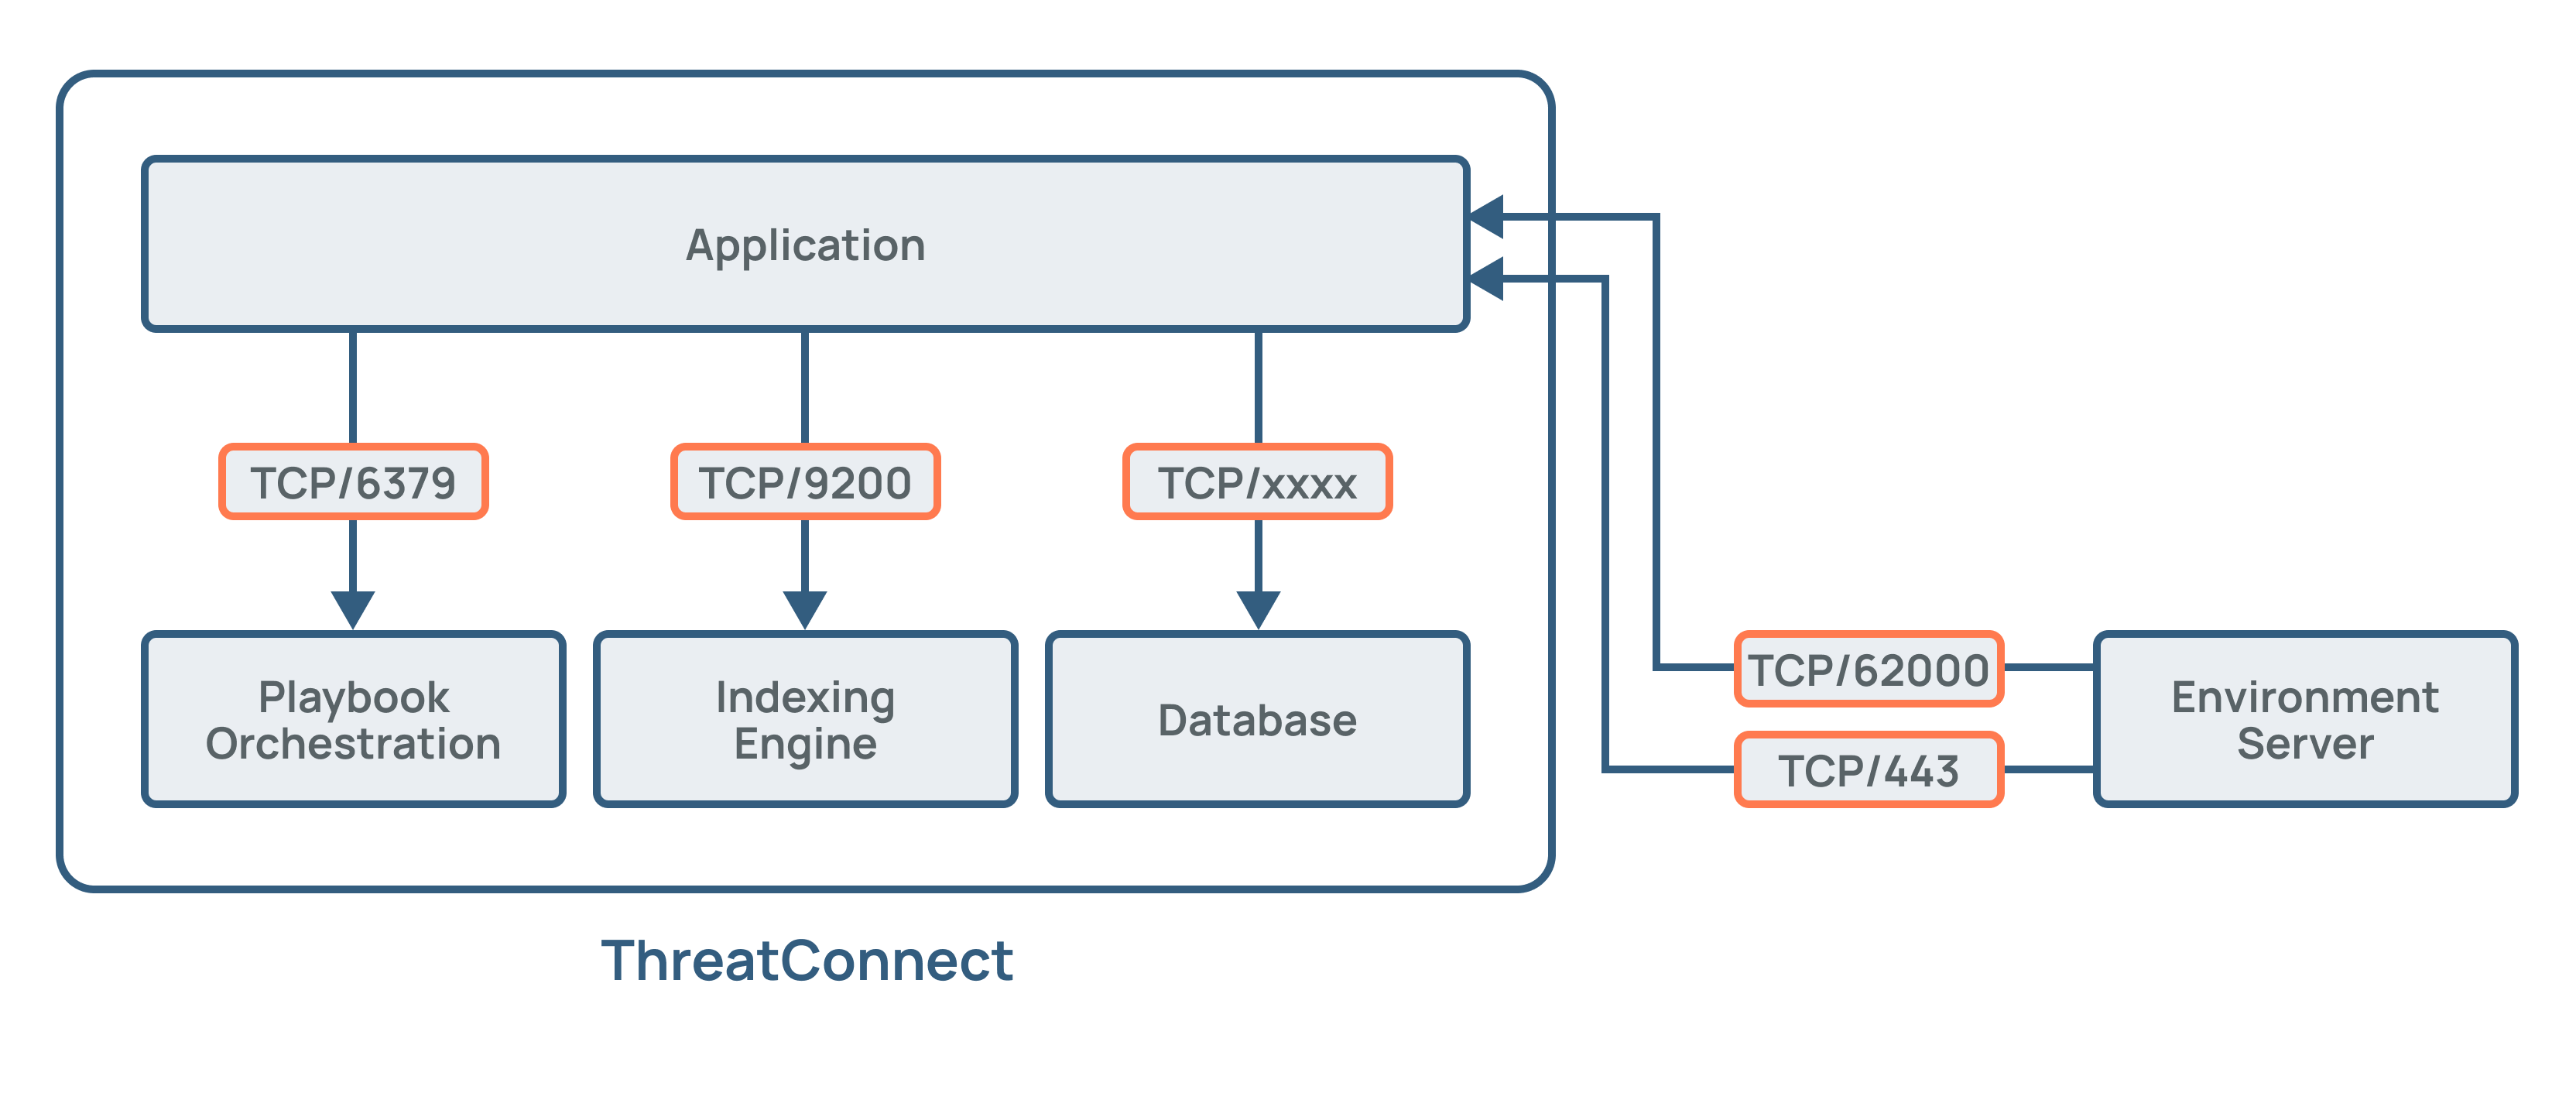
ThreatConnect Environment Server Architecture
Environment Servers are lightweight, deployable agents that sit behind your firewall. This configuration allows secure outbound traffic to flow from your systems to ThreatConnect, enabling ThreatConnect to interact with data and run automations based on your security environment. Port 62000 and Port 443 are used for this communication, with Port 62000 utilizing a raw socket. Figure 1 illustrates where an Environment Server resides in a ThreatConnect instance and how it communicates with ThreatConnect.
Environments are configured to house Environment Servers inside ThreatConnect. This configuration makes it possible to conduct health and performance monitoring to assess usage and collect statistics that are useful when administering Environment Servers.
ThreatConnect Environment Server System Requirements
This section provides the hardware, software, and end-user web browser requirements for installing an instance of the ThreatConnect Environment Server.
Hardware
The ThreatConnect Environment Server platform requires a server, virtual or physical, that meets the following minimum specifications:
- 4 CPU/vCPU Cores (2 GHz)
- 4 GB of memory
- 10 GB of storage
As the number or frequency of Jobs increases, you will likely need to increase the available system resources. Table 1 provides examples of TC Exchange™ Apps and their system-resource needs.
| App Name | Frequency | CPU Used | Memory Used |
|---|---|---|---|
| ArcSight™ EMS Extract | Daily | 1.44 | 75 |
| Tanium™ Extract v2.0 | Daily | < 1 | < 50 |
| QRadar® Extract v2.0 | Daily | <1 | < 50 |
| Palo Alto PAN-OS® Block List | Daily | .10 | 2.5 |
Software
The ThreatConnect Environment Server and its supporting packages require the following software environment:
- Operating System: Red Hat® Linux® variant—either Red Hat Enterprise Linux® (RHEL) 8 or 9.
threatconnect.- Java® Development Kit (JDK): Access to a local installation of Java 17 (OpenJDK or Oracle Java version 17).
- Python®: Installation of Python 3.11.x.
End-User Web Browser
It is recommended that secure WebSockets be allowed from your browser out to the cloud instance so that the Environment Server metrics can be monitored from the user interface. The specific traffic that needs to be allowed is wss://FQDN-of-cloud-instance:62000.
firewalld/iptable), SELinux (if using the “Enforcing” mode), the external firewall, and the proxy server.Network Traffic Port Requirements
The ports and protocols listed in Table 2 must be opened when deploying the ThreatConnect Environment Server inside a network. Appropriate firewall rules must be enabled for these ports from the machine running the Environment Server in order to allow connectivity to your ThreatConnect Dedicated Cloud instance.
| Network Port | Protocol | Traffic Direction | Description |
|---|---|---|---|
| 443 | HTTPS/TCP | Outbound to DC | This port connects to the ThreatConnect Dedicated Cloud API to download Apps for execution. Traffic is limited to App installs and upgrades. App downloads are performed when an execution request is sent from the ThreatConnect Dedicated Cloud instance for the first time. |
| 62000 | TCP | Outbound to DC | This port is defined in the appMessageBrokerHost parameter in the ThreatConnect system settings. It enables the Environment Server to connect securely with the ThreatConnect Dedicated Cloud message broker to receive real-time commands in order to execute an App to fulfill orchestration requirements, as well as provide command-and-control capabilities. Traffic is lightweight and used primarily in a request/response model to direct App executions. |
Prepare Software Environment
This section provides instructions for installing Python and Java JDK to prepare your software environment for installation and configuration of the ThreatConnect Environment Server.
Install Python
Follow these steps to compile and install Python 3.11 from source code:
- Run the following commands to install the developer packages required to compile Python from source code:
yum install -y yum-utils \ make gcc \ openssl openssl-devel \ postgresql-devel \ libtiff-devel libjpeg-devel libzip-devel freetype-devel \ libwebp-devel tcl-devel libxslt-devel libxml2-devel \ bzip2-devel \ gdbm-devel \ libffi-devel \ sqlite-devel \ ncurses-devel \ readline-devel \ tk-devel \ xz-devel \ zlib-devel \ wget ;\ yum clean all - Execute the following commands to download, build, and install Python 3.11:
mkdir /tmp/python3.11.1-build && \ cd /tmp/python3.11.1-build && \ curl https://www.python.org/ftp/python/3.11.1/Python-3.11.1.tgz > python-3.11.1.tgz && \ tar xzf python-3.11.1.tgz && \ cd Python-3.11.1 && \ mkdir -p /opt/python3.11.1/lib && \ export CFLAGS="$CFLAGS $(pkg-config --cflags openssl11)" && \ export LDFLAGS="$LDFLAGS $(pkg-config --libs openssl11)" && \ ./configure --prefix=/opt/python3.11.1 \ --with-ensurepip=install \ --enable-optimizations \ --enable-shared LDFLAGS="$LDFLAGS -Wl,-rpath /opt/python3.11.1/lib" && \ make -j$(nproc) - Begin the compile process to ensure there are no errors:
make install - Set up a symbolic link:
ln -s /opt/python3.11.1/bin/python3.11 /opt/python3.11.1/bin/python
Install and Configure Java JDK
Follow these steps to install and configure Java version 17.x in your software environment and to configure the JAVA_HOME environment variable to point to the Java directory:
- Execute the following command:
rpm -ivh https://download.oracle.com/java/17/latest/jdk-17_linux-x64_bin.rpm - Once installation is complete, execute the following command to output the current location of the new Java installation:
alternatives --config java - Typically, an installation of this type will create a symbolic link to
/usr/java/latest. Execute the following command to confirm whether this location can be configured as the run location for Java:cd /usr/java/latest - Create the
threatconnectlocal-OS user account:adduser threatconnect - Execute the following commands to log into and modify the
.bashrcfile for thethreatconnectaccount:su threatconnect vi ~/.bashrc - Add the following code as the second line of the
.bashrcfile, where<path to Java>would typically look like/user/java/latest:export JAVA_HOME=<path to Java> - Reload the
.bashrcprofile:source ~/.bashrc
Install the ThreatConnect Environment Server
This section provides instructions for downloading and unzipping the installer file for the ThreatConnect Environment Server.
Download the Installer
Follow these steps to download a .zip file containing the Environment Server installer:
- From the Automation & Feeds menu on the top navigation bar, select Environments.
- Select Download from the ⋮ menu on the card for the Environment for which you want to install an Environment Server.HintIf your ThreatConnect instance does not have any Environments, or if you want to install an Environment Server for a new Environment, click + Create Environment and enter the Environment’s name and owner to create a new Environment.
- Select the Download Bundle (All-in-one) option from the Environment: <name of selected Environment> window. This option downloads a
threatconnect-envsvr-bundle.zipfile containing the Environment Server configuration file, the file for the Environment Server, and the keystore files required to make a secure connection to the host ThreatConnect instance.NoteThe Environment Config Only option downloads only the.envfile for the Environment Server. Select this option if you want to connect an existing Environment Server to a new Environment. The Environment Server Only option downloads athreatconnect-envsvr.zipfile containing only thethreatconnect-envsvr.jarfile. Select this option if you are upgrading your instance of the ThreatConnect Environment Server to a newer version. Replace the existing.jarfile with the downloaded file and restart the Environment Server to complete the upgrade. - Click Download.
Unzip the Installer File
Use one of the following methods to unzip the threatconnect-envsvr-bundle.zip file:
- Copy the
.zipfile to the directory in which you want to install the ThreatConnect Environment Server. By default, this directory is/opt, which will result in an installation directory of/opt/threatconnect-envsvr. - Use the following command to unzip the file from the command-line interface:
unzip environment-server-bundle.zip
The threatconnect-envsvr-bundle.zip file extracts to a threatconnect-envsvr folder with the following contents:
- The
.tcenvsvrdirectory contains the default keystore and broker connection settings. - The
configure.shfile is used to configure the Environment Server settings via a command-line interface. - The
help.shfile contains command-line usage and help text when executed from the command line. - The
README.txtfile contains installation instructions for the Environment Server. - The
run.shfile is used to run the Environment Server directly from the command line (i.e., not as a service). - The
shutdown.shfile is used to shut down the current Environment Server. - The
threatconnect-envsvr.init.shfile is theinit.dservice script. - The
threatconnect-envsvr.jarfile for the Environment Server.
Configure the Operating System
Follow these steps to configure the operating system for installation of the ThreatConnect Environment Server:
- Execute a command like the following, which uses the default values of
threatconnectand/opt/threatconnet-envsvr, to configure permissions within the operating system to ensure that thethreatconnectuser can access the ThreatConnect Environment Server files:chown –R threatconnect:threatconnect /opt/threatconnect-envsvr - Run the following command to ensure that all
.shscripts are executable, which is a requirement for the ThreatConnect Environment Server:chmod +x /opt/threatconnect-envsvr/*.sh
Configure the Environment Server
This section provides instructions on how to configure the ThreatConnect Environment Server by creating the tc-job user, configuring privileges for the tc-job user, and configuring the sudoers file.
Create tc-job User
tc-job user will have restricted permissions for Apps so that it cannot modify files outside of App execution directories.Follow these steps to create a separate user on Linux systems to run TC Exchange Jobs (i.e., the tc-job user) and to create read and write groups to control the permissions to the files associated with these Jobs:
- Create the following directories:
mkdir -p /opt/threatconnect-envsvr/.tcenvsvr/exchange/programs mkdir -p /opt/threatconnect-envsvr/.tcenvsvr/exchange/jobs - Create the
tc-jobuser and the read and write groups that will control permissions to the directories created in Step 1:NoteThetc-job--pass123password is an example and should be replaced with a password of your choosing that is not used elsewhere, as thethreatconnectuser has sudo privileges to thetc-jobuser.useradd tc-job echo "tc-job-‐pass123" | passwd tc-job --stdin chgrp -R threatconnect /opt/threatconnect-envsvr/.tcenvsvr/exchange # correct octal permissions find /opt/threatconnect-envsvr/.tcenvsvr/exchange/ -type f -exec chmod 644 -- {} + find /opt/threatconnect-envsvr/.tcenvsvr/exchange/ -type d -exec chmod 755 -- {} + # set new default ACLs setfacl -Rdm u:tc-job:rx /opt/threatconnect-envsvr/.tcenvsvr/exchange/programs/ setfacl -Rdm u:tc-job:rwx /opt/threatconnect-envsvr/.tcenvsvr/exchange/jobs/ setfacl -Rdm u:threatconnect:rwx /opt/threatconnect-envsvr/.tcenvsvr/exchange/jobs/
Configure User Privileges
Add the following lines to /etc/pam.d/su after the first auth command to configure the privileges for the tc-job user:
auth    sufficient pam_rootok.so
auth    [success=ignore default=1] pam_succeed_if.so user = tc-job
auth    sufficient pam_succeed_if.so use_uid user = threatconnect
Configure sudoers File
Follow these steps to configure the sudoers file, which will allow the threatconnect user to run Jobs as the tc-jobs user:
- Execute the following command to create the
/etc/sudoers.d/threatconnectfile:visudo -f /etc/sudoers.d/threatconnect - Add the following lines:
Defaults:threatconnect !requiretty
threatconnect ALL=(tc‐job) NOPASSWD: ALL
Run the ThreatConnect Environment Server as a Linux Service
The initial configuration for the ThreatConnect Environment Server allows you to run the ThreatConnect Environment Server in a single session. However, this approach requires the platform to be started manually after each reboot or a terminal window or Secure Shell (SSH) session to be left open. To address this limitation, you can run the ThreatConnect Environment Server as a service in Linux.
Configure the ThreatConnect Environment Server to Run as a Service
Follow these steps to configure the ThreatConnect Environment Server to run as a Linux service:
- Open a terminal window and navigate to the App directory within the ThreatConnect Environment Server directory.
- Run the
run.shfile using the command that follows, which will ensure proper connectivity to the ThreatConnect Dedicated Cloud instance for your organization. As long as logs indicating connectivity to your Dedicated Cloud instance (FQDN:62000with successful connection) are being generated, the MEO server will connect properly to the Dedicated Cloud instance.su - threatconnect -c ./opt/threatconnect-envsvr/run.sh - Run CTRL-C to force the process to close.
- Once the process is closed, execute the following command:
su - threatconnect -c ./opt/threatconnect-envsvr/configure.sh - Select
1: System Configurationfrom the main menu. - Select
2: Edit System Configfrom theSystem Configurationmenu. - Edit the Java and Python locations as they are configured within your current ThreatConnect Environment Server configuration. Typically, the options to select are
3: appsJavaHome(for Java) and5: appsPythonHomeand6: appsPythonHome311(for Python). - If you are implementing a proxy within the Environment Server, the fields in the following menu will need to be configured:
13: proxyExternal = <empty> 14: proxyHost = <empty> 15: proxyPassword = <empty> 16: proxyPort = <empty> 17: proxyTC = <empty> 18: proxyUsername = <empty>- Set options
13and17totrue. - Populate options
14,15,16, and18according to your organization’s proxy configuration for where this server resides.
- Set options
Copy the Service Script
The ThreatConnect Environment Server installer file includes a threatconnect-envsvr.init.sh script used for running the ThreatConnect Environment Server as an initialized service. Run the following command to copy this script into the /etc/init.d directory to allow it to be recognized as a system service:
cp /opt/threatconnect-envsvr/threatconnect-envsvr.init.sh /etc/init.d/threatconnect-envsvrConfigure the Service Script
Follow these steps to configure the permissions and paths for the Environment Server service script:
- Set the
TCENVSVR_HOMEvariable in the script to point to the path for the ThreatConnect Environment Server installation files. The default path is/opt/threatconnect-envsvr. - Set the
USERvariable in the script to the user that owns the files for the ThreatConnect Environment Server application. Do not use the root user for this purpose. By default, the username isthreatconnect.
Start the ThreatConnect Environment Server as a Service
Enter one of the following commands while logged in as the root user to start the ThreatConnect Environment Server as a Linux service:
service threatconnect-envsvr start

/etc/init.d/threatconnect-envsvr start
Enter one of the following commands to stop the service:
service threatconnect-envsvr stop

/etc/init.d/threatconnect-envsvr stop
Enter the following commands to have the ThreatConnect Environment Server start on system startup:
- SysVinit systems:
chkconfig ‐‐add threatconnect-envsvr chkconfig threatconnect-envsvr on - systemd systems:
systemctl enable threatconnect-envsvr
Configuration Settings
This section provides information on configuration settings for the ThreatConnect Environment Server, including a master key for the keychain feature and the ThreatConnect system settings that can affect the ThreatConnect Environment Server.
Set Master Key for Keychain
The keychain feature is required for the ThreatConnect Environment Server. When prompted, enter a master password. The master password is used to encrypt sensitive values and is required on every server restart.
System Settings Checklist
Review the system settings for your ThreatConnect instance listed in Table 3 to ensure that they are configured according to your needs. You can view and edit these settings on the Settings tab of the System Settings screen when logged in as a user with a System role of Administrator.
| System Setting | Description |
|---|---|
| apiURL | The URL for the API at port 8443 (e.g., https://api.threatconnect.com:8443). |
| appDeliveryToken | The token that is used to authenticate with the App Catalog Server. |
| appsJavaHome | The path to the Java binary. |
| appsNumberofJobExecutors | The number of Job Executors that can run concurrently. It is a factor of the number of CPUs and the available memory on the server and should not exceed available resources. |
| appsPythonHome311 | The path to the Python 3.11 binary. |
| appsSandboxUser | The user account used to execute Jobs. This setting applies only to Linux installs. |
| appsSessionDaystoKeep | The number of days that logs will be kept in the Jobs log directory (%threatconnect%/exchange/jobs). |
| brokerHost | The remote host name of the messaging server to which the Environment Server connects. |
| brokerToken | The secure key used to authenticate a connection to the remote message broker. |
| proxyExternal | This setting has a value of true when all external connections for Apps should be routed through a proxy server. |
| proxyHost | The proxy host to use if a proxy server is required. Acceptable values are a valid IP address or host name for a proxy accessible by the ThreatConnect instance. |
| proxyPassword | The proxy password to use if a proxy server requires authentication. |
| proxyPort | The proxy port to use if a proxy server is required. |
| proxyTC | This setting has a value of true when all connections to the ThreatConnect host server should be routed through a proxy server |
| proxyUsername | The proxy username to use if a proxy server requires authentication. |
| queueTransport | This setting is empty by default, indicating that the raw TCP socket is used for messaging services. For deployments that require a proxy, set the value to websocket, which will enable an HTTP-based transport protocol supported by secured proxy environments. All traffic will move through port 62000 over HTTP/S. If the proxy is defined, then the Environment Server will utilize this proxy for all messaging traffic.Note Port 62000 enables the ThreatConnect Environment Server to connect securely with the ThreatConnect Dedicated Cloud message broker to receive real-time commands in order to execute an App to fulfill orchestration requirements, as well as provide command-and-control capabilities. Traffic is lightweight and used primarily in a request/response model to direct App executions. |
| relaySystemInfoPublishSeconds | The frequency at which to notify the remote ThreatConnect instance of the status of the Environment Server. |
| serverName | The name of the Environment Server. This name will be displayed in the ThreatConnect UI (e.g., on the Environments screen). |
| serverXid | A static number that uniquely identifies the given Environment Server. Do not change the default value. |
Appendix A: Add Trusted Private Certificates
Follow these steps to add trusted private certificates to the ThreatConnect Environment Server’s trust store in RHEL:
- Create a folder for the certificates.
mkdir /opt/certs && cd /opt/certs - Create a
fullchain.pemfile that contains the custom (i.e., self-signed) certificate and the custom certificate authority (CA) certificate concatenated together, as in the following example:cat /path/to/self.signed.cert.pem > fullchain.pem cat /path/to/custom.ca.pem >> fullchain.pem - Import the certificate into the Java
cacertskeystore:NoteThis step applies only if your installation uses Java. It is optional if your installation uses Python./opt/java/bin/keytool -importcert -trustcacerts -alias self.signed.cert -file fullchain.pem -cacerts -storepass changeit -noprompt - Rename the
python3.11executable file as follows:ImportantThe rest of the steps in this appendix assume that the python3.11 file is installed to /opt/python3.11.\mv -v /opt/python3.11/bin/python /opt/python3.11/bin/tcpython - Create the
python3.11wrapper executable:vi /opt/python3.11/bin/python - Export the contents of the
python3.11wrapper executable:#!/bin/bash export REQUESTS_CA_BUNDLE=/opt/certs/python3.11_cacert.pem /opt/python3.11/bin/tcpython $@ - Confirm that the
python3.11wrapper executable is executable:chmod 755 /opt/python3.11/bin/python - Copy the
python3.11_cacert.pemfile:\cp -v /opt/python3.11/lib/python3.11/site-packages/certifi/cacert.pem python3.11_cacert.pem - Append the
fullchain.pemfile to thepython3.11_cacert.pemfile:\cat fullchain.pem >> python3.11_cacert.pem
Appendix B: Upgrade ThreatConnect Environment Server
Follow these steps to upgrade the ThreatConnect Environment Server:
- From the Automation & Feeds menu on the top navigation bar, select Environments.
- Select Download from the ⋮ menu on the card for the Environment for which you want to upgrade the Environment Server.
- Select the Environment Server Only option from the Environment: <name of selected Environment> window. This option downloads a
threatconnect-envsvr.zipfile containing only thethreatconnect-envsvr.jarfile. - Click Download.
- Replace the existing
.jarfile with the downloaded file. - Restart the Environment Server to complete the upgrade.
ThreatConnect® is a registered trademark, and TC Exchange™ is a trademark, of ThreatConnect, Inc.
ArcSight™ is a trademark of Hewlett Packard Enterprise Company.
QRadar® is a registered trademark of IBM Corporation.
Linux® is a registered trademark of Linus Torvalds.
Java® is a registered trademark of Oracle Corporation.
PAN-OS® is a registered trademark of Palo Alto Networks.
Python® is a registered trademark of Python Software Foundation.
Red Hat® and Enterprise Linux® are registered trademarks, and CentOS™ is a trademark, of Red Hat, Inc.
Tanium™ is a trademark of Tanium, Inc.
10028-21 EN Rev. A