Creating an Outbound TAXII Exchange Feed
- 04 Mar 2024
- 4 Minutes to read
-
Print
-
DarkLight
-
PDF
Creating an Outbound TAXII Exchange Feed
- Updated on 04 Mar 2024
- 4 Minutes to read
-
Print
-
DarkLight
-
PDF
Article summary
Did you find this summary helpful?
Thank you for your feedback!
Overview
An Outbound TAXII™ Exchange Feed pushes STIX™ (Structured Threat Information eXpression)–formatted data to a TAXII server inbox.
Before You Start
| Minimum Role(s) | Organization role of Standard User |
|---|---|
| Prerequisites | A Source administered by your Organization |
Creating an Outbound TAXII Exchange Feed
- Log into ThreatConnect with an account that has access to the desired Source.
- On the top navigation bar, click Posts. The Posts screen will be displayed.
- Select a Source using the selector at the upper-right corner of the screen or from the Intelligence Sources section of the My ThreatConnect card on the left side of the screen. The Posts screen for the selected Source will be displayed (Figure 1).
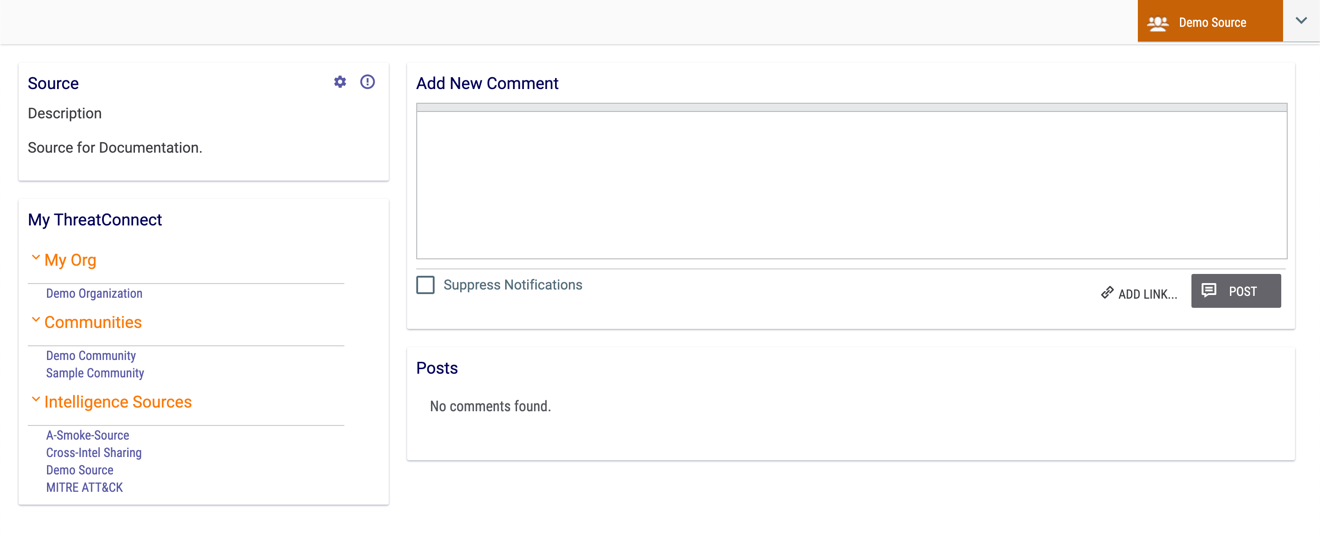
- Click Source Config
 icon at the upper-right corner of the Source card. The Attribute Types tab of the Source Config screen will be displayed.
 - Click the Data tab. The Data screen will be displayed (Figure 2).
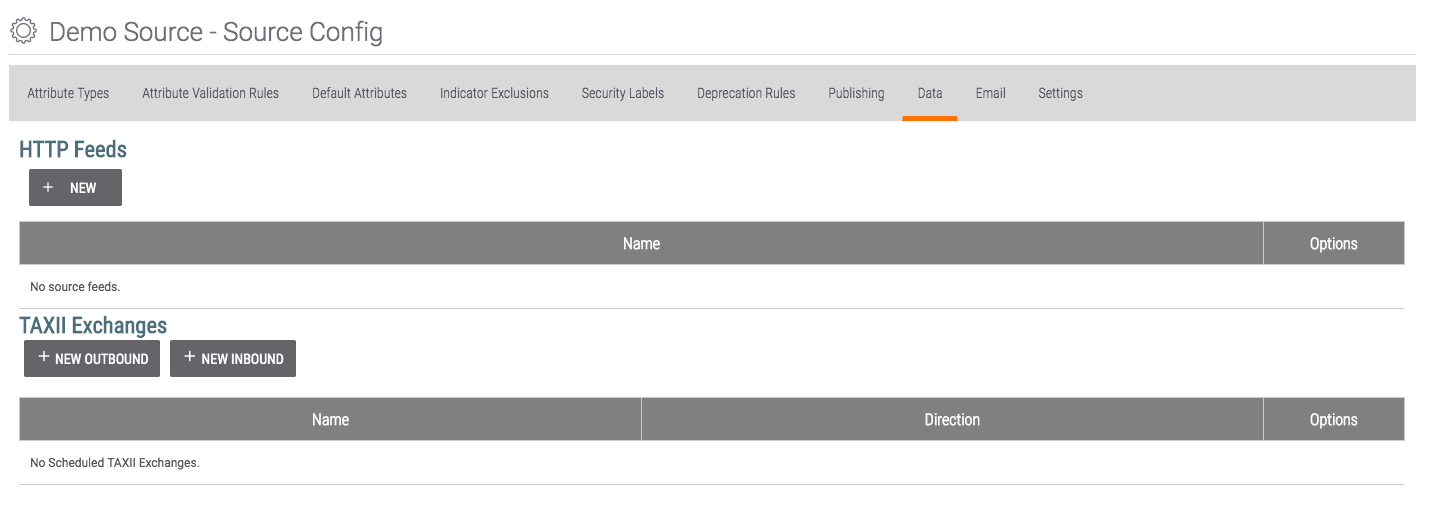
- Click the + NEW OUTBOUND button. The Configure Outbound TAXII Exchange window will be displayed with the TAXII tab highlighted (Figure 3).
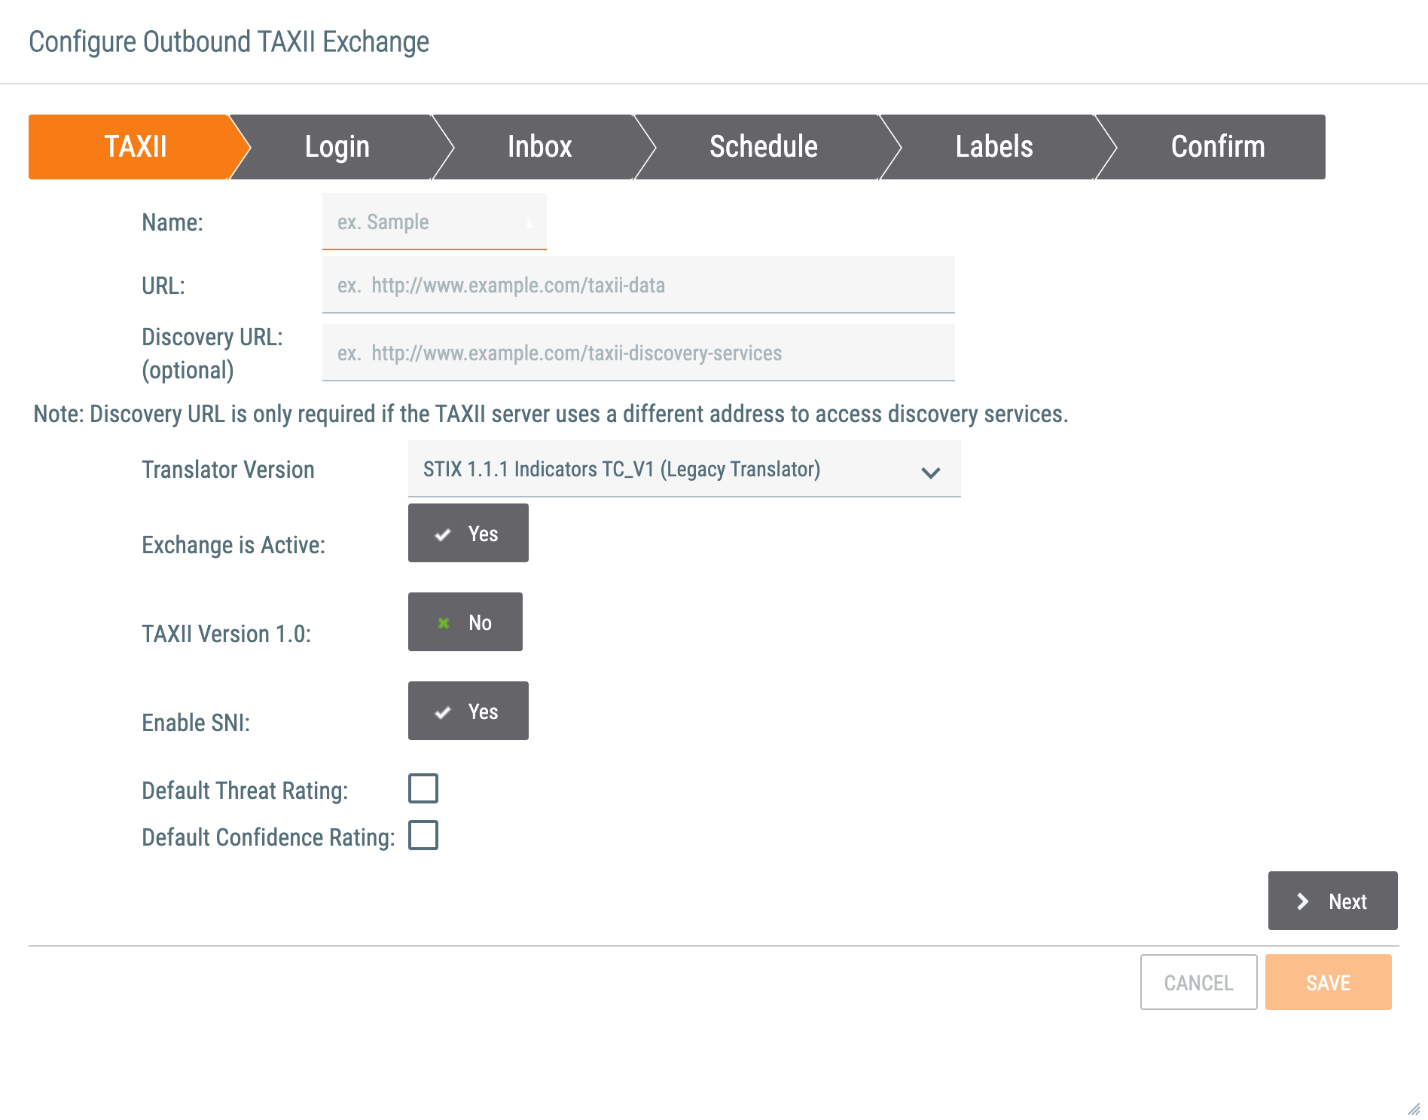
- Name: Enter a name for the Outbound TAXII Exchange Feed.
- URL: Enter a URL for the Outbound TAXII Exchange Feed.
- Discovery URL: If applicable, enter a Discovery URL for the Outbound TAXII Exchange Feed.
- Translator Version: Select the format of the outbound STIX:
- STIX 1.1.1 Indicators TC_V2 is the recommended translator. It converts ThreatConnect Indicators to individual STIX Indicators and is compatible with the TC_V2 Parser. It also inserts pipe-delimited metadata (Description, Source, Threat Rating, ThreatAssess score, False Positives, and Owner) into each Indicator’s description and includes Observations and Confidence Rating in separate STIX fields.
- STIX 1.1.1 Indicators TC_V1 (Legacy Translator) aggregates multiple ThreatConnect Indicators into a single watchlist for a particular type of Indicator and is compatible with the TC_V1 Parser.
- Exchange is Active: Select whether to activate the Outbound TAXII Exchange Feed.
- TAXII Version 1.0: Select whether to use TAXII Version 1.0. A selection of No indicates that TAXII Version 1.1 is to be used.
- Enable SNI: Select whether to enable Server Name Indication (SNI) when connecting to external TAXII servers.
- Default Threat Rating: Select this checkbox to enter a default Threat Rating. After you select this checkbox, five skulls will be displayed. Select the number of skulls to assign a Threat Rating.NoteIt is highly recommended to assign a Default Threat Rating value at this time for follow-on analyst workflows, applications, or Playbooks that may need to query for Indicators.
- Default Confidence Rating: Select this checkbox to enter a default Confidence Rating. After you select this checkbox, a slider will be displayed. Drag the slider to assign a Confidence Rating.NoteIt is highly recommended to assign a Default Confidence Rating value at this time for follow-on analyst workflows, applications, Indicator deprecation, or Playbooks that may need to query for Indicators.
- Click the Next button.
- The Login screen will be displayed (Figure 4).
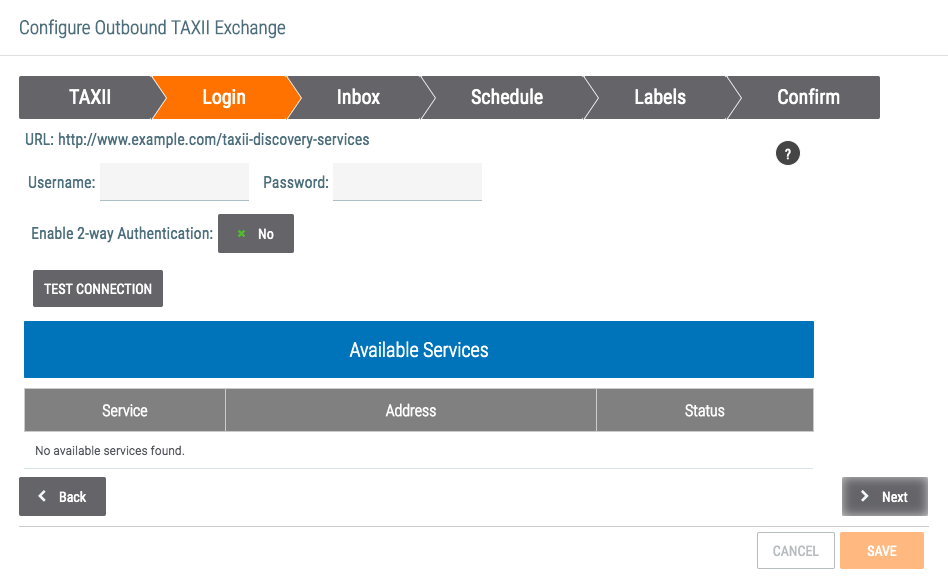
- URL: Verify that the URL displayed matches the one entered on the TAXII screen.
- Username: Enter the username to use to connect to the feed.
- Password: Enter the password to use to connect to the feed.
- Enable 2-way Authentication: Click on the gray rectangle and toggle to Yes to provide a Certificate. Enter the Private Key and Certificate found in the .pem certificate file. If the certificate in the .pem certificate file is not in Private Key PKCS#8 format, then it will need to be converted before it is entered into ThreatConnect.
- TEST CONNECTION: Click this button to test the connection if the remote TAXII server allows for connection testing.
- If the connection was tested and successful, the Available Services table will be populated. Select the appropriate Service if applicable.
- Click the Next button.
- The Inbox screen will be displayed (Figure 5).
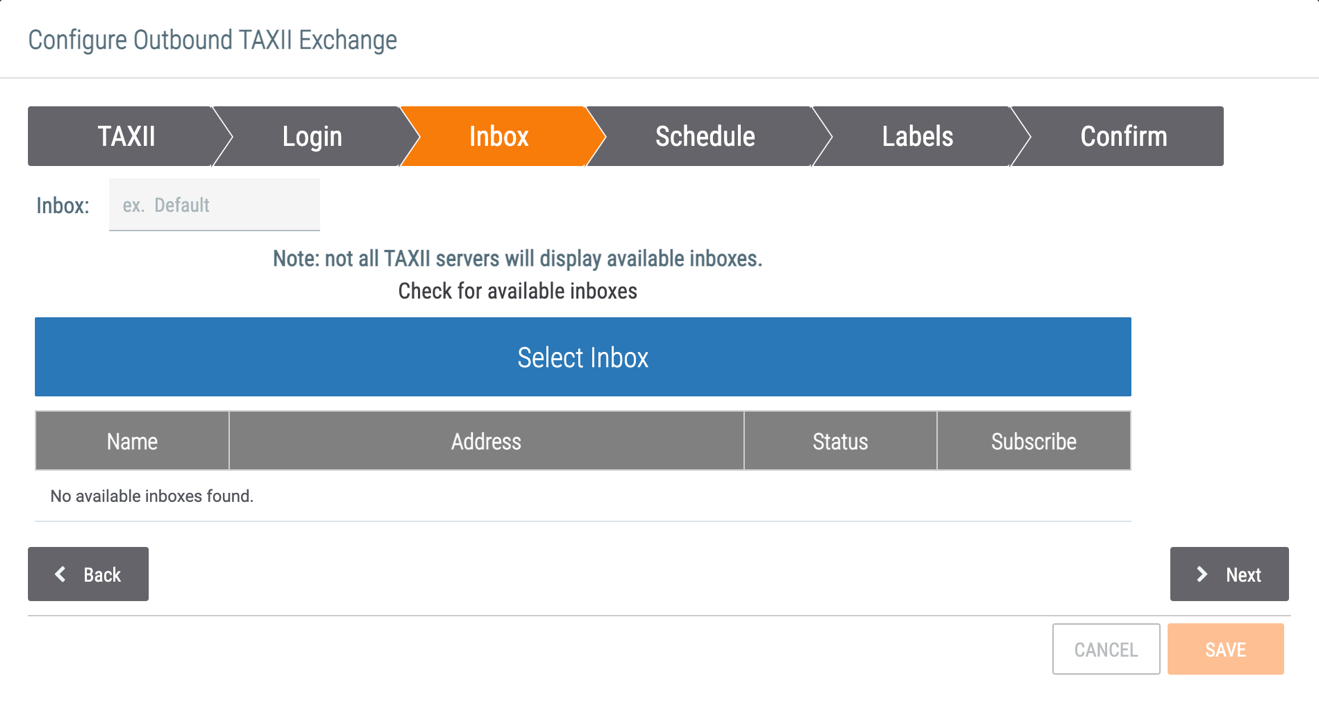
- Inbox: If applicable, enter the desired inbox name or the inbox name provided by the administrator of the remote TAXII server. If no inbox name has been entered, click Check for available inboxes and then select an inbox from the table to populate this field.
- Check for available inboxes: If the remote TAXII server allows for this functionality, click Check for available inboxes to view a table of available inboxes. Select an inbox from the table and then click the Select Inbox button to populate the Inbox field with the information for that inbox.
- Click the Next button.
- The Schedule screen will be displayed (Figure 6).
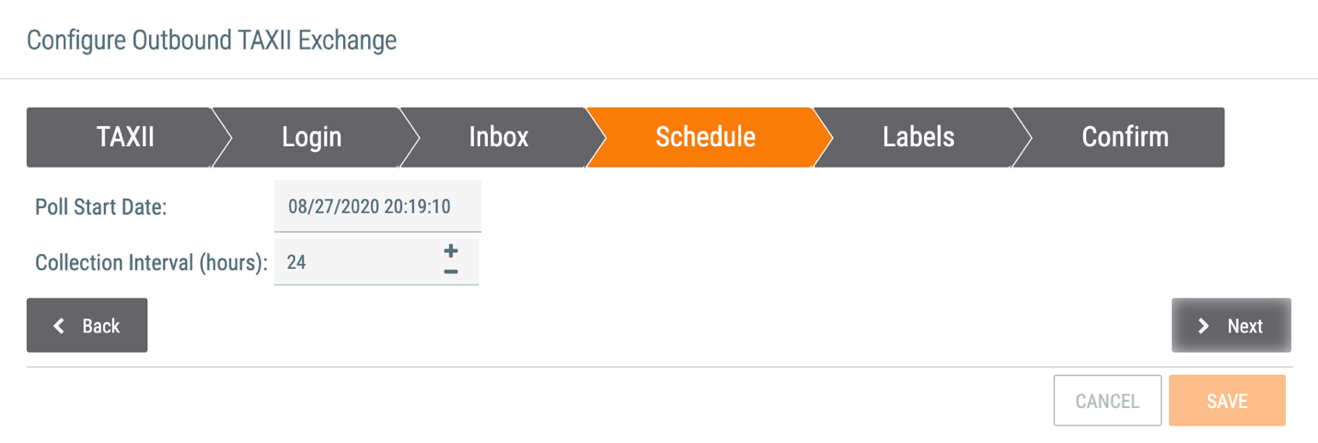
- Poll Start Date: Select the date and time from which the TAXII server should start polling data.
- Collection Interval (hours): Enter the date–time range, in hours, for polling requests. The TAXII service will push Indicators created or updated within the defined Collection Interval to the provided inbox.
- Click the Next button.
- The Labels screen will be displayed (Figure 7).
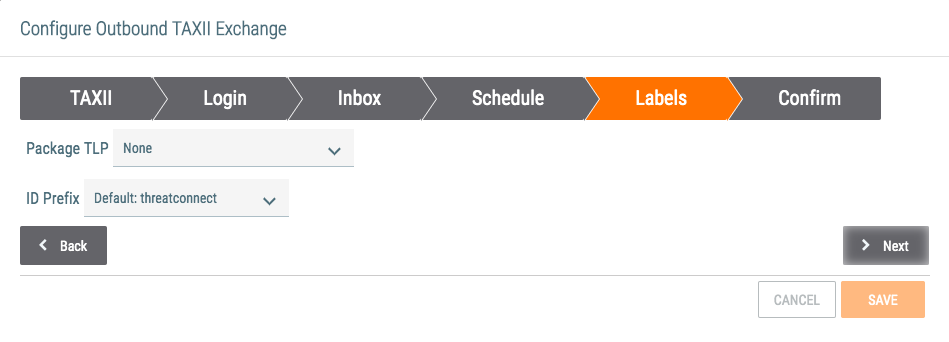
- Package TLP: Select the Traffic Light Protocol (TLP) level that will be added to the STIX package pushed by the outbound client. Selecting Most Restrictive Content TLP will label the package with the highest-level TLP marking found in the outbound content. Selecting a specific TLP color or None will consistently mark all outbound packages as such. The following is example XML for the TLP marking provided in the STIX header of the STIX package:
<stix:STIX_Header> <stix:Title>Report: System</stix:Title> <stix:Package_Intent>INDICATORS</stix:Package_Intent> <stix:Handling> <marking:Marking> <marking:Marking_Structure color="RED" xsi:type="tlpMarking:TLPMarkingStructureType"/> </marking:Marking> </stix:Handling> </stix:STIX_Header> - ID Prefix: Select the namespace prefix for generated STIX IDs.
- Click the Next button.
- Package TLP: Select the Traffic Light Protocol (TLP) level that will be added to the STIX package pushed by the outbound client. Selecting Most Restrictive Content TLP will label the package with the highest-level TLP marking found in the outbound content. Selecting a specific TLP color or None will consistently mark all outbound packages as such. The following is example XML for the TLP marking provided in the STIX header of the STIX package:
- The Confirm screen will be displayed (Figure 8).
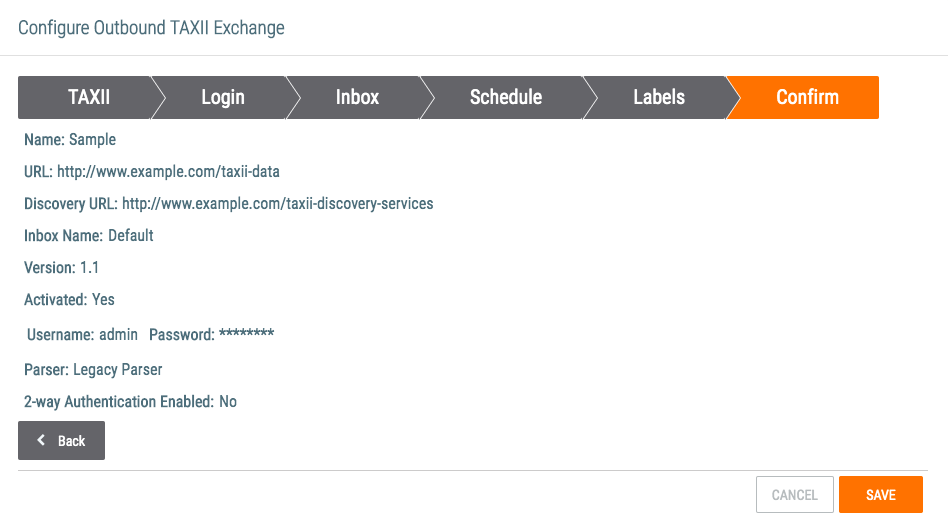
- Confirm that the entered information is correct.
- Click the SAVE button.
ThreatConnect® is a registered trademark of ThreatConnect, Inc.
STIX™ and TAXII™ are trademarks of The MITRE Corporation.
20059-01 v.06.B
Was this article helpful?


