ThreatConnect Risk Quantifier Administration and Configuration Guide
- 13 Feb 2023
- 8 Minutes to read
-
Print
-
DarkLight
ThreatConnect Risk Quantifier Administration and Configuration Guide
- Updated on 13 Feb 2023
- 8 Minutes to read
-
Print
-
DarkLight
Article Summary
Share feedback
Thanks for sharing your feedback!
Overview
ThreatConnect® Risk Quantifier (RQ) applies risk and financial models based on your business, your technical environment, and industry data so you can make strategic- and tactical-level decisions to mitigate financial risk to your organization.
This guide provides instructions on configuring an Enterprise as an RQ Enterprise Administrator logging into a new Enterprise for the first time. It also provides a link to instructions on configuring a new Legal Entity, which can be completed as an RQ Enterprise Administrator or RQ Pro Administrator.
Before You Start
| Minimum Role(s) | RQ Enterprise Administrator to configure an Enterprise |
|---|---|
| Prerequisites | A user account with a user role of RQ Enterprise Administrator assigned to it |
Configuring an Enterprise
An Enterprise is a collection of Legal Entities in an RQ instance. There are two main steps to configuring an Enterprise in RQ:
- Creating a Legal Entity
- Creating accounts for each user and assigning a Legal Entity to their account
Creating a Legal Entity
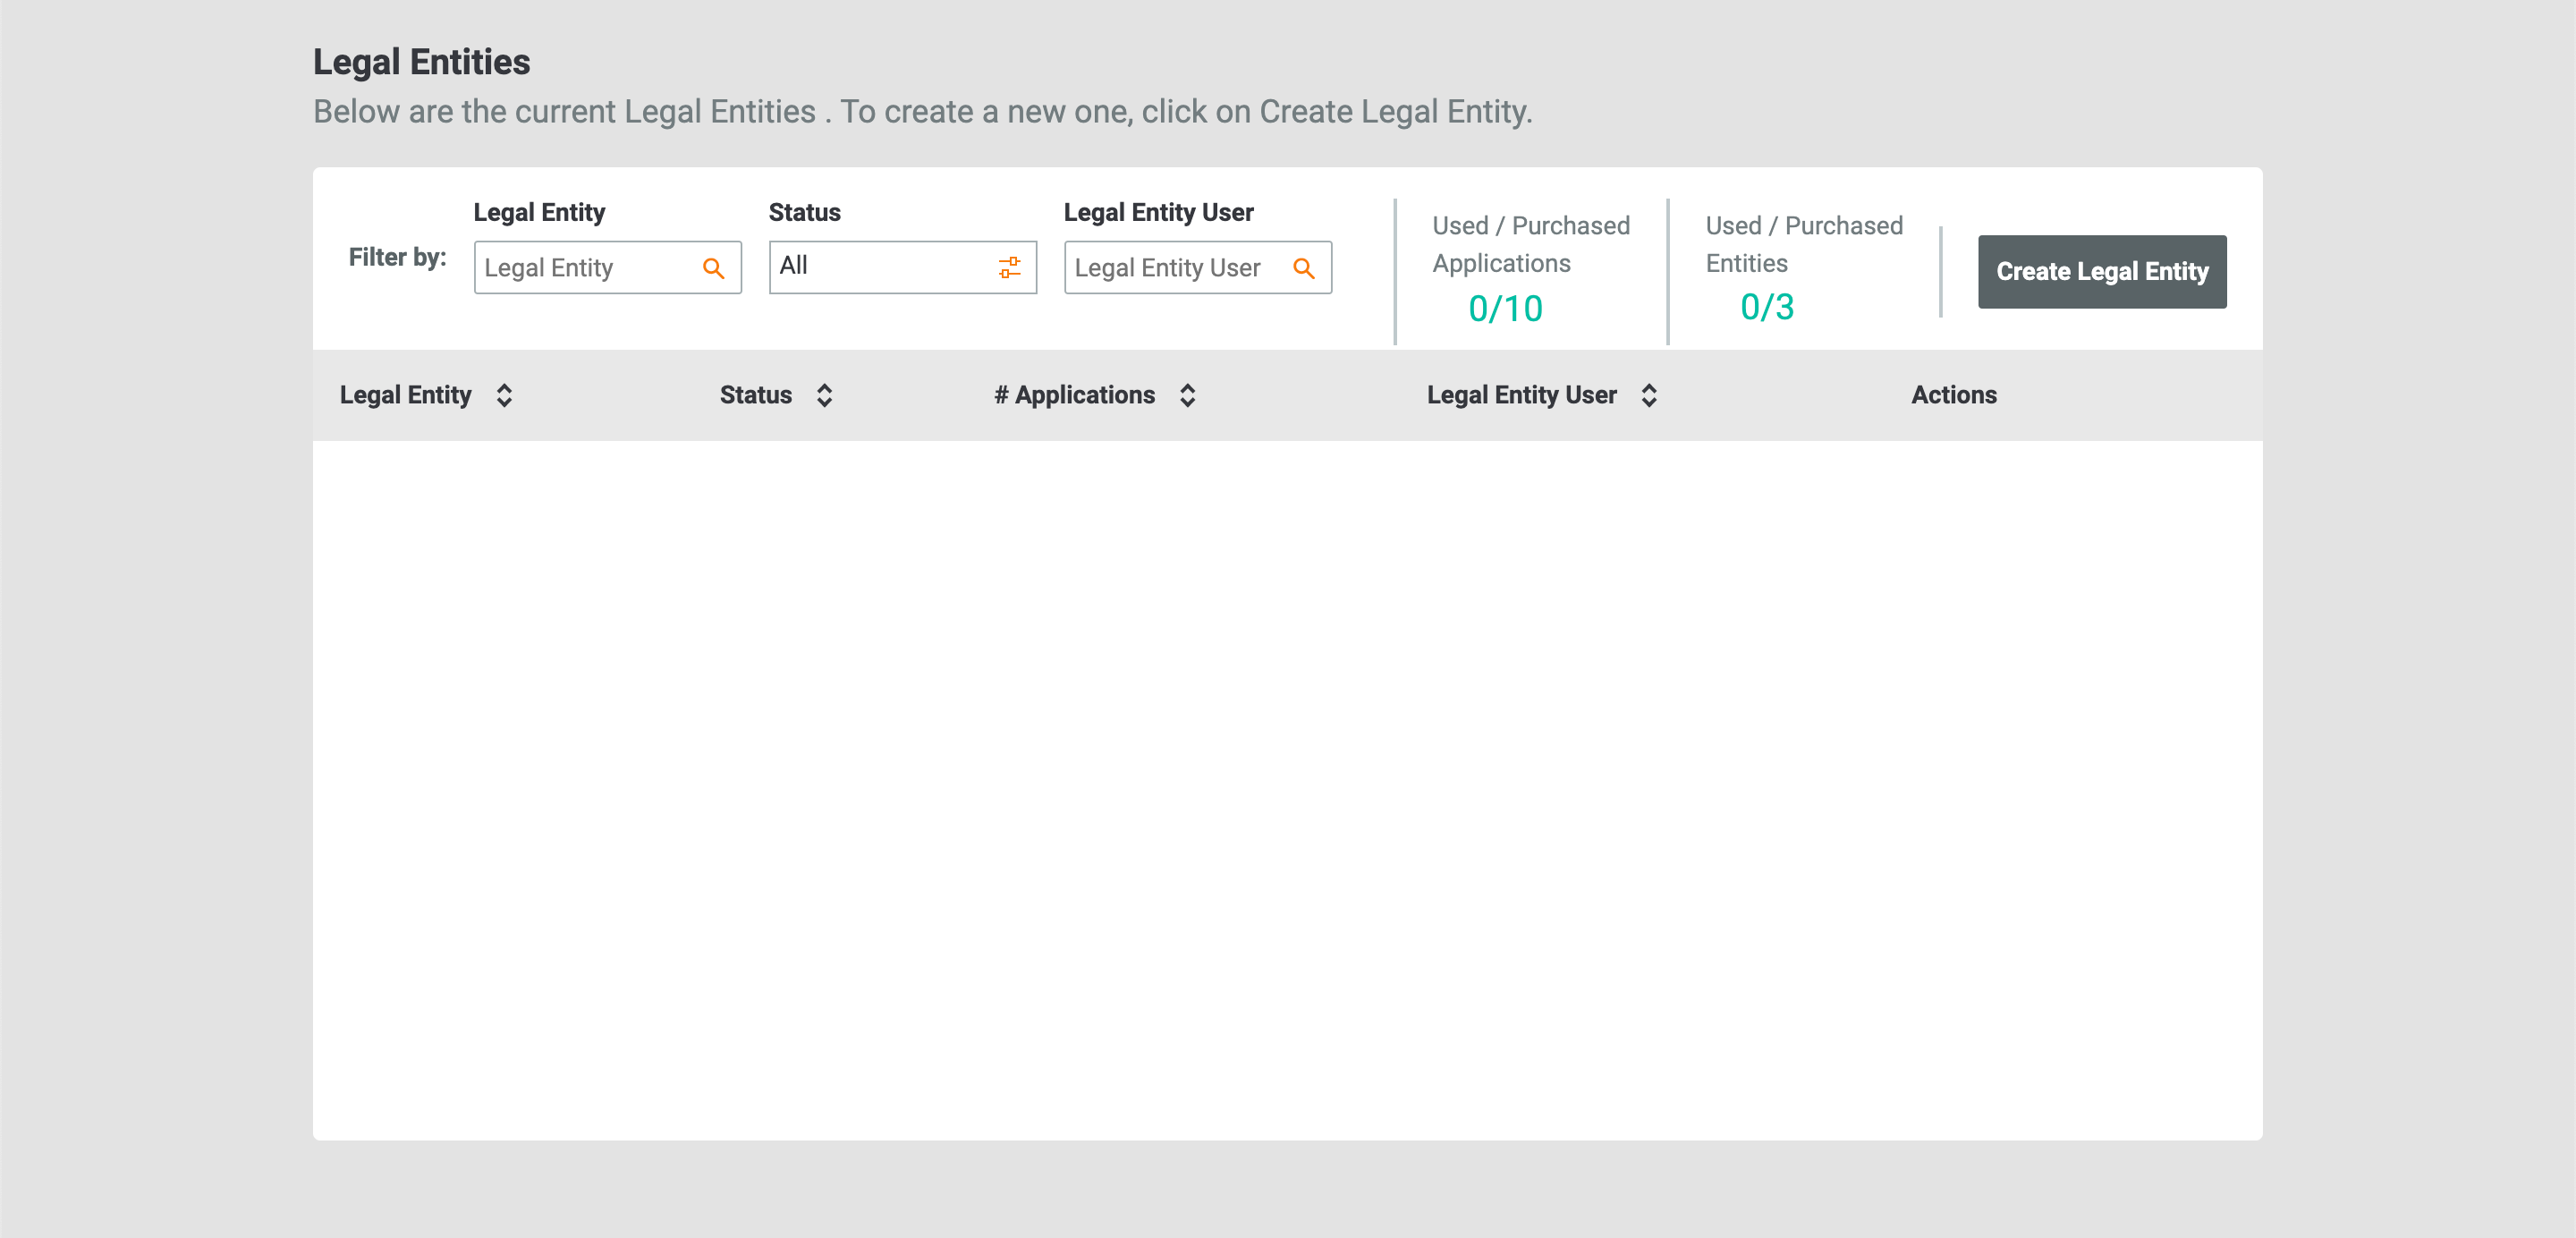
- On the top navigation bar, click Legal Entities. The Legal Entities screen will be displayed (Figure 1).
- Click the Create Legal Entity button. The General Information section of the Create Legal Entity screen will be displayed (Figure 2).
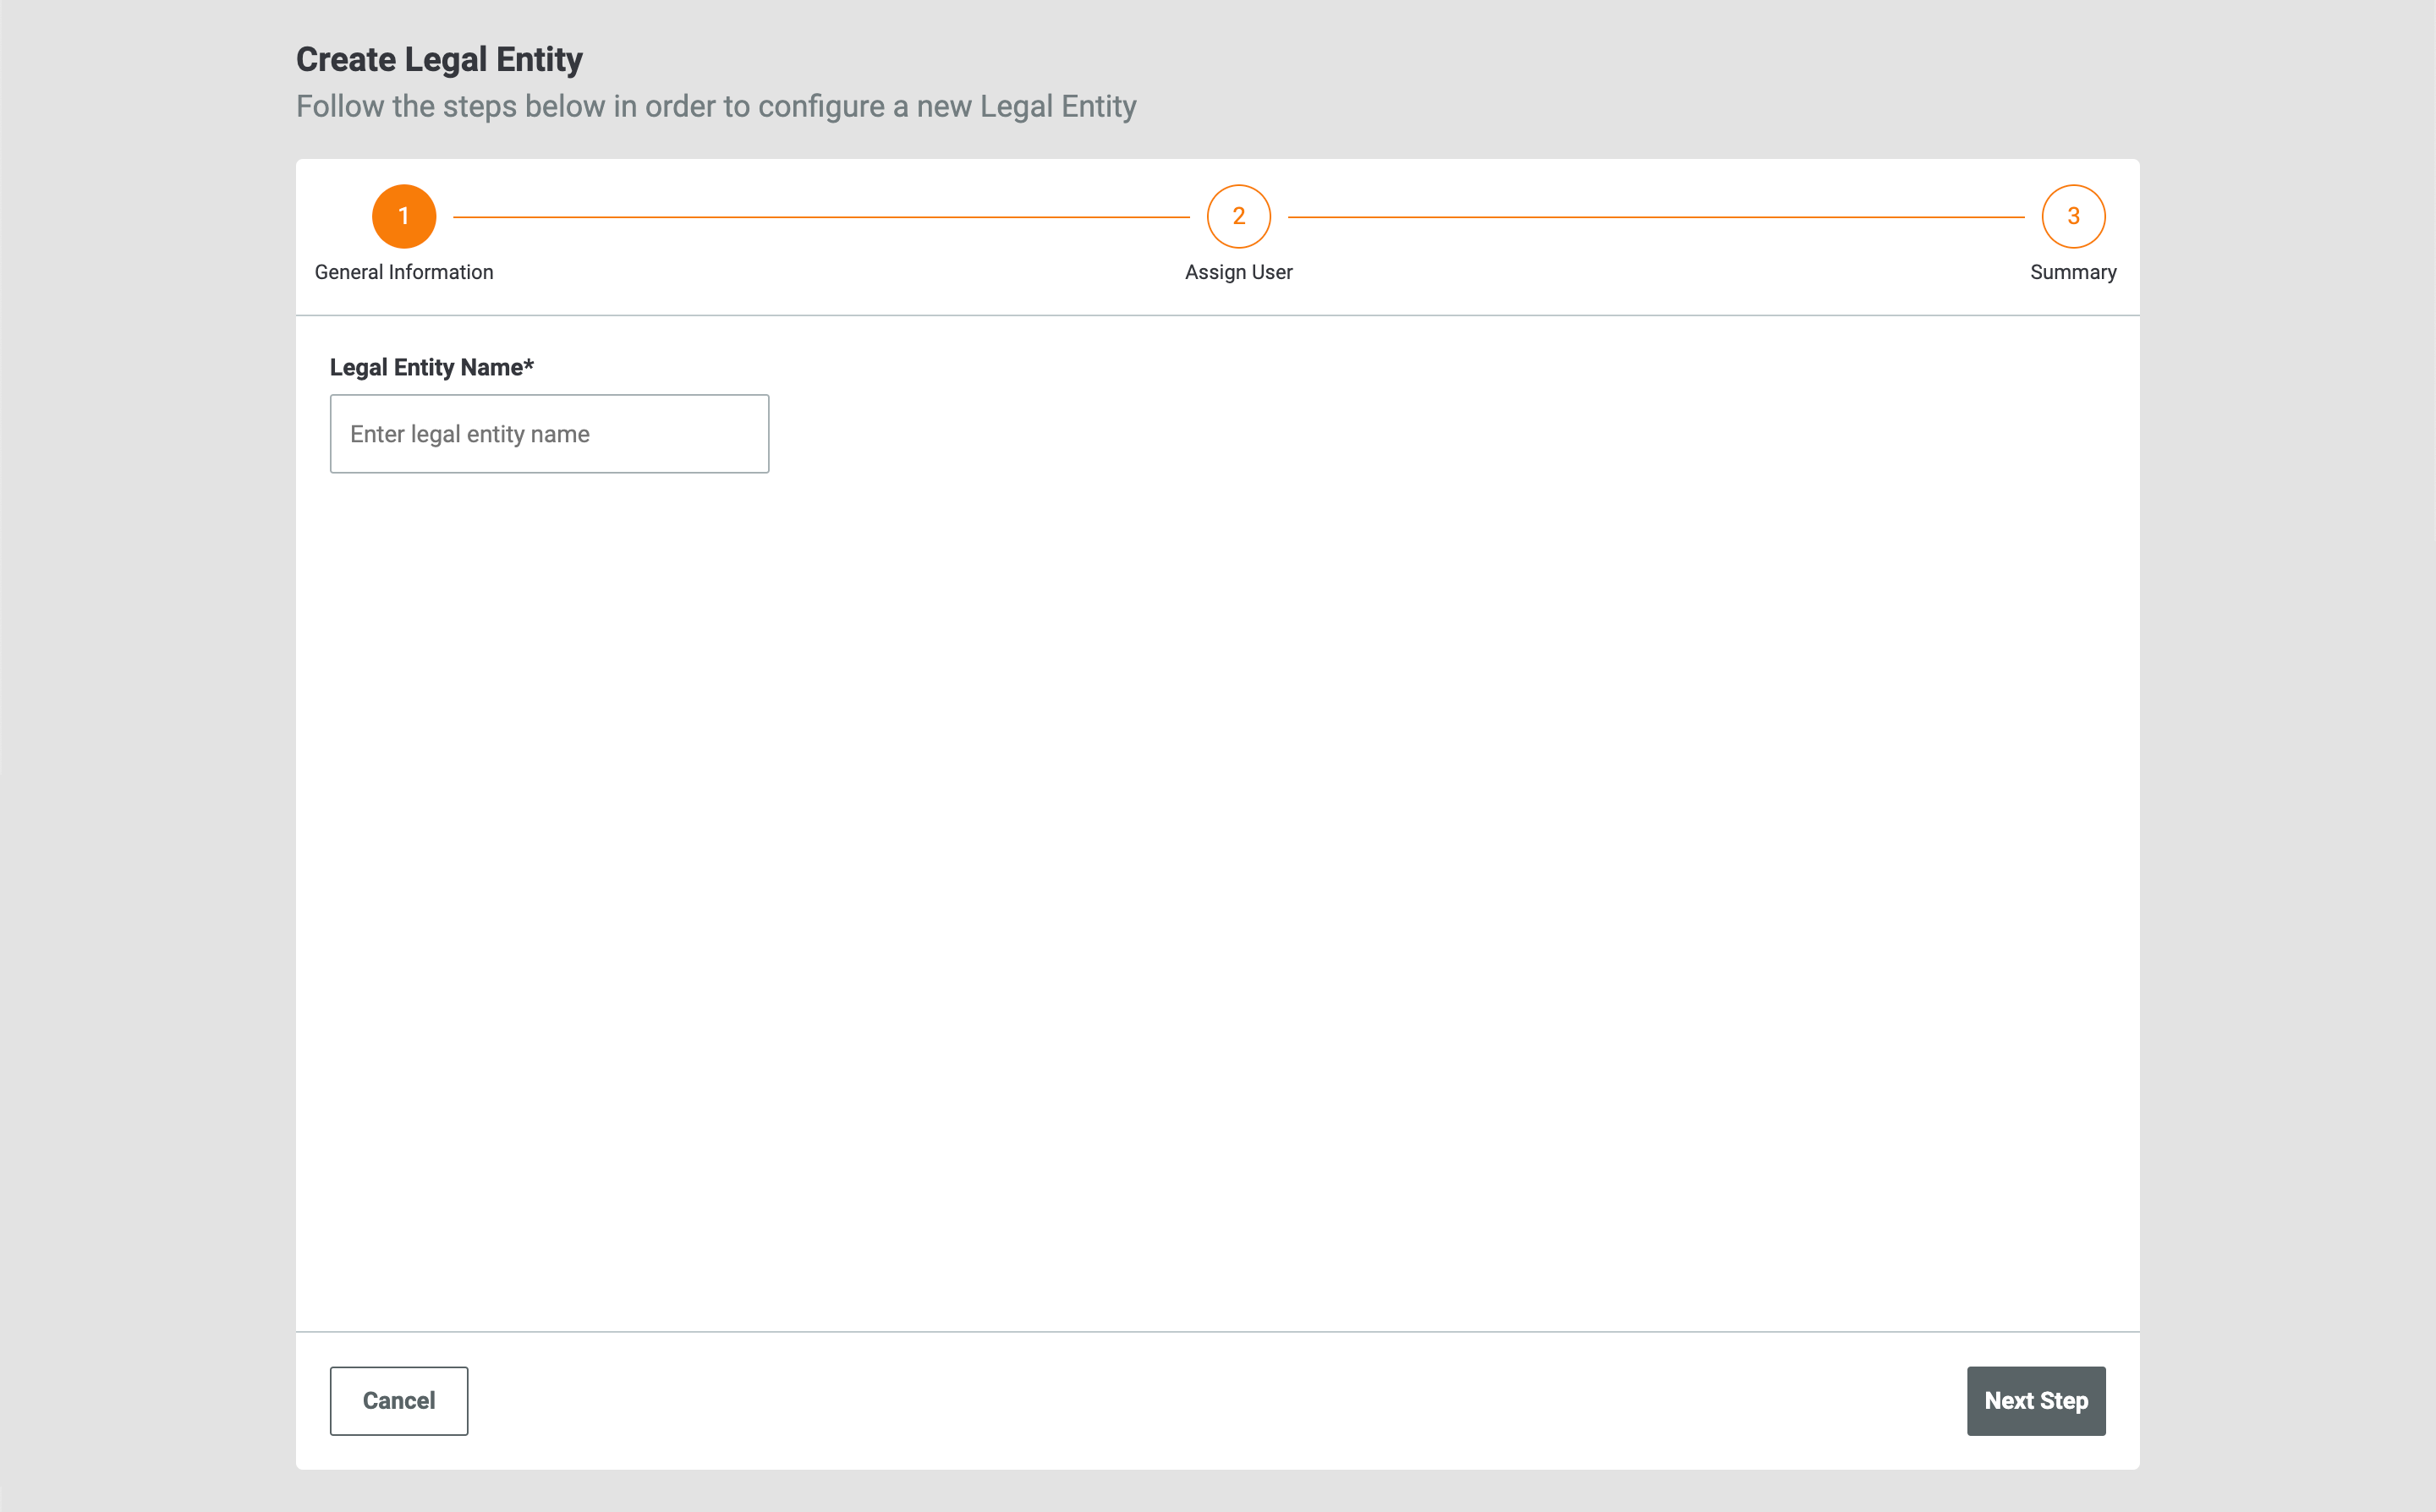
- Legal Entity Name: Enter the name of the Legal Entity.
- Click the Next Step button.
- The Assign Users section of the Edit Legal Entity screen will be displayed (Figure 3).

- No users will be listed on this screen, as the Legal Entity is the first object being created in your Enterprise.
- Click the Next Step button. The next section, “Creating Users and Assigning Legal Entities,” details how to create users and assign them to a Legal Entity.NoteIf you created user accounts before creating a Legal Entity, the table in Figure 3 will display the name, email address, and user role for each user. To assign a user to a Legal Entity from this screen, select the checkbox to the left of the Name column for the user.
- The Summary section of the Edit Legal Entity screen will be displayed (Figure 4).
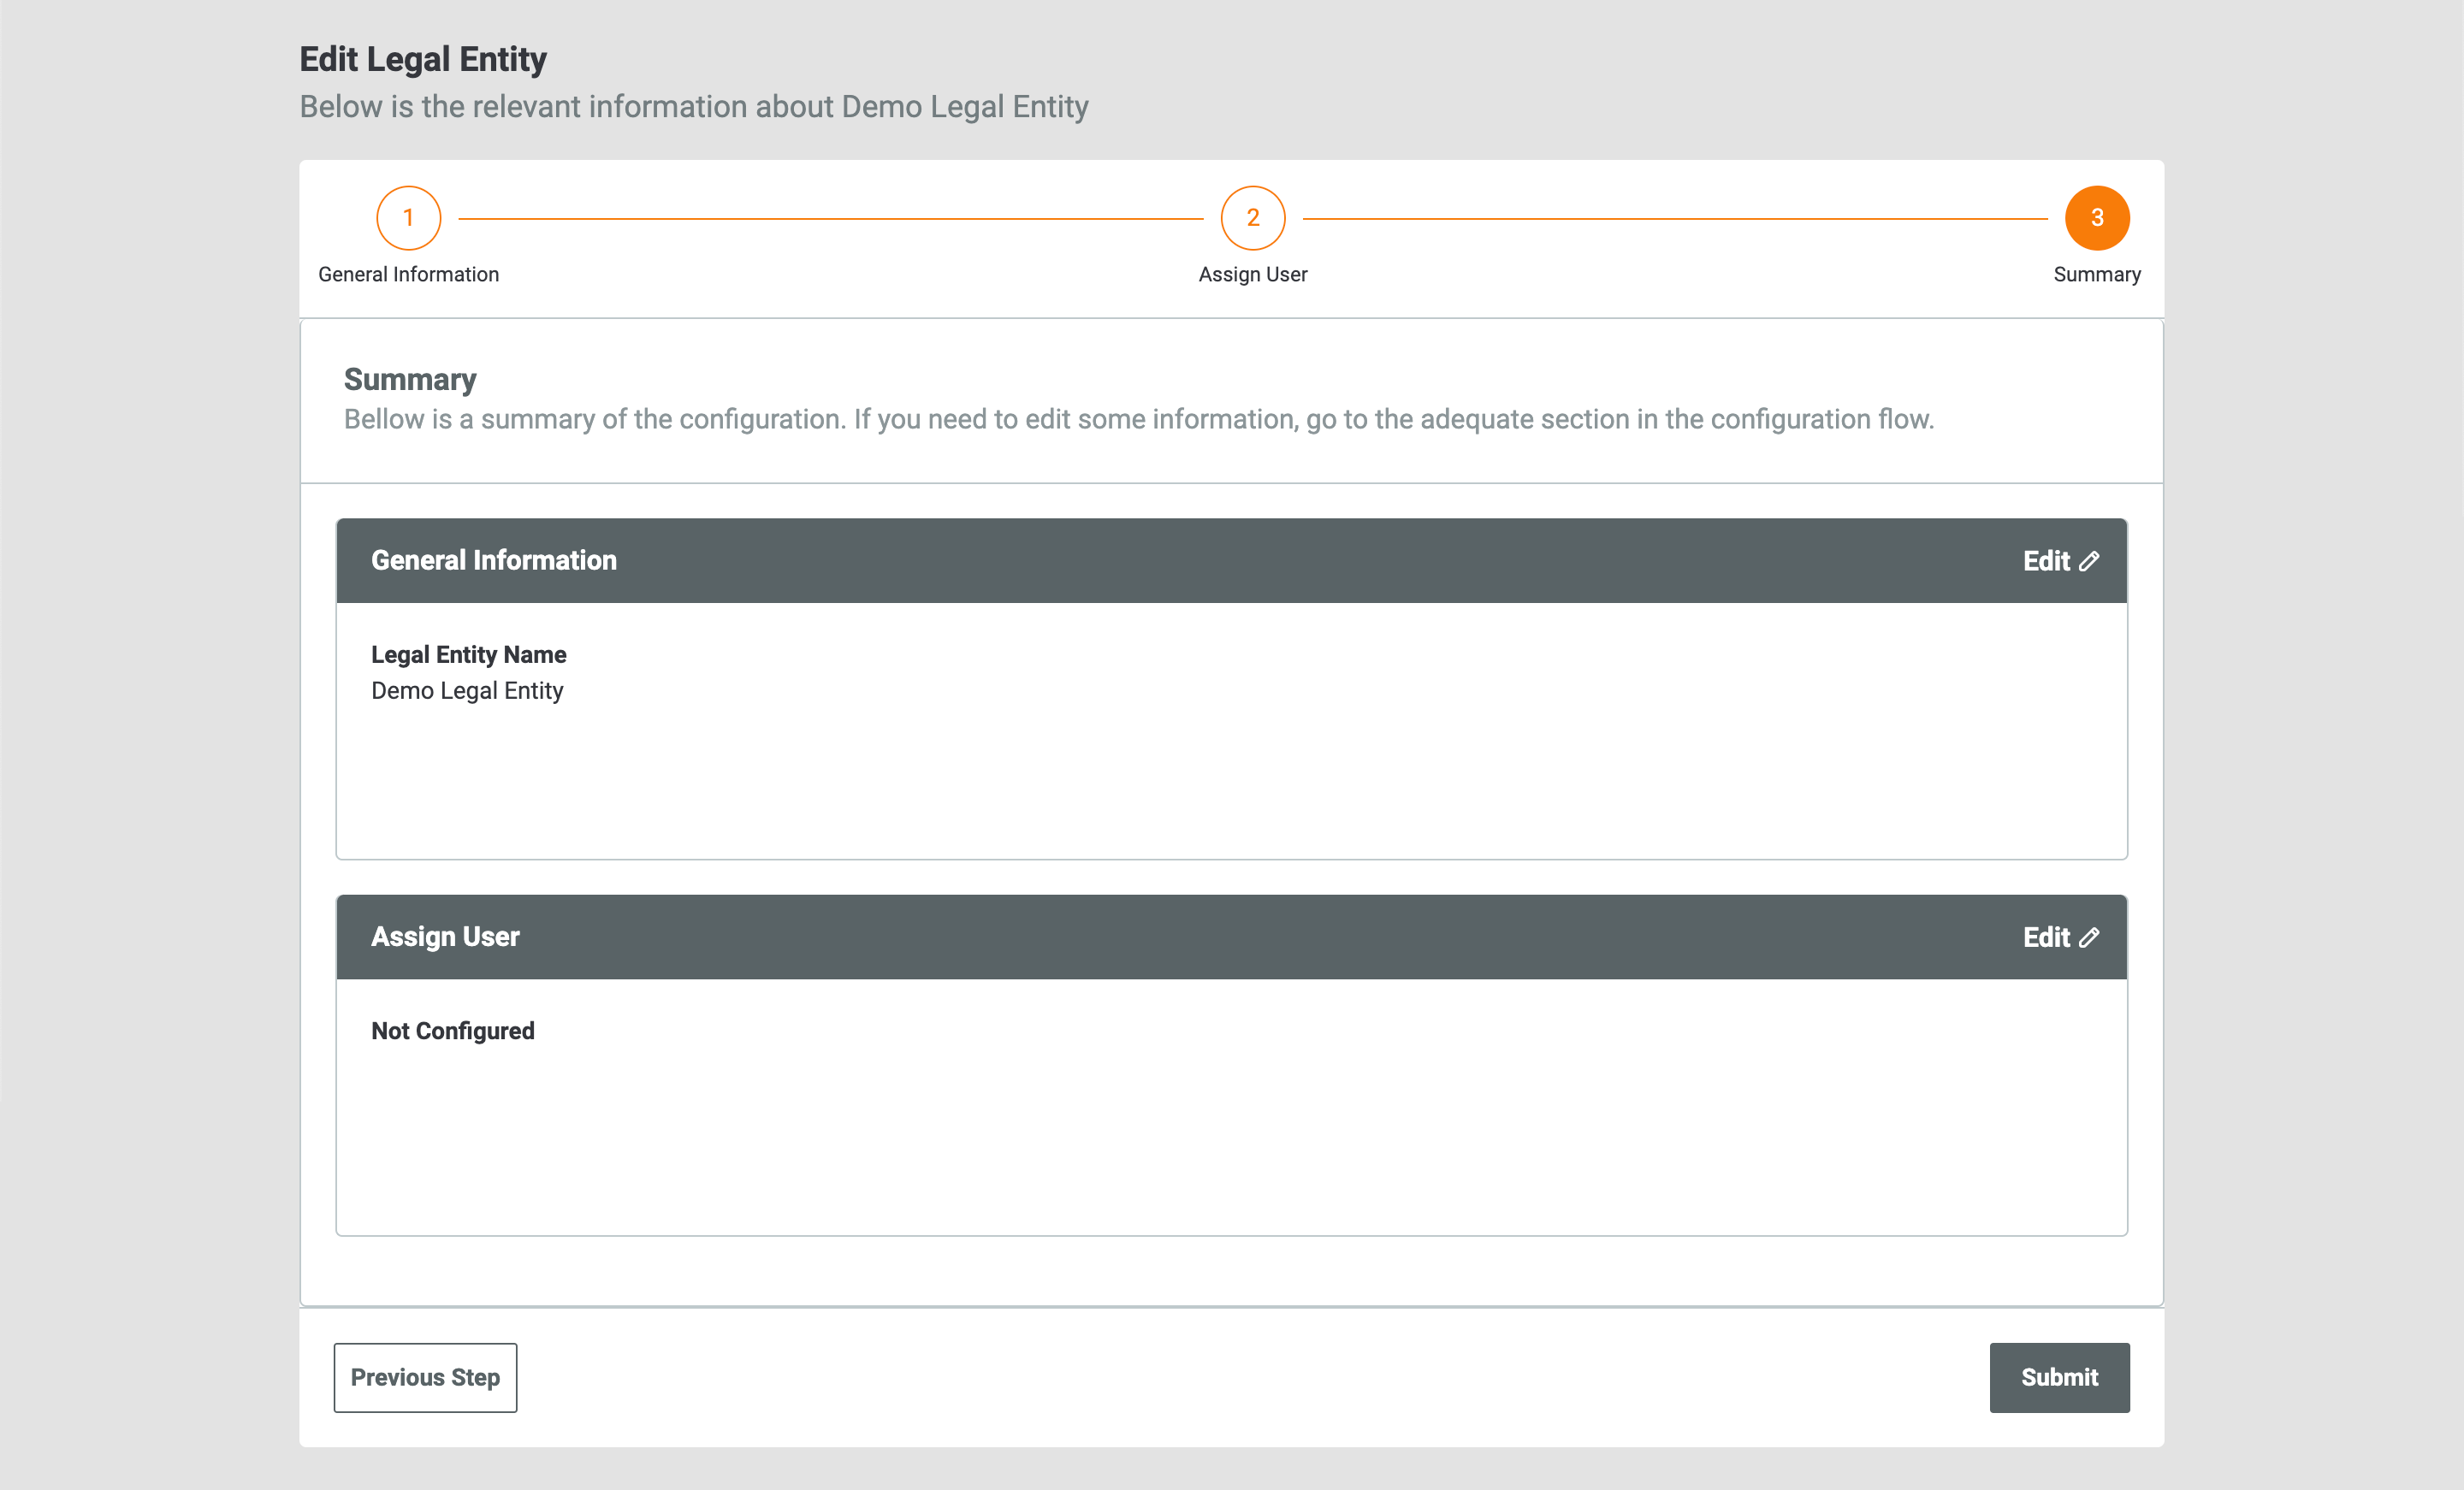
- To edit the Legal Entity’s name, click Edit
 at the upper-right corner of the General Information card.
 - To modify the users assigned to the Legal Entity, click Edit
 at the upper-right corner of the Assign User card. Alternatively, click the Previous Step button at the lower-left corner of the screen to return to the Assign User section of the Edit Legal Entity screen (Figure 3).
 - Click the Submit button.
- To edit the Legal Entity’s name, click Edit
The Legal Entities screen will be displayed, and the Legal Entity you just created will be listed in the table (Figure 5).
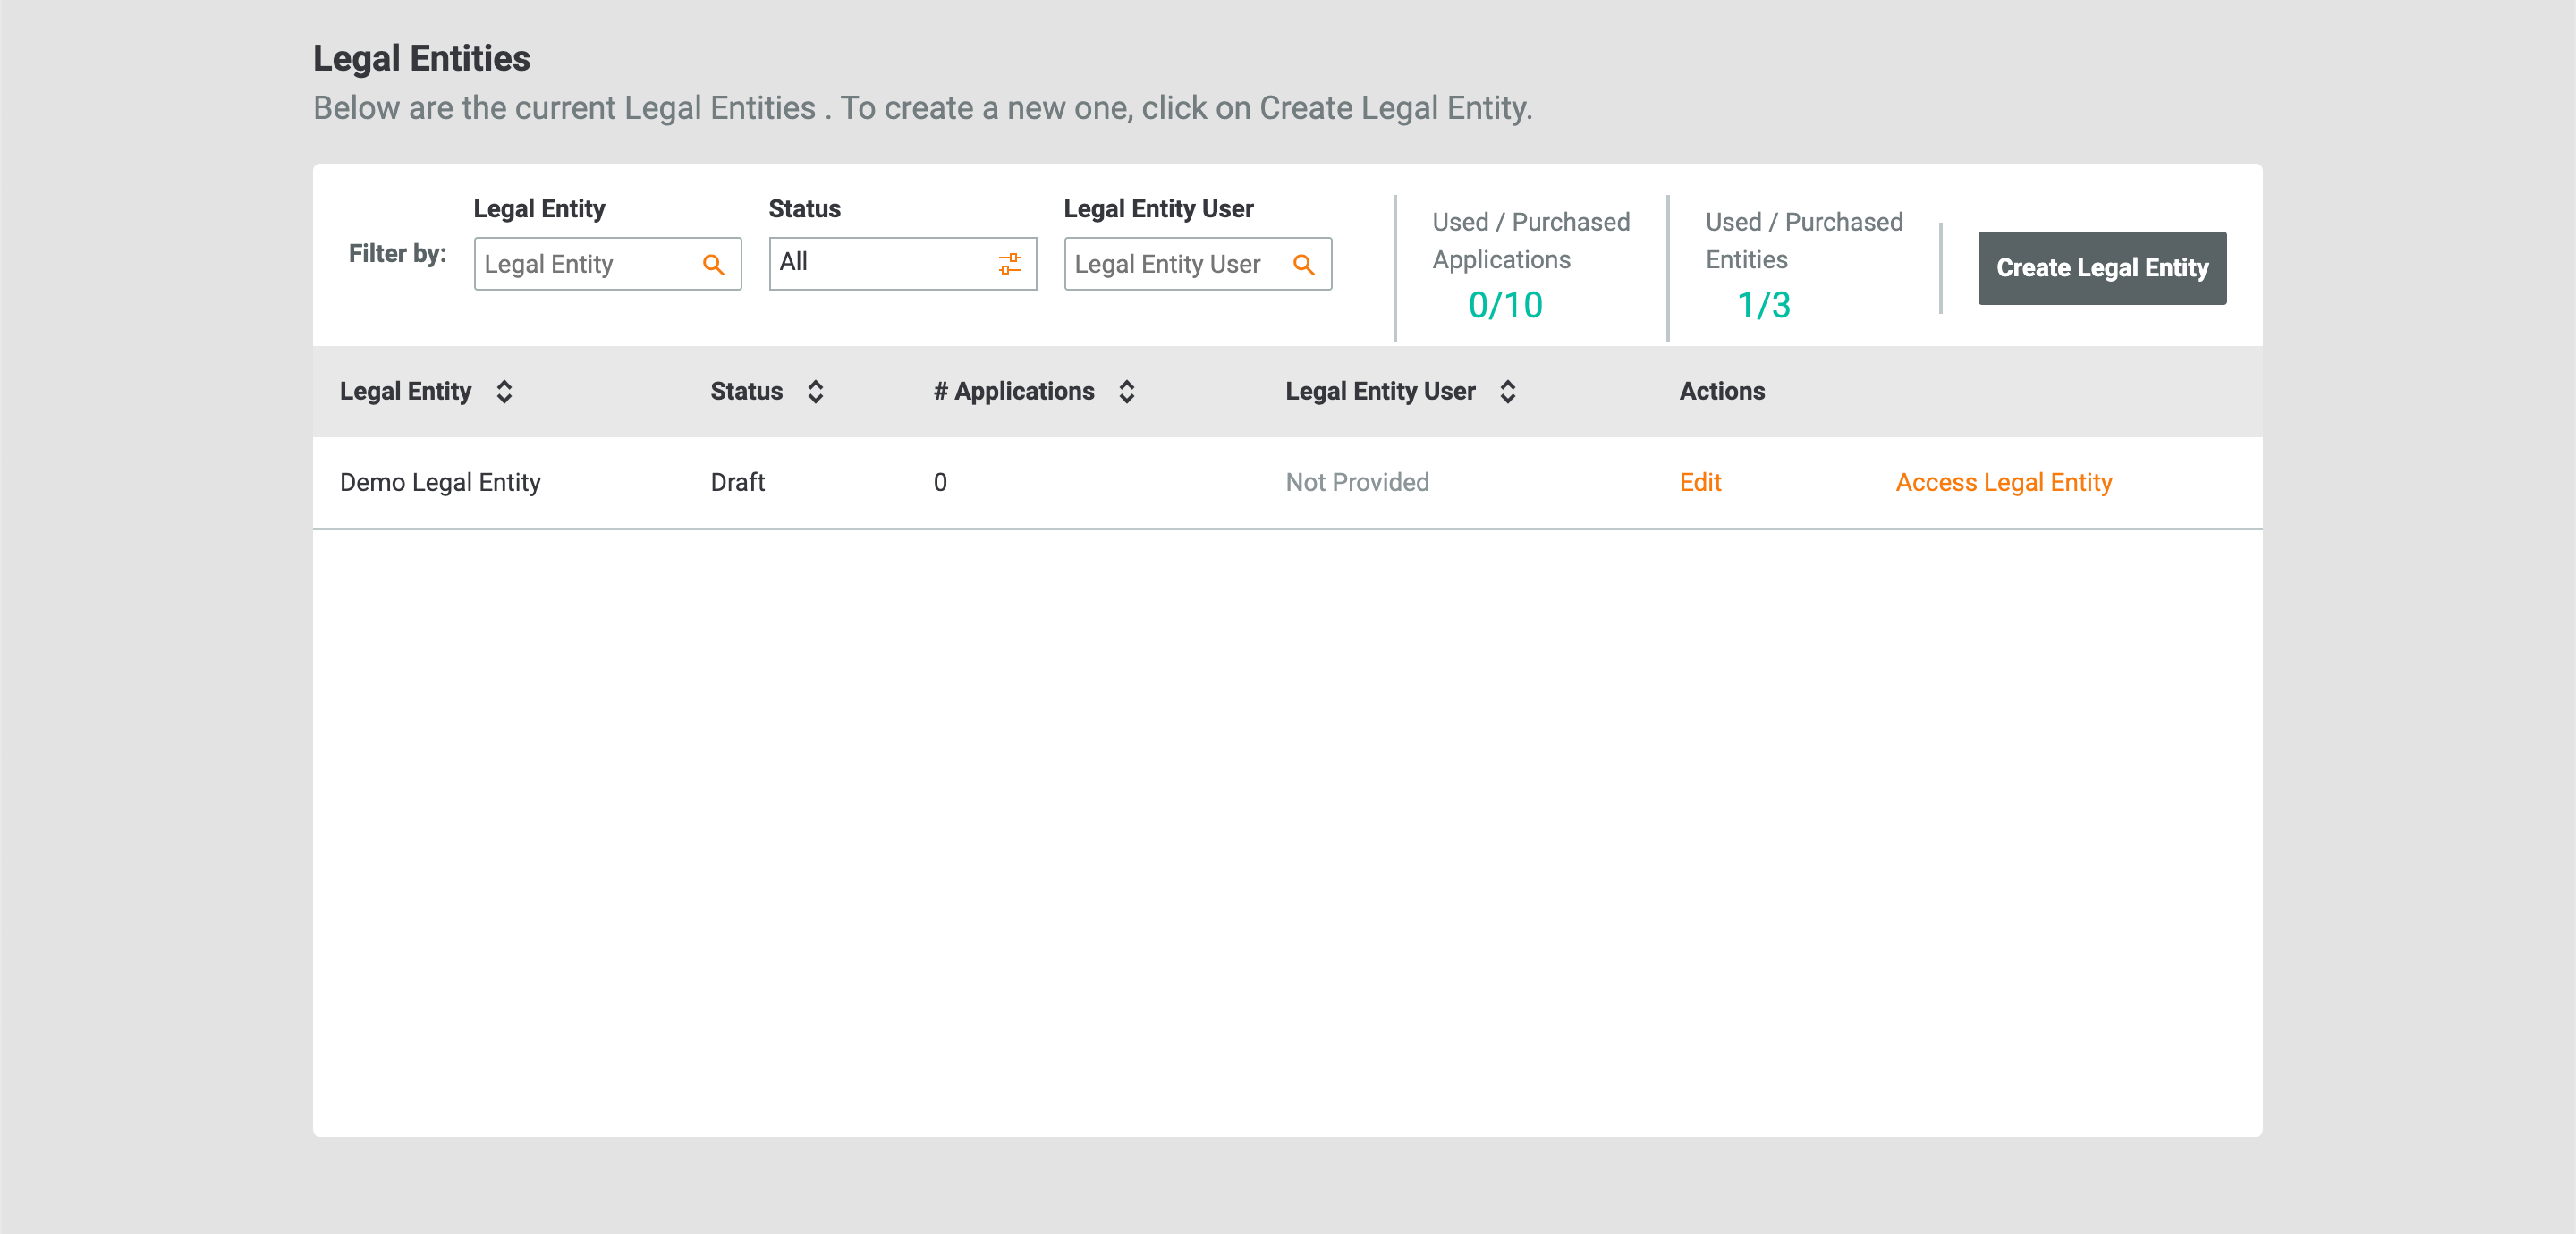
- Legal Entity: This column displays the Legal Entity’s name.
- Status: This column displays the Legal Entity’s status. Possible statuses include the following:
- Complete: This status is assigned to Legal Entities with all required configurations complete.
- Draft: This status is assigned to Legal Entities with an incomplete configuration.
- Archived: This status is assigned to archived Legal Entities.
- # Applications: This column displays the number of Applications used by the Legal Entity.
- Legal Entity User: This column displays the user(s) assigned to the Legal Entity. If more than one user is assigned to the Legal Entity, a Show More link will be displayed below the email address of the first user assigned to the Legal Entity. Click this link to display all users assigned to the Legal Entity.
- Actions: This column allows you to perform the following actions:
- Archive: Click Archive to archive a Legal Entity. When a Legal Entity is archived, users assigned to the Legal Entity will still be able to access it, but they will not be able to run risk analyses, modify the Legal Entity’s configurations, build ‘What If’ analyses, or export RQ data. In addition, the Legal Entity will not be displayed on the Portfolio Analysis screen, and it will not be included in calculations on this screen.
- Edit: Click this button to edit a Legal Entity’s name and modify the users assigned to it.
- Access Legal Entity: Click this button to access the Legal Entity. If all required configurations are complete for the Legal Entity, its Dashboard screen will be displayed. If one or more required configurations are not complete for the Legal Entity, its Configuration screen will be displayed.
Important
The Archive option will not be displayed for Legal Entities with a status of Draft.
Note
When a Legal Entity is archived, its status will change to Archived automatically. In addition, the Access Legal Entity link in the Actions column will be grayed out. RQ Enterprise Administrators can still access an archived Legal Entity using the Portfolio/Legal Entity selector on the top navigation bar.
- Filter by: If desired, use the following options to filter Legal Entities listed in the table:
- Legal Entity: Use this option to filter Legal Entities by name based on the entered search term.
- Status: Use this option to filter Legal Entities by the selected Legal Entity status(es).
- Legal Entity User: Use this option to filter Legal Entities by the users assigned to them based on the entered search term.
- Used/Purchased Applications: This section displays the number of Applications used in the Legal Entity and the total number of Applications purchased with your RQ license.
- Used/Purchased Entities: This section displays the number of Legal Entities created in your Enterprise and the total number of Legal Entities purchased with your RQ license.
- Create Legal Entity: Click this button to create a Legal Entity.
You can sort Legal Entities by name, status, number of Applications used by the Legal Entity, and the email address of users assigned to the Legal Entity by clicking the Legal Entity, Status, # of Applications, and Legal Entity User column headings, respectively.
Creating Users and Assigning Legal Entities
- On the top navigation bar, click
 Settings. The Settings screen for your Enterprise will be displayed (Figure 6).
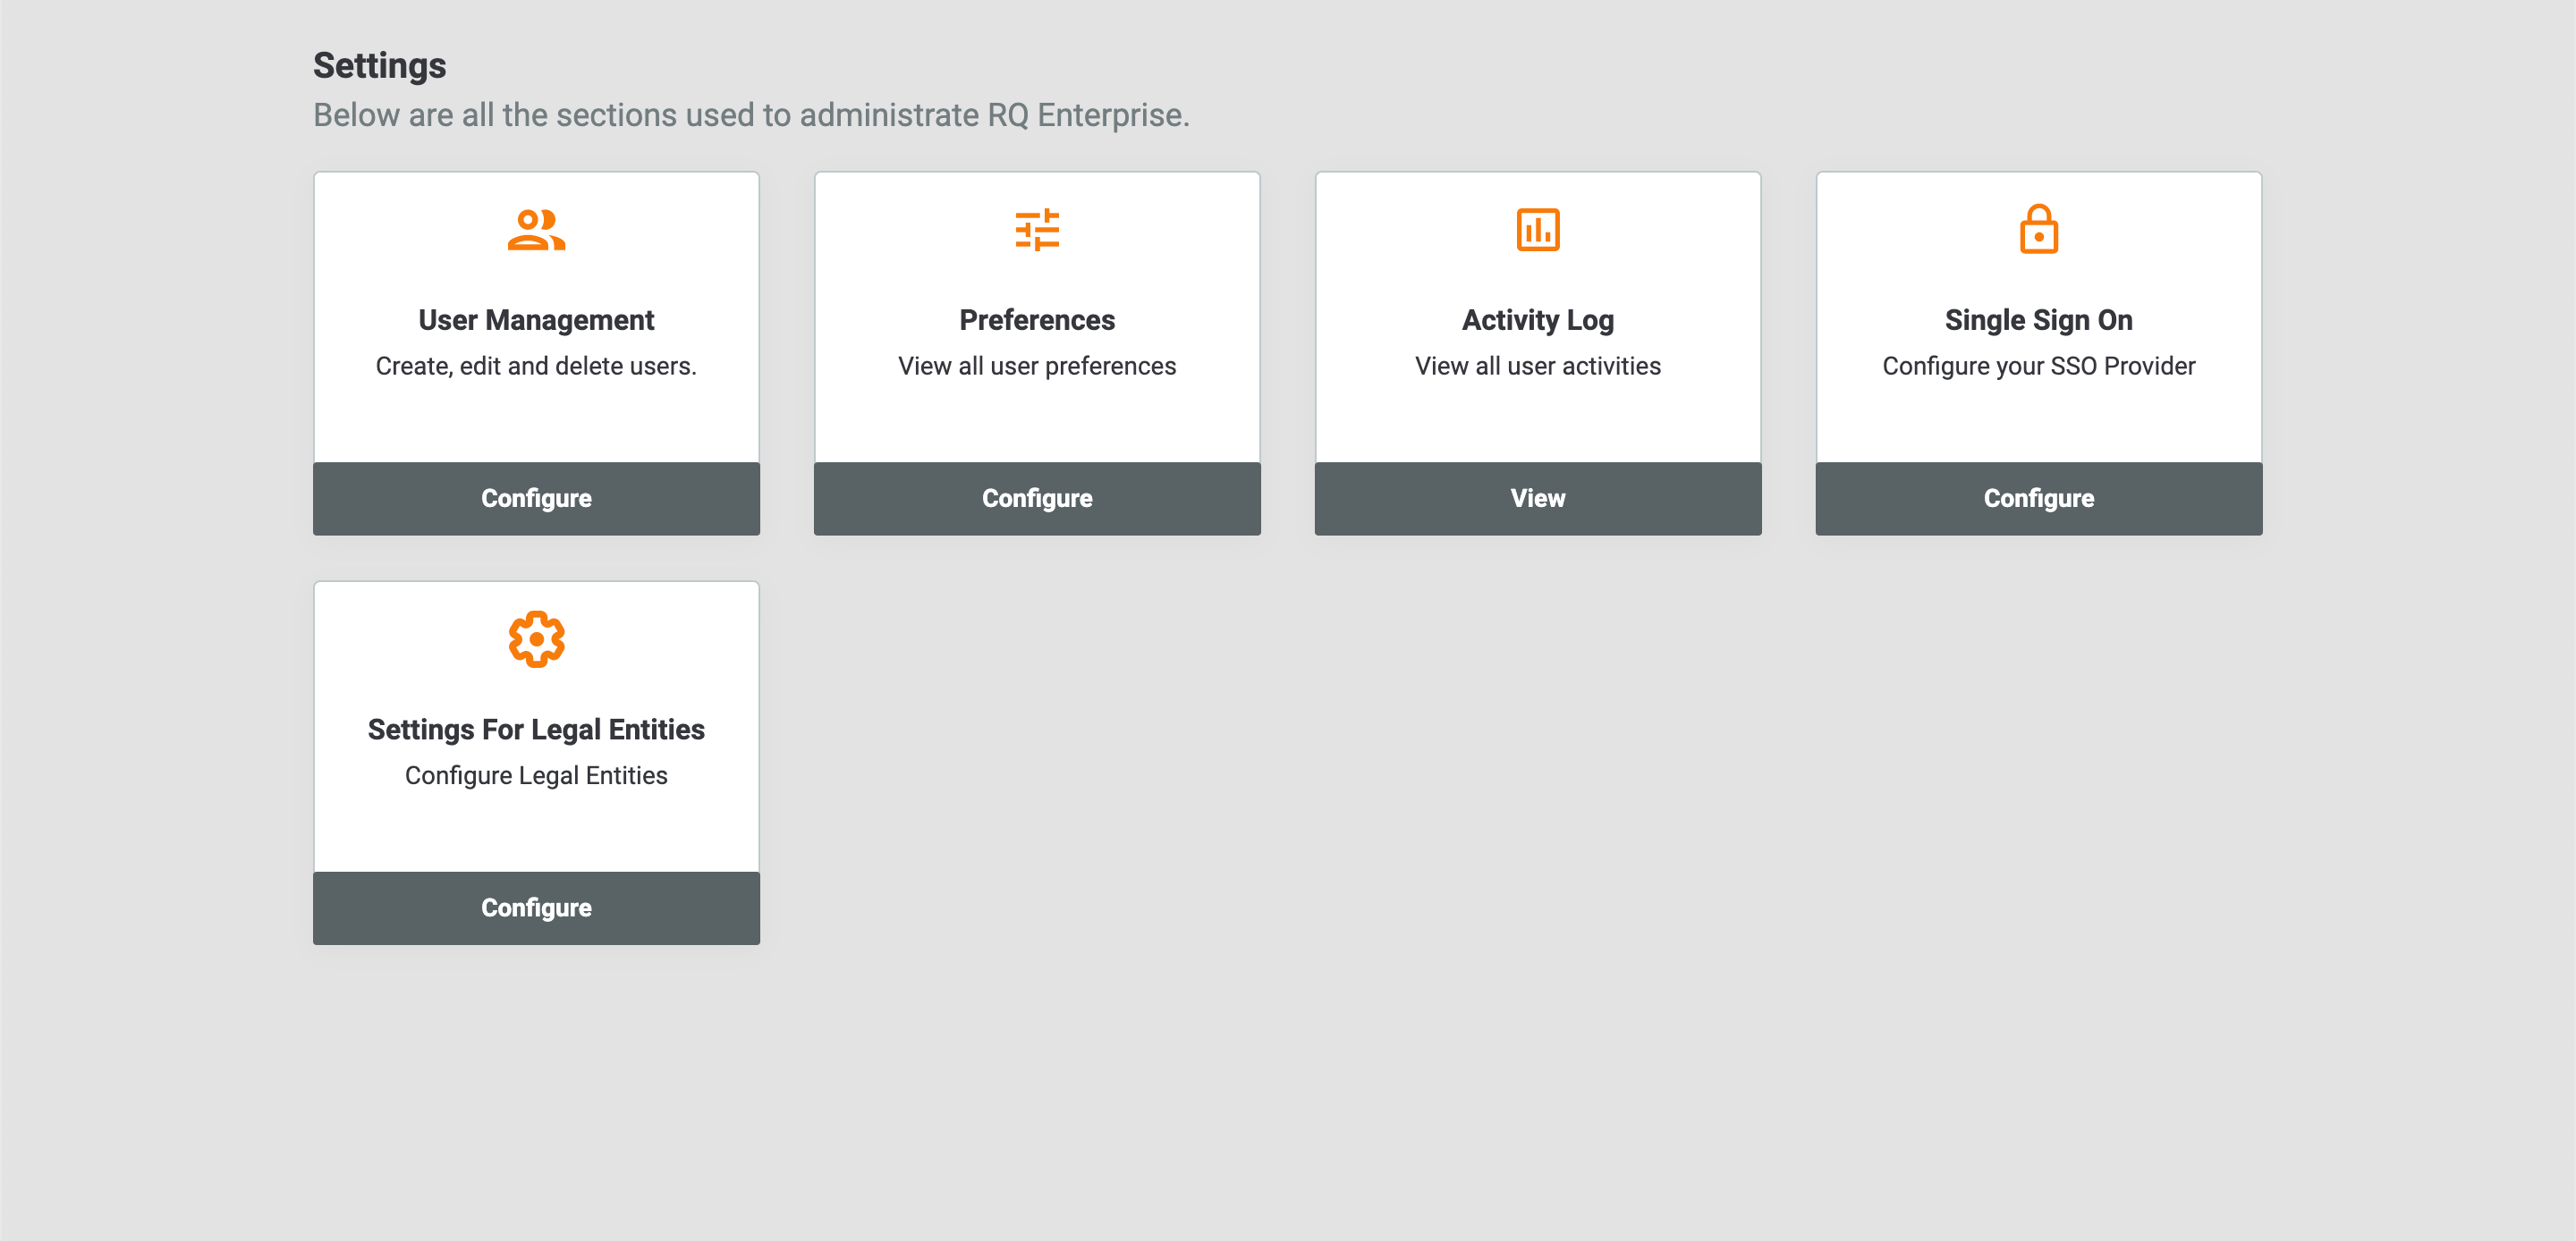
- Click the Configure button on the User Management card. The User Management screen will be displayed (Figure 7).
 ImportantThe rq user account belongs to your instance administrator at ThreatConnect and cannot be edited and should not have its password reset or be deactivated.
 - Click the Create User button. The General Information section of the Create User screen will be displayed (Figure 8).
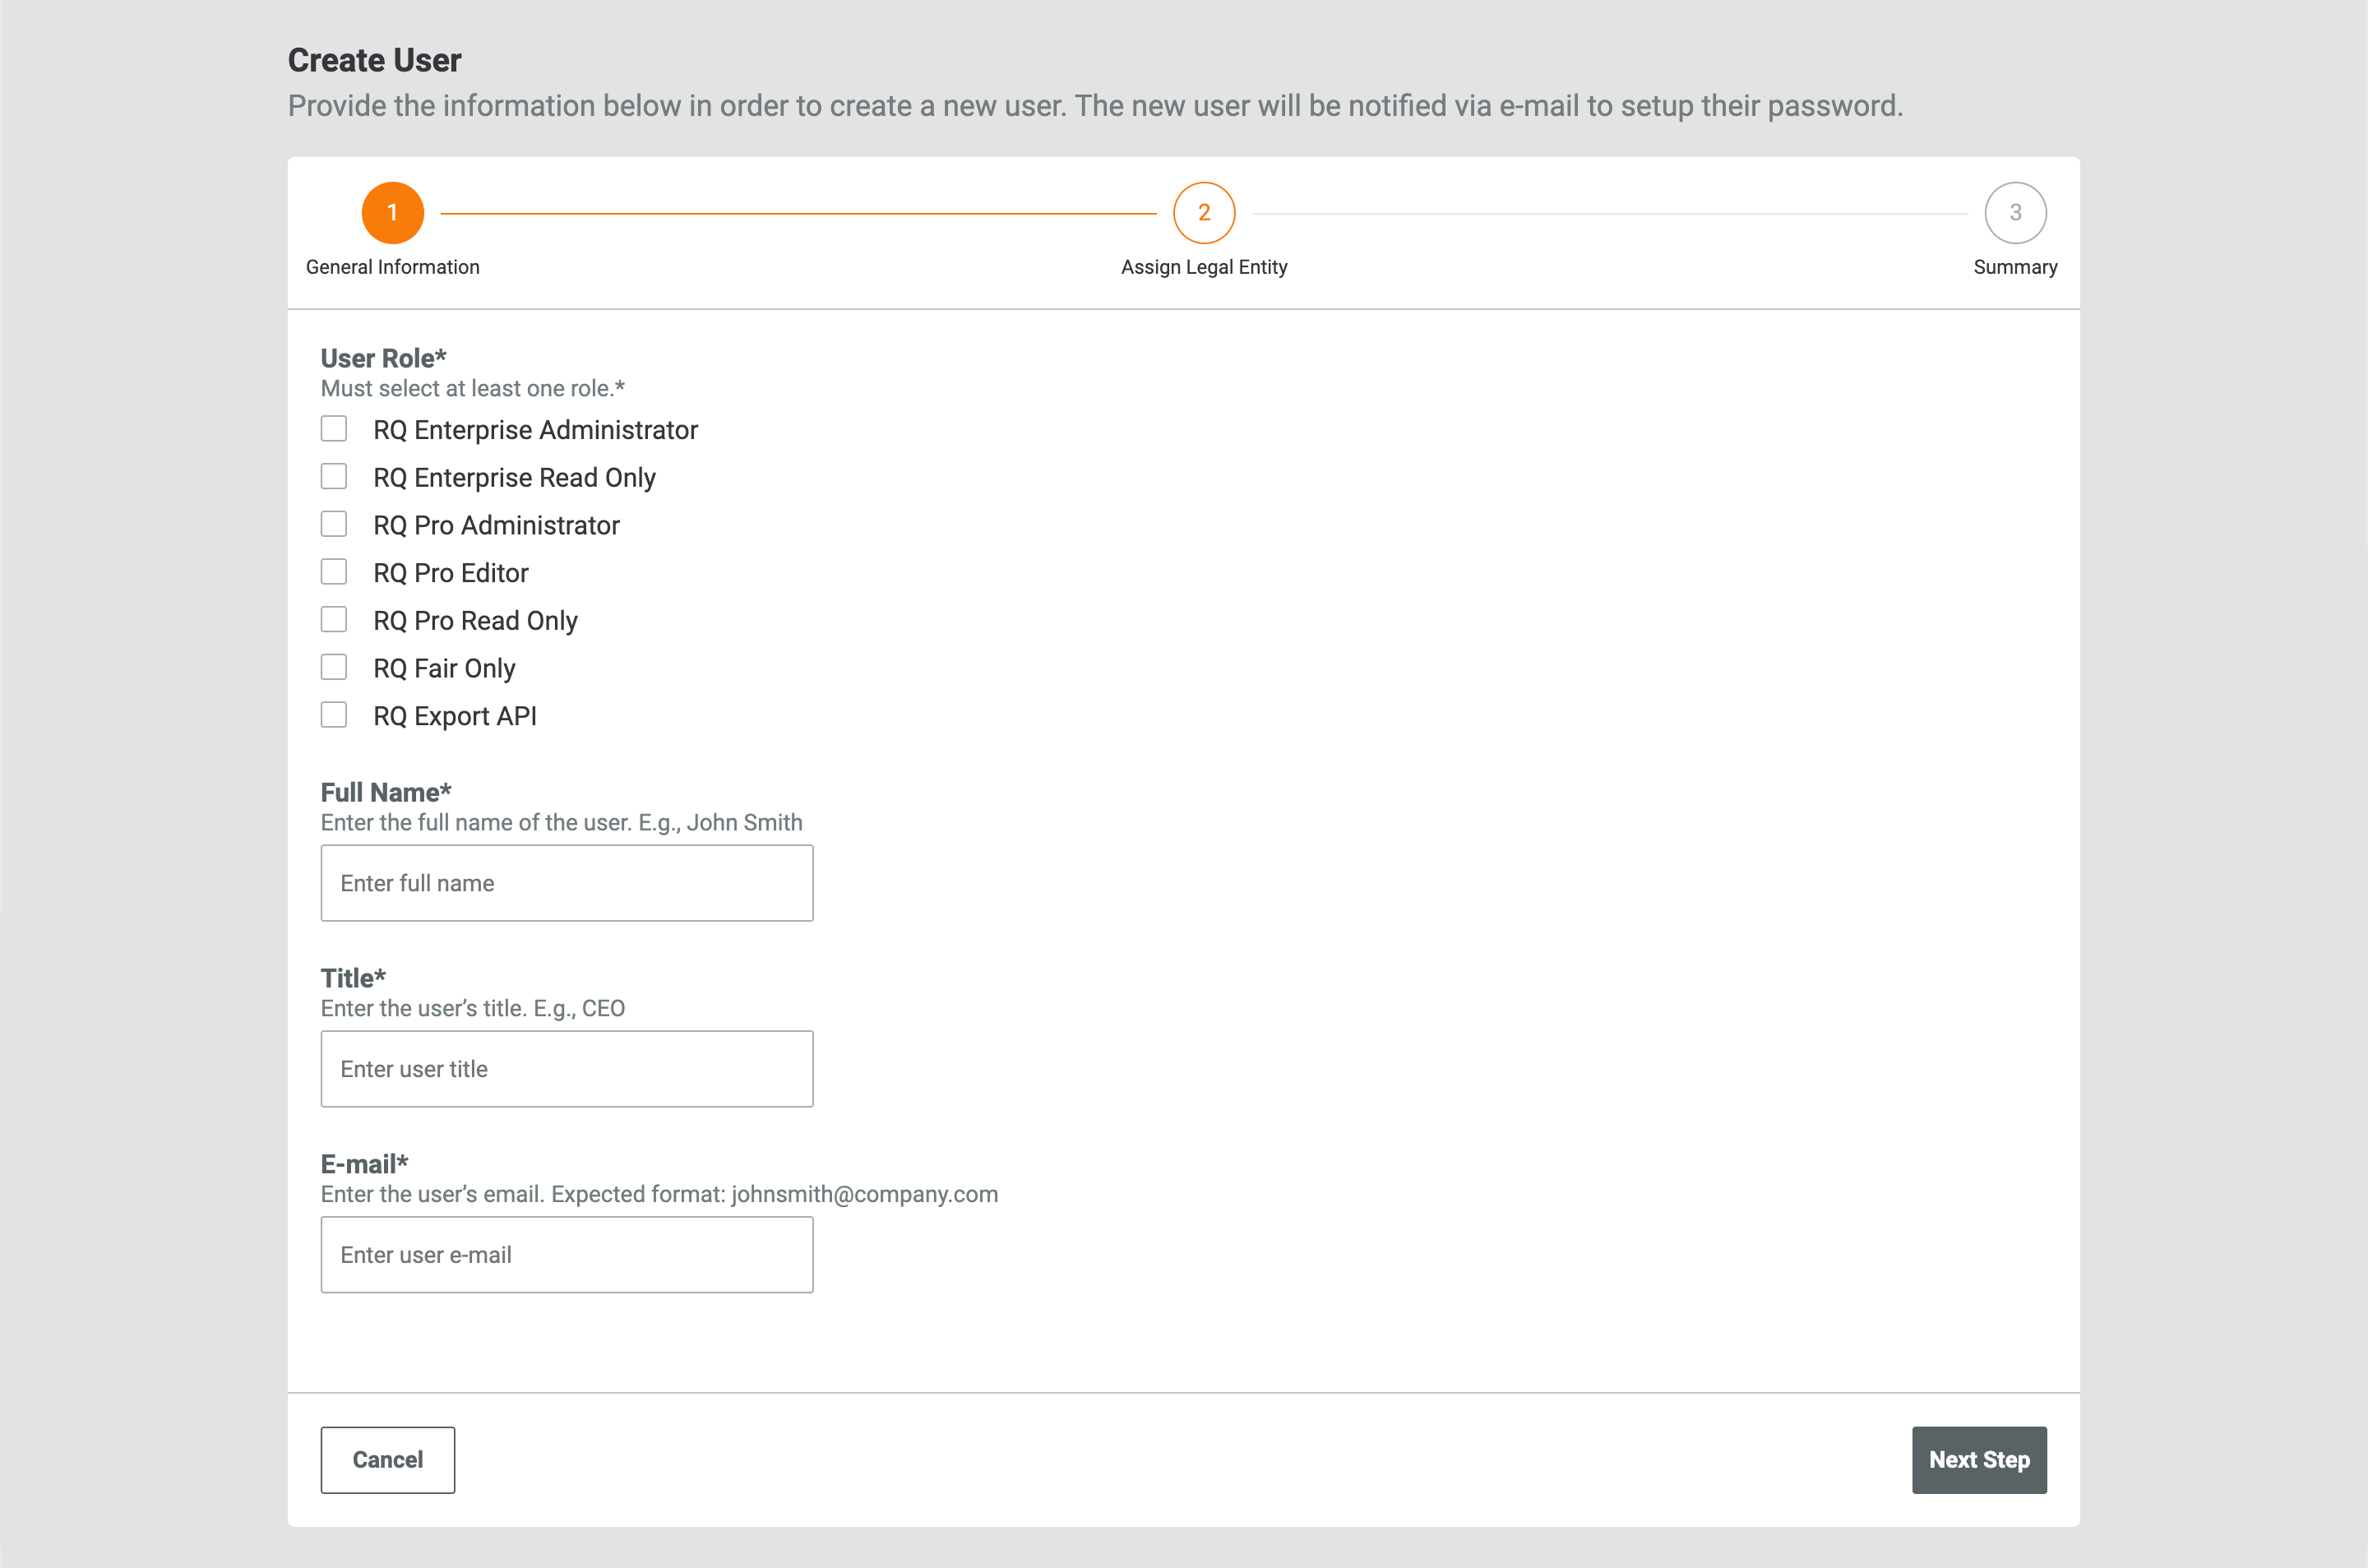
- User Role: Select the RQ user role for the account.
- Full Name: Enter the user’s full name.
- Title: Enter the user’s job title.
- E-mail: Enter the user’s email address. This is the same email address that the user will utilize to sign into their RQ instance.ImportantAfter a user’s account is created, you cannot change the email address associated with it.
- Click the Next Step button.
- The Assign Legal Entity section of the Edit User screen will be displayed (Figure 9).NoteIf a user role of RQ Enterprise Administrator or RQ Enterprise Read Only was selected on the previous screen, you will not be able to assign Legal Entities to the user’s account. This is because an account with a user role of RQ Enterprise Administrator is assigned to all Legal Entities, and an account with a user role of RQ Enterprise Read Only does not have access to the Legal Entities in the Enterprise.

- Filter by: If desired, enter a search term in this field to filter Legal Entities by name.
- Select one or more Legal Entities to assign to the user. After you select a Legal Entity, a system-generated email with the subject Assigned to legal entity <Legal Entity Name> will be sent to the user’s email address.
- Click the Next Step button.
- The Summary section of the Edit User screen will be displayed (Figure 10).
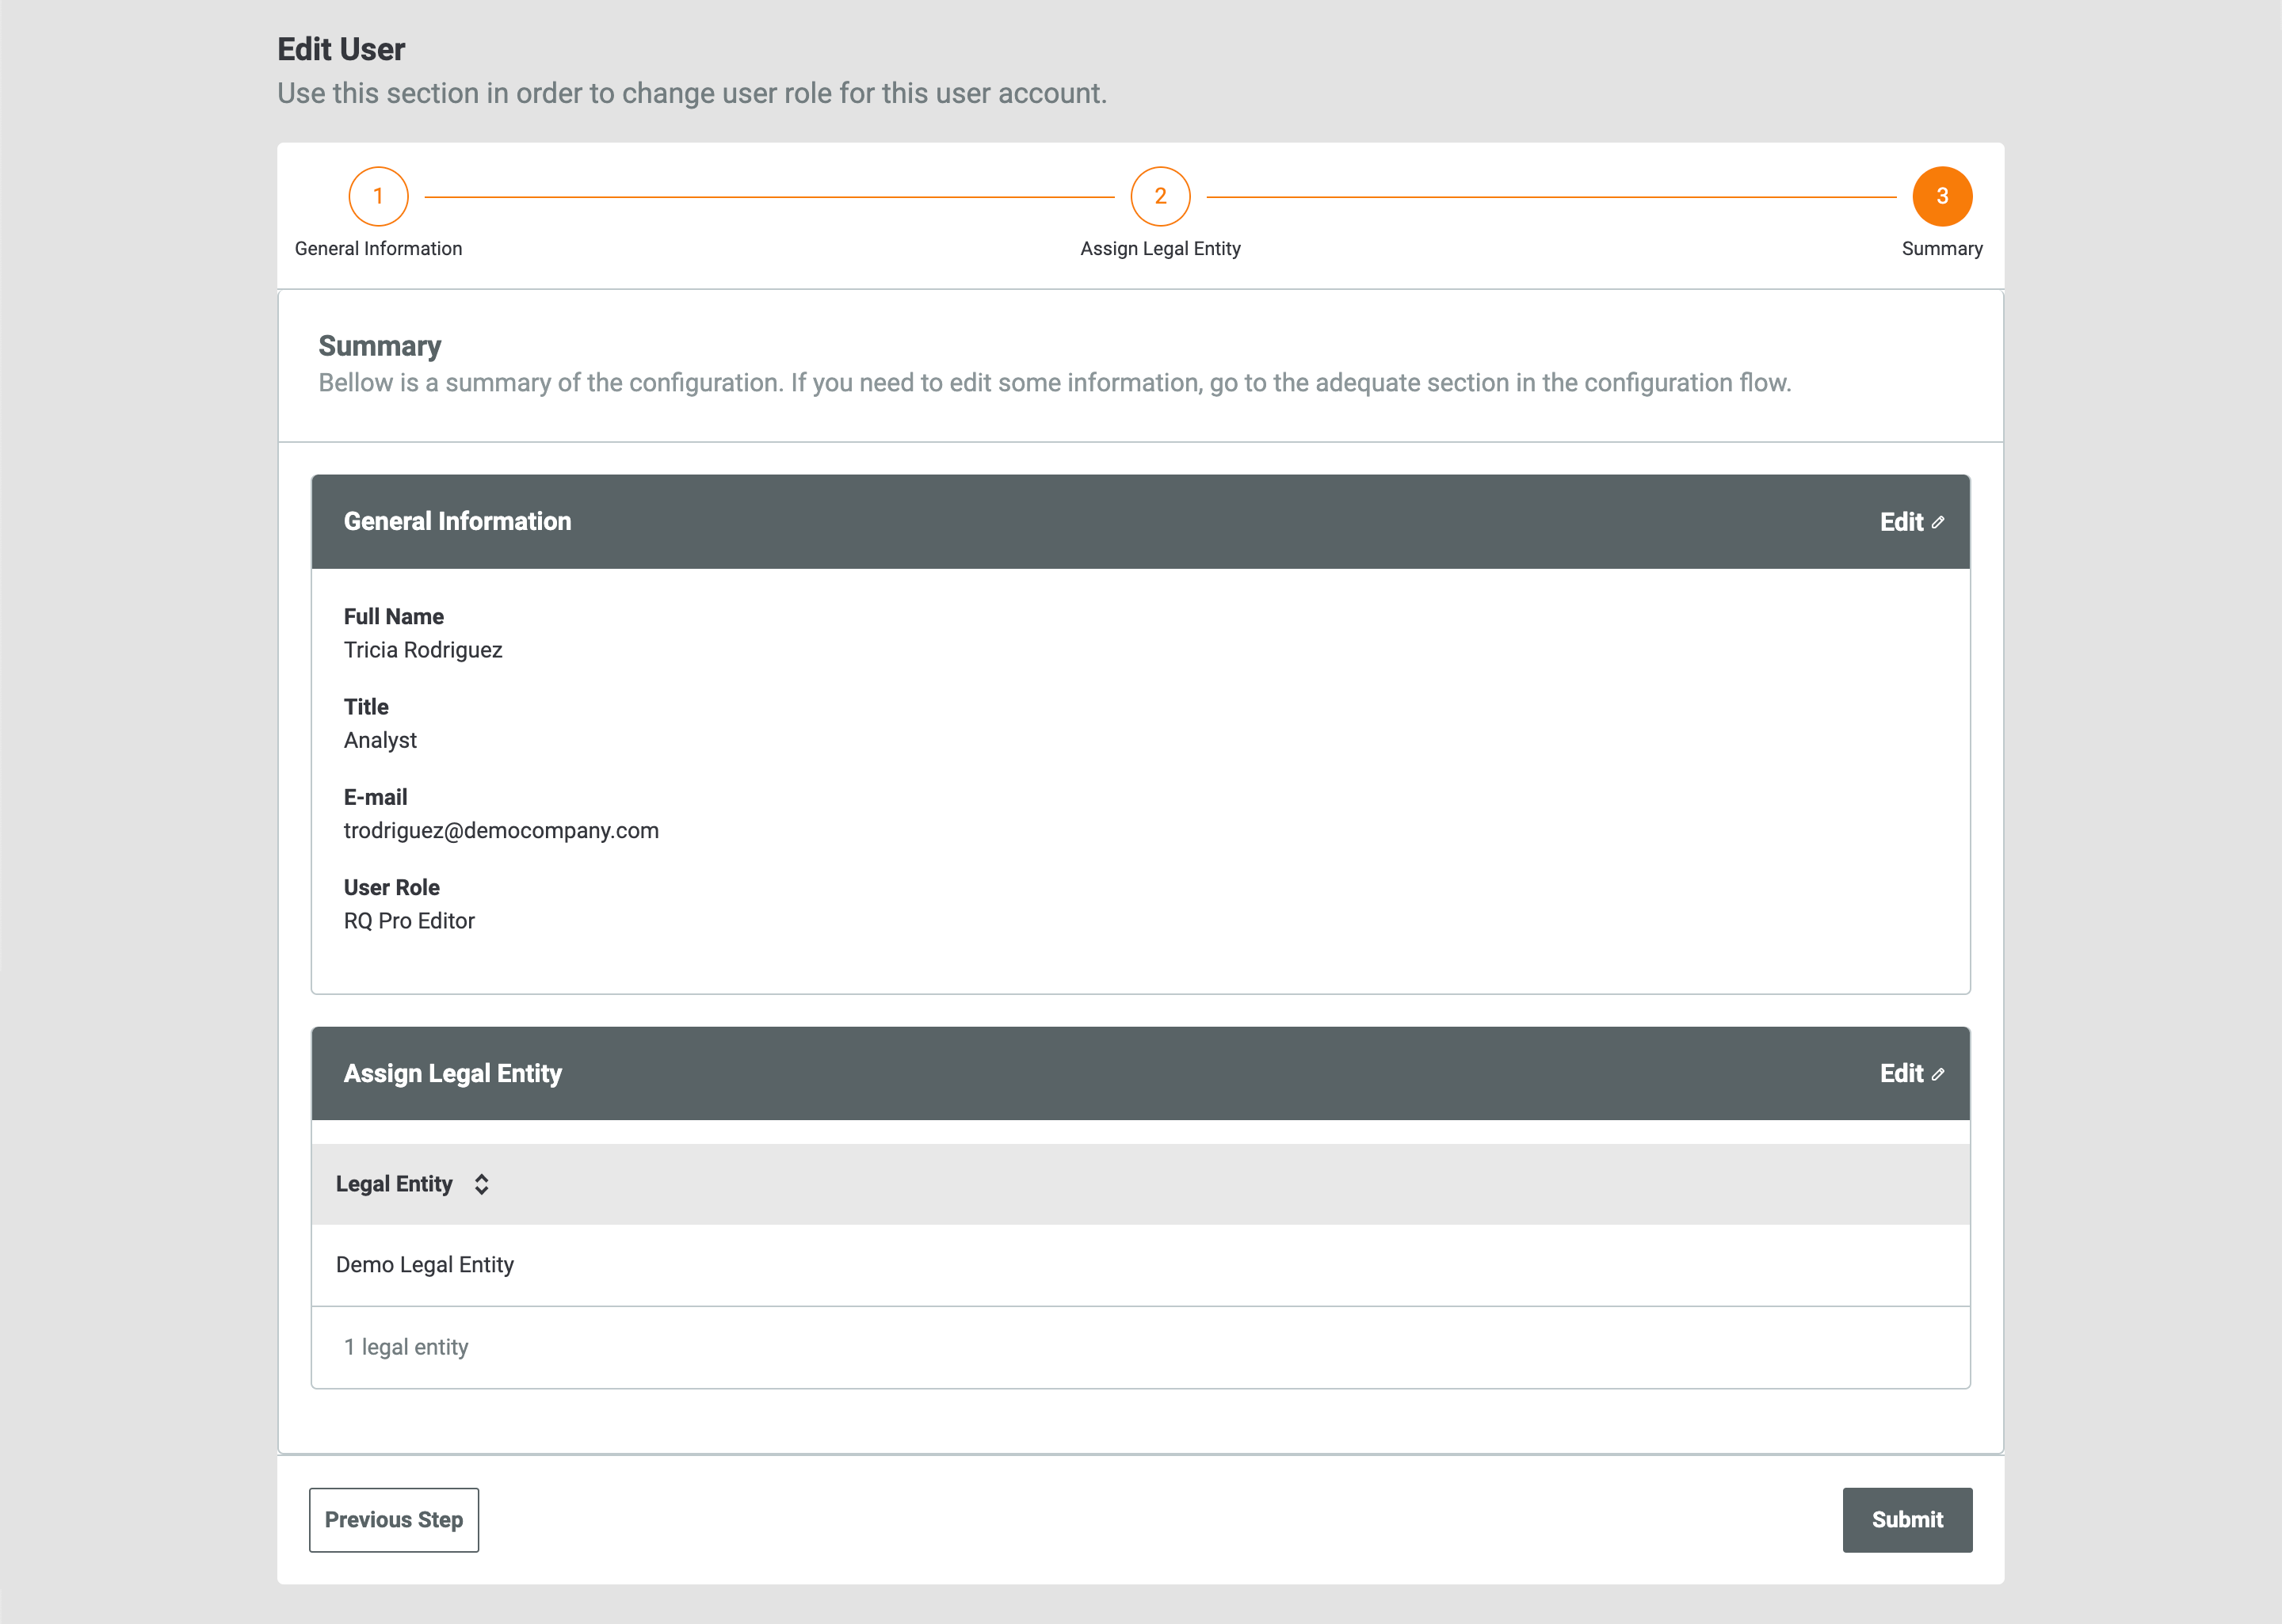
- To edit the user’s name, title, email address, or user role, click Edit
 at the upper-right corner of the General Information card.
 - To modify the Legal Entities to which the user is assigned, click Edit
 at the upper-right corner of the Assign Legal Entity card. Alternatively, click the Previous Step button at the lower-left corner of the screen to return to the Assign Legal Entity section of the Edit User screen (Figure 9).
 - Click the Submit button.
- To edit the user’s name, title, email address, or user role, click Edit
The User Management screen will be displayed, and the user you just created will be listed in the table (Figure 11).
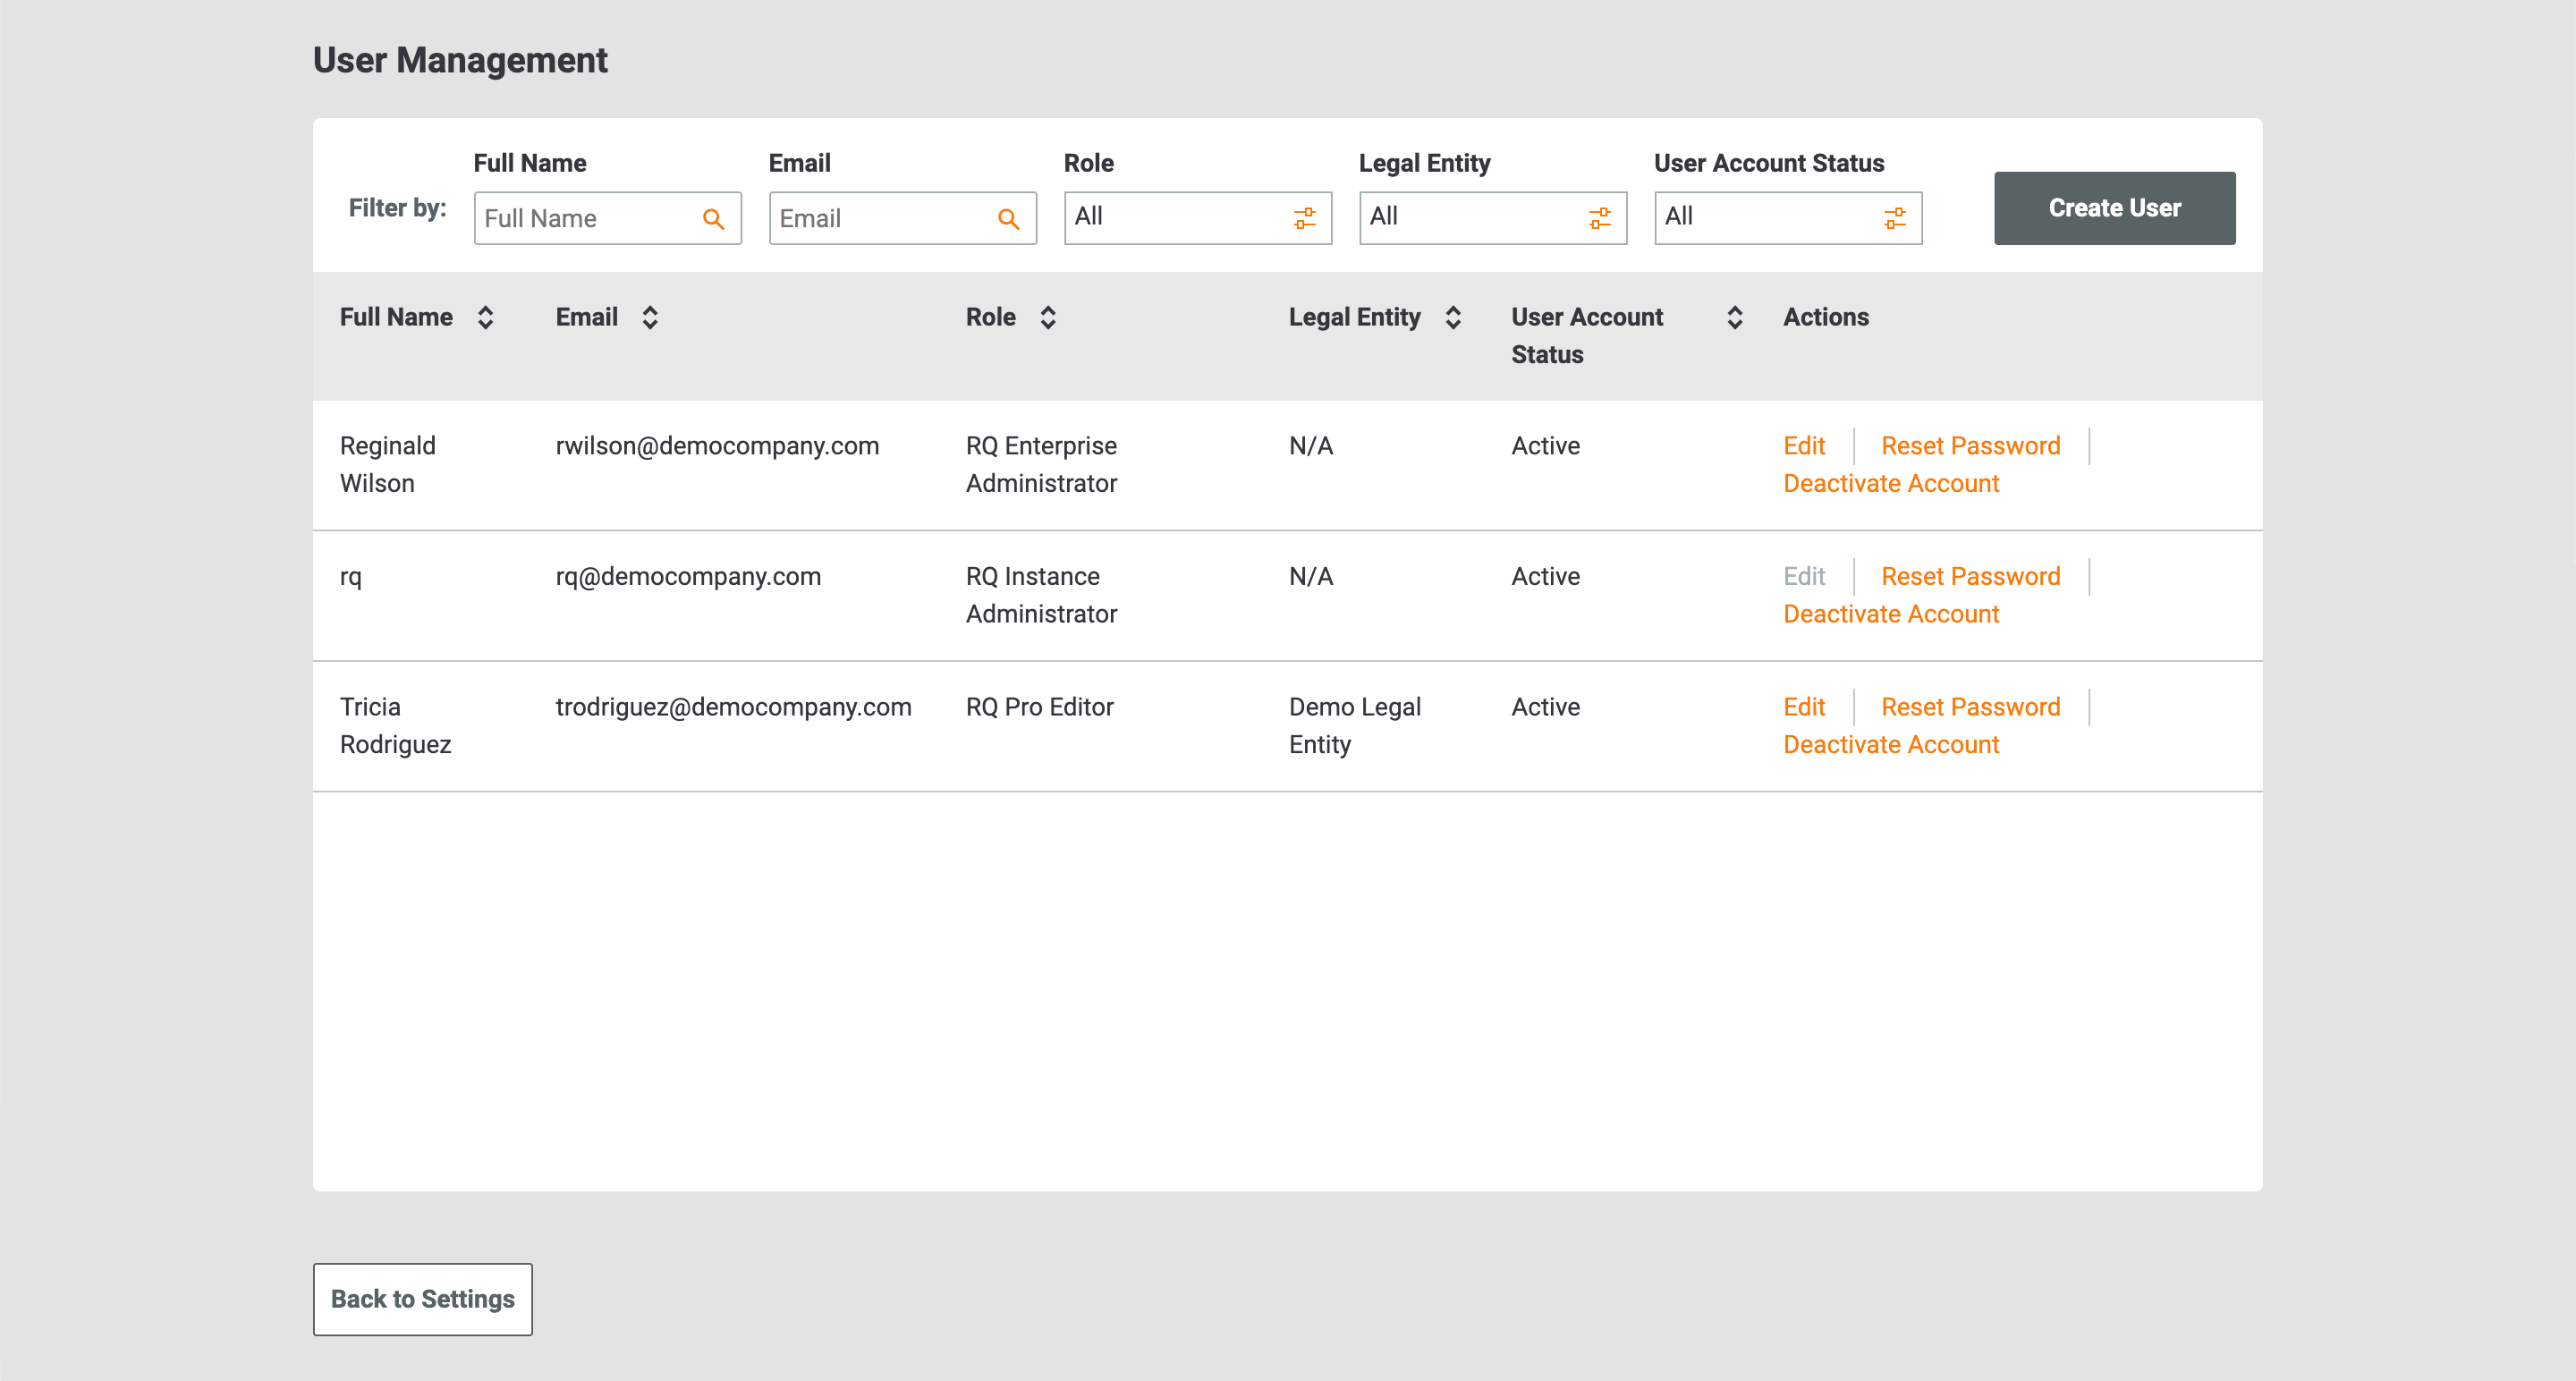
- Full Name: This column displays the user’s full name.
- Email: This column displays the user’s email address.
- Role: This column displays the user role assigned to the user’s account.
- Legal Entity: This column displays the Legal Entities to which the user is assigned. For users assigned the role of RQ Enterprise Administrator, as well as the RQ Instance Administrator account, a value of N/A will be displayed in this column. For users assigned the role of RQ Enterprise Read Only, a value of Not Provided will be displayed in this column.
- Actions: This column allows you to perform the following actions:
- Edit: Click Edit to modify the user’s full name, job title, user role, and the Legal Entities are to their account.
- Reset Password: Click Reset Password to send an email containing a password reset link to the user’s email address. See the “Creating Your Password” section of Getting Started with ThreatConnect Risk Quantifier for instructions on creating a new password for your RQ account.
- Deactivate Account: Click Deactivate Account to deactivate the user’s account. After deactivating a user’s account, their user account status will update automatically to Deactivated. In addition, the Deactivate Account link in the Actions column will be replaced with a Reactivate Account link.
Important
RQ Enterprise Administrators cannot deactivate the RQ Instance Administrator account.
Note
When a user’s account is deactivated, a system-generated email stating that their account has been deactivated and they should contact their administrator to reactivate their account will be sent to their email address. Similarly, when a user’s account is reactivated, a system-generated email stating that their account has been activated will be sent to their email address.
- Filter by: If desired, use the following options to filter users listed in the table:
- Full Name: Use this option to filter users by name based on the entered search term.
- Email: Use this option to filter users by email address based on the entered search term.
- Role: Use this option to filter users by the selected user role(s).
- Legal Entity: Use this option to filter users based on whether they are assigned to the selected Legal Entities.
- User Account Status: Use this option to filter users by the selected user account status(es).
- Create User: Click this button to create a user.
You can sort users by name, email address, user role, assigned Legal Entities, and user account status by clicking the Full Name, Email, Role, Legal Entity, and User Account Status column headings, respectively.
Configuring a Legal Entity
After creating a Legal Entity and assigning users to it, the next step is to configure the Legal Entity. See Configuration for instructions on configuring a Legal Entity as an RQ Enterprise Administrator or RQ Pro Administrator.
ThreatConnect® is a registered trademark of ThreatConnect, Inc.
20135-01 v.01.A
Was this article helpful?
