Polarity Nexus© Architecture
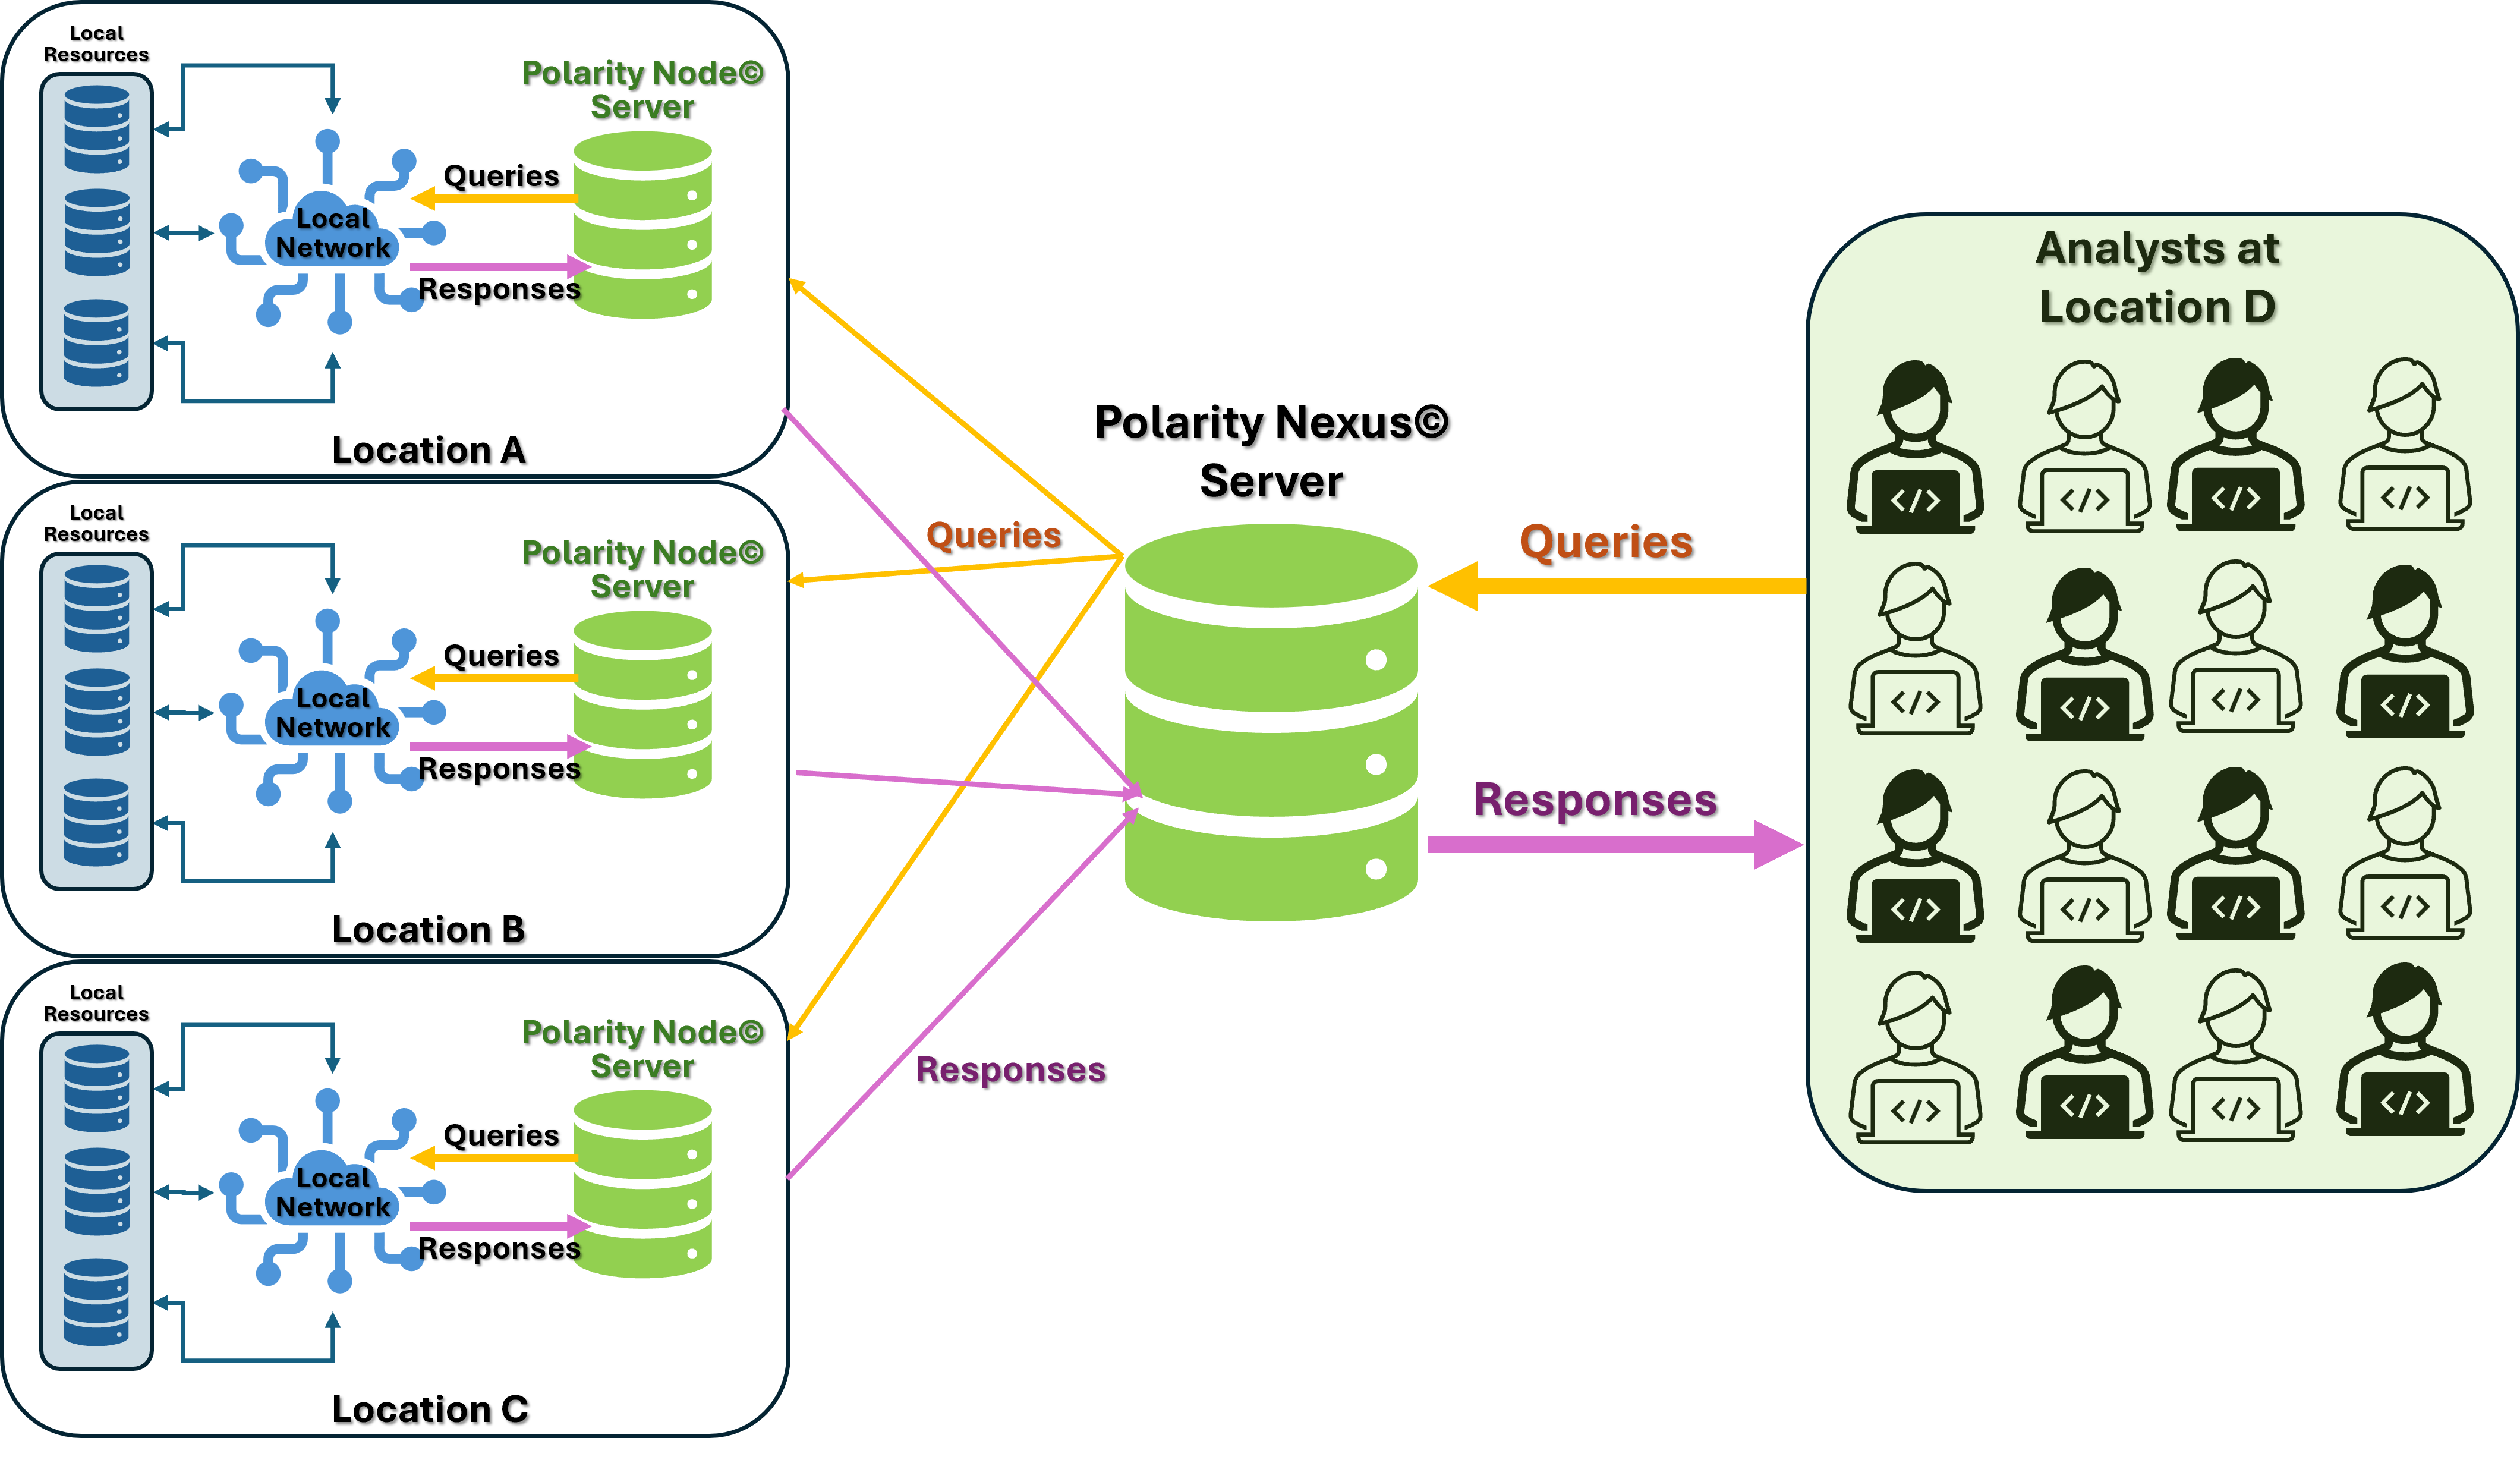
Figure 1 – Polarity Nexus© Architecture Overview
The basis of the Polarity Nexus© architecture is the Polarity Integration Broker© utility. This utility allows a Primary Polarity Server to proxy integration requests to one or more secondary Polarity Servers, referred to as “Brokers”.
Software Overview
The Polarity Integration Broker works by modifying integrations running on the Primary Server so that integrations running on there will forward integration requests to the matching integration running on the Broker Server. This relationship is essentially one-to-one, with one Primary Server and one Broker Server.
Polarity Nexus© Overview
The Polarity Nexus architecture extends the Polarity Integration Broker architecture from one-to-one to one-to-many. The main differences are in the setup:
There is one primary Polarity Server called the Nexus.
There are multiple Polarity Broker Servers called Nodes.
The Polarity Nexus contains all integrations to be installed on each Node, with one integration installed per Integration for each Node.
For instance, if you have the PostgreSQL integration installed on three Nodes, you will require three instances of the PostgreSQL integration to be installed on the Nexus.
Set Up the Polarity Nexus© System
This procedure describes how to set up the Polarity Nexus© system.
Deploy the Polarity Server software as required.
One Server will be required for the Nexus.
One Server will be required per Node.
Refer to the Polarity Installation Documentation here for instructions on base Polarity Server installation:
https://knowledge.threatconnect.com/docs/fresh-install
Download and extract the polarity-integration-broker package onto the Polarity Server designated to be the Nexus.
Determine the directory of the target integration that will be orchestrated.
Run the
add_broker.shscript and add the directory name of the target integration as an argument.For example:
./add_broker.sh virustotalWhere
virustotalis the name of the directory under/app/integrationscontaining the integration code for the integration targeted for orchestration.
By default, the
add_brokerscript will look for the directory in the/app/integrationspath.If the integrations are in a different location, specify an absolute path rather than a relative path.
Once the
add_brokerscript is successfully run, navigate to the integration's settings page in the Polarity Web interface on the Polarity Nexus Server.Select “Restart integration” from the navigation on the left.
Click the “Restart integration” button to assimilate the changes from the add_broker script. Once restarted, the integration version should have a “+1” concatenated onto it.
Select "Configuration" from the navigation on the left. There should be four new options at the top of the integration.
Fill in valid values for each of these options.
This process will need to be repeated for each integration that is to be orchestrated by the Nexus.
Polarity Node Options
[Broker] Polarity Broker Server URL
This is the fully qualified domain name (FQDN) of the target Polarity Node Server including the scheme (i.e. “https://”). The Polarity Node Server is the Polarity Server this particular integration will be proxying requests through.
[Broker] Polarity Broker Username
The username of a local or LDAP-based Polarity account on the Polarity Node.
The provided user cannot be a SAML based user account.
[Broker] Polarity Broker Password
The password for the Polarity username on the Polarity Node (provided above).
[Broker] Proxy Integration ID
The integration ID of the integration running on the Polarity Node that requests should be proxied through.
This will be the directory name of the integration instance on the target Node Server, not the directory name of the integration instance currently being modified.
Example Setup
Given:
One Polarity Nexus Server:
Polarity Web UI address: https://nexus.polarity.internal.
Username: admin
Password: NexusServer2015!
Two Polarity Node Servers:
Node 1 Polarity Web UI address: https://node-1.polarity.internal
Node 2 Polarity Web UI address: https://node-2.polarity.internal
Username (set on both): admin
Password (set on both): NodeServer2015!
Network Connectivity:
The Nexus Server can connect to each Node server via port 443/TCP.
The Nexus Server can connect to the Internet.
Each Node Server can connect to the Internet.
Integrations:
Set A installed and configured on Node 1.
Set B installed and configured on Node 2.
Sets A+B+C installed on Nexus, where Set C is unique to the Nexus and are the only integrations on the Nexus that are configured.
Note that while configurations of the API and credentials for the proxied integrations on the Nexus are not needed, integration settings such as “Permissions”, “Data types”, and “Cache” may still need to be set on them to provide minimal service to the desired users.
See the following documentation for additional information on configuring these settings:
https://knowledge.threatconnect.com/docs/polarity-integrations
https://knowledge.threatconnect.com/docs/channel-and-integration-permissions
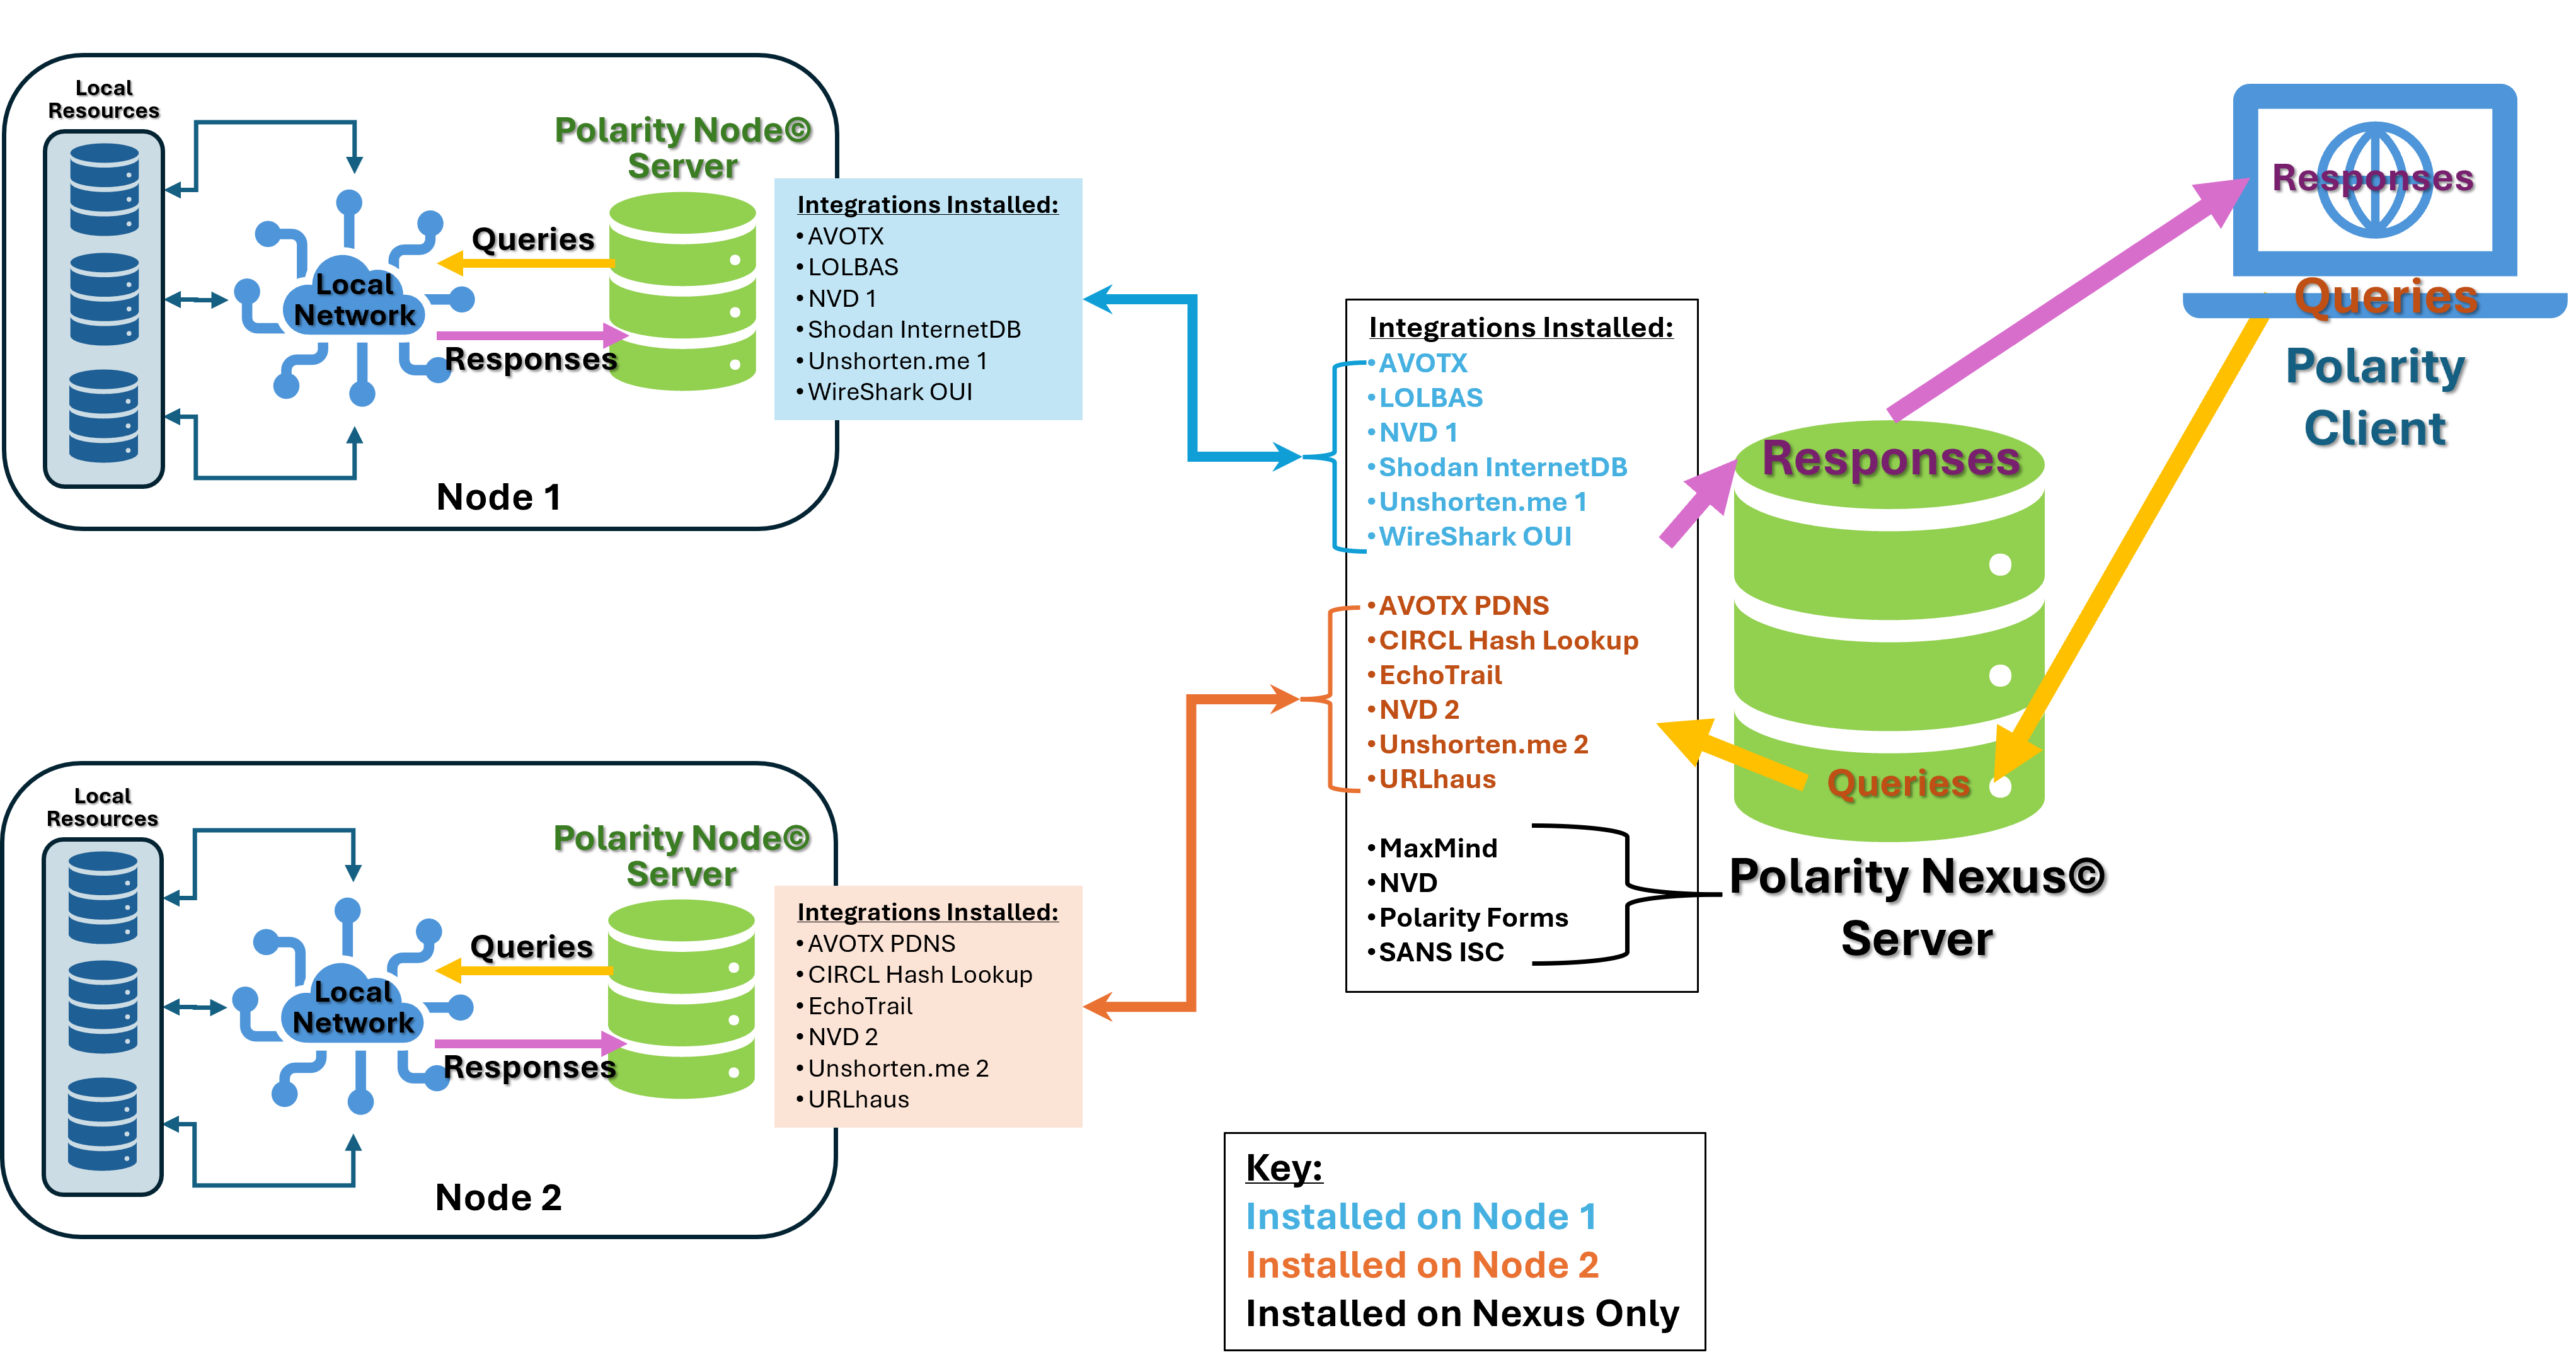
Figure 2 – Example Setup Diagram
Procedure:
This procedure will cover an example integration setup, which can be used as a template to repeat on as many integrations as necessary.
Download the polarity-integration-broker.tgz file to the Nexus Server.
You can place the TGZ in any location.
Extract the TGZ file and change directory to the newly extracted utility:
tar -xvzf polarity-integration-broker.tgz
cd polarity-integration-broker
Ensure the script
add_broker.shis executable:chmod a+x add_broker.sh
Execute the
add_broker.shscript on the Nexus Server's desired integration proxy.In this example, we will use the AlienVault OTX integration, located in the
/app/integrations/avotx_1directory:./add_broker.sh avotx_1
In a browser, navigate to the Polarity Nexus Server’s Web UI (https://nexus.polarity.internal for our example).
Click the “Settings” link to the right of the integration that was set up for proxy.
Select the “Restart integration” link in the left hand navigation.
Click the “Restart integration” button.
Once the integration is restarted, notice the version number at the top of the page has a “+1” concatenated onto it.
Select the “Configuration” link in the left hand navigation.
Add the values for the Node target in the new “[Broker]” settings shown.
Continuing the AlienVault OTX example from above:In the "[Broker] Polarity Broker Server URL" field, add the Node URL value:
In the "[Broker] Polarity Broker Username" field, add the Node username value:
admin
In the "[Broker] Polarity Broker Password" field, add the Node password value:
NodeServer2015!
In the "[Broker] Proxy Integration ID" field, add the Node integration ID value:
avotx_broker
Note that configuring the local integration beyond the fields for the corresponding Node Server is unnecessary, as the local integration will not send traffic to the data source directly.
Click the “Save configuration options” button in the bottom right hand corner.
Repeat Steps 4-10 for each integration that is to be proxied.
To Test: Run a search from the Nexus Server using a data type that the proxied integration can parse, and results should populate from the Node Server.