Overview
ThreatConnect users can leverage the HTTP Client Playbook App to connect to an external HTTP-based server using standard HTTP methods, customized headers, and a URL. When making HTTP requests, users may want to use cURL, a command-line tool used for transferring data with URLs. This article provides sample HTTP requests that use cURL and demonstrates how to configure each request in the HTTP Client Playbook App.
Before You Start
| Minimum Role(s) | Organization role of Standard User |
|---|---|
| Prerequisites | Playbooks enabled by a System Administrator |
Adding the HTTP Client App to a Playbook
To add the HTTP Client App to a Playbook, click Apps in the side navigation bar of the Playbook Designer and select the HTTP Client App, which can be located by entering "http client" in the search bar or scrolling down to the Utility section.
Configuring a GET Request
The following request to ThreatConnect's TAXII 2.1 server will retrieve all objects in the Demo Organization collection. Note the inclusion of the limit query parameter for pagination:
curl --location --request GET 'https://app.threatconnect.com/api/services/taxii2/v1/tc_taxii/collections/Demo%20Organization/objects?limit=5' \
--header 'Accept: application/taxii+json;version=2.1' \
--header 'Authorization: Basic <credentials>'
Double-click the HTTP Client App in the design pane of the Playbook Designer. The Action section of the Edit App pane will be displayed. Toggle the Inline Steps slider on to display all steps in the Edit App pane (Figure 1).
 icon at the upper-right corner of the Edit App pane.
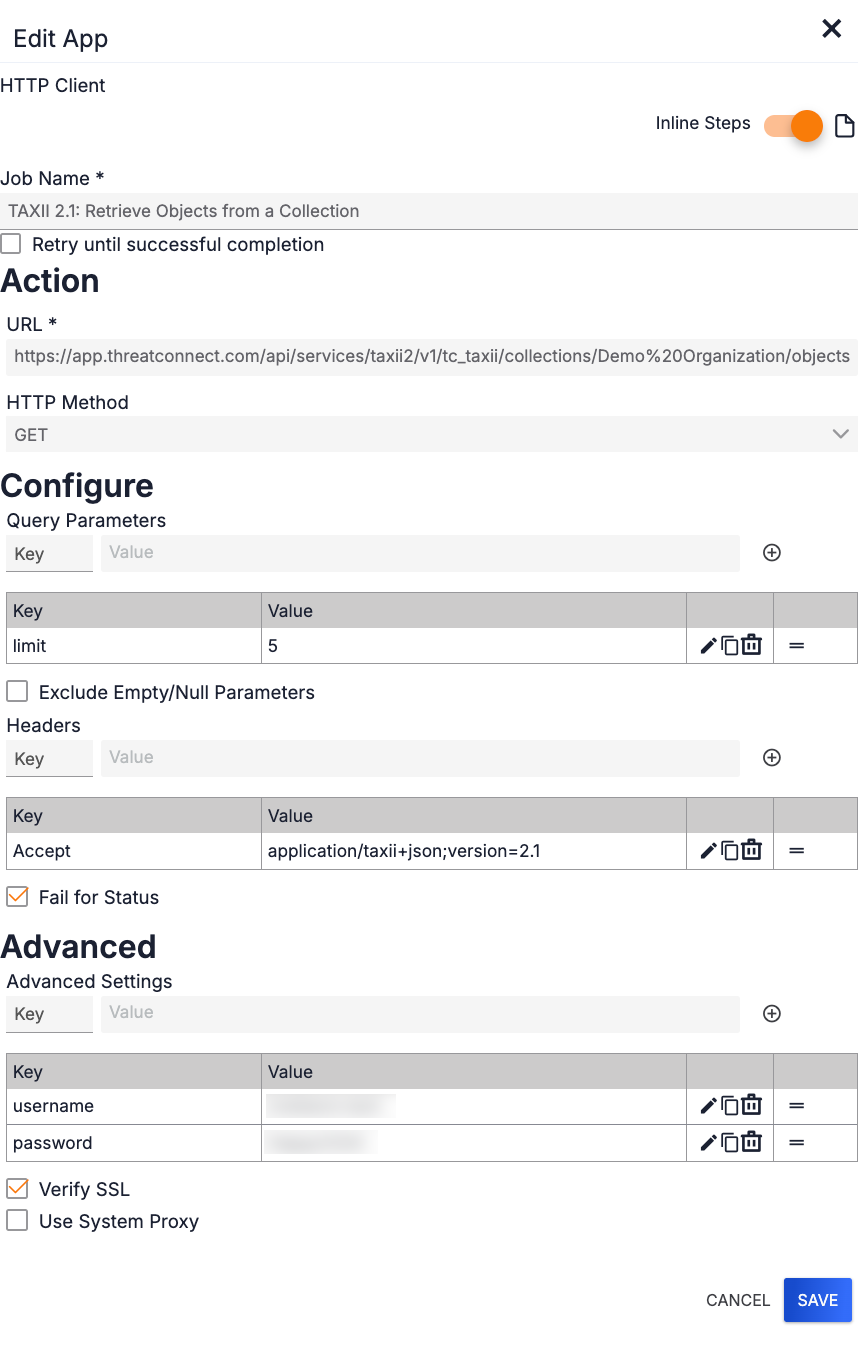
- Job Name: By default, the name is HTTP Client. It is recommended to update the name to specify the type and nature of the HTTP request the App will submit (TAXII 2.1: Retrieve Objects from a Collection in this example).
- Retry until successful completion: Leave this checkbox cleared.
- URL: Enter the full URL (i.e., the endpoint) to which the HTTP request will be sent. For this request, the URL is
https://app.threatconnect.com/api/services/taxii2/v1/tc_taxii/collections/Demo%20Organization/objects.NoteEnsure that the URL is manually encoded. - HTTP Method: Select GET.
- Query Parameters: For the
limitquery parameter included in this request, set limit as the Key and 5 as the Value, and then click the plus icon to save it in the App.
 - Exclude Empty/Null Parameters: Leave this checkbox cleared.
- Headers: For the
Acceptheader included in this request, set Accept as the Key and application/taxii+json;version=2.1 as the Value, and then click the plusicon to save it in the App.NoteThis request also includes anAuthorizationheader; however, this header will be configured in the Advanced Settings parameter of the Edit App pane. - Fail for Status: Selecting this checkbox will cause the Playbook to fail if it receives a 4XX or 5XX response status code (e.g., 400 Bad Request). It is recommended to leave this checkbox selected.
- Advanced Settings: For this request, which uses basic authentication, configure the settings in the accompanying table as key/value pairs. After entering the Key and Value for each setting, click the plusicon to save the pair in the App.NoteTo view a list of valid settings for the Advanced Settings parameter, click the Display Documentationicon at the upper-right corner of the Edit App pane.
Key Value username The username of the TAXII user account that is authenticating with the API. password The password of the TAXII user account that is authenticating with the API. - Verify SSL: Leave this checkbox selected.
- Use System Proxy: Select this checkbox to use system-defined proxy servers for the request, if desired.
- Click the SAVE button to complete the configuration process.
The HTTP Client App is now configured to submit the example GET request in this section. You may also follow these steps to configure other types of API requests, such as GET, HEAD, and OPTIONS, in the HTTP Client App.
Configuring a POST Request
The following request will create a Report Group named Phishing Report in ThreatConnect via the ThreatConnect v3 API:
curl --location --request POST 'https://app.threatconnect.com/api/v3/groups' \
--header 'Content-Type: application/json' \
--data-raw '{
    "type": "Report",
    "name": "Phishing Report",
    "fileName": "phishing-report.pdf"
}'
Double-click the HTTP Client App in the design pane of the Playbook Designer. The Action section of the Edit App pane will be displayed. Toggle the Inline Steps slider on (orange) to display all steps in the Edit App pane (Figure 2).
icon at the upper-right corner of the Edit App pane.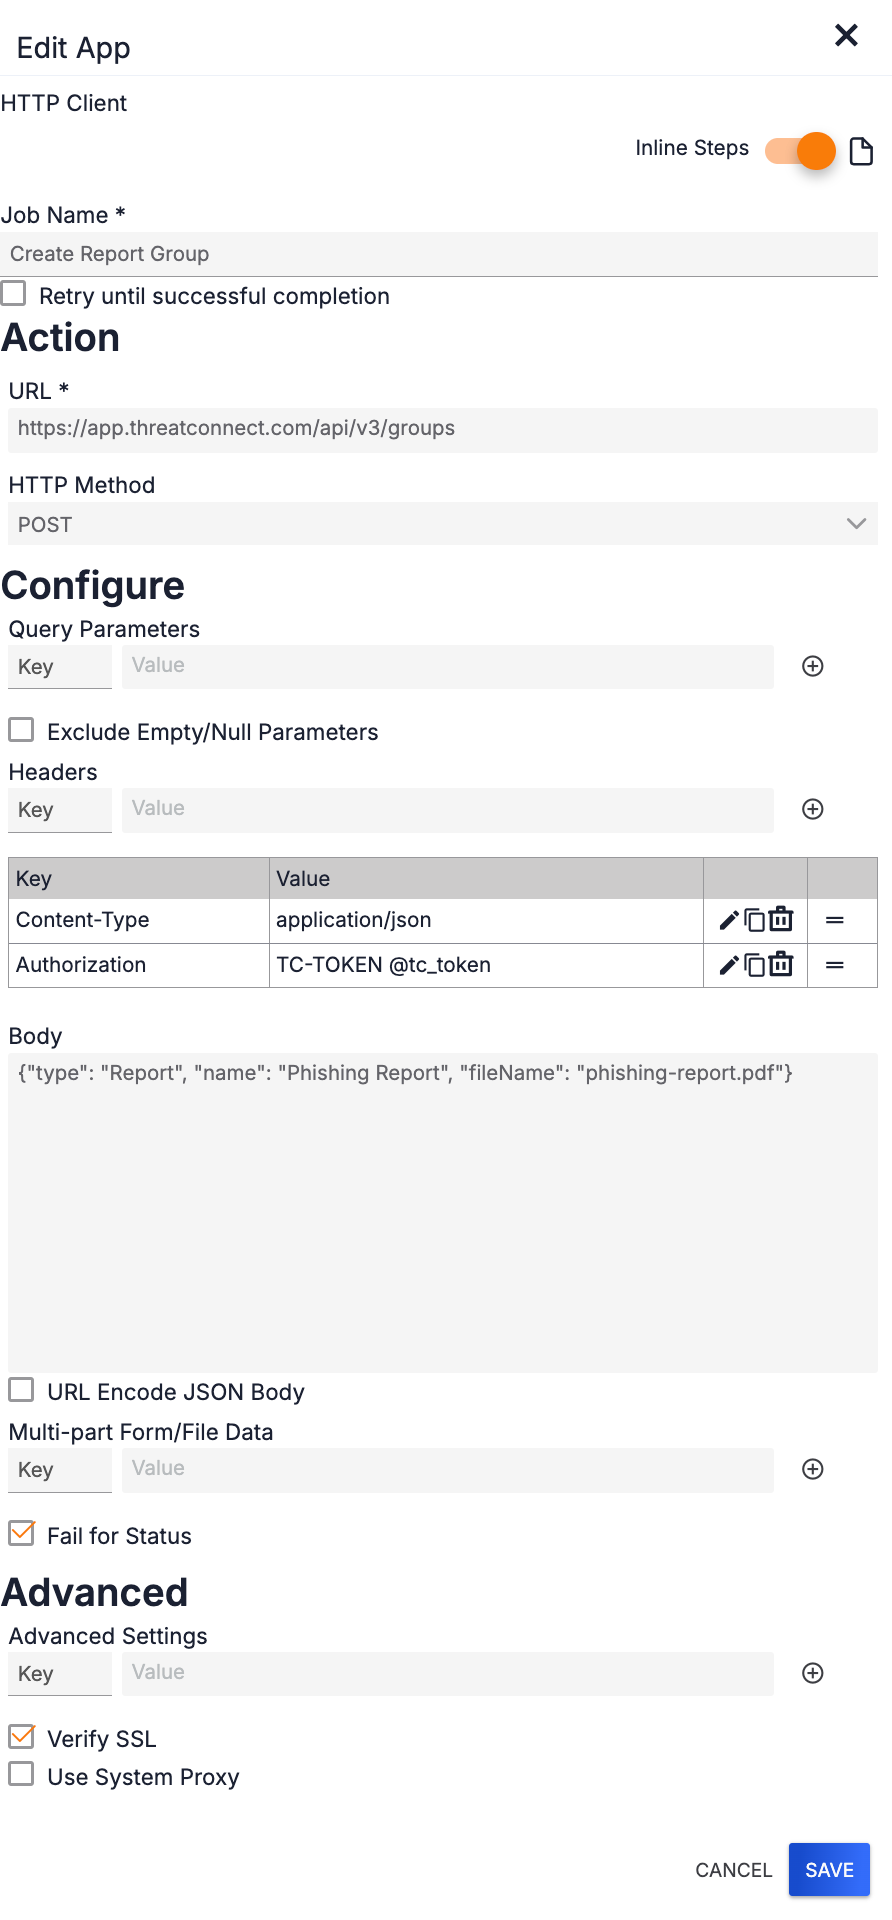
- Job Name: By default, the name is HTTP Client. It is recommended to update the name to specify the type and nature of the HTTP request the App will submit (Create Report Group in this example).
- Retry until successful completion: Leave this checkbox cleared.
- URL: Enter the full URL (i.e., the endpoint) to which the HTTP request will be sent. For this request, the URL is
https://app.threatconnect.com/api/v3/groups. - HTTP Method: Select POST.
- Query Parameters: Leave this parameter blank, as there are no query parameters included in this request.
- Exclude Empty/Null Parameters: Leave this checkbox cleared.
- Headers: For this request, configure the headers in the accompanying table as key/value pairs. After entering the Key and Value for each header, click the plusicon to save the pair in the App.
Key Value Content-Type application/json Authorization TC-Token @tc_token - Body: Enter the body of the POST request. For this request, the following is the request body:
{"type": "Report", "name": "Phishing Report", "fileName": "phishing-report.pdf"} - URL Encode JSON Body: Leave this checkbox cleared.
- Multi-part Form/File Data: Leave this parameter blank, as no form or file data are being submitted in this example.
- Fail for Status: Selecting this checkbox will cause the Playbook to fail if it receives a 4XX or 5XX response status code (e.g., 400 Bad Request). It is recommended to leave this checkbox selected.
- Advanced Settings: Leave this parameter blank, as there are no advanced settings to configure for this example.
- Verify SSL: Leave this checkbox selected.
- Use System Proxy: Select this checkbox to use system-defined proxy servers for the request, if desired.
- Click the SAVE button to complete the configuration process.
The HTTP Client App is now configured to submit the example POST request in this section. You may also follow these steps to configure other types of API requests, such as PUT, DELETE, and PATCH, in the HTTP Client App.
Configuring a PUT Request
The following request will upload a PDF to the Phishing Report Group created in the previous example, which has an ID of 12345, via a Playbook that uses a WebHook Trigger:
curl --location --request PUT 'https://app.threatconnect.com/api/v3/groups/12345/upload' \
--header 'Content-Type: application/octet-stream' \
--data-binary '@phishing-report.pdf'
Double-click the HTTP Client App in the design pane of the Playbook Designer. The Action section of the Edit App pane will be displayed. Toggle the Inline Steps slider on (orange) to display all steps in the Edit App pane (Figure 3).
icon at the upper-right corner of the Edit App pane.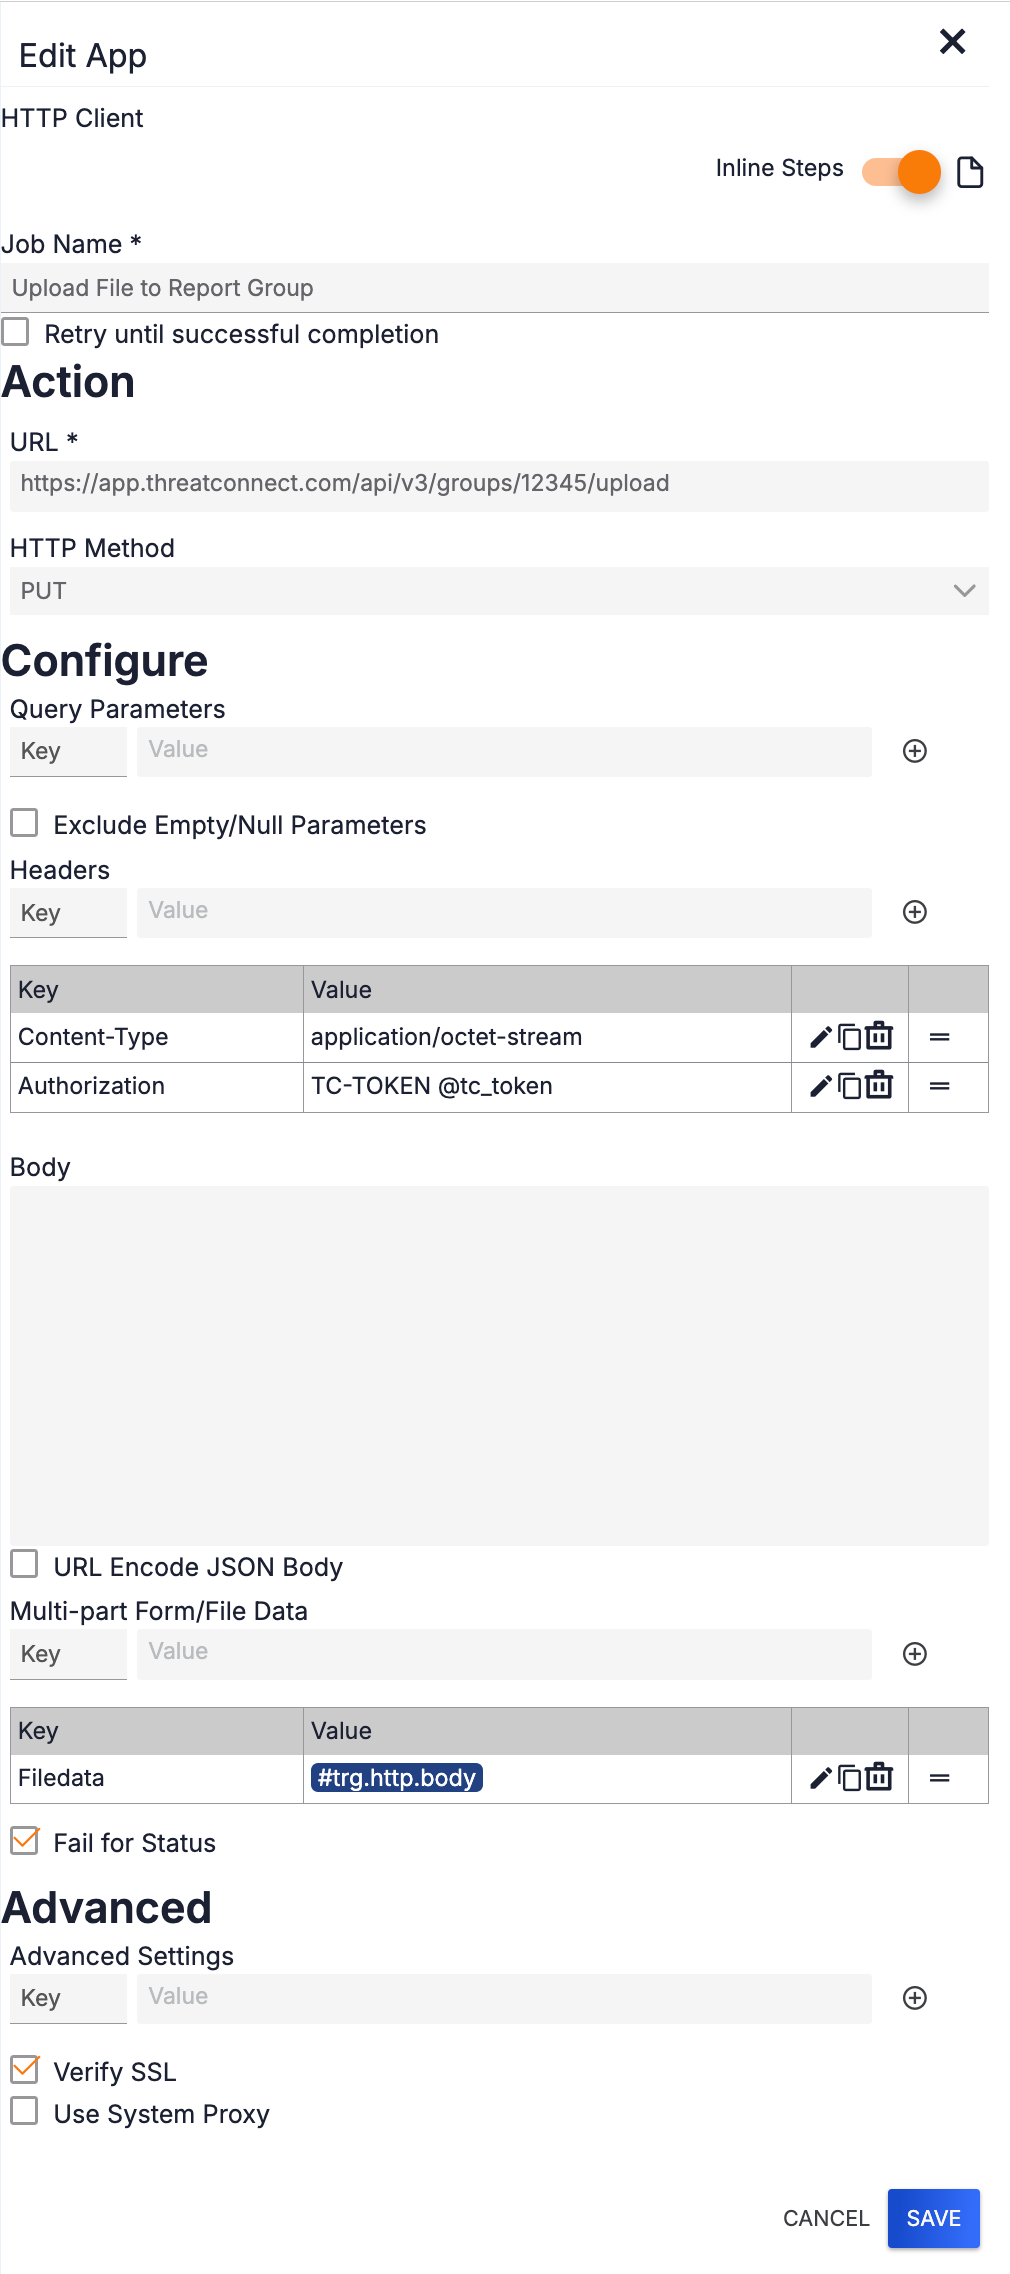
- Job Name: By default, the name is HTTP Client. It is recommended to update the name to specify the type and nature of the HTTP request the App will submit (Upload PDF to Report Group in this example).
- Retry until successful completion: Leave this checkbox cleared.
- URL: Enter the full URL (i.e., the endpoint) to which the HTTP request will be sent. For this request, the URL is
https://app.threatconnect.com/api/v3/groups/12345/upload. - HTTP Method: Select PUT.
- Query Parameters: Leave this parameter blank, as there are no query parameters included in this example.
- Exclude Empty/Null Parameters: Leave this checkbox cleared.
- Headers: For this request, configure the headers in the accompanying table as key/value pairs. After entering the Key and Value for each header, click the plusicon to save the pair in the App.
Key Value Content-Type application/octet-stream Authorization TC-Token @tc_token - Body: Leave this field blank, as this example does not include a body.
- URL Encode JSON Body: Leave this checkbox cleared.
- Multi-part Form/File Data: For this request, which is for uploading a file coming from a WebHook Trigger, set Filedata as the Key and #trg.http.body as the Value, and then click the plusicon to save it in the App.
- Fail for Status: Selecting this checkbox will cause the Playbook to fail if it receives a 4XX or 5XX response status code (e.g., 400 Bad Request). It is recommended to leave this checkbox selected.
- Advanced Settings: Leave this parameter blank, as there are no advanced settings to configure for this example.
- Verify SSL: Leave this checkbox selected.
- Use System Proxy: Select this checkbox to use system-defined proxy servers for the request, if desired.
- Click the SAVE button to complete the configuration process.
The HTTP Client App is now configured to submit the example PUT request in this section. You may also follow these steps to configure other types of API requests that send file or form data in HTTP Client App.
ThreatConnect® is a registered trademark of ThreatConnect, Inc.
20131-01 v.01.C